ICEE-Microchip-MPLAB® X IDE-Microchip-MPLAB-MCC(MPLAB® Code Configurator)
MCC(MPLAB Code Configurator)
https://www.microchip.com/en-us/tools-resources/configure/mplab-code-configurator#downloads
MPLAB Code Configurator (MCC) is a free GPE(graphical programming environment):
- generates C code(seamless, easy-to-understand ) to insert into your project.
- intuitive interface, it enables and configures a rich set of peripherals and functions specific to your application.
- It supports our 8-bit, 16-bit and 32-bit devices, which include our PIC, AVR and SAM microcontrollers (MCUs) and dsPIC Digital Signal Controllers (DSCs).
- Both the downloadable MPLAB X IDE(Integrated Development Environment) and the cloud-based MPLAB Xpress IDE include MCC.
MCC(MPLAB Code Configurator) User Guide:
MCC consists of three MCC Content Types:
- MCC Melody,
- MCC Classic,
- MPLAB Harmony.
It offers application libraries and system and peripheral drivers for the development of embedded software.
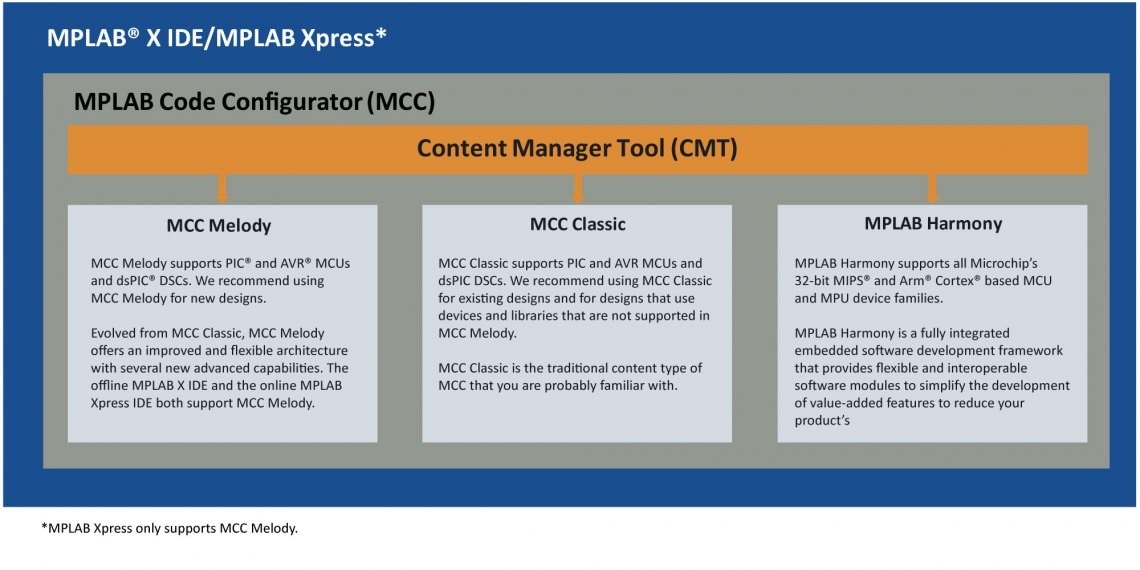
The MCC Content Manager Tool (CMT) within MCC allows you to select the type of content and gives you better flexibility by supporting content management and versioning at an individual component level.
MCC Easy Installation
Easy-to-Install MPLAB X IDE Plug-In: Recommended Way to Install MCC:
All plug-ins are free, available and ready to install once MPLAB X IDE has been installed.
Just follow the simple steps below to see all the available plug-ins and install MPLAB Code Configurator (MCC):
MPLAB X IDE -> "Tools" menu -> "Plugins" -> Plugins window -> "Available Plugins" tab -> Select MPLAB Code Configurator and click "Install"
MCC Offline Mode
To use MCC in offline mode, install the required Classic or Melody libraries and import them into MCC. For more information, please refer to the MPLAB Code Configurator (MCC) User Guide
MCC Downloads: MCC Current Download
Installing MCC from Downloaded File
Once downloaded, extract the archive which contains the MCC plugin to a preferred location.
To install the downloaded plugin, complete the following instructions:
1.Open MPLAB X IDE.
2.Go to Tools -> Plugins.
3.Select the Downloaded tab, and click on the Add Plugins... button.
4.Navigate to the folder where the downloaded .zip file was extracted and select the MCC plugin. It may have a** .nbm file extension**.
5.Click on the Install button. MPLAB X IDE will ask to be restarted. Upon restart, the plugin is installed. See figure below.
6.MCC can now be opened on a new or already existing MPLAB X IDE project. See Section 4.1 “Setting Up MPLAB X IDE and Launching MCC.”
MCC Plugin Options
Several aspects of the operation of the MCC can be managed by using the “Options” panel (see figure below), which can be invoked by clicking:
"menu bar" -> (MPLAB X IDE) -> "Preferences..." → Plugins → MPLAB Code Configurator *
- "Editor Behavior":
- check "Show Development log"
- Always ask before remove a pin
- Offline Mode: "Run MCC in Offline Mode":
- Core(Indexed by .mc3core file): "Open Core Folder"
- Library(Indexed by .jar/. mc3libfile): "Open Library Folder"
- Reset Plugin Files
- MCC Content Registry(Enter as a comma separated list): https://registry.npmjs.org/
- Harmony Repository: https://github.com/Microchip-MPLAB-Harmony
- Harmony Content Path: ~/.mcc/HarmonyContent
- Installing an "Core" for MCC(MPLAB Code Configurator): click on the "Install Core" button and select the .mc3core
- Installing an "Library" for MCC(MPLAB Code Configurator): An MCC Library file may have a .jar or a .mc3lib file extension
ICEE-Microchip-MPLAB® X IDE-Microchip-MPLAB-MCC(MPLAB® Code Configurator)的更多相关文章
- 【PIC单片机】MPLAB X IDE快速入门指南
引言:近期由于项目实践需要,开始动手学习相关硬件知识.从PIC单片机入手. 单片机学习核心要点:查数据手册 配置寄存器 一.基于MPLAB X IDE配置位设置 MPLAB X IDE和MPLAB I ...
- MPLAB X IDE V4.15 创建工程,编译,问题处理
初步接触,有错误的地方还请大神们务必提出来,防止误导他人 硬件环境:MCU--PIC18F67K22 仿真下载器--ICD 3 编译环境:MPLAB X IDE V4.15 中文版 工作需要接触到了P ...
- Mplab X IDE 安装DMCI
DMCI在Mplab 8中是默认安装的,在 Mplab X IDE中是作为插件,默认不安装. 找到 勾选前面的复选框,点击安装
- 基于MPLAB X IDE配置位设置讲解
http://blog.csdn.net/superanters/article/details/8541171 在讲基于MPLAB X IDE 配置位配置前我先讲讲如何配置配置位. 比如PICLF1 ...
- MPLAB X IDE调试仿真功能简单入门
仿真分为硬件仿真和软件仿真,这里的硬件仿真和软件仿真的区别,就不多说了,相信大家都听说过这两个概念. 我这里想给大家介绍的是“Set PC at Cursor”--“设置PC到光标处”这个功能,这个功 ...
- Microchip编译器产品线—MPLAB XC简介
以下为Microchip最新编译器产品线—MPLAB-XC简介 MPLAB-XC:适合所有PIC单片机和项目的编译器解决方案 Microchip最新编译器产品线—MPLAB-XC为项目开发的软件需求提 ...
- [PIC32--IDE]Microchip PIC32开发环境的搭建
问题描写叙述 PIC32是Microchip推出的32 bit MCU,其内核是MIPS架构的,MIPS也是属于RISC指令集的,好像ARM的指令集还在RISC指令集中做了一些扩充,而MIPS应当是更 ...
- 搭建Cocos Code IDE开发环境
Cocos Code IDE是Cocos2d-x团队开发的,用于开发Cocos2d-JS和Cocos2d-x Lua绑定的游戏工具,它是基于Eclipse[ Eclipse 是一个开放源代码的.基于J ...
- linux下C/C++IDE比较——Code::Blocks
工欲善其事,必先利其器.用了这么久的linux,现在比较主流的几个C/C++的IDE基本已都用过了,现在来对他们做一下简单的比较. 1.VIM首先要说的是VIM.我认为,VIM只是一个编辑器,不能算是 ...
- Atom IDE开发工具, ASCII艺术评论, ninimap 插件
1 ASCII Art Comments One neat trick is to use ASCII art to create huge comments visible in the minim ...
随机推荐
- 题解:P10858 [HBCPC2024] Long Live
给你两个数 x,yx,yx,y 让你找到一组 a,ba,ba,b,使 lcm(x,y)gcd(x,y)=ab\sqrt{\frac{\operatorname{lcm}(x,y)}{\gcd(x, ...
- 炸裂!!!Deepseek接入个人知识库,回答速度飞起来,确实可以封神了
高效管理知识.快速获取信息成为提升工作效率的关键.无论是做技术的同学还是普通的上班族,在日常积累了大量的知识数据和内容.项目文档.会议记录到技术手册.业务流程,这些信息如同宝藏一般,等待着被高效利用. ...
- Linux之删除命令
一.格式 只能删除文件夹 rmdir 文件名 删除文件 rm 是强大的删除命令,它可以 永久性地 删除文件系统中指定的文件或目录. 在使用 rm 命令删除文件或目录时,系统不会产生任何提示信息.此命令 ...
- 通过tushare获取k线数据
tushare中get_k_date接口主要目的是获取k线数据,该接口融合了get_hist_data和get_h_data两个接口的功能,即能方便获取日周月的低频数据,也可以获取5.15.30和60 ...
- Win32汇编学习笔记03.RadAsm和补丁
https://bpsend.net/thread-163-1-1.html 补丁 扫雷游戏啊下补丁 在扫雷游戏中,点关闭弹出一个确认框,确认之后再关闭,取消就不关闭 首先第一步就是确认关闭按钮响应的 ...
- 装在U盘或移动固态硬盘里的系统——适用于Ventoy和VirtualBox的Win to go 和 Linux to go 系统制作教程
写在前面 前段时间, 突然想起了大学期间折腾过的双系统, 又恰逢最近学习工作需要用到Linux系统环境, 用虚拟机又感觉性能跟不上, 因此萌生了一个用移动固态硬盘安装双系统的想法. 照着网络上各位老师 ...
- 使用批处理脚本在win10系统启动Redis 5.0.10
在<Spring Boot 整合Jedis连接Redis和简单使用>中,小编已经介绍了如何安装和启动Redis,但是,每次启动Redis 5.0.10 都是需要两个命令行窗口,执行启动 ...
- Innosetup 安装 VC_redist 运行时库
#普通安装vc_redis.x86.exe(会提示用户做出选择),在innosetup的[Run]属性中添加下面这一行 Filename: "{app}VC_redist.x86.exe&q ...
- 洛谷 P5066 [Ynoi2014] 人人本着正义之名debug-log
序言 此日志分为四部分. 00:00是开始打代码的时间. 最开始打完代码(没有debug)大约用了两小时. part1-20210323 02:30 生成新节点时,没有给随机权值. 02:41 upd ...
- [转]编译报错:virtual memory exhausted: Cannot allocate memory
一.问题 当安装虚拟机时系统时没有设置swap大小或设置内存太小,编译程序会出现virtual memory exhausted: Cannot allocate memory的问题,可以用swap扩 ...