深入学习Spring框架(一)- 入门
1.Spring是什么?
Spring是一个JavaEE轻量级的一站式开发框架。
JavaEE: 就是用于开发B/S的程序。(企业级)
轻量级:使用最少代码启动框架,然后根据你的需求选择,选择你喜欢的模块使用。
重量级:早期有的EJB,开发一个HelloWorld程序都需要引入EBJ的全部模块
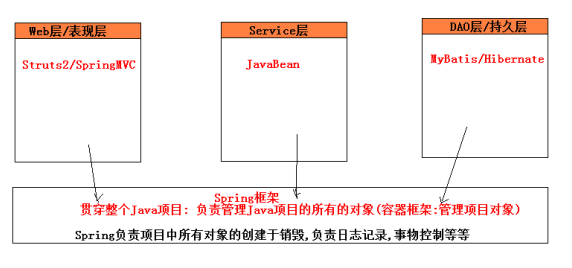
一站式:Spring框架提供涵盖了JavaEE开发的表示层,服务层,持久层的所有组件功能。也就是说,原则上,学完一套Spring框架,不用其他框架就可以完成网站一条流程的开发。但是Spring仍然可以和其他的框架无缝整合。
2.Spring的优点
轻量:Spring 是轻量的,就是除内核模块(4个jar),其他模块由开发者自由选择使用,同时支持整合其他框架。也可以称为就是可插拔式开发框架,像插头和插座一样,插上就用。这就是Spring框架核心理念(Ioc)。
控制反转:Spring通过控制反转实现了松散耦合,对象们给出它们的依赖,而不是创建或查找依赖的对象们。
面向切面的编程(AOP):Spring支持面向切面的编程,并且把应用业务逻辑和系统服务分开。
容器:Spring 包含并管理应用中对象的生命周期和配置。
MVC框架:Spring的WEB框架是个精心设计的框架,是Web框架的一个很好的替代品。
事务管理:Spring 提供一个持续的事务管理接口,可以扩展到上至本地事务下至全局事务(JTA)。
异常处理:Spring 提供方便的API把具体技术相关的异常(比如由JDBC,Hibernate or JDO抛出的)转化为一致的unchecked 异常。
3.Spring的作用
Spring强调的理念是,轻量级。Spring的轻量级主要体现在模块的可插拔,Spring提供的功能模块,除了内核模块以外,开发人员可以选择性使用。所以,Spring框架在现实开发中,主要的功能用于整合各种开发框架开发项目。
4.Spring框架包
Spring官方网站:https://spring.io/
4.1 下载
Spring官方提供的Maven方式的项目下载:https://start.spring.io/
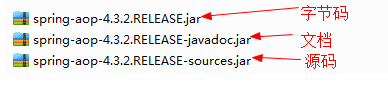
但是基于简单入门的原则,我们要通过导入包的方式来学习。需要下载框架的zip包
地址为:http://repo.springsource.org/libs-release-local/org/springframework/spring/
4.2 目录说明
根目录:

jar包:
包说明:
| 包名 | 说明 |
| spring-aop-4.3.2.RELEASE.jar | 实现了AOP的支持 |
| spring-aspects-4.3.2.RELEASE.jar | AOP框架aspects支持包 |
| spring-beans-4.3.2.RELEASE.jar | 内核支撑包,实现了处理基于xml对象存取 |
| spring-context-4.3.2.RELEASE.jar | 内核支撑包,实现了Spring对象容器 |
| spring-context-support-4.3.2.RELEASE.jar | 容器操作扩展包,扩展了一些常用的容器对象的设置功能 |
| spring-core-4.3.2.RELEASE.jar | 内核支撑包,Spring的内核 |
| spring-expression-4.3.2.RELEASE.jar | 内核支撑包,实现了xml对Spring表达式的支持 |
| spring-instrument-4.3.2.RELEASE.jar | 提供了一些类加载的的工具类 |
| spring-instrument-tomcat-4.3.2.RELEASE.jar | 提供了一些tomcat类加载的的工具类,实现对应Tomcat服务的调用 |
| spring-jdbc-4.3.2.RELEASE.jar | SpringJDBC实现包,一个操作数据库持久层的子框架 |
| spring-jms-4.3.2.RELEASE.jar | 集成jms的支持,jms:Java消息服务。 |
| spring-messaging-4.3.2.RELEASE.jar | 集成messaging api和消息协议提供支持 |
| spring-orm-4.3.2.RELEASE.jar | ORM框架集成包,实现了Hibernate,IBatis,JDO的集成。 |
| spring-oxm-4.3.2.RELEASE.jar | Spring OXM对主流O/X Mapping框架做了一个统一的抽象和封装。就是对应XML读写框架的支持 |
| spring-test-4.3.2.RELEASE.jar | Spring集成JUnit测试 |
| spring-tx-4.3.2.RELEASE.jar | 事务代理的支持 |
| spring-web-4.3.2.RELEASE.jar | SpringWeb通用模块 |
| spring-webmvc-4.3.2.RELEASE.jar | SpringMVC子框架 |
| spring-webmvc-portlet-4.3.2.RELEASE.jar | Spring对门户技术(portlet)的支持 |
| spring-websocket-4.3.2.RELEASE.jar | Spring对websocket的支持 |
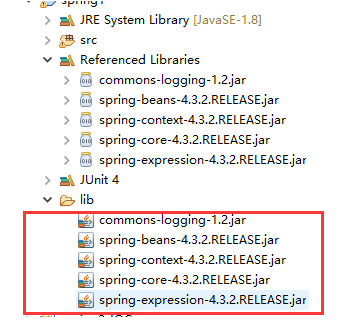
注:红色部分为基础核心包,使用Spring必须导入
5.入门实例
Spring之所以可以实现模块的可插拔是支持依赖注入,所谓的依赖注入/控制反转就是不用new就可以创建对象。
使用Spring框架不用new创建一个对象:
1.创建项目并导入jar包:将Spring的基础支撑包和依赖的日志包复制到lib文件下,并且加入项目中
2.创建配置文件
在项目的src下面创建配置文件applicationContext.xml中并完成配置文件的约束
<?xml version="1.0" encoding="UTF-8"?>

<beans xmlns="http://www.springframework.org/schema/beans"

    xmlns:xsi="http://www.w3.org/2001/XMLSchema-instance"

    xsi:schemaLocation="http://www.springframework.org/schema/beans

        http://www.springframework.org/schema/beans/spring-beans.xsd">

</beans>
3.创建对象到Spring容器中
创建一个类
package com.gjs.service;

public class HelloSpringService {

    public void say() {

        System.out.println("你好!Spring");

    }

}
往applicationContext.xml配置文件中加入配置
<?xml version="1.0" encoding="UTF-8"?>

<beans xmlns="http://www.springframework.org/schema/beans"

    xmlns:xsi="http://www.w3.org/2001/XMLSchema-instance"

    xsi:schemaLocation="http://www.springframework.org/schema/beans

        http://www.springframework.org/schema/beans/spring-beans.xsd">

         <!-- <bean id="" class = "">

          配置让spring管理类的对象的创建

          id : 唯一标识

          class :被管理类的全限定名

          -->

        <bean id="HelloSpringService" class="com.gjs.service.HelloSpringService"/>

</beans>
测试类, 使用getBean方法获得容器中的对象。
package com.gjs.test;

import static org.junit.Assert.*;

import org.junit.Test;

import org.springframework.context.ApplicationContext;

import org.springframework.context.support.ClassPathXmlApplicationContext;

import com.gjs.service.HelloSpringService;

public class TestSpring {

    @Test

    public void testName() throws Exception {

        ApplicationContext context = new ClassPathXmlApplicationContext("applicationContext.xml");

        HelloSpringService helloSpringService = context.getBean("HelloSpringService",HelloSpringService.class);

        helloSpringService.say();

    }

}
6.Spring容器的两个实现
ClassPathXmlApplicationContext:通过classpath路径(相对路径)直接获得加载的xml文件(推荐使用)
ApplicationContext context = new ClassPathXmlApplicationContext("applicationContext.xml");
FileSystemXmlApplicationContext:通过文件路径(绝对路径)来获得加载的xml文件。
ApplicationContext context = new FileSystemXmlApplicationContext("D:\\java\\eclipse-workspace\\spring1\\src\\applicationContext.xml");
8.控制反转(IOC)和依赖注入(DI)(A)
DI:Dependency Injection(依赖注入):
依赖注入是指Spring创建对象的过程中,将对象依赖属性(简单值,集合,对象)通过配置设值给该对象。
IoC:Inverse of Control(控制反转):
Spring号称是一个可以实现模块可插拔的JavaEE开发框架。而实现程序可插拔的核心理念就是控制反转。所谓的控制反转,就是将代码的调用权从调用方转移给被调用方(服务提供方)。不用修改调用方的的代码,只要修改配置文件就实现对象的切换。
读作“反转控制”,更好理解,它不是什么技术,而是一种设计思想,好比于MVC。就是将原本在程序中手动创建对象的控制权,交由Spring框架来管理。
正控:若调用者需要使用某个对象,其自身就得负责该对象的创建。
反控:调用者只管负责从Spring容器中获取需要使用的对象,不关心对象的创建过程,也就是把创建对象的控制权反转给了Spring框架。
控制反转(Ioc),就是依赖注入加上面向接口的编程思想的实现
示例:
整体结构:

CustomService接口:
package com.gjs.service;

public interface CustomeService {

    public void say();

}
实现类CustomServiceImpl1:
package com.gjs.service.impl;

import com.gjs.service.CustomeService;

public class CustomServiceImpl1 implements CustomeService {

    @Override

    public void say() {

        System.out.println("CustomerServiceImpl1.say()");

    }

}
实现类CustomServiceImpl2:
package com.gjs.service.impl;

import com.gjs.service.CustomeService;

public class CustomServiceImpl2 implements CustomeService {

    @Override

    public void say() {

        System.out.println("CustomerServiceImpl2.say()");

    }

}
调用方 CustomClient:
package com.gjs.client;

import com.gjs.service.CustomeService;

public class CustomClient {

    //1.声明一个接口引用类型

    private CustomeService customeService;

    //2.spring的依赖注入(DI)需要有一个set方法

    public void setCustomeService(CustomeService customeService) {

        this.customeService = customeService;

    }

    public void say() {

        customeService.say();

    }

}
配置文件 applicationContext.xml:
<?xml version="1.0" encoding="UTF-8"?>

<beans xmlns="http://www.springframework.org/schema/beans"

    xmlns:xsi="http://www.w3.org/2001/XMLSchema-instance"

    xsi:schemaLocation="http://www.springframework.org/schema/beans

        http://www.springframework.org/schema/beans/spring-beans.xsd">

         <!--

        <bean id="" class = "">

          配置让spring管理类的对象的创建

          id : 唯一标识

          class :被管理类的全限定名

          -->

        <bean id="client" class="com.gjs.client.CustomClient">

            <!-- 依赖注入(DI) :注入被调用方

              <property name="" value/ref=""/>

                         位置:

                  name : 是set方法确定的属性,不是成员变量

                      确定属性 : setXxx 方法去掉set前缀 ,剩余部分首字母小写

                         参数:

                  value : 值类型注入(字符串,基本数据类型)

                  ref :引用数据类型(对象), 对应bean的id

           -->

            <property name="customeService" ref="ServiceImpl1"/>

        </bean>

        <bean id="ServiceImpl1" class="com.gjs.service.impl.CustomServiceImpl1"/>

        <bean id="ServiceImpl2" class="com.gjs.service.impl.CustomServiceImpl2"/>

</beans>
测试类:
package com.gjs.test;

import static org.junit.Assert.*;

import org.junit.Test;

import org.springframework.context.ApplicationContext;

import org.springframework.context.support.ClassPathXmlApplicationContext;

import com.gjs.client.CustomClient;

import com.gjs.service.CustomeService;

public class TestSpring {

    @Test

    public void testName() throws Exception {

        //1.读取配置文件,创建Spring容器

        ApplicationContext context = new ClassPathXmlApplicationContext("applicationContext.xml");

        //获取调用方 CustomClient对象

        CustomClient client = context.getBean("client", CustomClient.class);

        //调用CustomClient对象的say()方法

        client.say();

    }

}
应用:
Spring框架又被称为容器框架,即通过控制反转将各个框架的对象创建交给Spring管理,然后通过依赖注入在层之间传递参数整合框架,并达到低耦合的目的。
9.标签说明
9.1 bean标签
作用:用于声明一个类,在启动Spring框架的时候根据该配置的类创建对象到容器里面
<bean id="someBean" class="com.gjs.pojo.SomeBean" scope="prototype"></bean>
id:设置对象名(唯一标识符)(推荐使用)
name:设置对象名(唯一标识符),与id的区别是可以有多个名称,每个名称用逗号隔开。
class:指定对象对应的类
scope:用于设置的对象的作用范围,可选参数如下:
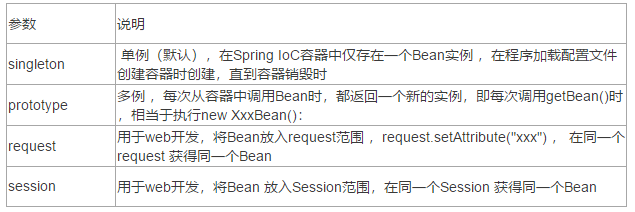
在Web开发的三层架构中的使用
Web层:一般都是多例
Service层 :单例
DAO层 :单例
9.2 alias 别名标签
作用:为已配置的bean设置别名
bean id="user" name="test" class="com.gjs.pojo.User"/>

<alias name="user" alias="user1"/>
name:必要属性, 代表为哪一个bean配置别名, 此属性的值为其他bean标签的id或name属性值
alias: 必要属性,命名的别名
10.实例化Bean的四种方式
1.构造器实例化(无参数构造器):(最常用)
public class SomeBean {

    public SomeBean() {

        System.out.println("SomeBean.SomeBean()");

    }

}
<bean id="someBean" class="com.gjs.pojo.SomeBean"/>
2.通过静态方法工厂创建(C)
public class SomeBean {

    public SomeBean() {

        System.out.println("SomeBean.SomeBean()");

    }

}

public class SomeBeanFacotry {

    //静态工厂方法

    public static SomeBean getSomeBean() {

        System.out.println("执行静态工厂方法");

        return new SomeBean();

    }

}
<bean id="someBean" class="com.gjs.pojo.SomeBeanFacotry" factory-method="getSomeBean"/>
3.通过实体工厂创建(C)
public class SomeBean {

    public SomeBean() {

        System.out.println("SomeBean.SomeBean()");

    }

}

public class SomeBeanFacotry {

    //实例工厂方法

    public SomeBean getSomeBean() {

        System.out.println("执行实例工厂方法");

        return new SomeBean();

    }

}
<bean id="someBeanfactory" class="com.gjs.pojo.SomeBeanFactory"/>
或
<bean id="someBean" factory-bean="someBeanfactory" factory-method="getSomeBean"/>
4.实现FactoryBean接口实例化:实例工厂变种
实现FactoryBean接口,MyBatis和Spring集成就是使用的这种方式。此种方式,如果没有使用Bean对应的对象,Spring就不会自动创建,只有在使用的时候Spring才会创建对应的对象
public class SomeBean {

    public SomeBean() {

        System.out.println("SomeBean4.SomeBean4()");

    }

}

public class SomeBeanObjectFactory implements FactoryBean<SomeBean>{

    //返回的泛型类型对应的对象

    @Override

    public SomeBean getObject() throws Exception {

        SomeBean bean = new SomeBean();

        return bean;

    }

}
<bean id="someBean" class="cn.zj.domian.SomeBeanObjectFactory"/>
11.初始化和销毁方法
<bean id="someBean" class="......"

   <init-method="该类中初始化方法名"/>

  <destroy-method="该类中销毁方法名"/>

</bean>
init-method:bean生命周期初始化方法,对象创建后就进行调用
destroy-method:容器被销毁的时候,如果bean被容器管理,会调用该方法。
12.依赖注入的四种方法
1.setter注入,(属性注入)(常用)
使用setter注入:
1,使用bean元素的<property>子元素设置;
1.简单类型值,直接使用value赋值;
2.引用类型,使用ref赋值;
3.集合类型,直接使用对应的集合类型元素即可。
2,spring通过属性的set方法注入值;
3,在配置文件中配置的值都是string,spring可以自动的完成类型的转换
示例:
员工类
public class Employee {

    private Integer age;

    private String name;

    private Department dept;

    public Integer getAge() {

        return age;

    }

    public void setAge(Integer age) {

        this.age = age;

    }

    public String getName() {

        return name;

    }

    public void setName(String name) {

        this.name = name;

    }

    public Department getDept() {

        return dept;

    }

    public void setDept(Department dept) {

        this.dept = dept;

    }

    @Override

    public String toString() {

        return "Employee [age=" + age + ", name=" + name + ", dept=" + dept + "]";

    }

}
部门类
public class Department {

    private Integer id;

    private String name;

    public Integer getId() {

        return id;

    }

    public void setId(Integer id) {

        this.id = id;

    }

    public String getName() {

        return name;

    }

    public void setName(String name) {

        this.name = name;

    }

}
配置文件
<?xml version="1.0" encoding="UTF-8"?>

<beans xmlns="http://www.springframework.org/schema/beans"

    xmlns:xsi="http://www.w3.org/2001/XMLSchema-instance"

    xsi:schemaLocation="http://www.springframework.org/schema/beans

        http://www.springframework.org/schema/beans/spring-beans.xsd">

    <!-- 员工 -->

    <bean id="employee" class="com.gjs.pojo.Employee" >

        <!-- setter方法注入: 属性注入

            <property name="" value="">

            name : 属性名称

            value : 基本数据类型+String类型的值注入

            ref : 引用类型(对象类型)的注入

            value 和ref 只能二选一

        -->

        <property name="age" value="18"></property>

        <property name="name" value="张三"></property>

        <property name="dept" ref="dept"></property>

    </bean>

    <!-- 部门 -->

    <bean id="dept" class="com.gjs.pojo.Department" >

           <property name="id" value="1"/>

           <property name="name" value="开发部"/>

   </bean>

</beans>
2.构造器注入
使用bean元素的<constructor-arg>子元素设置:
1.默认情况下,constructor-arg的顺序就是构造器参数的顺序
2. constructor-arg的属性
name : 构造方法参数的名称
index :参数的位置从 0 开始
value :值类型注入
ref :引用类型注入
type : 参数的数据类型
3.一般在一个类必须依赖另一个类才能正常运行时,才用构造器注入
<?xml version="1.0" encoding="UTF-8"?>

<beans xmlns="http://www.springframework.org/schema/beans"

    xmlns:xsi="http://www.w3.org/2001/XMLSchema-instance"

    xsi:schemaLocation="http://www.springframework.org/schema/beans

        http://www.springframework.org/schema/beans/spring-beans.xsd">

     <!-- 配置部门 -->

     <bean id="department" class="com.gjs.pojo.Department">

         <constructor-arg name="id"  value="2"/>

         <constructor-arg name="name"  value="研发部"/>

     </bean>

     <!-- 配置员工 -->

     <bean id="emp" class="com.gjs.pojo.Employee">

         <!-- 依赖注入 :构造器注入 -->

         <constructor-arg name="id" value="1"/>

         <constructor-arg name="name" value="张三"/>

         <constructor-arg name="dept" ref="department"/>

     </bean>

</beans>
3.p命名空间注入
使用p命名空间注入先在约束上面引入 p标签
xmlns:p="http://www.springframework.org/schema/p"
<?xml version="1.0" encoding="UTF-8"?>

<beans xmlns="http://www.springframework.org/schema/beans"

    xmlns:p="http://www.springframework.org/schema/p"

    xmlns:xsi="http://www.w3.org/2001/XMLSchema-instance"

    xsi:schemaLocation="http://www.springframework.org/schema/beans

        http://www.springframework.org/schema/beans/spring-beans.xsd">

     <!-- 配置部门 -->

     <bean id="department" class="com.gjs.pojo.Department"

     p:id="3"

     p:name="销售部"/>

     <!-- 配置员工 -->

     <bean id="emp" class="com.gjs.pojo.Employee"

     p:id="1"

     p:name="张三"

     p:dept-ref="department"/>

</beans>
4.集合类型值注入
用于处理:
1.键值对 Map 、Properties
2.数组
3.集合Set、List
public class CollectionBean {

    private Set<String> set;

    private List<String> list;

    private String[] array;

    private Map<String, String> map;

    private Properties prop; //读取本地 xxx.properties文件(本质就是一个Map集合)

}
<?xml version="1.0" encoding="UTF-8"?>

<beans xmlns="http://www.springframework.org/schema/beans"

    xmlns:xsi="http://www.w3.org/2001/XMLSchema-instance"

    xsi:schemaLocation="http://www.springframework.org/schema/beans

        http://www.springframework.org/schema/beans/spring-beans.xsd">

     <bean id="collectionBean" class="cn.zj.spring.pojo.CollectionBean">

         <!-- setter(属性)方法注入 -->

         <!-- 1.数组 -->

         <property name="arr">

             <array>

                 <value>AAA</value>

                 <value>BBB</value>

             </array>

         </property>

         <!-- 2.set集合 -->

         <property name="set" >

             <set>

                 <value>AAA</value>

                 <value>AAA</value>

                 <value>BBB</value>

             </set>

         </property>

         <!-- 3.list集合 -->

         <property name="lsit">

             <list>

                 <value>list1</value>

                 <value>list1</value>

                 <value>list2</value>

             </list>

         </property>

         <!-- 4. map集合 -->

         <property name="map">

             <map>

                 <entry key="key1" value="value1"/>

                 <entry key="key2" value="value2"/>

             </map>

         </property>

         <!-- 5.properties 集合 -->

         <property name="prop">

             <props>

                 <prop key="propKey1">propValue1</prop>

                 <prop key="propKey2">propValue2</prop>

             </props>

         </property>

     </bean>

</beans>
13.获得properties文件的值
1.导入命名空间方法
将命名空间和约束重新拷贝一份,将对于的全部替换成 context,然后关联context本地schema约束
<?xml version="1.0" encoding="UTF-8"?>

<beans xmlns="http://www.springframework.org/schema/beans"

    xmlns:p="http://www.springframework.org/schema/p"

    xmlns:context="http://www.springframework.org/schema/context"

    xmlns:xsi="http://www.w3.org/2001/XMLSchema-instance"

    xsi:schemaLocation="http://www.springframework.org/schema/beans

    http://www.springframework.org/schema/beans/spring-beans.xsd

    http://www.springframework.org/schema/context

    http://www.springframework.org/schema/context/spring-context.xsd

    ">

</beans>
2.导入Mysql驱动包和druid连接池jar包

3.applicationContext.xml配置
<?xml version="1.0" encoding="UTF-8"?>

<beans xmlns="http://www.springframework.org/schema/beans"

    xmlns:p="http://www.springframework.org/schema/p"

    xmlns:context="http://www.springframework.org/schema/context"

    xmlns:xsi="http://www.w3.org/2001/XMLSchema-instance"

    xsi:schemaLocation="

        http://www.springframework.org/schema/beans

        http://www.springframework.org/schema/beans/spring-beans.xsd

        http://www.springframework.org/schema/context

        http://www.springframework.org/schema/context/spring-context.xsd

        ">

      <!-- 使用context 读取配置文件到spring容器中

         <context:property-placeholder location=""/>

         location : db.properties文件的位置,必须加上 classpath: 作为前缀

    -->

      <context:property-placeholder location="classpath:db.properties"/>

          <!-- 创建阿里巴巴druid连接池 -->

          <bean id="dataSource" class="com.alibaba.druid.pool.DruidDataSource"

              init-method="init" destroy-method="close"

          >

              <!-- 属性注入 setter方法注入-->

              <property name="driverClassName" value="${jdbc.driverClassName}"/>

            <property name="url" value="${jdbc.url}"/>

            <property name="username" value="${jdbc.username}"/>

            <property name="password" value="${jdbc.password}"/>

            <!-- 最大连接数 -->

            <property name="maxActive" value="${jdbc.maxActive}"/>

      </bean>

</beans>
测试代码
@Test

    public void testSave() throws Exception {

        ApplicationContext context = new ClassPathXmlApplicationContext("applicationContext.xml");

        DataSource dataSource = context.getBean(DataSource.class, "dataSource");

        Connection conn = dataSource.getConnection();

        System.out.println("数据库连接对象:"+conn);

    }
深入学习Spring框架(一)- 入门的更多相关文章
- 深入浅出学习Spring框架(四):IoC和AOP的应用——事务配置
在前文 深入浅出学习Spring框架(一):通过Demo阐述IoC和DI的优势所在. 深入浅出学习Spring框架(三):AOP 详解 分别介绍了Spring的核心功能——IoC和AOP,光讲知识远远 ...
- 跟着刚哥学习Spring框架--创建HelloWorld项目(一)
1.Spring框架简介 Spring是一个开源框架,Spring是在2003年兴起的一个轻量级的开源框架,由Rod johnson创建.主要对JavaBean的生命周期进行管理的轻量级框架,Spri ...
- 跟着刚哥学习Spring框架--AOP(五)
AOP AOP(Aspect Oriented Programming),即面向切面编程,可以说是OOP(Object Oriented Programming,面向对象编程)的补充和完善.OOP引入 ...
- 跟着刚哥学习Spring框架--通过注解方式配置Bean(四)
组件扫描:Spring能够从classpath下自动扫描,侦测和实例化具有特定注解的组件. 特定组件包括: 1.@Component:基本注解,识别一个受Spring管理的组件 2.@Resposit ...
- 跟着刚哥学习Spring框架--通过XML方式配置Bean(三)
Spring配置Bean有两种形式(XML和注解) 今天我们学习通过XML方式配置Bean 1. Bean的配置方式 通过全类名(反射)的方式 √ id:标识容器中的bean.id唯一. √ cl ...
- 跟着刚哥学习Spring框架--Spring容器(二)
Spring容器 启动Spring容器(实例化容器) -- IOC容器读取Bean配置创建Bean实例之前,必须对它进行实例化(加载启动),这样才可以从容器中获取Bean的实例并使用. Bean是S ...
- 跟着刚哥学习Spring框架--事务配置(七)
事务 事务用来保证数据的完整性和一致性. 事务应该具有4个属性:原子性.一致性.隔离性.持久性.这四个属性通常称为ACID特性.1.原子性(atomicity).一个事务是一个不可分割的工作单位,事务 ...
- 跟着刚哥学习Spring框架--JDBC(六)
Spring的JDBC框架 Spring JDBC提供了一套JDBC抽象框架,用于简化JDBC开发. Spring主要提供JDBC模板方式.关系数据库对象化方式.SimpleJdbc方式.事务管理来简 ...
- 学习Spring框架等技术的方向、方法和动机
学习Spring框架最早学习Spring框架是在大二的时候,当时看了几本书,看了一些视频,主要是传智播客的.更多的,还是写代码,单独写Spring的,也有与Struts和Hibernate等框架整合的 ...
随机推荐
- Android之运行时相机权限和联系人权限获取
原文:Android之运行时相机权限和联系人权限获取 本文链接:http://blog.csdn.net/qq_16628781/article/details/61623502 Android之运行 ...
- centos 6 yum源记录,离线下载rpm包的办法
wget -O /etc/yum.repos.d/CentOS6-Base-163.repo http://mirrors.163.com/.help/CentOS6-Base-163.repo rp ...
- WebBrowser 的 DocumentCompleted事件不执行的解决方法
原文:WebBrowser 的 DocumentCompleted事件不执行的解决方法 WebBrowser 的 DocumentCompleted事件不执行的解决方法: 使用WebBrowser的P ...
- Delphi 10.2 Linux 程序开发环境部署的基本步骤(网络连接方式要选择桥接或者是Host Only)
Delphi 10.2 Linux 程序开发环境部署的基本步骤 http://blog.qdac.cc/?p=4477 升級到 Delphi 10.2 Tokyo 笔记http://www.cnblo ...
- Linux下的wfopen(手工打造)
Of Linux on wfopen (open wide-character version of the file name and mode) to achieve Not directly a ...
- 用vs2010编译好的ICU库
1.ICU库的官网网址为http://site.icu-project.org/ 2.ICU(International Components for Unicode)是一个国际化的字符编码和转化的库 ...
- windows-qt 使用mingw编译c++boost并使用
一.boost是一个准标准库,相当于STL的延续和扩充,它的设计理念和STL比较接近,都是利用泛型让复用达到最大化.不过对比STL,boost更加实用.STL集中在算法部分,而boost包含了不少工具 ...
- WCF研究-前篇
前篇 1.从SOA说起 2.什么是WCF 3.WCF通信模型 4.Endpoint与ABC以及元数据 1.SOA (Service Oriented Architecture) Ø 一种组件架 ...
- QImage的浅拷贝与深拷贝
首先简单说说什么是浅拷贝和深拷贝:浅拷贝就比如像引用类型,而深拷贝就比如值类型,即浅拷贝是共用一块内存的,而深拷贝是复制一份内容. 我们再来看看QImage类的几个构造函数: // 浅拷贝 QI ...
- 我的第一个Chrome插件:天气预报应用
1.Chrome插件开发基础 开发Chrome插件很简单,只要会基本的前台技术HTML.CSS.JS就可以开发了. Chrome插件一般包括两个HTML页面background和popup. ...