ssm集成(maven)& 分模块开发--详细教程
1 maven版本的ssm
1.1 最简单的版本步骤:
(1) 创建maven web项目
(2) 在pom.xml中导入依赖的jar包
(3) 再写配置文件:
web.xml
<!DOCTYPE web-app PUBLIC

        "-//Sun Microsystems, Inc.//DTD Web Application 2.3//EN"

        "http://java.sun.com/dtd/web-app_2_3.dtd" >

<web-app xmlns:xsi="http://www.w3.org/2001/XMLSchema-instance"

         xmlns="http://java.sun.com/xml/ns/javaee"

         xsi:schemaLocation="http://java.sun.com/xml/ns/javaee http://java.sun.com/xml/ns/javaee/web-app_3_0.xsd"

         version="3.0">

  <display-name>crm</display-name>

  <!-- Spring的配置文件 -->

  <context-param>

    <param-name>contextConfigLocation</param-name>

    <param-value>classpath:applicationContext.xml</param-value>

  </context-param>

  <!--Spring监听器 ApplicationContext 载入 -->

  <listener>

    <listener-class>org.springframework.web.context.ContextLoaderListener</listener-class>

  </listener>

  <!-- Spring MVC 核心配置开始 -->

  <servlet>

    <servlet-name>springmvc</servlet-name>

    <servlet-class>org.springframework.web.servlet.DispatcherServlet</servlet-class>

    <init-param>

      <param-name>contextConfigLocation</param-name>

      <param-value>classpath:applicationContext-mvc.xml</param-value>

    </init-param>

    <load-on-startup>1</load-on-startup>

  </servlet>

  <servlet-mapping>

    <servlet-name>springmvc</servlet-name>

    <url-pattern>/</url-pattern>

  </servlet-mapping>

  <!-- 编码过滤器 -->

  <filter>

    <filter-name>encodingFilter</filter-name>

    <filter-class>org.springframework.web.filter.CharacterEncodingFilter</filter-class>

    <init-param>

      <param-name>encoding</param-name>

      <param-value>UTF-8</param-value>

    </init-param>

  </filter>

  <filter-mapping>

    <filter-name>encodingFilter</filter-name>

    <url-pattern>/*</url-pattern>

  </filter-mapping>

</web-app>
applicationContext.xml
<?xml version="1.0" encoding="UTF-8"?>

<beans xmlns="http://www.springframework.org/schema/beans"

       xmlns:xsi="http://www.w3.org/2001/XMLSchema-instance"

       xmlns:context="http://www.springframework.org/schema/context" xmlns:tx="http://www.springframework.org/schema/tx"

       xsi:schemaLocation="http://www.springframework.org/schema/beans http://www.springframework.org/schema/beans/spring-beans.xsd http://www.springframework.org/schema/context http://www.springframework.org/schema/context/spring-context.xsd http://www.springframework.org/schema/tx http://www.springframework.org/schema/tx/spring-tx.xsd">

    <!--扫描的包-->

    <context:component-scan base-package="cn.itsource.crm.service"/>

    <!-- Jdbc配置文件 -->

    <context:property-placeholder location="classpath:db.properties" />

    <!-- 数据源dataSource -->

    <bean id="dataSource" class="org.apache.commons.dbcp.BasicDataSource" destroy-method="close">

        <property name="driverClassName" value="${jdbc.driverClassName}" />

        <property name="url" value="${jdbc.url}" />

        <property name="username" value="${jdbc.username}" />

        <property name="password" value="${jdbc.password}" />

        <!--maxActive: 最大连接数量 -->

        <property name="maxActive" value="150" />

        <!--minIdle: 最小空闲连接 -->

        <property name="minIdle" value="5" />

        <!--maxIdle: 最大空闲连接 -->

        <property name="maxIdle" value="20" />

        <!--initialSize: 初始化连接 -->

        <property name="initialSize" value="30" />

        <!--maxWait: 超时等待时间以毫秒为单位 1000等于60秒 -->

        <property name="maxWait" value="1000" />

        <!-- 在空闲连接回收器线程运行期间休眠的时间值,以毫秒为单位. -->

        <property name="timeBetweenEvictionRunsMillis" value="10000" />

        <!-- 在每次空闲连接回收器线程(如果有)运行时检查的连接数量 -->

        <property name="numTestsPerEvictionRun" value="10" />

        <!-- 1000 * 60 * 30 连接在池中保持空闲而不被空闲连接回收器线程 -->

        <property name="minEvictableIdleTimeMillis" value="10000" />

        <property name="validationQuery" value="SELECT NOW() FROM DUAL" />

    </bean>

    <!--Mybatis核心对象-->

    <bean id="sqlSessionFactory" class="org.mybatis.spring.SqlSessionFactoryBean">

        <!-- 注入数据源 -->

        <property name="dataSource" ref="dataSource" />

        <!-- 配置mybatis (mapper)映射器路径 -->

        <property name="mapperLocations" value="classpath*:cn/itsource/crm/mapper/*Mapper.xml" />

        <!-- 配置mybatis 类型别名 -->

        <property name="typeAliasesPackage">

            <value>

                cn.itsource.crm.domain

                cn.itsource.crm.query

            </value>

        </property>

    </bean>

    <!--注入映射器,一劳永逸的做法-->

    <bean class="org.mybatis.spring.mapper.MapperScannerConfigurer">

        <property name="basePackage" value="cn.itsource.crm.mapper"></property>

    </bean>

    <!--事务管理-->

    <bean id="transactionManager" class="org.springframework.jdbc.datasource.DataSourceTransactionManager">

        <property name="dataSource" ref="dataSource"/>

    </bean>

    <!--以注解的方式进行事务管理-->

    <tx:annotation-driven transaction-manager="transactionManager"/>

</beans>
applicationContext-mvc.xml
<?xml version="1.0" encoding="UTF-8" ?>

<beans xmlns="http://www.springframework.org/schema/beans"

       xmlns:xsi="http://www.w3.org/2001/XMLSchema-instance"

       xmlns:context="http://www.springframework.org/schema/context"

       xmlns:mvc="http://www.springframework.org/schema/mvc"

       xsi:schemaLocation="http://www.springframework.org/schema/beans http://www.springframework.org/schema/beans/spring-beans.xsd http://www.springframework.org/schema/context http://www.springframework.org/schema/context/spring-context.xsd http://www.springframework.org/schema/mvc http://www.springframework.org/schema/mvc/spring-mvc.xsd">

    <!-- 自动扫描该包,使SpringMVC认为包下用了@controller注解的类是控制器 -->

    <context:component-scan base-package="cn.itsource.crm.web.controller" />

    <!-- 启动SpringMVC的注解功能 -->

    <mvc:annotation-driven/>

    <!--静态资源放行-->

    <mvc:default-servlet-handler/>

    <!-- 定义跳转的文件的前后缀 ,视图解析器配置-->

    <bean class="org.springframework.web.servlet.view.InternalResourceViewResolver">

        <property name="prefix" value="/WEB-INF/views/" />

        <property name="suffix" value=".jsp" />

    </bean>

    <!-- 配置文件上传解析器 -->

    <bean id="multipartResolver"

          class="org.springframework.web.multipart.commons.CommonsMultipartResolver">

        <!-- 默认编码 -->

        <property name="defaultEncoding" value="utf-8" />

        <!-- 文件大小最大值 -->

        <property name="maxUploadSize" value="10485760000" />

    </bean>

</beans>
db.properties
jdbc.driverClassName=com.mysql.jdbc.Driver

jdbc.url=jdbc:mysql:///crm?useUnicode=true&characterEncoding=utf-8

jdbc.username=root

jdbc.password=root
log4j.properties
log4j.rootLogger=ERROR, stdout

#log4j.rootLogger=NONE

log4j.logger.cn.itsource=TRACE

log4j.appender.stdout=org.apache.log4j.ConsoleAppender

log4j.appender.stdout.layout=org.apache.log4j.PatternLayout
(4) 搭建service层,mapper层,controller层
(5) 进行测试
1.2 抽取一些公共的内容的版本
(1) 抽取BaseMapper
把公共的crud方法抽取到BaseMapper里面。
(2) 抽取IBaseService和BaseServiceImpl
把公共的crud方法抽取到BaseService里面,通过BaseServiceImpl去实现BaseService里面的方法。
(3) 抽取BaseDomain
抽取公共的id。
2 maven项目的分模块开发
2.1 为什么需要分模块开发
使用传统的ssm结构,在随着项目的进行,我们可能遇到下面一系列的问题:
(1) 大部分的domain或者一些service以及mapper在多个项目中是通用的
(2) pom.xml中的依赖越来越长
(3) build整个项目的时间越来越长,尽管你只是一直在web层工作,但是不得不build整个项目
(4) 某个模块,比如mapper,你只想让一些经验丰富的人来维护,但是现在每个开发者都能修改这个模
块,这导致关键模块的代码质量达不到你的要求
2.2 什么是分模块开发
一个大项目拆分为多个小项目(maven模块)组成,而且它们是有依赖关系的。
2.3 怎么去分模块开发
写项目写代码尽量满足以下内容:
(1) 开闭原则
对扩展开放
对修改关闭-->公共的不要乱修改
(2) 高内聚:比如一个方法(方法就应该完成一个方法该干的事情) -- 最多40行
低耦合:尽量的分层开发 mapper service controller(方便维护)
拆分:
按照层次结构拆分
按照业务功能拆分:电商、订单、物流……
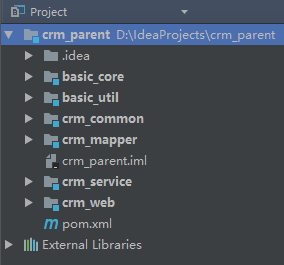
(1) 代码拆分
basic-util 工具类
basic-core 公共内容
crm-common 具体项目公共内容
crm-mapper 项目里面具体mapper
crm-service 项目里面service类
crm-web 项目的controller层
……
pss-common
(2) 配置文件拆分
web.xml / applicationContext-mvc.xml --> crm-web模块
applicationContext.xml --> crm-service模块
(3) 效果
3 RESTful风格
RESTful是一种开发理念,是设计风格而不是标准。 REST描述的是在网络中client和server的一种交互形式;REST本身不实用,实用的是如何设计 RESTful API(REST风格的网络接口),一种万维网软件架构风格。
前端代码 --> 后端代码进行交互,交互的时候前端代码(axios)发送请求到后端代码
axios --> get / post / put / delete / patch
3.1 RESTful风格理解
<a href="/xxx"> --> get
<form method="post"> --> post
ajax --> get/post
除了get/post以外,还支持其他请求 put/delete/patch --> http协议扩展出来的
没有RESTful以前:
/addUser?name='Bob'&age=38 -- get
/delete?id=1
=====================================华丽的分割线=============================================
RESTful风格:传输请求风格写法 -- http get/post/patch/put/delete 完成增删改查:
(1) put动作 + /user(资源路径) {"name":"Bob","age":28} --> 新增
(2) post动作 + /user(资源路径) {"name":"Bob","age":28} --> 修改
(3) delete 动作 +/user/1 --> 表示删除id为1的用户
(4) get 动作 + /user/10 --> 查询id为10的用户
(5) patch 动作 + /user --> 批量查询
那么为什么要使用RESTful?
安全性好一点,现在比较流行的风格,不会暴露动作
3.2 RESTful代码实现
以下为测试代码:
新增:
/**

 * 新增数据

 */

@RequestMapping(method = RequestMethod.PUT)

@ResponseBody

public AjaxResult save(@RequestBody Department department) {

    System.out.println("新增数据为:" + department);

    return new AjaxResult();

}
修改:
/**

 * 修改数据

 */

@RequestMapping(method = RequestMethod.POST)

@ResponseBody

public AjaxResult update(@RequestBody Department department) {

    System.out.println("修改数据为:" + department);

    return new AjaxResult();

}
删除:
/**

 * 删除数据

 */

@RequestMapping(value = "{id}", method = RequestMethod.DELETE)

@ResponseBody

public AjaxResult delete(@PathVariable Long id) {

    System.out.println("删除一条数据id为:" + id);

    return new AjaxResult();

}
查询一条:
/**

 * 查询一条数据

 */

@RequestMapping(value = "{id}", method = RequestMethod.GET)

@ResponseBody

public AjaxResult findOne(@PathVariable Long id) {

    System.out.println("查询一条数据id为:" + id);

    return new AjaxResult();

}
查询所有:
/**

 * 查询所有

 */

@RequestMapping(value = "/list",method = RequestMethod.PATCH)

@ResponseBody

public List<Department> findAll() {

    return departmentService.findAll();

}
4 swagger(前端人员使用很多)
实现
  <springfox.version>2.4.0</springfox.version>

    <dependencies>

        <dependency>

            <groupId>io.springfox</groupId>

            <artifactId>springfox-swagger2</artifactId>

            <version>${springfox.version}</version>

        </dependency>

        <dependency>

            <groupId>io.springfox</groupId>

            <artifactId>springfox-swagger-ui</artifactId>

            <version>${springfox.version}</version>

        </dependency>
package cn.itsource.crm.web.config;

import org.springframework.context.annotation.Bean;

import org.springframework.context.annotation.ComponentScan;

import org.springframework.context.annotation.Configuration;

import org.springframework.web.servlet.config.annotation.EnableWebMvc;

import springfox.documentation.builders.PathSelectors;

import springfox.documentation.builders.RequestHandlerSelectors;

import springfox.documentation.service.ApiInfo;

import springfox.documentation.spi.DocumentationType;

import springfox.documentation.spring.web.plugins.Docket;

import springfox.documentation.swagger2.annotations.EnableSwagger2;

@Configuration //相当于写一个配置文件 application.xml

@EnableWebMvc // 开启springmvc

@EnableSwagger2 //开启swagger2

@ComponentScan(basePackages="cn.itsource.crm.web.controller")

public class SwaggerConfig {

    //相当于 <bean ><property name="">   </bean>

    @Bean

    public Docket api(){

        //生成接口信息

        return new Docket(DocumentationType.SWAGGER_2)

                .apiInfo(this.apiInfo())

                .select()

                .apis(RequestHandlerSelectors.basePackage("cn.itsource.crm.web.controller"))

                .paths(PathSelectors.any())

                .build();

    }

    //api的 注解 javaweb 文档的描述信息

    private ApiInfo apiInfo(){

        @SuppressWarnings("deprecation")

        ApiInfo info=new ApiInfo(

                "API接口测试文档",

                "接口测试",

                "1.0",

                "http://www.itsource.cn",

                "itsource",

                "123",

                "http://www.itsource.cn");

        return info;

    }

}
和spring整合,根据controller 生成的接口的文档,通过页面访问
运行:http://localhost/swagger-ui.html
5 postman
postman就是一个工具,可以来发送各种http请求,可以用它来测试http协议接口。
postman就是http协议接口测试工具。
测试 put/get/post/delete/patch这些请求:

6 前端vue-element-admin
基于 vue-cli 和 elementui 搭建出来一个模块框架,框架基本功能,路由,插件,国际化等
搭建模板:
(1) 解压文件 --修改名称
(2) 使用idea 打开
(3) 执行命令 npm install 安装依赖
(4) 启动 npm run dev
(5) 访问
ssm集成(maven)& 分模块开发--详细教程的更多相关文章
- spring+springmvc+hibernate架构、maven分模块开发样例小项目案例
maven分模块开发样例小项目案例 spring+springmvc+hibernate架构 以用户管理做測试,分dao,sevices,web层,分模块开发測试!因时间关系.仅仅測查询成功.其它的准 ...
- java使用maven项目(二)分模块开发
1 整合ssh框架 1.1 依赖传递 只添加了一个struts2-core依赖,发现项目中出现了很多jar, 这种情况 叫 依赖传递 1.2 依赖版本冲突的解决 1. 第 ...
- Maven02——回顾、整合ssh框架、分模块开发、私服
1 回顾 1.1 Maven的好处 节省空间 对jar包做了统一管理 依赖管理 一键构建 可跨平台 应用在大型项目可提高开发效率 1.2 Maven安装部署配置 1.3 Maven的仓库 本地仓库 远 ...
- SSH框架分模块开发
------------------siwuxie095 SSH 框架分模块开发 1.在 Spring 核心配置文件中配置多个内容,容易造成 配置混乱,不利于维护 「分模块开发主要针对 Spring ...
- Spring_day04--HibernateTemplate介绍_整合其他方式_Spring分模块开发
HibernateTemplate介绍 1 HibernateTemplate对hibernate框架进行封装, 直接调用HibernateTemplate里面的方法实现功能 2 HibernateT ...
- Struts2_day01--Struts2的核心配置文件_常量配置_分模块开发_Action编写方式
Struts2的核心配置文件 1 名称和位置固定的 2 在配置文件中主要三个标签 package.action.result,标签里面的属性 标签package 1 类似于代码包,区别不同的actio ...
- Struts2分模块开发
-------------------siwuxie095 Struts2 分模块开发 在实际开发中,如果一个项目是团队开发的,也就是很多人开发的, 每个人都需要去修改 struts.xml,因为 s ...
- 七 Spring的分模块开发的配置,保存客户案例
Spring的分模块开发的配置 加载配置文件的时候,加载多个 在一个配置文件中引入多个配置文件(常用) 保存客户案例 applicationContext.xml: <?xml version= ...
- Maven高级:01.maven分模块构建&&02.私服的应用
IntelliJ IDEA 2018.3.6 x64 07 Maven高级:01.maven分模块构建(上) 07 Maven高级:01.maven分模块构建(中) 07 Maven高级:01.mav ...
随机推荐
- 【论文阅读】Learning Dual Convolutional Neural Networks for Low-Level Vision
论文阅读([CVPR2018]Jinshan Pan - Learning Dual Convolutional Neural Networks for Low-Level Vision) 本文针对低 ...
- web接口与restful规范
web接口 接口定义: 通过网络,规定了前后台信息交互规则的url链接,在web程序中也就是联系前台页面与后台数据库的媒介. 接口特点 url:长得像返回数据的url链接, 例如下面的搜索音乐 [ht ...
- CCNA 之 四 管理和配置CISCO设备
管理和配置CISCO设备 路由器组件 cpu 执行操作系统的指令 随机访问存储器RAM - RAM中内容断电丢失 - 运行操作系统: - 运行配置文件: - IP 路由表: - ARP 缓存; - 数 ...
- java 运算符&表达式
1. java中,模运算符%可以获取整数除法的余数,同样适用于浮点类型数据.double y = 23.56; y%5;(即y mod 5 =3.56) [c/c++中,要求%两侧均为整数数据.] 2 ...
- php实现微信拼手气红包
$result = sendHB(3, 5); echo '<pre>'; var_export($result); echo array_sum($result); /** * 拼手气红 ...
- php踩过的那些坑(2) strpos引发的血案
一.前方有坑 php某些自带函数,如果使用不当,也会坑得你人仰马翻.比如:strpos() 先了解一下strpos()函数是干啥的. strpos — 查找字符串首次出现的位置 用法: int str ...
- 如何将本地项目推送到码云仓库或者GitHub仓库
将本地项目推送到码云仓库. 前提: git 和码云 1.在码云上先创建一个仓库. 2.在要被上传的项目的目录右键, 选择 Git Bash Here. 3.在窗口输入命令: git init 这时 ...
- 使用cookies弹出层每24小时弹出一次
第一步:下载cookies的库 https://github.com/js-cookie/js-cookie 第二步:设置Cookies的失效时间,这里有两种方法,按天计算和按小时计算 functio ...
- DS1302时钟芯片驱动程序
/***************************************************************************** FileName : DS1302.c F ...
- GO富集分析示例【华为云技术分享】
版权声明:本文为博主原创文章,遵循CC 4.0 BY-SA版权协议,转载请附上原文出处链接和本声明. 本文链接:https://blog.csdn.net/devcloud/article/detai ...