(四)适配器Adapter
只对简单应用进行描述。适配器与ListView配合使用可以快速生成item,效果如下例所示
一、简单模式
方式一
xml
    <ListView

        android:id="@+id/lv_test"

        android:layout_width="wrap_content"

        android:layout_height="wrap_content"

     />
java
package com.example.app03; import android.content.Context;
import android.support.v7.app.AppCompatActivity;
import android.os.Bundle;
import android.widget.ArrayAdapter;
import android.widget.ListView; import java.util.LinkedList;
import java.util.List; public class MainActivity extends AppCompatActivity { private List<Animal> mData = null;
private Context mContext;
private AnimalAdapter mAdapter = null;
private ListView list_animal; @Override
protected void onCreate(Bundle savedInstanceState) {
super.onCreate(savedInstanceState);
setContentView(R.layout.activity_main); //要显示的数据
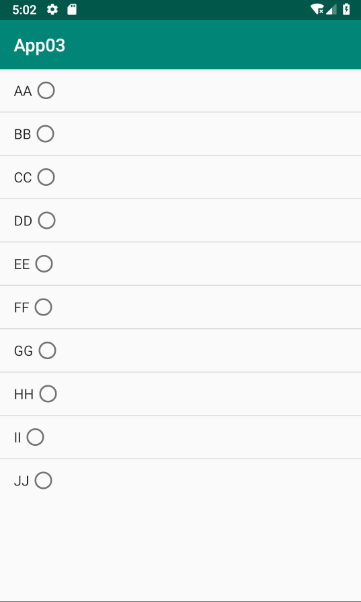
String[] strs = {"AA","BB","CC","DD","EE","FF","GG","HH","II","JJ"};
//创建ArrayAdapter
ArrayAdapter<String> adapter = new ArrayAdapter<String>
(this,android.R.layout.simple_list_item_single_choice ,strs);
//获取ListView对象,通过调用setAdapter方法为ListView设置Adapter设置适配器
ListView list_test = (ListView) findViewById(R.id.lv_test);
list_test.setAdapter(adapter); }
}
效果
方式二
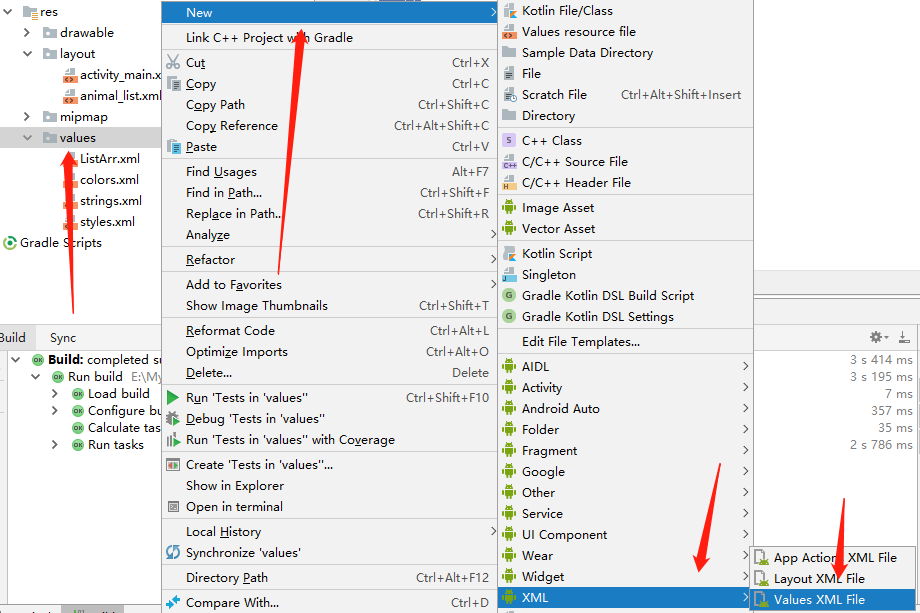
创建ListText(即显示的item信息):选中Values-右键new-xml-values xml file,如下图所示。
在文件中添加如下内容,其中name即为此数据文件的标识,定义好此文件后方式一中的adapter也可以这样定义(此方法不需要下述代码)
        ArrayAdapter<CharSequence> adapter = ArrayAdapter.createFromResource(this,

               R.array.ListText,android.R.layout.simple_list_item_multiple_choice );
<?xml version="1.0" encoding="utf-8"?>
<resources>
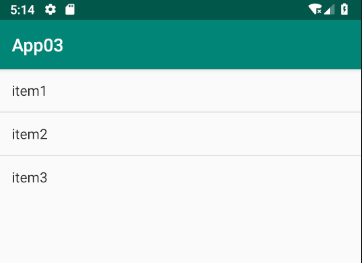
<string-array name="ListText">
<item>item1</item>
<item>item2</item>
<item>item3</item>
</string-array>
</resources>
xml
android:entries="@array/ListText" 比方法一增加的一行,默认数据在ListText中
    <ListView

        android:id="@+id/lv_test"

        android:layout_width="wrap_content"

        android:layout_height="wrap_content"

        android:entries="@array/ListText"

     />
直接运行即可如下效果
一、复杂模式
先来一个效果图

1)准备三张图片

2)新建一个布局,xml文件如下

<?xml version="1.0" encoding="utf-8"?>

<LinearLayout xmlns:android="http://schemas.android.com/apk/res/android"

    android:orientation="horizontal"

    android:layout_width="match_parent"

    android:layout_height="match_parent">

    <!-- 定义一个用于显示头像的ImageView -->

    <ImageView

        android:id="@+id/iv_head"

        android:baselineAlignBottom="true"

        android:paddingLeft="8dp"

        android:layout_width="64dp"

        android:layout_height="64dp" />

    <!-- 定义一个竖直方向的LinearLayout,把QQ呢称与说说的文本框设置出来 -->

    <LinearLayout

        android:orientation="vertical"

        android:layout_width="match_parent"

        android:layout_height="wrap_content">

        <TextView

            android:id="@+id/tv_name"

            android:layout_width="wrap_content"

            android:layout_height="wrap_content"

            android:paddingLeft="8dp"

            android:textColor="#1D1D1C"

            android:textSize="20sp" />

        <TextView

            android:id="@+id/tv_says"

            android:layout_width="wrap_content"

            android:layout_height="wrap_content"

            android:paddingLeft="8dp"

            android:textColor="#1D1D1C"

            android:textSize="20sp" />

    </LinearLayout>

</LinearLayout>
3)新建两个类:Animal动物类用来存储动物的图标,name和说说;AnimalAdapter类继承BaseAdapter
package com.example.app03;

public class Animal

{

    private String aName;

    private String aSpeak;

    private int aIcon;

    public Animal() {

    }

    public Animal(String aName, String aSpeak, int aIcon) {

        this.aName = aName;

        this.aSpeak = aSpeak;

        this.aIcon = aIcon;

    }

    public String getaName() {

        return aName;

    }

    public String getaSpeak() {

        return aSpeak;

    }

    public int getaIcon() {

        return aIcon;

    }

    public void setaName(String aName) {

        this.aName = aName;

    }

    public void setaSpeak(String aSpeak) {

        this.aSpeak = aSpeak;

    }

    public void setaIcon(int aIcon) {

        this.aIcon = aIcon;

    }

}
package com.example.app03;

import android.content.Context;

import android.view.LayoutInflater;

import android.view.View;

import android.view.ViewGroup;

import android.widget.BaseAdapter;

import android.widget.ImageView;

import android.widget.TextView;

import java.util.LinkedList;

public class AnimalAdapter extends BaseAdapter

{

    private LinkedList<Animal> mData;

    private Context mContext;

    public AnimalAdapter(LinkedList<Animal> mData, Context mContext) {

        this.mData = mData;

        this.mContext = mContext;

    }

    @Override

    public int getCount() {

        return mData.size();

    }

    @Override

    public Object getItem(int position) {

        return null;

    }

    @Override

    public long getItemId(int position) {

        return position;

    }

    @Override

    public View getView(int position, View convertView, ViewGroup parent) {

        convertView = LayoutInflater.from(mContext).inflate(R.layout.animal_list,parent,false);

        ImageView img_icon = (ImageView) convertView.findViewById(R.id.iv_head);

        TextView txt_aName = (TextView) convertView.findViewById(R.id.tv_name);

        TextView txt_aSpeak = (TextView) convertView.findViewById(R.id.tv_says);

        img_icon.setBackgroundResource(mData.get(position).getaIcon());

        txt_aName.setText(mData.get(position).getaName());

        txt_aSpeak.setText(mData.get(position).getaSpeak());

        return convertView;

    }

}
4)MainActivity中代码
package com.example.app03;

import android.content.Context;

import android.support.v7.app.AppCompatActivity;

import android.os.Bundle;

import android.widget.ArrayAdapter;

import android.widget.ListView;

import java.util.LinkedList;

import java.util.List;

public class MainActivity extends AppCompatActivity {

    private List<Animal> mData = null;

    private Context mContext;

    private AnimalAdapter mAdapter = null;

    private ListView list_animal;

    @Override

    protected void onCreate(Bundle savedInstanceState) {

        super.onCreate(savedInstanceState);

        setContentView(R.layout.activity_main);

        mContext = MainActivity.this;

        list_animal = (ListView) findViewById(R.id.lv_test);

        mData = new LinkedList<Animal>();

        mData.add(new Animal("狗1", "我是狗1",  R.drawable.aa));

        mData.add(new Animal("狗2", "我是狗2",  R.drawable.bb));

        mData.add(new Animal("狗3", "我是狗3",  R.drawable.cc));

        mAdapter = new AnimalAdapter((LinkedList<Animal>) mData, mContext);

        list_animal.setAdapter(mAdapter);

    }

}
原文链接:http://www.runoob.com/w3cnote/android-tutorial-adapter.html
(四)适配器Adapter的更多相关文章
- 设计模式--适配器(Adapter)模式
今天学习另一个设计模式,适配器(Adapter)模式,这是一个共同方向,但有特殊要求,就应用到此设计模式.写到这里,想起很久以前,有写过一篇<ASP.NET的适配器设计模式(Adapter)&g ...
- 【原】模式之-适配器Adapter模式
适配器Adapter模式 适配器模式(Adapter Pattern)把一个类的接口变换成客户端所期待的的另一种接口,从而使原本因接口不匹配而无法在一起工作的两个类能够在一起工作. 模式所涉及的角色有 ...
- Ruby设计模式透析之 —— 适配器(Adapter)
转载请注明出处:http://blog.csdn.net/sinyu890807/article/details/9400153 此为Java设计模式透析的拷贝版,专门为Ruby爱好者提供的,不熟悉R ...
- 理解什么是适配器(adapter)和接口(interface)
● 适配器(adapter) In computing, adapter is a hardware device or software component that converts transm ...
- 设计模式学习心得<适配器 Adapter>
适配器模式(Adapter Pattern)是作为两个不兼容的接口之间的桥梁.这种类型的设计模式属于结构型模式,它结合了两个独立接口的功能. 这种模式涉及到一个单一的类,该类负责加入独立的或不兼容的接 ...
- 安卓开发笔记——打造万能适配器(Adapter)
为什么要打造万能适配器? 在安卓开发中,用到ListView和GridView的地方实在是太多了,系统默认给我们提供的适配器(ArrayAdapter,SimpleAdapter)经常不能满足我们的需 ...
- 适配器(Adapter)模式
适配器模式把一个类的接口变换成客户端所期待的另一种接口,从而使原本因接口不匹配而无法在一起工作的两个类能够在一起工作. 适配器模式的一些其他名称:变压器模式.转换器模式.包装(Wrapper)模式.适 ...
- Android Studio 学习笔记(四):Adapter和RecyclerView说明
在现版本中,滚动控件有多种,而相比于ListView,GridView,RecyclerView的用途更广,因此将前两者作为Adapter适配器的引入,再对RecyclerView进行简单讲解. MV ...
- 如何实现 axios 的自定义适配器 adapter
Axios 是一个非常优秀的基于 promise 的 HTTP 库,可以用在浏览器和 node.js 中.并且提供了很多便捷的功能,例如: 支持 Promise API 拦截请求和响应 转换请求数据和 ...
随机推荐
- android字母索引实现ListView定位
最近闲的很,没什么事干 ,在玩手机的时间看到android系统自带的那个通讯录软件对联系人的快速定位功能. 感觉这个功能也比较实用自己就试着自己去实现. 虽然网络上还是有大牛封闭好了的框架,但是如果 ...
- 【SQL server基础】object_id()函数
在SQLServer数据库中,如果查询数据库中是否存在指定名称的索引或者外键约束等,经常会用到object_id('name','type')方法,做笔记如下: ? 语法:object_id('obj ...
- ng-cli新建项目
tip:所有的命令是红色标签 , 链接为蓝色标签 使用ng-cli创建新的项目一般需要安装一些新的东西后才可以进行创建成功 1.需要先安装node.js 链接: https://nodejs.org ...
- Future类型的连锁的运用
Future类型的连锁的运用: 洗脸 刷牙 吃早饭 看电视 出门 串行: import scala.concurrent.{Await, Future} import scala.util.{Fail ...
- SpringBoot2+Netty打造通俗简版RPC通信框架
2019-07-19:完成基本RPC通信! 2019-07-22:优化此框架,实现单一长连接! 2019-07-24:继续优化此框架:1.增加服务提供注解(带版本号),然后利用Spring框架的在启动 ...
- Hexo 博客快速整合公众号导流工具,不用互推也能实现粉丝躺增!
readmore 插件简介 Hexo 整合 OpenWrite 平台的 readmore 插件,实现博客的每一篇文章自动增加阅读更多效果,关注公众号后方可解锁全站文章,从而实现博客流量导流到微信公众号 ...
- k8s pod访问不通外网问题排查
环境概况 自建k8s集群,主机操作系统ubuntu16.04,k8s版本v1.14, 集群网络方案calico-3.3.6. worker节点数50+,均为GPU物理服务器,服务器类型异构,如Nvid ...
- JS基本数据类型和引用数据类型的区别及深浅拷贝
前言 首先我们先来了解一下什么叫栈堆,基本数据类型与引用数据类型 1.栈(stack)和堆(heap)stack为自动分配的内存空间,它由系统自动释放:而heap则是动态分配的内存,大小也不一定会自动 ...
- 【NOIP2013】花匠
Description 花匠栋栋种了一排花,每株花都有自己的高度.花儿越长越大,也越来越挤.栋栋决定把这排中的一部分花移走,将剩下的留在原地,使得剩下的花能有空间长大,同时,栋栋希望剩下的花排列得比较 ...
- CS184.1X 计算机图形学导论 第3讲L3V1
二维空间的变换 L3V1这一课主要讲了二维空间的变换,包括平移.错切和旋转. 缩放 缩放矩阵 使用矩阵的乘法来完成缩放 缩放矩阵是一个对角矩阵,对角线上的值对应缩放倍数 错切(shear) 错切可以将 ...