
SpringBoot进阶教程(六十一)intellij idea project下建多个module搭建架构(下)
在上一篇文章《SpringBoot进阶教程(六十)intellij idea project下建多个module(上)》中,我们已经介绍了在intellij idea中创建project之后再分化多个module,今天再大致介绍介绍各个module之间详细工作的细分。 如果是不考虑细分多个module的话,可以看看这篇文章《SpringBoot入门教程(一)详解intellij idea搭建SpringBoot》。
v设计数据库
CREATE TABLE `useraccount` (

    `id` int(10) unsigned NOT NULL AUTO_INCREMENT,

    `username` varchar(255) NOT NULL,

    `age` int(10) NOT NULL,

    `phone` bigint NOT NULL,

    `email` varchar(255) NOT NULL,

    `account` varchar(100) NOT NULL UNIQUE,

    `pwd` varchar(255) NOT NULL,

    PRIMARY KEY (`id`)

)ENGINE=InnoDB AUTO_INCREMENT=1 DEFAULT CHARSET=utf8;

insert into `useraccount` values(1,'赵(dev)',23,158,'qq@qq.com','test001','test001');

insert into `useraccount` values(2,'钱(dev)',27,136,'126@126.com','test002','test002');

insert into `useraccount` values(3,'孙(dev)',31,159,'163@163.com','test003','test003');

insert into `useraccount` values(4,'李(dev)',35,130,'sina@sina.com','test004','test004');

select * from `useraccount`;
v引入mybatis
1.0 添加mybatis插件
在learn-persist的pom.xml中添加mybatis插件。
<build>

        <plugins>

            <plugin>

                <groupId>org.mybatis.generator</groupId>

                <artifactId>mybatis-generator-maven-plugin</artifactId>

                <version>${mybatis-generator.version}</version>

                <dependencies>

                    <dependency>

                        <groupId> mysql</groupId>

                        <artifactId> mysql-connector-java</artifactId>

                        <version>${mysql.version}</version>

                    </dependency>

                    <dependency>

                        <groupId>org.mybatis.generator</groupId>

                        <artifactId>mybatis-generator-core</artifactId>

                        <version>${mybatis-generator.version}</version>

                    </dependency>

                </dependencies>

                <configuration>

                    <!-- 自动生成的配置 -->

                    <configurationFile>src/main/resources/mybatis-config/mybatis-generator.xml</configurationFile>

                    <!--允许移动生成的文件 -->

                    <verbose>true</verbose>

                    <!-- 是否覆盖 -->

                    <overwrite>false</overwrite>

                </configuration>

            </plugin>

        </plugins>

    </build>
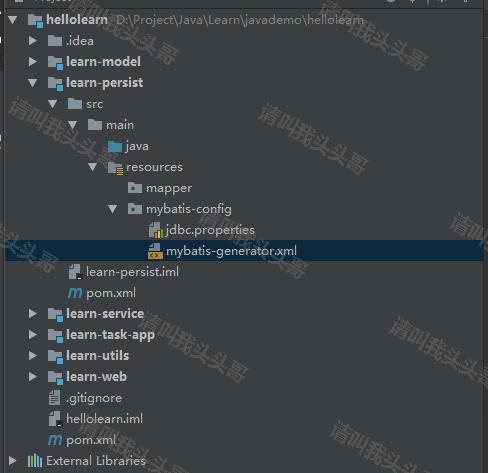
如上图,在learn-persist的resources下分别创建mapper和mybatis-config文件目录,并添加jdbc.properties和mybatis-generator.xml文件。
1.1 jdbc.properties
jdbc.driverClassName=com.mysql.jdbc.Driver

jdbc.url=jdbc:mysql://localhost:3306/mytest?useSSL=false

jdbc.username=toutou

jdbc.password=demo123456
1.2 mybatis-generator.xml
<?xml version="1.0" encoding="UTF-8"?>

<!DOCTYPE generatorConfiguration

        PUBLIC "-//mybatis.org//DTD MyBatis Generator Configuration 1.0//EN"

        "http://mybatis.org/dtd/mybatis-generator-config_1_0.dtd">

<generatorConfiguration>

    <properties resource="mybatis-config/jdbc.properties"/>

    <context id="DB2Tables"    targetRuntime="MyBatis3">

        <commentGenerator>

            <property name="suppressDate" value="true"/>

            <property name="suppressAllComments" value="true"/>

        </commentGenerator>

        <!--数据库链接地址账号密码-->

        <jdbcConnection driverClass="com.mysql.jdbc.Driver" connectionURL="${jdbc.url}" userId="${jdbc.username}" password="${jdbc.password}">

        </jdbcConnection>

        <javaTypeResolver>

            <property name="forceBigDecimals" value="false"/>

        </javaTypeResolver>

        <javaModelGenerator targetPackage="learn.model.po"

                            targetProject="../learn-model/src/main/java/">

            <property name="enableSubPackages" value="false" />

            <property name="trimStrings" value="true" />

        </javaModelGenerator>

        <sqlMapGenerator targetPackage="mapper"

                         targetProject="../learn-persist/src/main/resources">

            <property name="enableSubPackages" value="false" />

        </sqlMapGenerator>

        <javaClientGenerator targetPackage="learn.persist"

                             targetProject="../learn-persist/src/main/java/"

                             type="XMLMAPPER">

            <property name="enableSubPackages" value="false" />

        </javaClientGenerator>

        <!--生成对应表及类名-->

        <table tableName="useraccount" domainObjectName="UserAccount" enableCountByExample="false" enableUpdateByExample="false" enableDeleteByExample="false" enableSelectByExample="false" selectByExampleQueryId="false"></table>

    </context>

</generatorConfiguration>
mybatis-generator.xml更多介绍可以看这里。
1.3 版本号统一配置
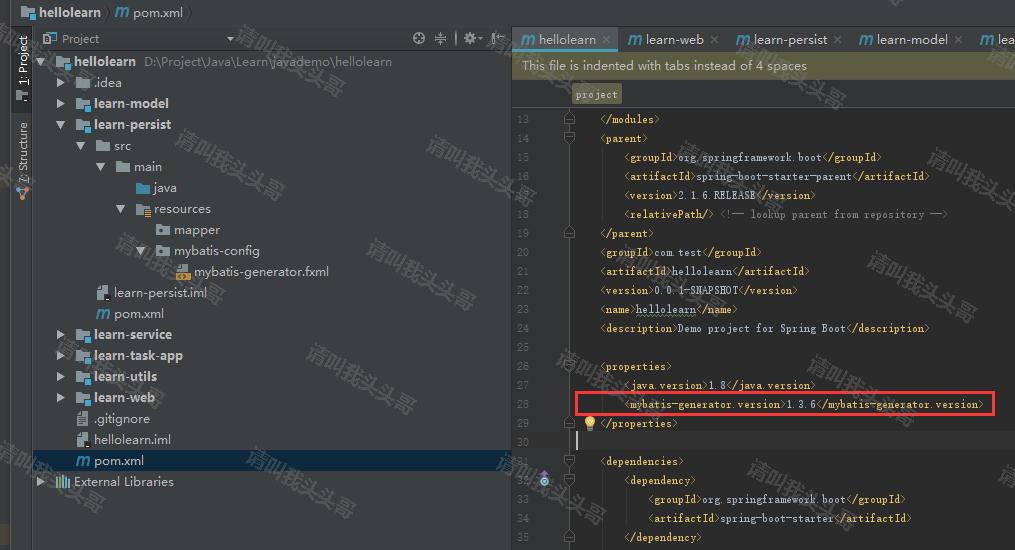
为了方便后续管理,将所有引入插件的版本号统一放在project(hellolearn)的pom.xml中统一控制,各子module(如learn-persist)的pom.xml中直接用 ${} 的方法使用。
例如:在hellolearn的pom.xml 属性中添加 < mybatis-generator.version>1.3.6< /mybatis-generator.version> ,在learn-persist的pom.xml中直接 < version>${mybatis-generator.version}< /version> 使用即可。
注意上面的"例如"中代码标签部分有空格是为了转义的,防止浏览器将"mybatis-generator.version"和"version"识别为html标签。
1.4 Maven Project 插件
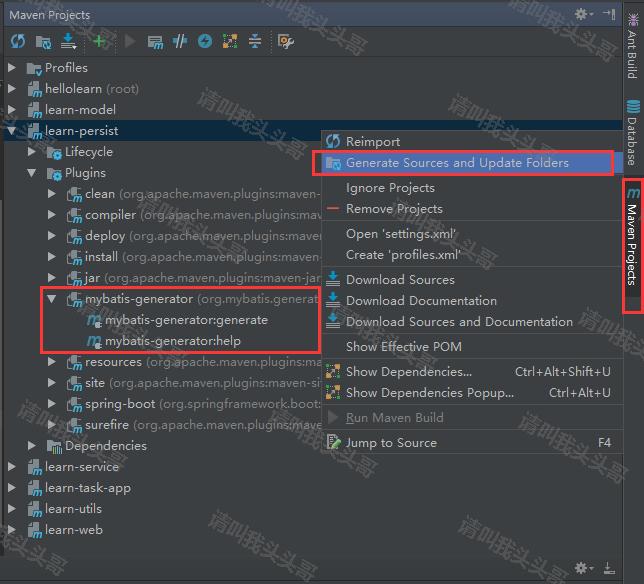
如上图,在idea右侧的maven project中就可以了对应的找到mybatis-generator的插件,如果找不到就右键maven project中的learn-persist,然后点击generate sources...。
1.5 运行mybatis generator插件
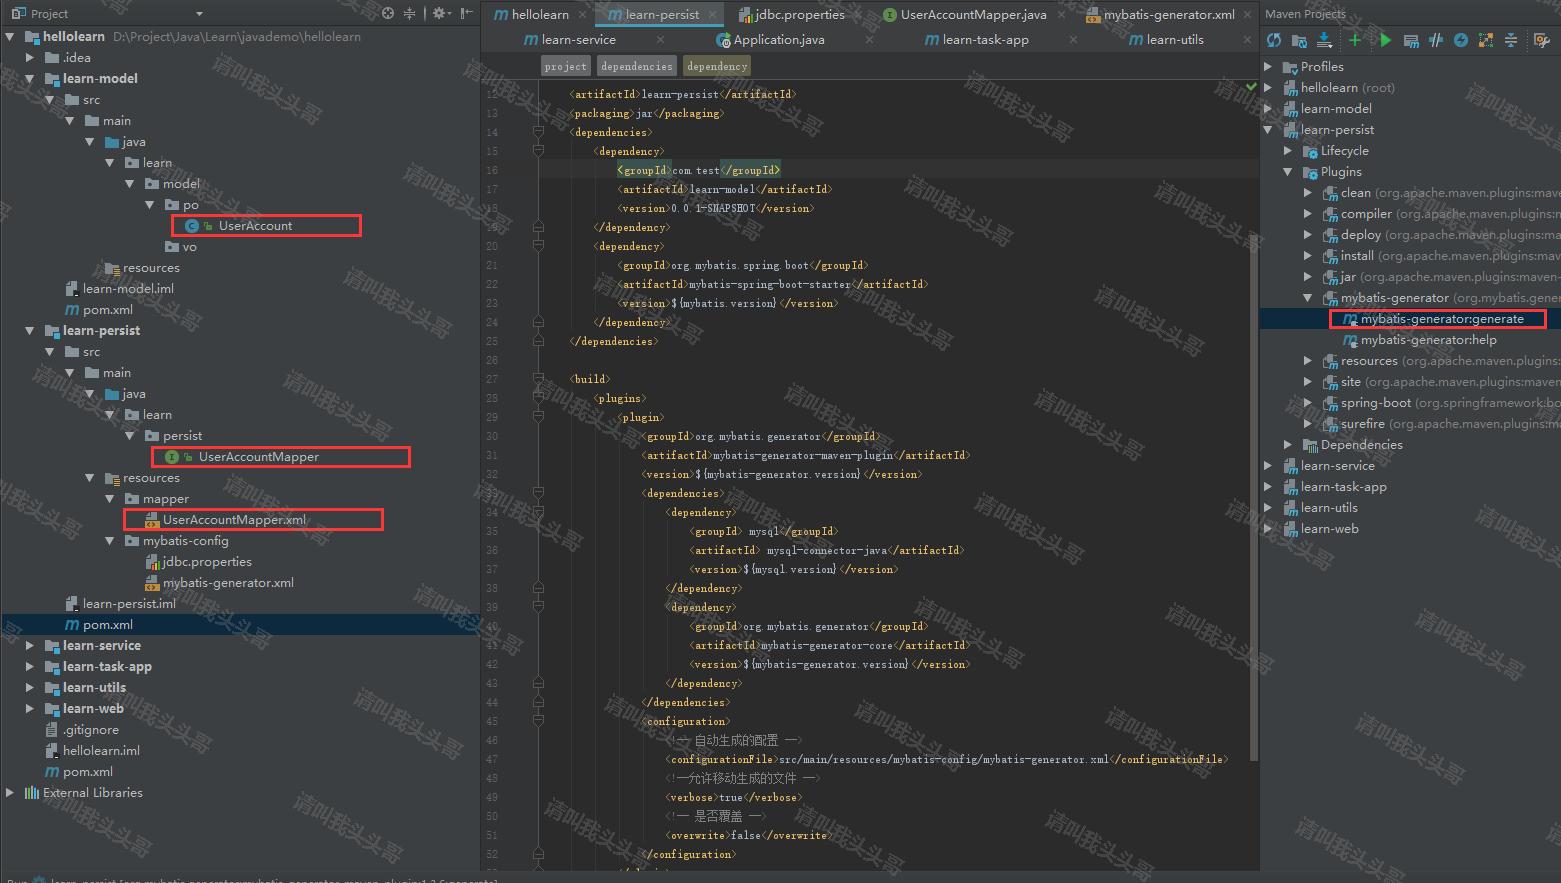
如上图,点击运行mybatis generator:generator插件,会对应生成左侧标红的三个文件。
v编写controller
2.0 添加result返回实体类
package learn.model.vo;

import java.io.Serializable;

/**

 * @author toutou

 * @date by 2019/07

 */

public class Result<T> implements Serializable {

    public int code;

    public String message;

    public T data;

    public int getCode() {

        return code;

    }

    public void setCode(int code) {

        this.code = code;

    }

    public String getMessage() {

        return message;

    }

    public void setMessage(String message) {

        this.message = message;

    }

    public T getData() {

        return data;

    }

    public void setData(T data) {

        this.data = data;

    }

    public static <T> Result<T> setSuccessResult(T t){

        Result<T> r = new Result<T>();

        r.setCode(200);

        r.setData(t);

        r.setMessage("success");

        return r;

    }

    public static <T> Result<T> setErrorResult(int tempCode, String messageTemp){

        Result<T> r = new Result<T>();

        r.setCode(tempCode);

        r.setMessage(messageTemp);

        return r;

    }

}
2.1 添加controller
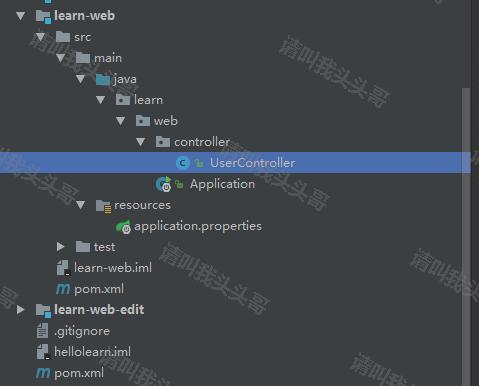
package learn.web.controller;

import learn.model.vo.Result;

import learn.model.vo.UserAccountVO;

import learn.service.*;

import org.springframework.beans.factory.annotation.Autowired;

import org.springframework.web.bind.annotation.GetMapping;

import org.springframework.web.bind.annotation.RequestParam;

import org.springframework.web.bind.annotation.RestController;

/**

 * @author toutou

 * @date by 2019/07

 */

@RestController

public class UserController {

    @Autowired

    UserAccountService userAccountService;

    @GetMapping("/user/hello")

    public String helloWorld() {

        return "hello world.";

    }

    @GetMapping("/user/getuser")

    public Result getUserAccountById(@RequestParam("uid") int id){

        UserAccountVO user = userAccountService.getUserAccountById(id);

        if(user != null){

            return Result.setSuccessResult(user);

        }else{

            return Result.setErrorResult(404, "用户不存在");

        }

    }

}
注意:getUserAccountById暂时用不上,可以先不添加。
2.2 添加aplication启动类
package learn.web;

import org.mybatis.spring.annotation.MapperScan;

import org.springframework.boot.SpringApplication;

import org.springframework.boot.autoconfigure.SpringBootApplication;

import org.springframework.context.annotation.ComponentScan;

/**

 * Created by toutou on 2019/7

 */

@SpringBootApplication

@ComponentScan(basePackages = {"learn.*" })

@MapperScan(basePackages = {"learn.persist"})

public class Application {

    public static void main(String[] args) {

        SpringApplication.run(Application.class, args);

    }

}
2.3 添加aplication.properties
server.port=8300

spring.profiles.active=@env@

#mybatis

mybatis.mapper-locations = classpath:mapper/*Mapper.xml
2.4 配置启动类
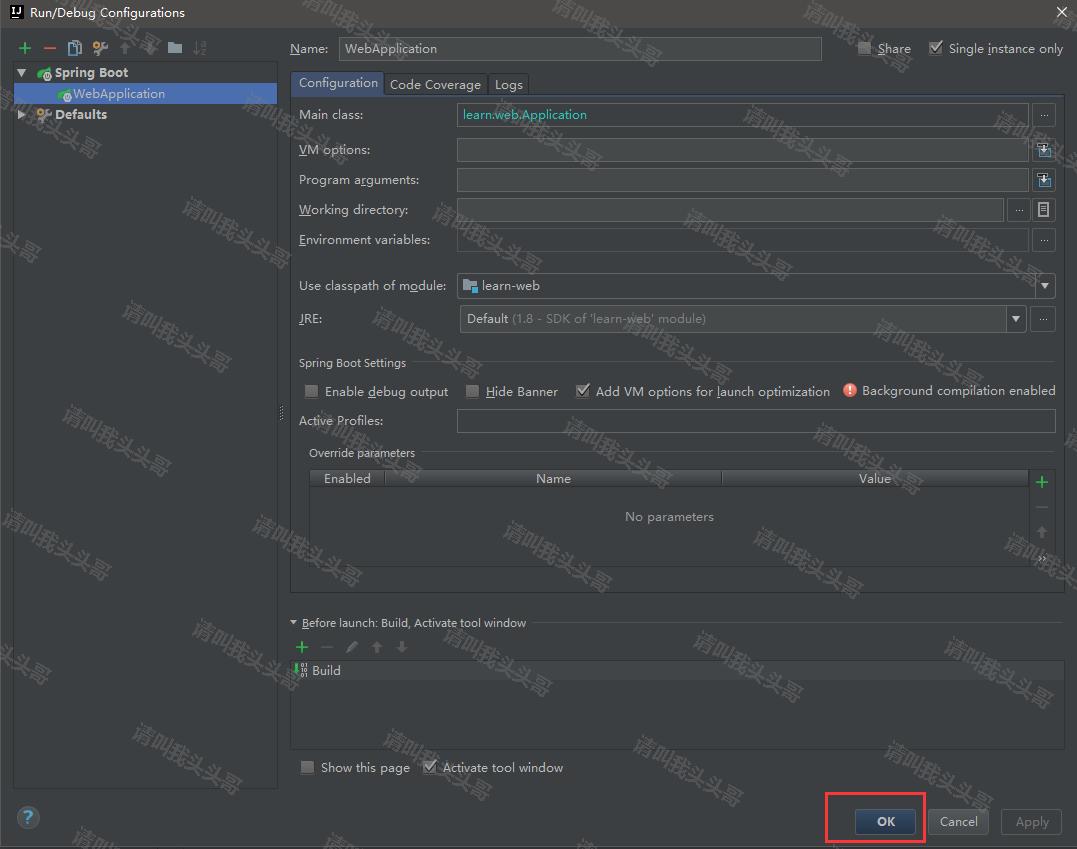
2.5 测试效果
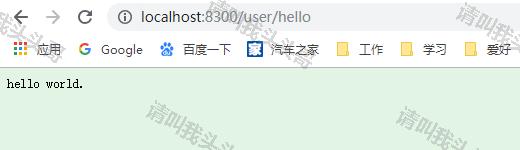
v编写service
3.1 添加Service
package learn.service;

import learn.model.vo.UserAccountVO;

/**

 * @author toutou

 * @date by 2019/07

 */

public interface UserAccountService {

    UserAccountVO getUserAccountById(Integer id);

}
3.2 实现Service
package learn.service.impl;

import learn.model.po.UserAccount;

import learn.model.vo.UserAccountVO;

import learn.persist.UserAccountMapper;

import learn.service.UserAccountService;

import org.springframework.beans.factory.annotation.Autowired;

import org.springframework.stereotype.Service;

/**

 * @author toutou

 * @date by 2019/07

 */

@Service

public class UserAccountServiceImpl implements UserAccountService{

    @Autowired

    UserAccountMapper userMapper;

    public UserAccountVO getUserAccountById(Integer id){

        UserAccountVO accountVO = null;

        UserAccount account = userMapper.selectByPrimaryKey(id);

        if (account != null) {

            accountVO = new UserAccountVO();

            accountVO.setId(account.getId());

            accountVO.setAccount(account.getAccount());

            accountVO.setAge(account.getAge());

            accountVO.setEmail(account.getEmail());

            accountVO.setUsername(account.getUsername());

            accountVO.setPhone(account.getPhone());

        }

        return accountVO;

    }

}
v配置设置
4.1 添加application.properties
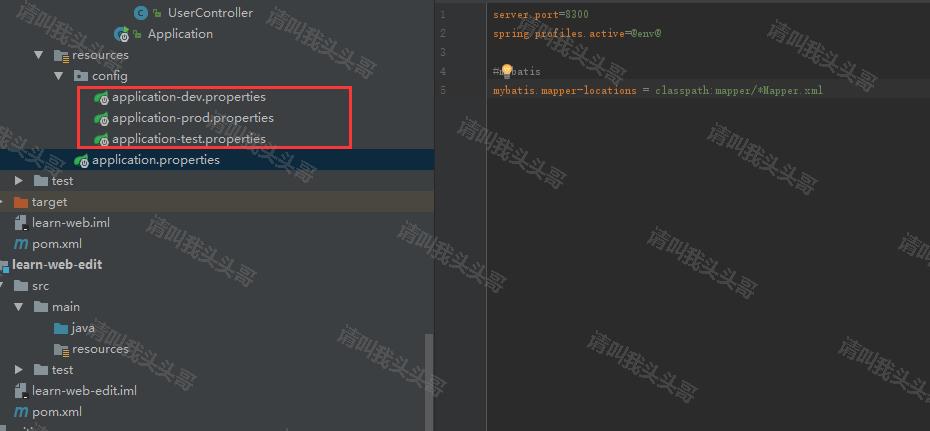
4.2 添加application.dev.properties
spring.datasource.url=jdbc:mysql://localhost:3306/mytest?useSSL=false&useUnicode=true&characterEncoding=utf-8&zeroDateTimeBehavior=convertToNull&serverTimezone=GMT%2b8

spring.datasource.username=toutou

spring.datasource.password=demo123456

spring.datasource.driver-class-name=com.mysql.jdbc.Driver
4.3 添加pom.xml配置
4.3.1 hellolearn pom.xml
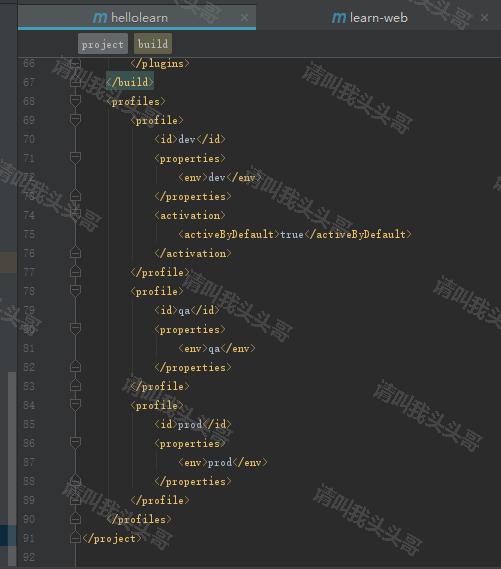
4.3.2 learn-web pom.xml
    <build>

        <filters>

            <filter>src/main/resources/config/application-${env}.properties</filter>

        </filters>

    </build>
4.4 更新application启动类
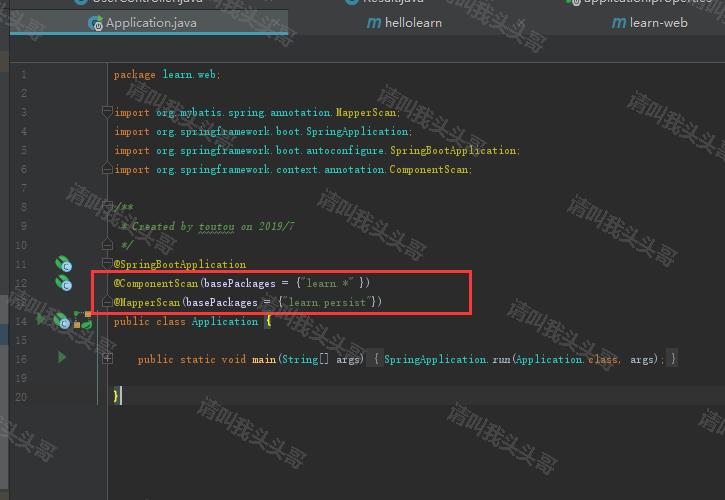
4.5 测试效果
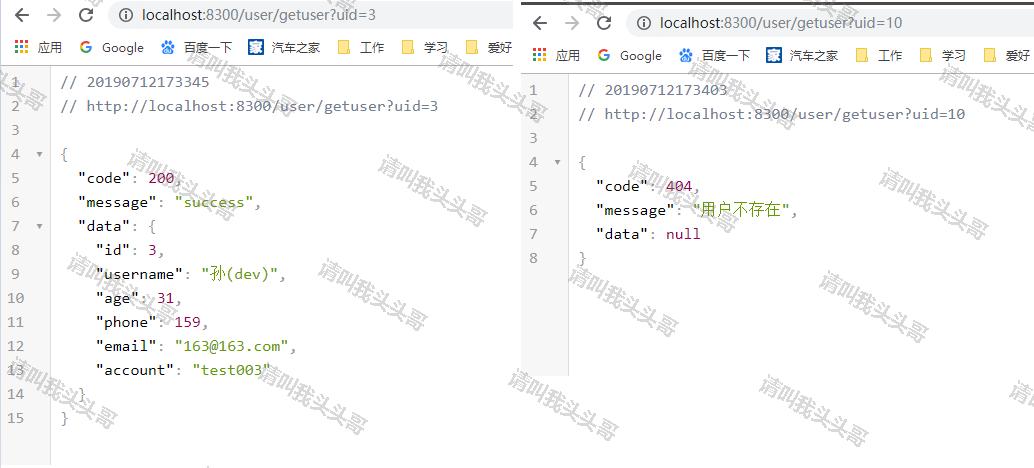
vlinux部署springboot
5.1 learn-web pom.xml中添加插件
    <build>

        <filters>

            <filter>src/main/resources/config/application-${env}.properties</filter>

        </filters>

        <plugins>

            <plugin>

                <groupId>org.springframework.boot</groupId>

                <artifactId>spring-boot-maven-plugin</artifactId>

                <configuration>

                    <mainClass>learn.web.Application</mainClass>

                    <classifier>exec</classifier>

                </configuration>

                <executions>

                    <execution>

                        <goals>

                            <goal>repackage</goal>

                        </goals>

                    </execution>

                </executions>

            </plugin>

        </plugins>

    </build>
5.2 hellolearn pom.xml中添加插件
    <build>

        <plugins>

            <plugin>

                <groupId>org.apache.maven.plugins</groupId>

                <artifactId>maven-jar-plugin</artifactId>

                <version>3.0.2</version>

                <configuration>

                    <excludes>

                        <exclude>**/profiles/</exclude>

                        <exclude>**/mybatis-generator/</exclude>

                    </excludes>

                </configuration>

            </plugin>

            <plugin>

                <groupId>org.apache.maven.plugins</groupId>

                <artifactId>maven-compiler-plugin</artifactId>

                <configuration>

                    <source>1.8</source>

                    <target>1.8</target>

                </configuration>

            </plugin>

        </plugins>

    </build>
注意:如果有用到profiles文件目录则exclude。
5.3 打包部署
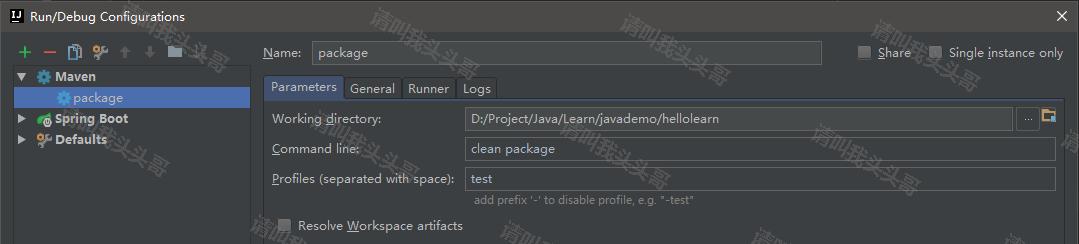
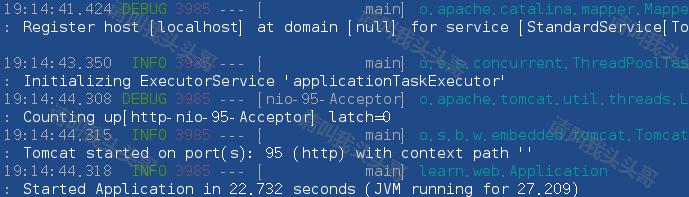
java -jar learn-web-0.0.1-SNAPSHOT-exec.jar --server.port=95
你可能会遇到的问题:
- Spring boot Field required a bean of type that could not be found
- Caused by: java.lang.IllegalStateException: Ambiguous mapping found. Cannot map 'xxxController' bean method
- mybatis-generator的maven插件使用异常(mybatis-generator-maven-plugin):generate failed: Exception getting JDBC Driver
- maven出现:Failed to execute goal on project ...: Could not resolve dependencies for project ...
- spring boot 项目打包时报错 Execution default of goal org.springframework.boot:spring-boot-maven-plugin:1.5.
- Failed to configure a DataSource: 'url' attribute is not specified and no embedded datasource could be configured.
v源码地址
https://github.com/toutouge/javademosecond/tree/master/hellolearn
作 者:请叫我头头哥
出 处:http://www.cnblogs.com/toutou/
关于作者:专注于基础平台的项目开发。如有问题或建议,请多多赐教!
版权声明:本文版权归作者和博客园共有,欢迎转载,但未经作者同意必须保留此段声明,且在文章页面明显位置给出原文链接。
特此声明:所有评论和私信都会在第一时间回复。也欢迎园子的大大们指正错误,共同进步。或者直接私信我
声援博主:如果您觉得文章对您有帮助,可以点击文章右下角【推荐】一下。您的鼓励是作者坚持原创和持续写作的最大动力!
SpringBoot进阶教程(六十一)intellij idea project下建多个module搭建架构(下)的更多相关文章
- SpringBoot进阶教程(六十)intellij idea project下建多个module搭建架构(上)
在 IntelliJ IDEA 中,没有类似于 Eclipse 工作空间(Workspace)的概念,而是提出了Project和Module这两个概念.多module有一个父maven工程,多个子工程 ...
- SpringBoot进阶教程(六十四)注解大全
在Spring1.x时代,还没出现注解,需要大量xml配置文件并在内部编写大量bean标签.Java5推出新特性annotation,为spring的更新奠定了基础.从Spring 2.X开始spri ...
- SpringBoot进阶教程(六十五)自定义注解
在上一篇文章<SpringBoot进阶教程(六十四)注解大全>中介绍了springboot的常用注解,springboot提供的注解非常的多,这些注解简化了我们的很多操作.今天主要介绍介绍 ...
- SpringBoot进阶教程(六十八)Sentinel实现限流降级
前面两篇文章nginx限流配置和SpringBoot进阶教程(六十七)RateLimiter限流,我们介绍了如何使用nginx和RateLimiter限流,这篇文章介绍另外一种限流方式---Senti ...
- SpringBoot进阶教程(七十一)详解Prometheus+Grafana
随着容器技术的迅速发展,Kubernetes已然成为大家追捧的容器集群管理系统.Prometheus作为生态圈Cloud Native Computing Foundation(简称:CNCF)中的重 ...
- SpringBoot进阶教程(六十二)整合Kafka
在上一篇文章<Linux安装Kafka>中,已经介绍了如何在Linux安装Kafka,以及Kafka的启动/关闭和创建发话题并产生消息和消费消息.这篇文章就介绍介绍SpringBoot整合 ...
- SpringBoot进阶教程(六十三)Jasypt配置文件加密
数据库密码直接明文写在配置中,对安全来说,是一个很大的挑战.一旦密码泄漏,将会带来很大的安全隐患.尤其在一些企业对安全性要求很高,因此我们就考虑如何对密码进行加密.本文着重介绍Jasypt对Sprin ...
- SpringBoot入门教程(二十一)IntelliJ IDEA配置Quartz启动项
本地运行:
- SpringBoot进阶教程(六十七)RateLimiter限流
在上一篇文章nginx限流配置中,我们介绍了如何使用nginx限流,这篇文章介绍另外一种限流方式---RateLimiter. v限流背景 在早期的计算机领域,限流技术(time limiting)被 ...
随机推荐
- 调用另一个进程,createprocess返回值正确,但被调进程连入口函数都没进入。
1.单独运行被调进程(提示atl不匹配). 2.编译选项设置为不依赖atl即可. 3.启发:能单独测试的,先单独测试.
- Ubuntu系统安装QQ等软件
1.安装deepin-wine环境:上https://github.com/wszqkzqk/deepin-wine-for-ubuntu页面下载zip包(或用git方式克隆),解压到本地文件夹,在文 ...
- 个人永久性免费-Excel催化剂功能第97波-快递单号批量查询物流信息
电商时代,快递已进千万家,做电商零售行业的,快递信息的再挖掘,也显得更有意义,是数据精细化运营中必不可少的一环.一般站在系统的角度,数据用于业务流转的增删改查使用,而对于分析需求来说,这些业务系统里集 ...
- [系列] Gin框架 - 数据绑定和验证
目录 概述 推荐阅读 概述 上篇文章分享了 Gin 框架使用 Logrus 进行日志记录,这篇文章分享 Gin 框架的数据绑定与验证. 有读者咨询我一个问题,如何让框架的运行日志不输出控制台? 解决方 ...
- Java 集合框架部分面试题
1.Java集合框架是什么?说出一些集合框架的优点? 每种编程语言中都有集合,最初的Java版本包含几种集合类:Vector.Stack.HashTable和Array.随着集合的广泛使用,Java1 ...
- .Net微信网页开发之使用微信JS-SDK调用微信扫一扫功能
前言: 之前有个项目需要调用微信扫描二维码的功能,通过调用微信扫码二维码功能,然后去获取到系统中生成的二维码信息.正好微信JS-SDK提供了调用微信扫一扫的功能接口,下面让我们来看看是如何实现的吧. ...
- Vue双向绑定原理及其实现
在之前面试的时候被面试官问到是否了解Vue双向绑定的原理,其实自己之前看过双向绑定的原理,但也就是粗略的了解,但是没有深入.面试官当时让我手写一个原理,但是就蒙了
- firewalld防火墙命令规则设置
1.firewalld的基本使用 启动/关闭: systemctl start/stop firewalld 查看状态: systemctl status firewalld 开机启用/禁用 : sy ...
- 【JDK】JDK源码分析-LinkedHashMap
概述 前文「JDK源码分析-HashMap(1)」分析了 HashMap 主要方法的实现原理(其他问题以后分析),本文分析下 LinkedHashMap. 先看一下 LinkedHashMap 的类继 ...
- 【Spring】The matching wildcard is strict……
applicationContext.xml 文件抛出了这个异常信息. 解决方法: 需要在 namespace 后加上对应的 schemaLocation,如下所示: <?xml version ...