[Part 1] Ubuntu 16.04安装和配置QT5 | Part-1: Install and Configure Qt5 on Ubuntu 16.04
本文首发于个人博客https://kezunlin.me/post/91842b71/,欢迎阅读!
Part-1: Install and Configure Qt5 on Ubuntu 16.04
Series
- Part-1: Install and Configure Qt5 on Ubuntu 16.04
- Part-2: Install and Configure VTK 8.1.0 from source with Qt5 on Ubuntu 16.04
- Part-3: Install and Configure PCL 1.8.1 with vtk qt support on Ubuntu 16.04 from source
- Part-4: Install and Configure PCL 1.8.1 with vtk qt support on windows 10 from source
Guide
- qt: 5.7.0
- qmake: 3.0 based on Qt 5.7.0
- qtcreator: 3.5.1 based on Qt 5.5.1
purge existing qt5 and qt4
sudo apt-get purge qt5-default qtcreator

sudo apt-get purge qt4-designer qt4-dev-tools
install qt57
In addition, building graphical Qt applications requires OpenGL libraries and headers installed. On Ubuntu and other Debian-based Linux systems you can get OpenGL and the minimal set of development tools by installing the packages libgl1-mesa-dev and build-essential, i.e. by running this command:
sudo apt-get install build-essential libgl1-mesa-dev
Download qt and install.
sudo apt-get install build-essential libgl1-mesa-dev

wget http://download.qt.io/official_releases/qt/5.7/5.7.0/qt-opensource-linux-x64-5.7.0.run

chmod +x qt-opensource-linux-x64-5.7.0.run

./qt-opensource-linux-x64-5.7.0.run
install to
/opt/Qt5.7.0
cd /opt

sudo ln -s /opt/Qt5.7.0 qt
add qt bin to path
vim .bashrc

# added by kzl

export PATH=/opt/cuda-8.0/bin:$PATH

export PATH=/opt/MATLAB/R2016b/bin:$PATH

export PATH=/opt/qt/5.7/gcc_64/bin:$PATH
qt.conf for ld.so.conf.d
cd /etc/ld.so.conf.d

sudo vim qt.conf

/opt/qt/5.7/gcc_64/lib

sudo ldconfig
or only install qtcreator (find_package error for qt5x11extra-config.cmake)
sudo apt-get install qt5-default qtcreator

sudo apt-get install qt4-designer qt4-dev-tools
qtchooser
add qt57.conf
cat /usr/share/qtchooser/qt57.conf

/opt/qt/5.7/gcc_64/bin

/opt/qt/5.7/gcc_64/lib

# link to qt57

cd /usr/lib/x86_64-linux-gnu/qtchooser

sudo ln -s /usr/share/qtchooser/qt57.conf qt57.conf
link to default
cd /usr/lib/x86_64-linux-gnu/qt-default/qtchooser

sudo rm default.conf

sudo ln -s /usr/share/qtchooser/qt57.conf default.conf

ls -l default.conf

default.conf -> /usr/share/qtchooser/qt57.conf
qt conf
/usr/share/qtchooser/
- qt4-x86_64-linux-gnu.conf (FILE)
- qt5-x86_64-linux-gnu.conf (FILE)
- qt57.conf (FILE)
/usr/lib/x86_64-linux-gnu/qtchooser/
- 4.conf (link)
- 5.conf (link)
- qt4.conf (link)
- qt5.conf (link)
- qt57.conf (link)
/usr/lib/x86_64-linux-gnu/qt-default/qtchooser/
- default.conf (link) qt57.conf
qtchooser
which qtchooser

/usr/bin/qtchooser

qtchooser -l

4

5

default

qt4-x86_64-linux-gnu

qt4

qt5-x86_64-linux-gnu

qt5
qtchooser env
qtchooser -print-env

QT_SELECT="default"

QTTOOLDIR="/opt/qt/5.7/gcc_64/bin"

QTLIBDIR="/opt/qt/5.7/gcc_64/lib"
export QT_QPA_PLATFORM_PLUGIN_PATH
vim .bashrc

export QT_QPA_PLATFORM_PLUGIN_PATH=/opt/qt/5.7/gcc_64/plugins/platforms
otherwise,errors may occur.
Failed to load platform plugin "xcb".
Qtcreator Tutorial
install qtcreator
sudo apt-get -y install qtcreator

qtcreator -version

Qt Creator 3.5.1 based on Qt 5.5.1
create application
Start qtcreator and create a Qt Widget Application named hello.
add resource file
Add a resource file named resource.qrc.
hello-->right click--> Add New... --->qt---> qt resource file---> name resource---> generate resource.qrc
and then import images to resource.qrc
Resources | resource.qrt--->right click---> Add Prefix...---> name /prefix

Resources | resource.qrt | /prefix--->right click ---> Add Existing Files... ---> choose images ---> OK
use resource in mainwindow.ui
button ---> property page ---> icon ---> Choose Resource... ---> select image ---> OK
Qt slots
method 1
steps:
mainwindow.ui ---> choose button ---> right click ---> Go to slot... ---> choose clicked() ---> OK
will add slots in mainwindow.h automatically
private slots:

    void on_pushButtonOK_clicked();
and in mainwindow.cpp
void MainWindow::on_pushButtonOK_clicked()

{

}
Tips: if we use on_pushButtonOK_clicked style, there is no need to connect with slots in MainWindow constructor by hand.
method 2 (OK)
add slots in mainwindow.h by hand
private slots:

    void pushButtonCancel_clicked();
and in mainwindow.cpp
void MainWindow::pushButtonCancel_clicked()

{

}
connect button with slot in mainwindow.cpp
MainWindow::MainWindow(QWidget *parent) :

    QMainWindow(parent),

    ui(new Ui::MainWindow)

{

    ui->setupUi(this);

    // connect

    connect(ui->pushButtonCancel, SIGNAL(clicked()), this, SLOT(pushButtonCancel_clicked()));

}
Code Example
folder
folder structure like this:
$ tree hello/

hello/

├── CMakeLists.txt

├── hello.pro

├── hello.pro.user

├── images

│   ├── kezunlin_logo.png

│   ├── logo.svg

│   └── searchicon.png

├── main.cpp

├── mainwindow.cpp

├── mainwindow.h

├── mainwindow.ui

└── resource.qrc

1 directory, 11 files
code
mainwinow.h
#ifndef MAINWINDOW_H

#define MAINWINDOW_H

#include <QMainWindow>

namespace Ui {

class MainWindow;

}

class MainWindow : public QMainWindow

{

    Q_OBJECT

public:

    explicit MainWindow(QWidget *parent = 0);

    ~MainWindow();

private slots:

    void on_pushButtonOK_clicked(); // method1

    void pushButtonCancel_clicked(); // method2

private:

    Ui::MainWindow *ui;

};

#endif // MAINWINDOW_H
mainwindow.cpp
#include "mainwindow.h"

#include "ui_mainwindow.h"

#include <QMessageBox>

MainWindow::MainWindow(QWidget *parent) :

    QMainWindow(parent),

    ui(new Ui::MainWindow)

{

    ui->setupUi(this);

    // connect

    connect(ui->pushButtonCancel, SIGNAL(clicked()), this, SLOT(pushButtonCancel_clicked()));

}

MainWindow::~MainWindow()

{

    delete ui;

}

void MainWindow::on_pushButtonOK_clicked()

{

    QString text = ui->lineEditName->text();

    QMessageBox::information(this, "OK", text);

    ui->pushButtonOK->setText( tr("(OK. click me)") );

}

void MainWindow::pushButtonCancel_clicked()

{

    QString text = ui->lineEditName->text();

    QMessageBox::information(this, "Cancel", text);

    ui->pushButtonCancel->setText( tr("(Cancel.click me)") );

}
main.cpp
#include "mainwindow.h"

#include <QApplication>

int main(int argc, char *argv[])

{

    QApplication a(argc, argv);

    MainWindow w;

    w.show();

    return a.exec();

}
CMakeLists.txt
cmake_minimum_required(VERSION 2.8.8)

project(helloworld)

# Find includes in corresponding build directories

set(CMAKE_INCLUDE_CURRENT_DIR ON)

# Instruct CMake to run moc automatically when needed.

set(CMAKE_AUTOMOC ON)

# ${QT_INCLUDE_DIRS} ${QT_LIBRARIES} and so on are all Qt4 Macro Definitions!!!!!

# Find the QtWidgets library

find_package(Qt5Core)

find_package(Qt5Widgets)

find_package(Qt5Gui)

find_package(Qt5OpenGL)

find_package(Qt5Xml)

#message( [qt] ${Qt5Core_INCLUDE_DIRS} )

#message( [qt] ${Qt5Core_LIBRARIES} )

#message( [qt] ${Qt5Widgets_INCLUDE_DIRS} )

#message( [qt] ${Qt5Widgets_LIBRARIES} )

# cpp files

aux_source_directory(. SRC_LIST)

# ui files

qt5_wrap_ui(ui_FILES mainwindow.ui)

# resource files

qt5_add_resources(qrc_FILES resource.qrc)

message( [Main] ${SRC_LIST} ) # ./main.cpp./mainwindow.cpp

message( [Main] ${ui_FILES} ) # build/ui_mainwindow.h

message( [Main] ${qrc_FILES} )# build/qrc_resource.cpp

# Tell CMake to create the helloworld executable

add_executable(${PROJECT_NAME} ${SRC_LIST} ${ui_FILES} ${qrc_FILES})

qt5_use_modules(${PROJECT_NAME} Core Widgets OpenGL Xml Gui)

# Use the Widgets module from Qt 5.

#qt5_use_modules(helloworld Widgets)

# link other libraries

#target_link_libraries (${PROJECT_NAME} ${SPEC_OPENCV_LIBS})
CMakeLists.txt 2
cmake_minimum_required(VERSION 3.0)

set(PROJECT_NAME demo)

set(CMAKE_BINARY_DIR ${CMAKE_SOURCE_DIR}/bin)  # bin/

set(EXECUTABLE_OUTPUT_PATH ${CMAKE_BINARY_DIR})

set(LIBRARY_OUTPUT_PATH ${CMAKE_BINARY_DIR})

set(CMAKE_CXX_STANDARD 11)

#set(CMAKE_PREFIX_PATH ${QTDIR})

set(CMAKE_AUTOMOC ON)

set(CMAKE_AUTOUIC ON)

set(CMAKE_AUTORCC ON)

# QT5_DIR /opt/Qt5.7.0/5.7/gcc_64/lib/cmake/Qt5

find_package(Qt5 REQUIRED Widgets Core Gui Network OpenGL)

find_package(OpenCV REQUIRED COMPONENTS core highgui imgproc features2d calib3d )

find_package(Protobuf REQUIRED) # 3.6.1

find_package(VTK REQUIRED) # 8.1.2

include(${VTK_USE_FILE})

MESSAGE( [Main] " VTK_INCLUDE_DIRS = ${VTK_INCLUDE_DIRS}")

MESSAGE( [Main] " VTK_LIBRARIES = ${VTK_LIBRARIES}")

find_package(PCL REQUIRED) # 1.9.1

#find_package(PCL REQUIRED COMPONENTS common io filters visualization)

link_directories(${PCL_LIBRARY_DIRS})

add_definitions(${PCL_DEFINITIONS})

message ([main] "PCL_DIR = ${PCL_DIR}")

message ([main] "PCL_FOUND = ${PCL_FOUND}")

message ([main] "PCL_INCLUDE_DIRS = ${PCL_INCLUDE_DIRS}")

message ([main] "PCL_LIBRARIES = ${PCL_LIBRARIES}")

message ([main] "PCL_LIBRARY_DIRS = ${PCL_LIBRARY_DIRS}")

message ([main] "PCL_COMMON_LIBRARIES = ${PCL_COMMON_LIBRARIES}")

message ([main] "PCL_IO_LIBRARIES = ${PCL_IO_LIBRARIES}")

message ([main] "PCL_FILTERS_LIBRARIES = ${PCL_FILTERS_LIBRARIES}")

message ([main] "PCL_VISUALIZATION_LIBRARIES = ${PCL_VISUALIZATION_LIBRARIES}")

include_directories(

	./ # current folder

#	${GFLAGS_INCLUDE_DIRS}

#	${GLOG_INCLUDE_DIRS}

#	${GTEST_INCLUDE_DIRS}

	${PROTOBUF_INCLUDE_DIRS}

	${Boost_INCLUDE_DIRS}

	${OpenCV_INCLUDE_DIRS}

	${VTK_INCLUDE_DIRS}

	${PCL_INCLUDE_DIRS}

)

set(SOURCE_FILES

    main.cpp

    MainWindow.cpp

    ./proto/camera_image.pb.cc

    ./proto/point_cloud.pb.cc

)

set(RESOURCE_FILE resource.qrc)

add_executable(${PROJECT_NAME} ${SOURCE_FILES} ${RESOURCE_FILE})

target_link_libraries(${PROJECT_NAME}

    Qt5::Widgets Qt5::Gui Qt5::Core Qt5::OpenGL Qt5::Network

	${Boost_LIBRARIES}

	${PROTOBUF_LIBRARIES}

	${OpenCV_LIBRARIES}

	${VTK_LIBRARIES}

	${PCL_LIBRARIES}

    pthread

    rt

)
cmake
cd hello

mkdir build

cd build

cmake ..

make
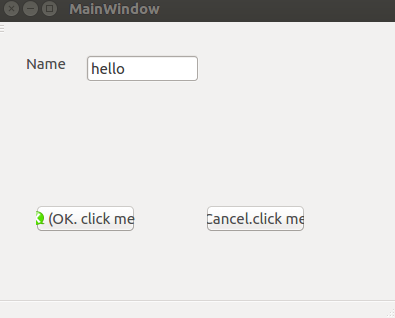
run
./helloworld
screen snapshot like this:
Reference
- Install_Qt_5_on_Ubuntu
- install-qt-creator-on-ubuntu-16-04
- getting-started-qt-and-qt-creator-linux
- failed-to-load-platform-plugin-xcb
- deploying-qt-applications-on-linux-and-windows-3
- cmake with qt
- cmake-manual
- add resource
- qt slots
History
- 20180108: created.
Copyright
- Post author: kezunlin
- Post link: https://kezunlin.me/post/91842b71/
- Copyright Notice: All articles in this blog are licensed under CC BY-NC-SA 3.0 unless stating additionally.
[Part 1] Ubuntu 16.04安装和配置QT5 | Part-1: Install and Configure Qt5 on Ubuntu 16.04的更多相关文章
- ubuntu 16.04源码编译和配置caffe详细教程 | Install and Configure Caffe on ubuntu 16.04
本文首发于个人博客https://kezunlin.me/post/b90033a9/,欢迎阅读! Install and Configure Caffe on ubuntu 16.04 Series ...
- Ubuntu 16.04 安装和配置 Redis
因为发现之前手动安装的 redis 与现有的教程不一样,所以总结统一一下安装的标准步骤. 安装依赖项 为了获取最新版本的 Redis,我们将从源代码进行编译和安装.下载源代码之前,需要先安装一些编译所 ...
- Ubuntu 18.04 安装、配置和美化
本文章修改自inkss的博文 为什么要修改原文? 本来我是想自己写这么一篇的,但是没想到在百度一搜,居然一篇好文.我之前没看到,真是可惜. 这篇文章主要是帮助我记录一些东西,如题. 原文虽然不错,但是 ...
- Ubuntu 16.04LTS 安装和配置Bochs
环境:VMWare14+Ubuntu16.04 安装Bochs2.6.9 1.去官网下载 下载 bochs-2.6.9.tar.gz 2.安装一系列的包 因为Bochs 需要在 X11 环境下运行,因 ...
- Ubuntu系统下安装并配置hive-2.1.0
说在前面的话 默认情况下,Hive元数据保存在内嵌的Derby数据库中,只能允许一个会话连接,只适合简单的测试.实际生产环境中不使用,为了支持多用户会话, 则需要一个独立的元数据库,使用MySQL作为 ...
- [转]:Ubuntu 下Apache安装和配置
[转]:Ubuntu 下Apache安装和配置_服务器应用_Linux公社-Linux系统门户网站 https://www.linuxidc.com/Linux/2013-06/85827.htm ...
- ubuntu server nginx 安装与配置
ubuntu server nginx 安装与配置 一:关于nginx http://wiki.ubuntu.org.cn/Nginx http://nginx.org/cn http://wiki. ...
- P6 EPPM 16 R1安装和配置文档
白桃花心木P6企业项目组合管理文档库 描述 链接 下载 零件号 16 R1用户和集成文档 查看库 下载 E68199-01 16 R1安装和配置文档 查看库 下载 E68198-01 描述 链接 ...
- Ubuntu 16.04安装和配置Sublime Text 3
1.安装Sublime Text 3 首先添加sublime text 3的仓库: sudo add-apt-repository ppa:webupd8team/sublime-text-3 根据提 ...
随机推荐
- Spring Boot项目中如何定制拦截器
本文首发于个人网站:Spring Boot项目中如何定制拦截器 Servlet 过滤器属于Servlet API,和Spring关系不大.除了使用过滤器包装web请求,Spring MVC还提供Han ...
- 百万年薪python之路 -- socket()模块的用法
socket()模块的用法: import socket socket.socket(socket_family,socket_type,protocal=0) socket_family 可以是 A ...
- CentOS7 下升级Python版本
来博客园的第一篇博客,以后要坚持养成记录.分享的习惯啊,这样生活才会有痕迹~ 服务器版本:CentOS 7.3 64位 旧Python版本:2.7.5 新Python版本:3.8.0 说明:本次配置使 ...
- Sublime Text 常用快捷键(Mac环境)
Shift + Cmd + P 显示命令面板 Cmd + P 快速查找目录和文件,跳转到任意地方 Cmd + P 输入 @ ,可以查找文件中的函数 Cmd + P 输入 # ,可以查找文件中的字符 C ...
- CentOS 7 的root口令破解两种方法
破解CentOS7的root口令 方法一: 第一步: 启动时任意键暂停启动 按-e-键进入编辑模式 第二步: 1.将光标移动至蓝框处linux16开头的行,添加内核参数 rd.break 2.按ctr ...
- Life is short, I love Python~!
python学习目录 一:计算机基础 计算机基础 二:python基础 python基础 三:函数 函数 内置函数匿名函数 迭代器生成器 四:文件处理&异常 文件处理 异常处理 五:模块 常用 ...
- 【MySQL】MySQL数据类型
MySQL表数据存储大小说明 MySQL中规定,任何一条记录(数据表中每行数据)理论上的最大存储容量为 2^16 - 1 (Bytes) = 65535字节. MySQL数据类型思维导图 MySQL数 ...
- ProvisionedAppxPackage VS AppxPackage
正文 先来说说问题的由来. 在 Preinstall 的 component 中,有一支 component 叫做 MS_StartApp,这个 component 的行为是在预安装时为目标机器装入一 ...
- 全栈项目|小书架|服务器开发-Koa2 全局异常处理
什么是异常 做开发的基本都知道异常,像Android开发中常见的ANR异常.空指针异常,服务器开发中经常遇到的异常404,500异常,还有一些其他常见的异常,具体可见HTTP状态码. 基本上这些异常可 ...
- [考试反思]1025csp-s模拟测试87:生存
想起一句话 课上求生存,课下求发展 发展还好说,如何生存? 生存很困难... 没什么可抱怨的.有AK的.高分的也很多. 该说的在<Dust>里说完了,安静会吧. 这场rank43怎么追? ...