Centos 7.4 源码 Nginx 安装
一、安装编译工具及库文件
yum -y install make zlib zlib-devel gcc-c++ libtool openssl openssl-devel
二、首先要安装 PCRE
PCRE 作用是让 Nginx 支持 Rewrite 功能。
1、下载 PCRE 安装包,下载地址: http://downloads.sourceforge.net/project/pcre/pcre/8.35/pcre-8.35.tar.gz
[root@bogon src]# wget http://downloads.sourceforge.net/project/pcre/pcre/8.35/pcre-8.35.tar.gz

2、解压安装包:
[root@bogon src]# tar zxvf pcre-8.35.tar.gz
3、进入安装包目录
[root@bogon src]# cd pcre-8.35
4、编译安装
[root@bogon pcre-8.35]# ./configure

[root@bogon pcre-8.35]# make && make install
5、查看pcre版本
[root@bogon pcre-8.35]# pcre-config --version

安装 Nginx
1、下载 Nginx,下载地址:http://nginx.org/download/nginx-1.6.2.tar.gz
[root@bogon src]# wget http://nginx.org/download/nginx-1.6.2.tar.gz
 2、解压安装包
[root@bogon src]# tar zxvf nginx-1.6.2.tar.gz
3、进入安装包目录
[root@bogon src]# cd nginx-1.6.2
4、编译安装
[root@bogon nginx-1.6.2]# ./configure --prefix=/usr/local/webserver/nginx --with-http_stub_status_module --with-http_ssl_module --with-pcre=/usr/local/src/pcre-8.35

[root@bogon nginx-1.6.2]# make

[root@bogon nginx-1.6.2]# make install
5、查看nginx版本
[root@bogon nginx-1.6.2]# /usr/local/webserver/nginx/sbin/nginx -v

到此,nginx安装完成。
Nginx 配置
创建 Nginx 运行使用的用户 www:
[root@bogon conf]# /usr/sbin/groupadd www

[root@bogon conf]# /usr/sbin/useradd -g www www
配置nginx.conf ,将/usr/local/webserver/nginx/conf/nginx.conf替换为以下内容
[root@bogon conf]#  cat /usr/local/webserver/nginx/conf/nginx.conf

user www www;

worker_processes 2; #设置值和CPU核心数一致

error_log /usr/local/webserver/nginx/logs/nginx_error.log crit; #日志位置和日志级别

pid /usr/local/webserver/nginx/nginx.pid;

#Specifies the value for maximum file descriptors that can be opened by this process.

worker_rlimit_nofile 65535;

events

{

  use epoll;

  worker_connections 65535;

}

http

{

  include mime.types;

  default_type application/octet-stream;

  log_format main  '$remote_addr - $remote_user [$time_local] "$request" '

               '$status $body_bytes_sent "$http_referer" '

               '"$http_user_agent" $http_x_forwarded_for';


#charset gb2312;


  server_names_hash_bucket_size 128;

  client_header_buffer_size 32k;

  large_client_header_buffers 4 32k;

  client_max_body_size 8m;


  sendfile on;

  tcp_nopush on;

  keepalive_timeout 60;

  tcp_nodelay on;

  fastcgi_connect_timeout 300;

  fastcgi_send_timeout 300;

  fastcgi_read_timeout 300;

  fastcgi_buffer_size 64k;

  fastcgi_buffers 4 64k;

  fastcgi_busy_buffers_size 128k;

  fastcgi_temp_file_write_size 128k;

  gzip on;

  gzip_min_length 1k;

  gzip_buffers 4 16k;

  gzip_http_version 1.0;

  gzip_comp_level 2;

  gzip_types text/plain application/x-javascript text/css application/xml;

  gzip_vary on;


  #limit_zone crawler $binary_remote_addr 10m;

 #下面是server虚拟主机的配置

 server

  {

    listen 80;#监听端口

    server_name localhost;#域名

    index index.html index.htm index.php;

    root /usr/local/webserver/nginx/html;#站点目录

      location ~ .*\.(php|php5)?$

    {

      #fastcgi_pass unix:/tmp/php-cgi.sock;

      fastcgi_pass 127.0.0.1:9000;

      fastcgi_index index.php;

      include fastcgi.conf;

    }

    location ~ .*\.(gif|jpg|jpeg|png|bmp|swf|ico)$

    {

      expires 30d;

  # access_log off;

    }

    location ~ .*\.(js|css)?$

    {

      expires 15d;

   # access_log off;

    }

    access_log off;

  }

}
检查配置文件ngnix.conf的正确性命令:
[root@bogon conf]# /usr/local/webserver/nginx/sbin/nginx -t

启动 Nginx
Nginx 启动命令如下:
[root@bogon conf]# /usr/local/webserver/nginx/sbin/nginx

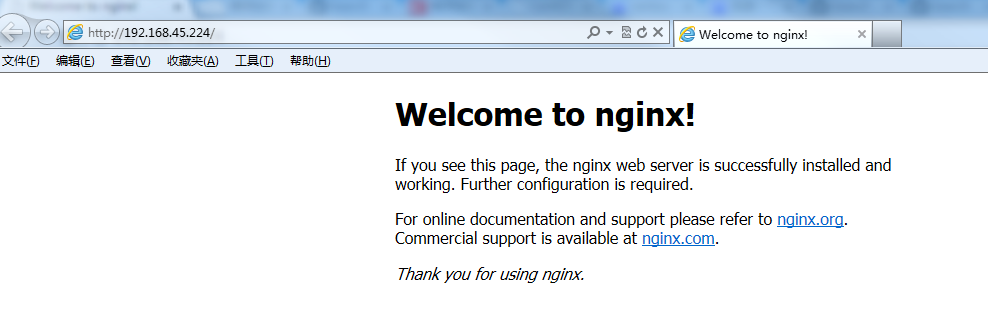
访问站点
从浏览器访问我们配置的站点ip:
Nginx 其他命令
以下包含了 Nginx 常用的几个命令:
/usr/local/webserver/nginx/sbin/nginx -s reload            # 重新载入配置文件

/usr/local/webserver/nginx/sbin/nginx -s reopen            # 重启 Nginx

/usr/local/webserver/nginx/sbin/nginx -s stop              # 停止 Nginx
Centos 7.4 源码 Nginx 安装的更多相关文章
- CentOS 7上源码编译安装和配置LNMP Web+phpMyAdmin服务器环境
CentOS 7上源码编译安装和配置LNMP Web+phpMyAdmin服务器环境 什么是LNMP? LNMP(别名LEMP)是指由Linux, Nginx, MySQL/MariaDB, PHP/ ...
- CentOS 7.4 源码编译安装 Redis
一.CentOS 7.4 源码编译安装 Redis 1.下载源码并解压 wget http://download.redis.io/releases/redis-4.0.10.tar.gz tar ...
- centos 6.5源码编译安装subversion 1.8.10
一.简介 CentOS 6.5的yum源可以安装的SVN客户端版本太低了,1.6.11,所以需要升级到1.8.10,而官网有没有找到1.8.10的安装包,只能选择源码编译安装. 二.安装步骤 参考官网 ...
- CentOS 6.4源码编译安装httpd并启动测试
今天来总结一下在Linux中软件安装,通常我们应该知道,安装软件有两种方法:一种是软件包的安装,也就是rpm包的安装,就是指这些软件包都是 已经编译好的二进制rpm包,我们通过rpm安装工具和yum安 ...
- Centos 7.5源码编译安装zabbix4.0报fatal error: mysql.h: No such file or directory
系统环境:CentOS 7.5是最小化安装的 编译信息 编译选项: root@Server01 zabbix-]# ./configure --prefix=/usr/share/applicatio ...
- nginx在centos 7中源码编译安装【添加grpc的支持】
安装依赖软件 1.安装编译工具gcc gcc是一个开源编译器集合,用于处理各种各样的语言:C.C++.Java.Ada等,在linux世界中是最通用的编译器,支持大量处理器:x86.AMD64.Pow ...
- centos 7 源码包安装、卸载nginx
1.源码包安装之前,首页安装依赖包 yum -y install gcc gcc-c++ make libtool zlib zlib-devel openssl openssl-devel pcre ...
- CentOS 7下源码安装MySQL 5.7
网上说linux安装mysql服务分两种安装方法: ①源码安装,优点是安装包比较小,只有几十M左右,缺点是安装依赖的库多,安装编译时间长,安装步骤复杂容易出错: ②使用官方编译好的二进制文件安装,优点 ...
- Centos7通过yum跟源码编译安装Nginx
源码编译安装 http://nginx.org/en/download.html 到官网下载,然后用XFTP上传到root目录 把文件解压出来 tar -zxvf nginx-1.16.0.tar.g ...
随机推荐
- 堆+建堆、插入、删除、排序+java实现
package testpackage; import java.util.Arrays; public class Heap { //建立大顶堆 public static void buildMa ...
- 懒懒的Rain的寒假小结
快开学了,才发现这个寒假算是又废了,放假前满满的雄心壮志要刷多少多少题回家写一会都不行了,唉,在家真不适合学习.可能还是因为没有学习的气氛吧,在家老是就自己一个人,遇到问题或者出现什么错误了没有人可以 ...
- C/C++.文件是否存在
1. 2._access, _waccess.html(https://msdn.microsoft.com/en-us/library/1w06ktdy.aspx) int _access( con ...
- VC.时间_ZC测试代码
1. #include <windows.h> #include <stdio.h> void TimeNowZ( char* _pc ) { SYSTEMTIME sys; ...
- OpenModelica中simulate的用法
先把官网上的说明文档放上来: simulate simulates a modelica model by generating c code, build it and run the simula ...
- java反编译器
一时手残,把java工程中的源文件给删了,幸亏还有.class文件,想起java可以反编译,所以试一试. JD-Eclipse 如果是使用Eclipse的话,可以用Eclipse插件JadClipse ...
- Android开发代码规范总结
本篇开始总结Android开发中的一些注意事项,提高代码质量(仅供参考): 1. Activity间的数据通信,对于数据量比较大的,避免使用 Intent + Parcelable 的方式,可以考虑 ...
- leecode第一百二十四题(二叉树中的最大路径和)
/** * Definition for a binary tree node. * struct TreeNode { * int val; * TreeNode *left; * TreeNode ...
- Codeforces 600 E - Lomsat gelral
E - Lomsat gelral 思路1: 树上启发式合并 代码: #include<bits/stdc++.h> using namespace std; #define fi fir ...
- ThinkPHP的数据操作
查询: 具体数据的操作方法使用: 1. where()条件 $model->where(条件值); //条件值就是sql语句where后边的结果值 2. limit() 限制条数 $ ...