
macOS 不用任何第三方工具 简单两步使用 Automator 将截图转成@1x
制作 Automator 脚本
打开 Automator -> 选择服务,左侧搜索 shell,双击打开,右侧粘贴以下内容,将上部 服务收到... 改成 没有输入,CMD+S保存,名称就叫 屏幕快照@1x。
然后退出程序,这部分工作已经结束了。
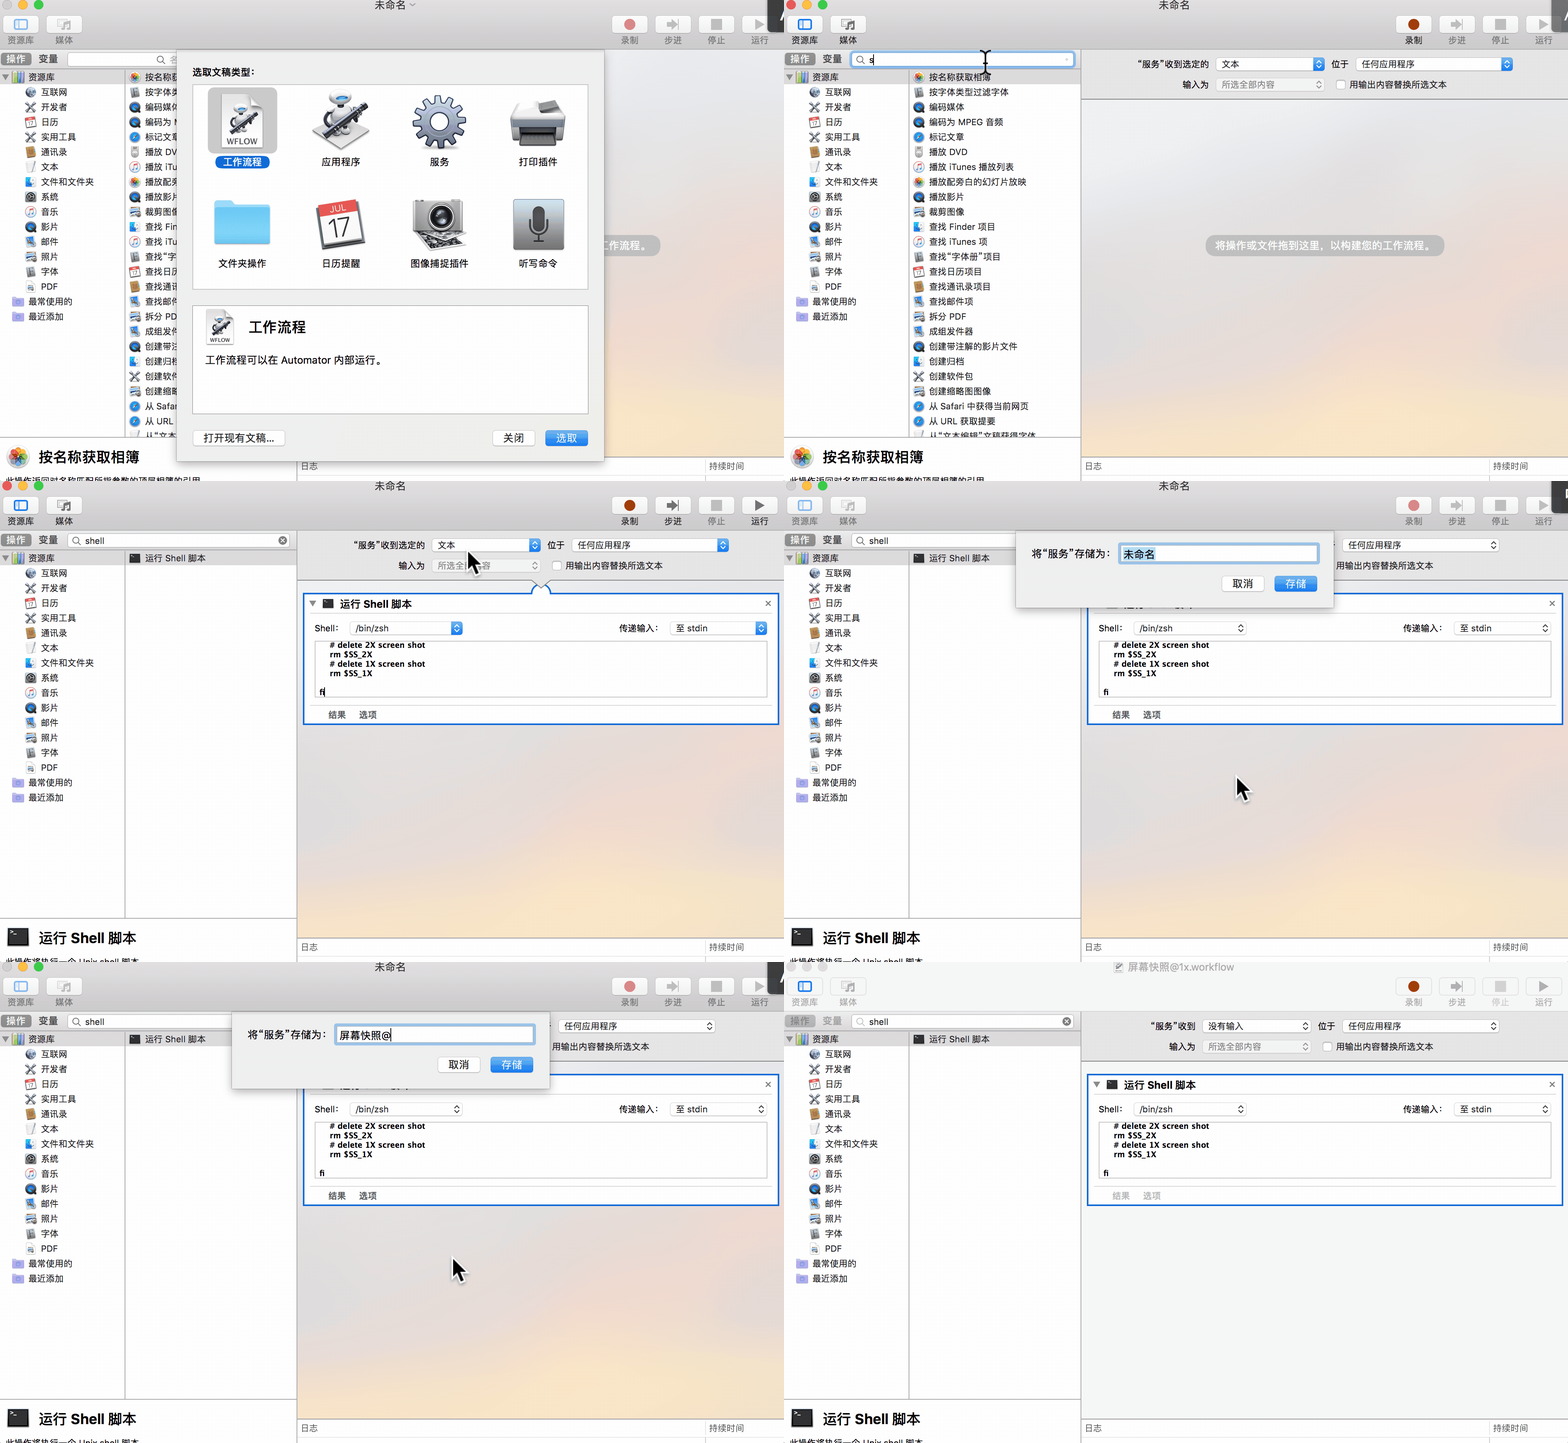
# 保存到桌面同时复制到剪贴板

# the path where screenshots to save

# if you want to save them to your desktop, SS_PATH should be "/Users/YOURNAME/Desktop"

SS_PATH="/Users/`whoami`/Desktop"

# a variable of unix timestamp for screenshot file name

NOW=$(date +"%Y-%m-%d %H.%M.%S")

# image format to create, default is png (other options include pdf, jpg, tiff and other formats)

SS_TYPE=JPG

# name of screenshot

SS_NAME=屏幕快照$NOW

# full path of screenshot file

SS_1X=$SS_PATH/$SS_NAME@1X.$SS_TYPE

SS_2X=$SS_PATH/$SS_NAME@2X.$SS_TYPE

# execute screen capture command and save to $SS_2X

screencapture -i -r -t $SS_TYPE $SS_2X

# check if screenshot is existing

if [ -f $SS_2X ]; then

    # get the 50% width of screenshot by sips

    WIDTH=$(($(sips -g pixelWidth $SS_2X | cut -s -d ':' -f 2 | cut -c 2-)/2))

    # scale down by sips

    sips --resampleWidth $WIDTH $SS_2X --out $SS_1X

    # copy small one to clipboard by applescript

    # if you hold control key when do capture, causes screen shot 2X to go to clipboard

    # osascript -e 'set the clipboard to POSIX file "'$SS_1X'"'

    osascript -e 'set the clipboard to (read (POSIX file "'$SS_1X'") as JPEG picture)'

    # delete 2X screen shot

    rm $SS_2X

fi
设置快捷键支持
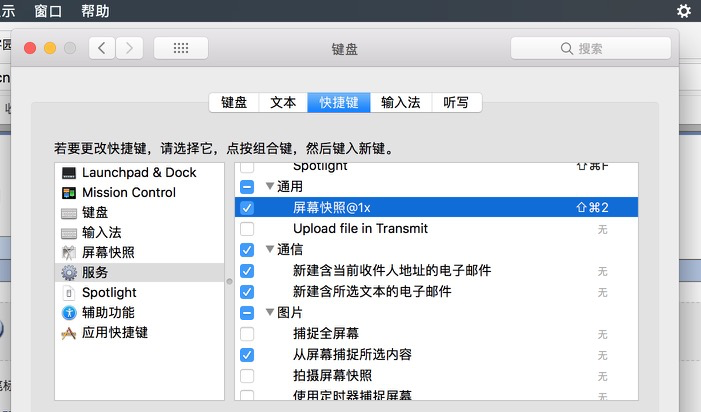
打开系统偏好设置->键盘->快捷键,左侧选中服务,右侧找到通用下的屏幕快照@1x,设置快捷键Shift+CMD+2(或者其他未被系统占用的快捷键),然后关闭界面。
使用
任意程序内,按下设置的快捷键 Shift+CMD+2(截图操作时顶部状态栏右侧会有小齿轮旋转图标)
桌面会生成屏幕快照 [当前时间]@1X.JPG命名的图像,并且内容也复制到系统剪切板,其他程序内直接粘贴即可。
其他可选脚本
# 只保存到桌面

# the path where screenshots to save

# if you want to save them to your desktop, SS_PATH should be "/Users/YOURNAME/Desktop"

SS_PATH="/Users/`whoami`/Desktop"

# a variable of unix timestamp for screenshot file name

NOW=$(date +"%Y-%m-%d %H.%M.%S")

# image format to create, default is png (other options include pdf, jpg, tiff and other formats)

SS_TYPE=JPG

# name of screenshot

SS_NAME=屏幕快照$NOW

# full path of screenshot file

SS_1X=$SS_PATH/$SS_NAME@1X.$SS_TYPE

SS_2X=$SS_PATH/$SS_NAME@2X.$SS_TYPE

# execute screen capture command and save to $SS_2X

screencapture -i -r -t $SS_TYPE $SS_2X

# check if screenshot is existing

if [ -f $SS_2X ]; then

    # get the 50% width of screenshot by sips

    WIDTH=$(($(sips -g pixelWidth $SS_2X | cut -s -d ':' -f 2 | cut -c 2-)/2))

    # scale down by sips

    sips --resampleWidth $WIDTH $SS_2X --out $SS_1X

    # copy small one to clipboard by applescript

    # if you hold control key when do capture, causes screen shot 2X to go to clipboard

    # osascript -e 'set the clipboard to POSIX file "'$SS_1X'"'

    # osascript -e 'set the clipboard to (read (POSIX file "'$SS_1X'") as JPEG picture)'

    # delete 2X screen shot

    rm $SS_2X

fi
# 只复制到剪贴板

# the path where screenshots to save

# if you want to save them to your desktop, SS_PATH should be "/Users/YOURNAME/Desktop"

SS_PATH="/Users/`whoami`/Desktop"

# a variable of unix timestamp for screenshot file name

NOW=$(date +"%Y-%m-%d %H.%M.%S")

# image format to create, default is png (other options include pdf, jpg, tiff and other formats)

SS_TYPE=JPG

# name of screenshot

SS_NAME=屏幕快照$NOW

# full path of screenshot file

SS_1X=$SS_PATH/$SS_NAME@1X.$SS_TYPE

SS_2X=$SS_PATH/$SS_NAME@2X.$SS_TYPE

# execute screen capture command and save to $SS_2X

screencapture -i -r -t $SS_TYPE $SS_2X

# check if screenshot is existing

if [ -f $SS_2X ]; then

    # get the 50% width of screenshot by sips

    WIDTH=$(($(sips -g pixelWidth $SS_2X | cut -s -d ':' -f 2 | cut -c 2-)/2))

    # scale down by sips

    sips --resampleWidth $WIDTH $SS_2X --out $SS_1X

    # copy small one to clipboard by applescript

    # if you hold control key when do capture, causes screen shot 2X to go to clipboard

    # osascript -e 'set the clipboard to POSIX file "'$SS_1X'"'

    osascript -e 'set the clipboard to (read (POSIX file "'$SS_1X'") as JPEG picture)'

    # delete 2X screen shot

    rm $SS_2X

    # delete 1X screen shot

    rm $SS_1X

fi
最后感慨一句,虽然 Automator 里边的 AppleScript 语言很难用,但 Automator 这个工具还是很强大的,好好利用确实能让工作效率提高很多。
参考
脚本改自原作者:
https://derekswingley.com/2016/09/06/how-to-take-1x-screen-shots-on-a-retina-mac/
macOS 不用任何第三方工具 简单两步使用 Automator 将截图转成@1x的更多相关文章
- 简单两步使用css控制div下导航栏ul居中显示
第一步:父层设置文本居中属性 ul{ text-align:center; } 第二步:li设置内联样式 li{ display:inline; } PS 只需以上两步就可以实现导航栏居中显示了,但为 ...
- 【路由达人】简单两步搞定小米路由新增功能-DDNS(解析域名地址转向在线工具)
DDNS(Dynamic Domain Name Server)是动态域名服务的缩写! 简单来说目前ISP大多为我们提供动态IP(如ADSL拨号上网),而很多设备或服务需要通过远程访问时需要一个固定的 ...
- 超简单(两步)-微信怎么实现打开外部浏览器,下载app,打开网页URL
现在微信渠道可以说是拉新最快的渠道,因为微信具备强裂变性.但是目前微信对第三方下载链接的拦截是越来越严格了,那么想要在微信内肆无忌惮地推广链接就需要用到微信跳转浏览器的接口,那如何获取该接口呢? ...
- 简单两步快速实现shiro的配置和使用,包含登录验证、角色验证、权限验证以及shiro登录注销流程(基于spring的方式,使用maven构建)
前言: shiro因为其简单.可靠.实现方便而成为现在最常用的安全框架,那么这篇文章除了会用简洁明了的方式讲一下基于spring的shiro详细配置和登录注销功能使用之外,也会根据惯例在文章最后总结一 ...
- 利用stylist插件,简单两步屏蔽新浪微博上的广告
以前新浪微博只是在侧栏有几块小小的广告,还算可以接受,想着忍忍就算了,可最近真是越来越不厚道了,自从和淘宝合作之后,侧栏就开始有一大块广告根据你在淘宝的搜索记录推荐商品,更可恶的是信息流里的祛痘微博现 ...
- 简单两步快速学会使用Mybatis-Generator自动生成entity实体、dao接口和简单mapper映射(用mysql和oracle举例)
前言: mybatis-generator是根据配置文件中我们配置的数据库连接参数自动连接到数据库并根据对应的数据库表自动的生成与之对应mapper映射(比如增删改查,选择性增删改查等等简单语句)文件 ...
- 所有eclipse版本,主题黑化,代码黑化的简单两步
一.下载两个文件 二.打开eclipse,Import .epf文件 三.把.jar 复制到 eclipse的plugins目录下,重启eclipse 效果如下: 注 以上方法:来自互联网
- ubuntu更新源,简单两步搞定
1.启动器中打开Ubuntu软件中心 2.鼠标顶部面板点击编辑选择软件源(163.sohu) 搞定!
- 简单两步 ~ 绕过 "Paused in debugger"
不BB,上图 然后刷新一下就ok了~再也不能阻止我们查看源码了~ 补充:(屏蔽在Sources里面)
随机推荐
- [luogu3244 HNOI2015] 落忆枫音(容斥原理+拓扑排序)
传送门 Description 给你一张 n 个点 m 条边的DAG,1 号节点没有入边.再向这个DAG中加入边 x→y ,求形成的新图中以 1 为根的外向树形图数 模 10^9+7 . Input ...
- Linux思维导图之查找命令
常用查找命令的区别:
- HDU 3691
一个源点,一个汇点,明显是网络流的问题,但据说用网络流来求最小割,会超时..囧,那出题的人是怎么想的... 用SW的算法来求最小割. #include <iostream> #includ ...
- RubyMine快捷键
RubyMine快捷键 ctrl+shift+up/down 向上/向下移动代码段 alt+shift+up/down 向上/向下移动代码行 ctrl+y 删除一行 ctrl+shift+f10 运行 ...
- JS经常使用表单验证总结
<!DOCTYPE html PUBLIC "-//W3C//DTD HTML 4.01 Transitional//EN" "http://www.w3.org/ ...
- netty 学习记录一
近期在学习netty相关知识,认为<netty 权威指南>这本书还是挺好的,适合我这样的刚開始学习的人.加上netty本身自带的很多样例,学起来还是挺有兴趣的.简单记录下, 一般serve ...
- 【JavaScript】——JS入门
结束XML之旅,開始JavaScript的学习,看视频.了解了她的前世今生,还是为她捏了把汗啊! 看了部分视 频了,简单的总结一下吧! JavaScript是什么? JavaScript是一种基于面向 ...
- IOS总结_实现UIButton的图文混排(二)
非常久没有写博客了,之前写过一篇关于UIButton图文混排的,可是有点复杂,今天来一个比較简单地.相信大家回用得着 UIButton *button=[[UIButton alloc, , )]; ...
- Jetty:部署到Jetty
Web应用的框架 标准Jetty公布版本号能部署标准servlet Spec Web应用和Jetty内部ContextHandler部署描写叙述符,或者两者的一个混合. Web应用是可部署的动态(se ...
- springAOP注解方式实现日志操作
通过自定义注解调用方法执行日志存储: package com.zktx.platform.log2; import java.lang.reflect.Method; import java.util ...