
JAVAEE——spring01:介绍、搭建、概念、配置详解、属性注入和应用到项目
一、spring介绍
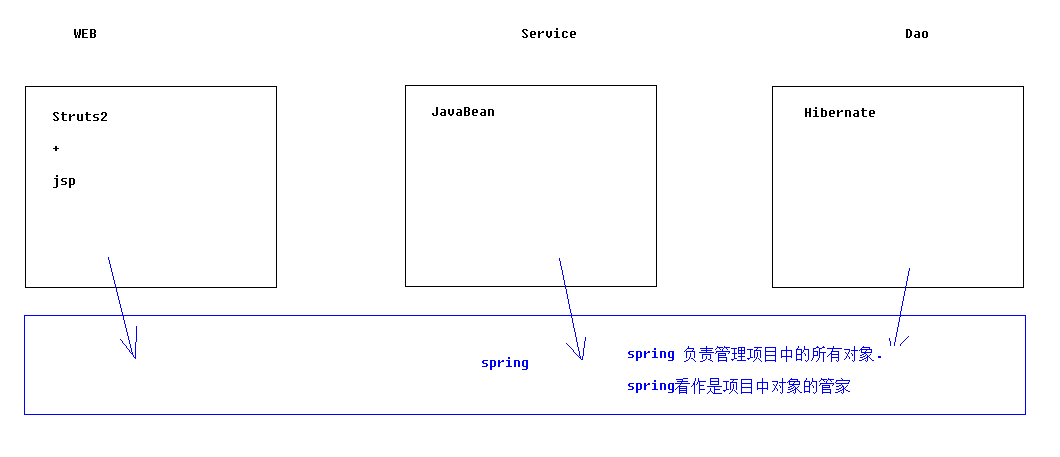
1.三层架构中spring位置
2.spring一站式框架
正是因为spring框架性质是属于容器性质的.
容器中装什么对象就有什么功能.所以可以一站式.
不仅不排斥其他框架,还能帮其他框架管理对象.
aop支持、ioc思想、spring jdbc、aop 事务、junit 测试支持
二、spring搭建
1.导包

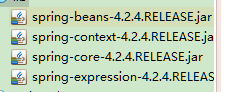
日志包:com.springsource.org.apache.commons.logging-1.1.1.jar
可选:com.springsource.org.apache.log4j-1.2.15.jar(老版本要导入的,导入可以保证一定能运行)
2.创建一个对象
public class User {

    private String name;

    private Integer age;

    public String getName() {

        return name;

    }

    public void setName(String name) {

        this.name = name;

    }

    public Integer getAge() {

        return age;

    }

    public void setAge(Integer age) {

        this.age = age;

    }

}
3.书写配置注册对象到容器
位置任意(建议放到src下)
配置文件名任意(建议applicationContext.xml)
导入约束:
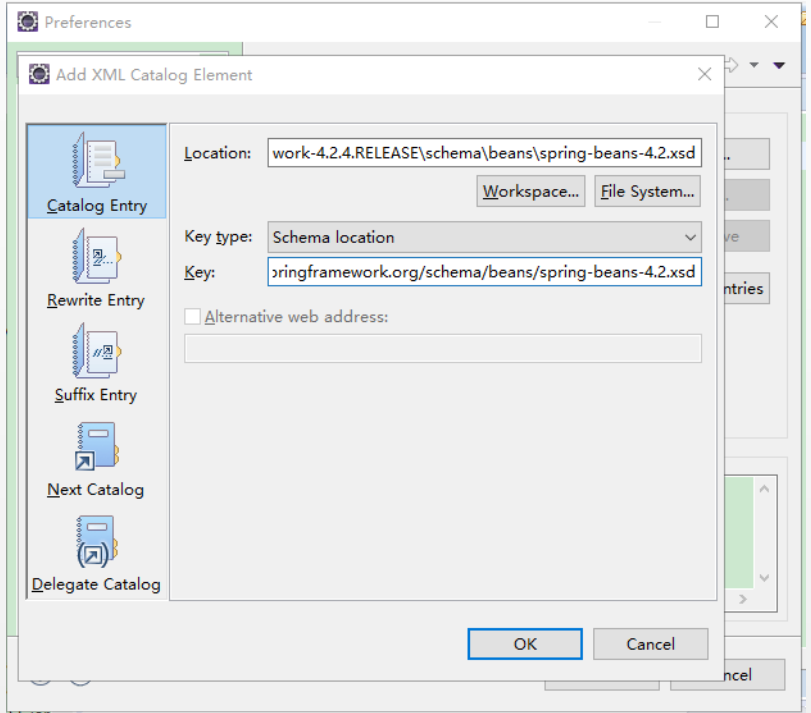
然后编辑applicationContext.xml,加入<beans></beans>后切换带设计视图

进入编辑后点击add,导入xsi

添加完xsi后,再次点击add,指定一个新的命名空间
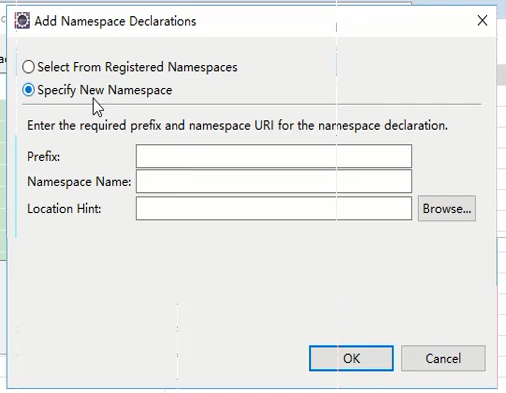
然后选择刚刚导入的xsd
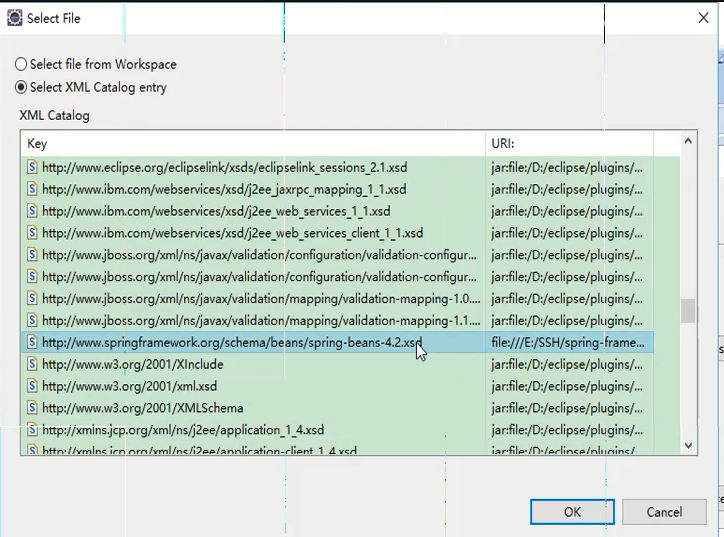
点击OK,回到刚刚的页面,设置命名空间的名字(可以直接复制location Hint的前半段),prefix空着即可
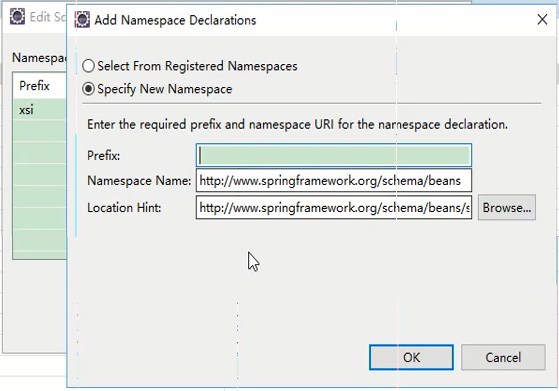
点击OK,显示为下面的界面,就说明导入成功了。
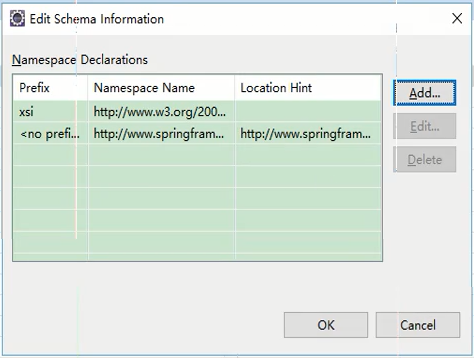
书写applicationContext.xml:
<?xml version="1.0" encoding="UTF-8"?>

<beans xmlns:xsi="http://www.w3.org/2001/XMLSchema-instance" xmlns="http://www.springframework.org/schema/beans" xsi:schemaLocation="http://www.springframework.org/schema/beans http://www.springframework.org/schema/beans/spring-beans-4.2.xsd ">

    <!-- 将User对象交给spring容器管理 -->

    <bean  name="user" class="cn.itcast.bean.User" ></bean>

</beans>
4.代码测试
    @Test

    public void fun1(){

        //1 创建容器对象

        ApplicationContext ac = new ClassPathXmlApplicationContext("applicationContext.xml");

        //2 向容器"要"user对象

        User u = (User) ac.getBean("user");

        //3 打印user对象

        System.out.println(u);

    }
三、spring概念
1.思想
1.1 ioc
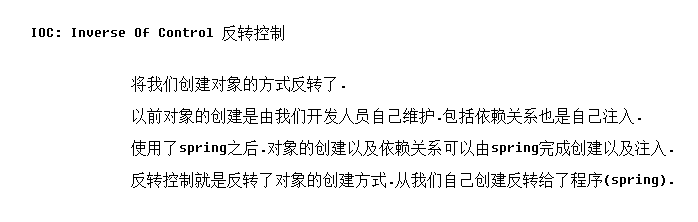
1.2 di
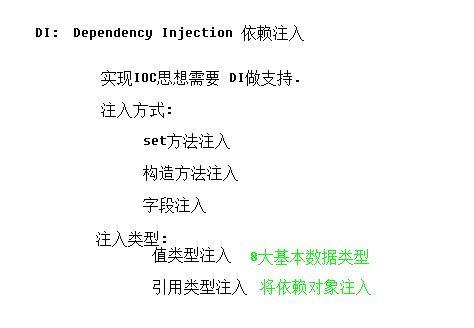
2.applicationContext&BeanFactory
2.1 BeanFactory接口
spring原始接口.针对原始接口的实现类功能较为单一;
BeanFactory接口实现类的容器.特点是每次在获得对象时才会创建对象。
2.2 ApplicationContext
每次容器启动时就会创建容器中配置的所有对象.并提供更多功能。
从类路径下加载配置文件:ClassPathXmlApplicationContext
2.3 结论
结论:web开发中,使用applicationContext. 在资源匮乏的环境可以使用BeanFactory.
四、spring配置详解
1.Bean元素
    <!-- 将User对象交给spring容器管理 -->

    <!-- Bean元素:使用该元素描述需要spring容器管理的对象

            class属性:被管理对象的完整类名.

            name属性:给被管理的对象起个名字.获得对象时根据该名称获得对象.

                    可以重复.可以使用特殊字符.

            id属性: 与name属性一模一样.

                    名称不可重复.不能使用特殊字符.

            结论: 尽量使用name属性.

      -->

    <bean  name="user" class="cn.itcast.bean.User" ></bean>
2.Bean元素进阶
2.1 scope属性
singleton(默认值):单例对象.被标识为单例的对象在spring容器中只会存在一个实例
prototype:多例原型.被标识为多例的对象,每次再获得才会创建.每次创建都是新的对象.整合struts2时,ActionBean必须配置为多例的.
request:web环境下.对象与request生命周期一致.
session:web环境下,对象与session生命周期一致.
2.2 生命周期属性
init-method:配置一个方法作为生命周期初始化方法.spring会在对象创建之后立即调用.
destory-method:配置一个方法作为生命周期的销毁方法.spring容器在关闭并销毁所有容器中的对象之前调用.
    <bean  name="user" class="cn.itcast.bean.User"

         init-method="init" destroy-method="destory" ></bean>
3.spring创建对象的方式
    <!-- 创建方式1:空参构造创建(重点)  -->

    <bean  name="user" class="cn.itcast.bean.User"

         init-method="init" destroy-method="destory" ></bean>

    <!-- 创建方式2:静态工厂创建 (了解)

          调用UserFactory的createUser方法创建名为user2的对象.放入容器

     -->

    <bean  name="user2"

        class="cn.itcast.b_create.UserFactory"

        factory-method="createUser" ></bean>

    <!-- 创建方式3:实例工厂创建 (了解)

         调用UserFactory对象的createUser2方法创建名为user3的对象.放入容器

     -->

    <bean  name="user3"

        factory-bean="userFactory"

        factory-method="createUser2" ></bean>

    <bean  name="userFactory"

        class="cn.itcast.b_create.UserFactory"   ></bean>
4.spring的分模块配置
    <!-- 导入其他spring配置文件 -->

    <import resource="cn/itcast/b_create/applicationContext.xml"/>
五、spring属性注入
1.注入方式
1.1 set方法注入(重中之重)
    <!-- set方式注入: -->

    <bean  name="user" class="cn.itcast.bean.User" >

        <!--值类型注入: 为User对象中名为name的属性注入tom作为值 -->

        <property name="name" value="tom" ></property>

        <property name="age"  value="18" ></property>

        <!-- 引用类型注入: 为car属性注入下方配置的car对象 -->

        <property name="car"  ref="car" ></property>

    </bean>

    <!-- 将car对象配置到容器中 -->

    <bean name="car" class="cn.itcast.bean.Car" >

        <property name="name" value="兰博基尼" ></property>

        <property name="color" value="黄色" ></property>

    </bean>
1.2 构造函数注入(重点)
    <!-- 构造函数注入 -->

<bean name="user2" class="cn.itcast.bean.User" >

    <!-- name属性: 构造函数的参数名 -->

    <!-- index属性: 构造函数的参数索引 -->

    <!-- type属性: 构造函数的参数类型-->

    <constructor-arg name="name" index="0" type="java.lang.Integer" value="999"  ></constructor-arg>

    <constructor-arg name="car" ref="car" index="1" ></constructor-arg>

</bean>
1.3 p名称空间注入
<!-- p名称空间注入, 走set方法

    1.导入P名称空间  xmlns:p="http://www.springframework.org/schema/p"

    2.使用p:属性完成注入

        |-值类型: p:属性名="值"

        |-对象类型: p:属性名-ref="bean名称"

 -->

    <bean  name="user3" class="cn.itcast.bean.User" p:name="jack" p:age="20" p:car-ref="car"  >

    </bean>
1.4 spel注入
<!--

    spel注入: spring Expression Language sping表达式语言

 -->

<bean  name="user4" class="cn.itcast.bean.User" >

        <property name="name" value="#{user.name}" ></property>

        <property name="age" value="#{user3.age}" ></property>

        <property name="car" ref="car" ></property>

</bean>
2.复杂类型注入
2.1 数组
    <!-- 如果数组中只准备注入一个值(对象),直接使用value|ref即可

    <property name="arr" value="tom" ></property>

    -->

    <!-- array注入,多个元素注入 -->

    <property name="arr">

        <array>

            <value>tom</value>

            <value>jerry</value>

            <ref bean="user4" />

        </array>

    </property>
2.2 List
    <!-- 如果List中只准备注入一个值(对象),直接使用value|ref即可

    <property name="list" value="jack" ></property>-->

    <property name="list"  >

        <list>

            <value>jack</value>

            <value>rose</value>

            <ref bean="user3" />

        </list>

    </property>
2.3 Map
    <!-- map类型注入 -->

    <property name="map"  >

        <map>

            <entry key="url" value="jdbc:mysql:///crm" ></entry>

            <entry key="user" value-ref="user4"  ></entry>

            <entry key-ref="user3" value-ref="user2"  ></entry>

        </map>

    </property>
2.4 Properties
    <!-- prperties 类型注入 -->

    <property name="prop"  >

        <props>

            <prop key="driverClass">com.jdbc.mysql.Driver</prop>

            <prop key="userName">root</prop>

            <prop key="password">1234</prop>

        </props>

    </property>
六、练习:将spring容器应用到struts-crm项目
管理Service对象以及Dao对象
1.导包(4+2),再加1
再加1指的是:spring-web-4.2.4.RELEASE.jar(因为要用到web的监听)
2.将Service对象以及Dao对象配置到spring容器(注入属性记得加相应的set方法)
<?xml version="1.0" encoding="UTF-8"?>

<beans xmlns:xsi="http://www.w3.org/2001/XMLSchema-instance" xmlns="http://www.springframework.org/schema/beans" xsi:schemaLocation="http://www.springframework.org/schema/beans http://www.springframework.org/schema/beans/spring-beans-4.2.xsd ">

    <!-- 配置Dao -->

    <bean name="customerDao" class="cn.itheima.dao.impl.CustomerDaoImpl" ></bean>

    <bean name="linkManDao" class="cn.itheima.dao.impl.LinkManDaoImpl" ></bean>

    <bean name="userDao" class="cn.itheima.dao.impl.UserDaoImpl" ></bean>

    <!-- 配置Service -->

    <bean name="customerService" class="cn.itheima.service.impl.CustomerServiceImpl" >

        <property name="customerDao" ref="customerDao" ></property>

    </bean>

    <bean name="linkManService" class="cn.itheima.service.impl.LinkManServiceImpl" >

        <property name="cd" ref="customerDao" ></property>

        <property name="lmd" ref="linkManDao" ></property>

    </bean>

    <bean name="userService" class="cn.itheima.service.impl.UserServiceImpl" >

        <property name="ud" ref="userDao" ></property>

    </bean>

</beans>
3.在Action中获得容器中的Service对象
3.1 web.xml中配置容器随项目启动
  <!-- 可以让spring容器随项目的启动而创建,随项目的关闭而销毁 -->

  <listener>

      <listener-class>org.springframework.web.context.ContextLoaderListener</listener-class>

  </listener>

  <!-- 指定加载spring配置文件的位置 -->

  <context-param>

      <param-name>contextConfigLocation</param-name>

      <param-value>classpath:applicationContext.xml</param-value>

  </context-param>
3.2 在Action中获得容器
        //获得spring容器=>从Application域获得即可

        //1 获得servletContext对象

        ServletContext sc = ServletActionContext.getServletContext();

        //2.从Sc中获得ac容器

        WebApplicationContext ac = WebApplicationContextUtils.getWebApplicationContext(sc);

        //3.从容器中获得CustomerService

        UserService us = (UserService) ac.getBean("userService");
4.管理容器在项目中的生命周期
下面错误的示范.导致每次请求都创建新的容器
        //创建容器对象

        ApplicationContext ac = new ClassPathXmlApplicationContext("applicationContext.xml");

        //获得cs(customerService对象)

        CustomerService cs = (CustomerService) ac.getBean("customerService");
JAVAEE——spring01:介绍、搭建、概念、配置详解、属性注入和应用到项目的更多相关文章
- spring-搭建-概念-配置详解-属性注入
1 spring介绍 三层架构中spring位置 spring一站式框架 正是因为spring框架性质是属于容器性质的. 容器中装什么对象就有什么功能.所以可以一站式. 不仅不排斥其他框架,还能帮其 ...
- Hibernate-概述-搭建-测试-配置详解
一 hibernate概述 1.1 框架是什么 1.框架是用来提高开发效率的 2.封装了好了一些功能.我们需要使用这些功能时,调用即可.不需要再手动实现. 3.所以框架可以理解成是一个半成品的项目.只 ...
- 实时监控、直播流、流媒体、视频网站开发方案流媒体服务器搭建及配置详解:使用nginx搭建rtmp直播、rtmp点播、,hls直播服务配置详解
注意:这里不会讲到nginx流媒体模块如何安装的问题,只研究rtmp,hls直播和录制相关的nginx服务器配置文件的详细用法和说明.可以对照这些命令详解配置nginx -rtmp服务 一.nginx ...
- Log4j介绍,log4j.properties配置详解
http://www.cnblogs.com/simle/archive/2011/09/29/2195341.html本文主要解释log4j的配置文件各个配置项的含义,内容是从网上转载的 1.Log ...
- centos6.5环境搭建openvp服务器及windows客户端搭建及配置详解
1.环境搭建 说明: vpn client 192.168.8.16/24 openvpn server: eth0: 192.168.8.41 eth1: 172.16.1.10 app serve ...
- struts2-环境搭建-访问流程-配置详解-常量配置-类详解
1 struts2概述 1.1 概念 1.2 struts2使用优势 自动封装参数 参数校验 结果的处理(转发|重定向) 国际化 显示等待页面 表单的防止重复提交 struts2具有更加先进的架构以 ...
- Hibernate4搭建Log4J日志管理(附Log4j.properties配置详解)
1.首先加入slf4j的jar包,即slf4j-api-1.6.1.jar 在hibernate官网下载hibernate-release-4.2.2.Final.zip并解压,在hibernate- ...
- Linux - CentOS6.5服务器搭建与初始化配置详解(上)
1.新建一个虚拟机 选择典型 单机下一步 p.MsoNormal,li.MsoNormal,div.MsoNormal { margin: 0cm 0cm 0.0001pt; text-align: ...
- Linux - CentOS6.5服务器搭建与初始化配置详解(下)
传送带:Linux - CentOS6.5服务器搭建与初始化配置详解(上) 继续接着上面的安装,安装完后会出现下面界面 点击reboot重启 重启后可以看到下面的tty终端界面 因为这就是最小化安装 ...
随机推荐
- mysql导入导出sql文件(包括数据库和数据表的操作)
废话不多说直接开始. 在windows命令行下登录mysql,创建一个test_01数据库,创建一个user表,并插入一条数据,如下 一.导出数据库test_01 1.退出数据库,在命令行中输入 my ...
- poj2349,最小生成树!
The Department of National Defence (DND) wishes to connect several northern outposts by a wireless n ...
- Java中的Classpath
classpath实际上就是编译后的,以classes文件夹为起点的路径各种path获取到的路径的区别 Demo.class.getResource("");//得到的是Demo类 ...
- React入门---可复用组件-10
主要对props更多重要的特性进行学习; 还是用之前代码, index.js代码为: var React = require('react'); var ReactDOM = require('rea ...
- dubbo在企业中用得多吗?
看了阿里的dubbo,据说是一个不错的服务框架, 不过,好像Minglisoft.technology搞研发希望各位可以指点学习 想知道其他的公司用这个框架多吗?遇到的问题能否快速解决呢?抉择中...
- ASP.NET Core 菜鸟之路:从Startup.cs说起
1.前言 本文主要是以Visual Studio 2017 默认的 WebApi 模板作为基架,基于Asp .Net Core 1.0,本文面向的是初学者,如果你有 ASP.NET Core 相关实践 ...
- trap-接收信号_采取行动
trap命令用于指定在接收到信号后将要采取的动作,常见的用途是在脚本程序被中断时完成清理工作. kill和trap等都可以看到信号编号及其关联的名称. "信号"是指那些被异步发送到 ...
- 【2017-05-19】WebForm复合控件
自动提交的属性: AutoPostBack="True" 1.RadioButtonList 单选集合 -属性:RepeatDirection:Vertical (垂直排布 ...
- 浏览器兼容性--new Date
ie浏览器下new Date("2013/04")与new Date("2016-04")会报错: //将201601格式的字符串转为Date对象,月份从0开始 ...
- (转ORCLE导入导出命令)
oracle数据库导入导出命令! Oracle数据导入导出imp/exp 功能:Oracle数据导入导出imp/exp就相当与oracle数据还原与备份. 大多情况都可以用Oracle数据导入导出 ...