GridView编辑删除操作
第一种:使用DataSource数据源中自带的编辑删除方法,这样的不经常使用,在这里就不加说明了。
另外一种:使用GridView的三种事件:GridView1_RowEditing(编辑)、GridView1_RowUpdating(更新)、GridView1_RowCancelingEdit(取消编辑)。GridView1属性中将DataKeyNames的值设置为主键名,否则找不到索引,这个非常重要哦。
该方法有2种操作,一种是不正确绑定列转换为模板列,第二种是转换为模板列。
这里先说不转换为模板列的情况;
首先;先对GridView进行数据绑定,无论用代码绑定还是DataSource绑定都能够。绑定好后,对GridView加入�绑定列 和编辑列
和编辑列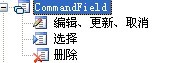 (注意这里,加入�好后不做不论什么修改,千万不要将它们转换为模板列),加入�好后,将所要绑定的数据库表字段填入
属性中。
然后,分别激活上述提到的三种事件,然后加入�代码:
protected void GridView1_RowDeleting(object sender, GridViewDeleteEventArgs e)
{ //运行删除
string str = "delete from tb_hby where id='"+GridView1.DataKeys[e.RowIndex].Value.ToString()+"'";
db.Delete(str); //db是操作类的实例,Delete是删除数据的方法
this.GridView1.DataBind();
}
protected void GridView1_RowUpdating(object sender, GridViewUpdateEventArgs e)
{//运行更新
string cell1 = ((TextBox)(GridView1.Rows[e.RowIndex].Cells[1].Controls[0])).Text.ToString().Trim();//第一列注意这样的写法非常重要
string cell2 = ((TextBox)(GridView1.Rows[e.RowIndex].Cells[2].Controls[0])).Text.ToString().Trim();//第二列注意这样的写法非常重要
string str = "update tb_hby set hby_title='" + cell1 + "',hby_Datetime='" + cell2 + "' where id='" + GridView1.DataKeys[e.RowIndex].Value.ToString() + "'";
db.Update(str);//db是操作类的实例,Update是更新数据的方法
GridView1.EditIndex = -1;
GView();
}
protected void GridView1_RowEditing(object sender, GridViewEditEventArgs e)
{//激活编辑button的事件
this.GridView1.EditIndex = e.NewEditIndex;
GView();
}
protected void GridView1_RowCancelingEdit(object sender, GridViewCancelEditEventArgs e)
{//取消编辑状态的事件
GridView1.EditIndex = -1;
GView();
}
说明:此方法中,如果要求某个绑定列不做编辑,则在它的前台代码中添�ReadOnly=”true”就可以。
此方法有一些缺点,比方对日期列进行格式化时,显示的时候是格式化后的日期,可是在编辑状态下仍然显示出日期的原貌,还有,某一列的字符太长时,不好对它进行字符截取。
在点击删除button的时候,假设须要一个弹出删除提示,则要将删除列转化为模板列,其代码例如以下:
<ItemTemplate>
<asp:LinkButton ID="LinkButton1" runat="server" CausesValidation="False" CommandName="Delete" OnClientClick="return confirm('确定要删除吗?')" Text="删除"></asp:LinkButton>
</ItemTemplate>
也能够这样写:
在RowDataBind事件中:
if (e.Row.RowType == DataControlRowType.DataRow)
{
LinkButton lnkdelete = (LinkButton)e.Row.FindControl("lnkdelete");
lnkdelete.Attributes.Add("onclick","return confirm('您确定要删除吗?')");
}
假设不转化为模板列,这这样写:
if (e.Row.RowType == DataControlRowType.DataRow)
{
if (e.Row.RowState == DataControlRowState.Normal || e.Row.RowState == DataControlRowState.Alternate)
{
//((LinkButton)e.Row.Cells[7].Controls[0]).Attributes.Add("onclick", "javascript:return confirm('你确认要删除:\"" + e.Row.Cells[0].Text + "\"吗?')");
((LinkButton)e.Row.Cells[7].Controls[0]).Attributes.Add("onclick", "javascript:return confirm('你确认要删除吗?')");
}
}
完整代码例如以下:
<asp:GridView ID="GridView1" runat="server" AutoGenerateColumns="False" DataKeyNames="id" OnRowDeleting="GridView1_RowDeleting" OnRowEditing="GridView1_RowEditing" OnRowCancelingEdit="GridView1_RowCancelingEdit" OnRowUpdating="GridView1_RowUpdating">
<Columns>
<asp:BoundField DataField="id" HeaderText="id" InsertVisible="False" ReadOnly="True" SortExpression="id" />
<asp:BoundField DataField="hby_Title" HeaderText="hby_Title" SortExpression="hby_Title" AccessibleHeaderText="fgfg" />
<asp:BoundField DataField="hby_Datetime" DataFormatString="{0:HH:mm}" />
<asp:CommandField ShowEditButton="True" />
<asp:TemplateField ShowHeader="False">
<ItemTemplate>
<asp:LinkButton ID="LinkButton1" runat="server" CausesValidation="False" CommandName="Delete" OnClientClick="return confirm('确定要删除吗?')"
Text="删除"></asp:LinkButton>
</ItemTemplate>
</asp:TemplateField>
</Columns>
</asp:GridView>
后台代码:
public partial class Default3 : System.Web.UI.Page
{
DBconn db = new DBconn();
protected void Page_Load(object sender, EventArgs e)
{
if (!Page.IsPostBack)
{
GView();
}
}
private void GView()
{
string strbind = "select id,hby_title,hby_Datetime from tb_hby order by id desc";
this.GridView1.DataSource = db.getDataSet(strbind);
this.GridView1.DataBind();
}
protected void GridView1_RowDeleting(object sender, GridViewDeleteEventArgs e)
{
string str = "delete from tb_hby where id='"+GridView1.DataKeys[e.RowIndex].Value.ToString()+"'";
db.Delete(str);
this.GridView1.DataBind();
}
protected void GridView1_RowEditing(object sender, GridViewEditEventArgs e)
{
this.GridView1.EditIndex = e.NewEditIndex;
GView();
}
protected void GridView1_RowUpdating(object sender, GridViewUpdateEventArgs e)
{
string cell1 = ((TextBox)(GridView1.Rows[e.RowIndex].Cells[1].Controls[0])).Text.ToString().Trim();//第一列
string cell2 = ((TextBox)(GridView1.Rows[e.RowIndex].Cells[2].Controls[0])).Text.ToString().Trim();//第二列
string str = "update tb_hby set hby_title='" + cell1 + "',hby_Datetime='" + cell2 + "' where id='" + GridView1.DataKeys[e.RowIndex].Value.ToString() + "'";
db.Update(str);//db是操作类的实例,Update是更新数据的方法
GridView1.EditIndex = -1;
GView();
}
protected void GridView1_RowCancelingEdit(object sender, GridViewCancelEditEventArgs e)
{
GridView1.EditIndex = -1;
GView();
}
}
下面是对绑定列转换为模板列的操作(包含将编辑列和删除列都转化为模板列):
private void GView()
{//绑定数据源
string strbind = "select top 15 id,hby_title,hhhhh,hby_Datetime from tb_hby";
this.GridView1.DataSource = db.getDataSet(strbind);
this.GridView1.DataBind();
}
protected void GridView1_RowDeleting(object sender, GridViewDeleteEventArgs e)
{//运行删除
string str = "delete from tb_hby where id='"+GridView1.DataKeys[e.RowIndex].Value.ToString()+"'";
db.Delete(str);
//GView();
Response.Write("<script language='JavaScript'>");
Response.Write("alert('删除成功!');location.href='default3.aspx';");
Response.Write("</script>");
}
protected void GridView1_RowEditing(object sender, GridViewEditEventArgs e)
{//激活编辑
this.GridView1.EditIndex = e.NewEditIndex;
GView();
}
protected void GridView1_RowUpdating(object sender, GridViewUpdateEventArgs e)
{//运行更新
string EditTitle = ((TextBox)(GridView1.Rows[e.RowIndex].FindControl("TextBox1"))).Text.ToString().Trim();
string DateTimestr = ((TextBox)(GridView1.Rows[e.RowIndex].FindControl("TextBox2"))).Text;//注意:日期字段不要加ToString(),否则会报错,而nvarchar和int的字段能够加
string hhh = ((TextBox)(GridView1.Rows[e.RowIndex].FindControl("TextBox3"))).Text.ToString();
string str = "update tb_hby set hby_title='" +EditTitle + "',hby_Datetime='" + DateTimestr + "',hhhhh='"+hhh+"' where id='" + GridView1.DataKeys[e.RowIndex].Value.ToString() + "'";
db.Update(str);
GridView1.EditIndex = -1;
GView();
}
这里千万要注意:
当对绑定列转换为模板列了之后,编辑列这样写:
string EditTitle = ((TextBox)(GridView1.Rows[e.RowIndex].FindControl("TextBox1"))).Text.ToString().Trim();
不转化为模板列的时候,编辑列这样写:
string EditTitle = ((TextBox)(GridView1.Rows[e.RowIndex].Cells[1].Controls[0])).Text.ToString().Trim();
这里easy搞错,以致常常发生疑惑。
protected void GridView1_RowCancelingEdit(object sender, GridViewCancelEditEventArgs e)
{//取消编辑状态
GridView1.EditIndex = -1;
GView();
}
下面是前台代码:
<asp:GridView ID="GridView1" runat="server" AutoGenerateColumns="False" DataKeyNames="id" OnRowDeleting="GridView1_RowDeleting" OnRowEditing="GridView1_RowEditing" OnRowCancelingEdit="GridView1_RowCancelingEdit" OnRowUpdating="GridView1_RowUpdating">
<Columns>
<asp:BoundField DataField="id" HeaderText="id" InsertVisible="False" ReadOnly="True"
SortExpression="id" />
<asp:TemplateField AccessibleHeaderText="fgfg" HeaderText="hby_Title" SortExpression="hby_Title">
<EditItemTemplate>
<asp:TextBox ID="TextBox1" runat="server" Text='<%# Eval("hby_Title") %>'></asp:TextBox>
</EditItemTemplate>
<ItemTemplate>
<asp:Label ID="Label1" runat="server" Text='<%# Eval("hby_Title") %>'></asp:Label>
</ItemTemplate>
</asp:TemplateField>
<asp:TemplateField>
<EditItemTemplate>
<asp:TextBox ID="TextBox2" runat="server" Text='<%# Eval("hby_Datetime", "{0:HH:mm}") %>'></asp:TextBox>
</EditItemTemplate>
<ItemTemplate>
<asp:Label ID="Label2" runat="server" Text='<%# Eval("hby_Datetime", "{0:HH:mm}") %>'></asp:Label>
</ItemTemplate>
</asp:TemplateField>
<asp:TemplateField HeaderText="好">
<EditItemTemplate>
<asp:TextBox ID="TextBox3" runat="server" Text='<%# Bind("hhhhh") %>'></asp:TextBox>
</EditItemTemplate>
<ItemTemplate>
<asp:Label ID="Label3" runat="server" Text='<%# Bind("hhhhh") %>'></asp:Label>
</ItemTemplate>
</asp:TemplateField>
<asp:TemplateField ShowHeader="False">
<EditItemTemplate>
<asp:LinkButton ID="LkBtnUpdate" runat="server" CausesValidation="True" CommandName="Update"
Text="更新"></asp:LinkButton>
<asp:LinkButton ID="LkBtnCtrl" runat="server" CausesValidation="False" CommandName="Cancel"
Text="取消"></asp:LinkButton>
</EditItemTemplate>
<ItemTemplate>
<img src="img/edt.gif" /><asp:LinkButton ID="LinkButton2" runat="server" CausesValidation="False" CommandName="Edit"
Text="编辑"></asp:LinkButton>
</ItemTemplate>
</asp:TemplateField>
<asp:TemplateField ShowHeader="False" HeaderText="删除">
<ItemTemplate>
<asp:LinkButton ID="LinkButton1" runat="server" CausesValidation="False" CommandName="Delete" OnClientClick="return confirm('确定要删除吗?')"
Text="删除"></asp:LinkButton>
</ItemTemplate>
</asp:TemplateField>
</Columns>
</asp:GridView>
以上绑定中,不管是Eval或者Bind都能够。
第三种方法:将编辑和显示都放在模板列中,代码例如以下:
前台绑定:
<asp:TemplateField HeaderText="出团日期">
<ItemTemplate>
<asp:TextBox ID="tbx_ctrq" runat="server" Text='<%# Eval("cspd_ctrq") %>' Visible="false"></asp:TextBox>
<asp:Label ID="lbl_ctrq" runat="server" Text='<%# Eval("cspd_ctrq") %>'></asp:Label>
</ItemTemplate>
<ControlStyle Width="84px" />
</asp:TemplateField>
<asp:TemplateField HeaderText="价格">
<ItemTemplate>
<asp:TextBox ID="tbx_price" runat="server" Text='<%# Eval("cspd_price") %>' Visible="false"></asp:TextBox>
<asp:Label ID="lbl_price" runat="server" Text='<%# Eval("cspd_price") %>'></asp:Label>
</ItemTemplate>
<ControlStyle Width="60px" />
</asp:TemplateField>
<asp:TemplateField HeaderText="编辑" ShowHeader="False">
<ItemTemplate>
<asp:LinkButton ID="LB_edit" runat="server" CausesValidation="False" CommandArgument='<%# ((GridViewRow) Container).RowIndex %>' CommandName="iEdit" Text="编辑"></asp:LinkButton>
<asp:LinkButton ID="LB_upd" runat="server" CausesValidation="True" CommandName="iUpdate"
Visible="false" CommandArgument='<%# ((GridViewRow) Container).RowIndex %>' Text="更新"></asp:LinkButton>
<asp:LinkButton ID="LB_cancel" runat="server" CausesValidation="False" CommandName="iCancel" Visible="false" CommandArgument='<%# ((GridViewRow) Container).RowIndex %>' Text="取消"></asp:LinkButton>
</ItemTemplate>
</asp:TemplateField>
<asp:TemplateField HeaderText="删除">
<ItemTemplate>
<asp:LinkButton ID="LB_Del" runat="server" OnClientClick="return confirm('确定要删除吗?')"
CommandName="Delete" Text="删除"></asp:LinkButton>
</ItemTemplate>
</asp:TemplateField>
后台代码例如以下:
protected void GV_Main_RowCommand(object sender, GridViewCommandEventArgs e)
{
if (e.CommandName == "iEdit")
{
int rowIndex = Convert.ToInt32(e.CommandArgument);
((LinkButton)GV_Main.Rows[rowIndex].FindControl("LB_edit")).Visible = false;
((LinkButton)GV_Main.Rows[rowIndex].FindControl("LB_upd")).Visible = true;
((LinkButton)GV_Main.Rows[rowIndex].FindControl("LB_cancel")).Visible = true;
((Label)GV_Main.Rows[rowIndex].FindControl("lbl_chanpin")).Visible = false;
((TextBox)GV_Main.Rows[rowIndex].FindControl("tbx_chanpin")).Visible = true;
((Label)GV_Main.Rows[rowIndex].FindControl("lbl_ctrq")).Visible = false;
((TextBox)GV_Main.Rows[rowIndex].FindControl("tbx_ctrq")).Visible = true;
}
if (e.CommandName == "iCancel")
{
int rowIndex = Convert.ToInt32(e.CommandArgument);
((LinkButton)GV_Main.Rows[rowIndex].FindControl("LB_edit")).Visible = true;
((LinkButton)GV_Main.Rows[rowIndex].FindControl("LB_upd")).Visible = false;
((LinkButton)GV_Main.Rows[rowIndex].FindControl("LB_cancel")).Visible = false;
((Label)GV_Main.Rows[rowIndex].FindControl("lbl_chanpin")).Visible = true;
((TextBox)GV_Main.Rows[rowIndex].FindControl("tbx_chanpin")).Visible = false;
((Label)GV_Main.Rows[rowIndex].FindControl("lbl_ctrq")).Visible = true;
((TextBox)GV_Main.Rows[rowIndex].FindControl("tbx_ctrq")).Visible = false;
}
if (e.CommandName == "iUpdate")
{
int rowIndex = Convert.ToInt32(e.CommandArgument);
if (!wpf.IsNum(((TextBox)GV_Main.Rows[rowIndex].FindControl("tbx_price")).Text.Trim()))
{
Page.ClientScript.RegisterStartupScript(this.GetType(), "Startup", "<script>alert('价格必须是数字!');</script>");
}
string strupd = "UPDATE [tb_cspd] SET [cspd_chanpin] = '" + wpf.checkStr(((TextBox)GV_Main.Rows[rowIndex].FindControl("tbx_chanpin")).Text.Trim()) + "', [cspd_ctrq] = '" + wpf.checkStr(((TextBox)GV_Main.Rows[rowIndex].FindControl("tbx_ctrq")).Text.Trim())
+ "', WHERE [id] = " + GV_Main.DataKeys[rowIndex][0].ToString();
//Response.Write(strupd);
wpf.SqlQuery(strupd);
GV_Main.DataBind();
}
}
}
点击编辑button后统一列在文本框中进行编辑:
效果:
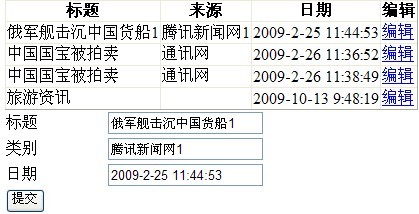
首先还是在GridView1属性中将DataKeyNames的值设置为主键名
前台代码:
<asp:GridView ID="GridView3" runat="server" AutoGenerateColumns="False" OnRowCommand="GridView3_RowCommand" DataKeyNames="News_Id">
<Columns>
<asp:BoundField DataField="News_Title" HeaderText="标题" />
<asp:BoundField DataField="News_Source" HeaderText="来源" />
<asp:BoundField DataField="News_Date" HeaderText="日期" />
<asp:TemplateField HeaderText="编辑">
<ItemTemplate>
<asp:LinkButton ID="LkBtnbianji" runat="server" CommandName="edit_ok" CommandArgument='<%# ((GridViewRow) Container).RowIndex %>'>编辑</asp:LinkButton>
</ItemTemplate>
</asp:TemplateField>
</Columns>
</asp:GridView>
后台代码:
private void GView3()
{
string strbind = "select News_Id,News_Title,News_Source,News_Date from tb_News";
this.GridView3.DataSource = db.getDataSet(strbind);
this.GridView3.DataBind();
}
protected void GridView3_RowCommand(object sender, GridViewCommandEventArgs e)
{
if (e.CommandName == "edit_ok")
{
int rowIndex = Convert.ToInt32(e.CommandArgument);
string strbind = "select News_Id,News_Title,News_Source,News_Date from tb_News where News_Id=" + GridView3.DataKeys[rowIndex][0].ToString();
DataRow dr = db.getDataSet(strbind).Tables[0].Rows[0];
this.BunAdd.CommandArgument = GridView3.DataKeys[rowIndex][0].ToString();
this.TextTitle.Text = dr["News_Title"].ToString();
this.TextType.Text=dr["News_Source"].ToString();
this.TextDatetime.Text = dr["News_Date"].ToString();
}
}
protected void BunAdd_Click(object sender, EventArgs e)
{
string up = "update tb_News set News_Title='" + this.TextTitle.Text.Trim() + "',News_Source='" + this.TextType.Text.Trim() + "',News_Date='" + this.TextDatetime.Text.Trim() + "' where News_Id="+BunAdd.CommandArgument;
db.Update(up);
GView3();
}
GridView编辑删除操作的更多相关文章
- GridView编辑删除
A前台代码 <%@ Page Language="C#" AutoEventWireup="true" CodeBehind="test.asp ...
- GridView自定义删除操作
今天,我们这里要说的就是在GridView里面如何新添加一行“删除”列,如何删除前弹出通知等. 首先,我们前端的代码如下: <asp:GridView ID="gridViewDxjk ...
- GridView 编辑,更新,删除 等操作~~
protected void GridView1_RowCancelingEdit(object sender, GridViewCancelEditEventArgs e) { GridView1. ...
- GridView总结二:GridView自带编辑删除更新
GridView自带编辑删除更新逻辑很简单:操作完,重新绑定.总结总结,防止忘记... 效果图: 前台代码: <%@ Page Language="C#" AutoEvent ...
- GridView 编辑、删除 、分页
类似代码都差不多,记录一下,便于以后查看使用. 前台页面: <asp:GridView ID="gdvList" runat="server" AutoG ...
- Asp.Net MVC +EntityFramework主从表新增编辑操作的实现(删除操作怎么实现?)
Asp.Net MVC +EntityFramework主从表新增编辑操作的实现 对于MVC中同时对主从表的表单操作在网上现有的解决很少,而这样的操作在做业务系统中是经常为遇到的.我在网上搜索了很久都 ...
- mySql事务_ _Java中怎样实现批量删除操作(Java对数据库进行事务处理)?
本文是记录Java中实现批量删除操作(Java对数据库进行事务处理),在开始之前先来看下面这样的一个页面图: 上面这张图片显示的是从数据库中查询出的出租信息,信息中进行了分页处理,然后每行的前面提 ...
- editplus批量删除重复行(编辑-删除-删除重复行)
editplus快速删除重复数据 多行文本,有些行的文字或数据是重复的,该怎么删除重复部分,只留下不重复的部分?很多人对这个问题感到无比头疼,Editplus同样能快速帮你删除数据. 那么,editp ...
- ASP.NET MVC3 实例(六) 增加、修改和删除操作(二)
http://www.jquery001.com/asp.net-mvc3-instance-add-update-delete2.html 上篇我们在 ASP.NET MVC3 中实现了添加操作,由 ...
随机推荐
- mysql数据库修改密码
更改MySQL用户密码 方法1: 用SET PASSWORD命令 首先登录MySQL. 格式:mysql> set password for 用户名@localhost = password(' ...
- LeetCode(1) -Two Sum
题目要求很简单,给你一个数组(例如,nums = [2,7,11,15])和一个target(target = 9),找到数组里两个数相加后能得到target的这两个数的index.在本例中,返回的应 ...
- 如何开启php报错
今天碰到一个很二的问题,安装了php网站之后,发现nginx一直无法解析到index.php文件,显示为空白,从后台的日志来看是500错误,但是同目录下的phpinfo.php却可以正常解析.想来应该 ...
- centos 7搭建vpn(pptpd)服务器 (只限centos 7)
第一步:首先检查ppp是否开启 若使用XEN构架的VPS,此步骤不用执行 终端输入命令:cat /dev/ppp 开启成功的标志:No such file or directory 或者 No su ...
- CF160D
题意:给你一个图,判断每条边是否在最小生成树MST上,不在输出none,如果在所有MST上就输出any,在某些MST上输出at least one: 分析:首先必须知道在最小生成树上的边的权值一定是等 ...
- TcxDBTreeList导出EXCEL
function ExportExcel(tree: TcxDBTreeList; const fileName: string = '1.xls'): Boolean;var sd: TSave ...
- XML文件的生成与读取
从数据库生成: public static void ToXML(string tablename) { //获取数据 string sql = "select * from " ...
- UVa 11536 Smallest Sub-Array (水题, 滑动窗口)
题意:给定 n 个由0~m-1的整数组成的序列,输入 k ,问你找出连续的最短序列,使得这个序列含有1-k的所有整数. 析:这个题,很简单么,只要从头开始扫一遍就OK,时间复杂度为O(n). 代码如下 ...
- 解决远程连接mysql错误1130
Mysql远程连接Mysql服务器的数据库,错误代码是1130,ERROR 1130: Host xxx.xxx.xxx.xxx is not allowed to connect to this ...
- 结构类模式(二):桥接(Bridge)
定义 将抽象化(Abstraction)与实现化(Implementation)脱耦,使得二者可以独立地变化. 在软件系统中,某些类型由于自身的逻辑,它具有两个或多个维度的变化,那么如何应对这种“多维 ...