
SpringBoot整合Liquibase
1、是什么?
Liquibase是一个开源的数据库管理工具,可以帮助开发人员管理和跟踪数据库变更。它可以与各种关系型数据库和NoSQL数据库一起使用,并提供多种数据库任务自动化功能,例如数据库迁移、版本控制和监控。Liquibase还提供了一个Web界面,可以方便地管理和跟踪数据库变更。它支持Java、Python、Ruby等多种语言,可以轻松地集成到现有的开发环境中。
2、能干嘛?
Liquibase主要功能包括:
- 数据库迁移:可以方便地将数据库从一个版本迁移到另一个版本。
- 版本控制:可以跟踪数据库变更的历史记录,并可以根据需要回滚到以前的版本。
- 监控:可以监控数据库变更,并在发生变更时收到通知。
- 自动化:可以自动化数据库任务,例如在应用程序部署之前检查数据库完整性。
Liquibase可以帮助开发人员更加高效地管理数据库,并减少由于数据库变更而导致的错误。
Liquibase的优点:
- 配置文件支持SQL、XML、JSON 或者 YAML
- 版本控制按序执行
- 可以用上下文控制sql在何时何地如何执行
- 支持schmea的变更
- 根据配置文件自动生成sql语句用于预览
- 可重复执行迁移
- 可插件拓展
- 可回滚
- 可兼容14中主流数据库如oracle,mysql,pg等,支持平滑迁移
- 支持schema方式的多租户(multi-tenant)
3、怎么玩?
这里主要使用SpringBoot整合Liquibase实现对数据库进行版本管理
(1) 引入依赖
<?xml version="1.0" encoding="UTF-8"?>

<project xmlns="http://maven.apache.org/POM/4.0.0"

         xmlns:xsi="http://www.w3.org/2001/XMLSchema-instance"

         xsi:schemaLocation="http://maven.apache.org/POM/4.0.0 http://maven.apache.org/xsd/maven-4.0.0.xsd">

    <modelVersion>4.0.0</modelVersion>

    <groupId>com.ly</groupId>

    <artifactId>springboot-liquibase</artifactId>

    <version>1.0-SNAPSHOT</version>

    <parent>

        <groupId>org.springframework.boot</groupId>

        <artifactId>spring-boot-starter-parent</artifactId>

        <version>3.1.0</version>

    </parent>

    <properties>

        <maven.compiler.source>17</maven.compiler.source>

        <maven.compiler.target>17</maven.compiler.target>

        <project.build.sourceEncoding>UTF-8</project.build.sourceEncoding>

    </properties>

    <dependencies>

        <dependency>

            <groupId>org.springframework.boot</groupId>

            <artifactId>spring-boot-starter-web</artifactId>

        </dependency>

        <dependency>

            <groupId>mysql</groupId>

            <artifactId>mysql-connector-java</artifactId>

            <version>8.0.33</version>

        </dependency>

        <dependency>

            <groupId>org.liquibase</groupId>

            <artifactId>liquibase-core</artifactId>

            <version>4.23.0</version>

        </dependency>

        <dependency>

            <groupId>org.projectlombok</groupId>

            <artifactId>lombok</artifactId>

            <version>1.18.28</version>

        </dependency>

        <dependency>

            <groupId>com.alibaba</groupId>

            <artifactId>druid-spring-boot-starter</artifactId>

            <version>1.2.18</version>

        </dependency>

    </dependencies>

</project>
(2) 配置数据源
package com.ly.config;

import com.alibaba.druid.pool.DruidDataSource;

import lombok.Data;

import org.springframework.boot.SpringBootConfiguration;

import org.springframework.boot.context.properties.ConfigurationProperties;

import org.springframework.context.annotation.Bean;

import javax.sql.DataSource;

import static com.ly.config.DataSourcesConfig.SPRING_DATASOURCE;

/**

 * @author ly (个人博客:https://www.cnblogs.com/ybbit)

 * @date 2023-07-22  16:28

 * @tags 喜欢就去努力的争取

 */

@ConfigurationProperties(prefix = SPRING_DATASOURCE)

@SpringBootConfiguration

@Data

public class DataSourcesConfig {

    public static final String SPRING_DATASOURCE = "spring.datasource";

    private String driverClassName;

    private String url;

    private String username;

    private String password;

    /**

     * 数据源配置

     *

     * @return

     */

    @Bean

    public DataSource dataSource() {

        DruidDataSource dataSource = new DruidDataSource();

        dataSource.setDriverClassName(driverClassName);

        dataSource.setUrl(url);

        dataSource.setUsername(username);

        dataSource.setPassword(username);

        return dataSource;

    }

}
(3) 配置Liquibase
package com.ly.config;

import liquibase.integration.spring.SpringLiquibase;

import org.springframework.boot.SpringBootConfiguration;

import org.springframework.boot.autoconfigure.condition.ConditionalOnProperty;

import org.springframework.context.annotation.Bean;

import javax.sql.DataSource;

/**

 * @author ly (个人博客:https://www.cnblogs.com/ybbit)

 * @date 2023-07-22  14:53

 * @tags 喜欢就去努力的争取

 */

@ConditionalOnProperty(value = "spring.profiles.active", havingValue = "dev")

@SpringBootConfiguration

public class LiquibaseConfig {

    public static final String CHANGE_LOG_PATH = "classpath:/liquibase/db.changelog-master.xml";

    @Bean

    public SpringLiquibase liquibase(DataSource dataSource) {

        SpringLiquibase liquibase = new SpringLiquibase();

        liquibase.setChangeLog(CHANGE_LOG_PATH);

        liquibase.setDataSource(dataSource);

        liquibase.setShouldRun(true);

        return liquibase;

    }

}
(4) 创建db.changelog-master.xml文件
<?xml version="1.0" encoding="UTF-8"?>

<databaseChangeLog

        xmlns="http://www.liquibase.org/xml/ns/dbchangelog"

        xmlns:xsi="http://www.w3.org/2001/XMLSchema-instance"

        xsi:schemaLocation="http://www.liquibase.org/xml/ns/dbchangelog

                      http://www.liquibase.org/xml/ns/dbchangelog/dbchangelog-3.1.xsd">

    <!--

    1:includeAll 标签可以把一个文件夹下的所有 changelog 都加载进来。如果单个加载可以用 include。

    2:includeAll 标签里有两个属性:path 和 relativeToChangelogFile。

        2.1:path (在 include 标签里是 file):指定要加载的文件或文件夹位置

        2.2:relativeToChangelogFile :文件位置的路径是否相对于 root changelog 是相对路径,默认 false,即相对于 classpath 是相对路径。

    -->

<!--    <includeAll path="change/" relativeToChangelogFile="true"/>-->

    <!--加入一张test_create_table表-->

    <include file="classpath:liquibase/change/changelog_v1.0.xml"></include>

    <!--给test_create_table表加一个email字段-->

    <include file="classpath:liquibase/change/changelog_v2.0.xml"></include>

    <!--修改test_create_table表加email字段-->

    <include file="classpath:liquibase/change/changelog_v3.0.xml"></include>

    <!--向test_create_table表加一条数据-->

    <include file="classpath:liquibase/change/changelog_v4.0.xml"></include>

</databaseChangeLog>
(5) 创建每一项的变更文件(推荐把各个模块的变更都分门别类的整理好)
changelog_v1.0.xml
<?xml version="1.1" encoding="UTF-8" standalone="no"?>

<databaseChangeLog xmlns="http://www.liquibase.org/xml/ns/dbchangelog"

                   xmlns:xsi="http://www.w3.org/2001/XMLSchema-instance"

                   xsi:schemaLocation="http://www.liquibase.org/xml/ns/dbchangelog http://www.liquibase.org/xml/ns/dbchangelog/dbchangelog-latest.xsd">

    <!--

     changeSet:每一个changeSet对应一个数据库相关的操作

      author:修改人

      id:唯一

    -->

    <!--加入一张表【test_create_table】-->

    <changeSet author="ly" id="2023072201-1">

        <createTable remarks="用户表" tableName="test_create_table">

            <column autoIncrement="true" name="id" type="INT" remarks="主键">

                <constraints nullable="false" primaryKey="true" unique="true"/>

            </column>

            <column name="username" remarks="用户名" type="VARCHAR(32)">

                <constraints unique="true" nullable="false"/>

            </column>

            <column name="password" remarks="密码" type="VARCHAR(100)">

                <constraints unique="false" nullable="false"/>

            </column>

        </createTable>

    </changeSet>

</databaseChangeLog>
changelog_v2.0.xml
<?xml version="1.1" encoding="UTF-8" standalone="no"?>

<databaseChangeLog xmlns="http://www.liquibase.org/xml/ns/dbchangelog"

                   xmlns:xsi="http://www.w3.org/2001/XMLSchema-instance"

                   xsi:schemaLocation="http://www.liquibase.org/xml/ns/dbchangelog http://www.liquibase.org/xml/ns/dbchangelog/dbchangelog-latest.xsd">

    <changeSet author="ly" id="2023072202-1">

        <!--加入一个email字段-->

        <addColumn tableName="test_create_table">

            <column name="email" type="VARCHAR(32)" remarks="邮箱">

                <constraints nullable="true"/>

            </column>

        </addColumn>

    </changeSet>

</databaseChangeLog>
changelog_v3.0.xml
<?xml version="1.1" encoding="UTF-8" standalone="no"?>

<databaseChangeLog xmlns="http://www.liquibase.org/xml/ns/dbchangelog"

                   xmlns:xsi="http://www.w3.org/2001/XMLSchema-instance"

                   xsi:schemaLocation="http://www.liquibase.org/xml/ns/dbchangelog http://www.liquibase.org/xml/ns/dbchangelog/dbchangelog-latest.xsd">

    <changeSet author="ly" id="2023072203-1">

        <!--重命名email列名称-->

        <renameColumn tableName="test_create_table" oldColumnName="email" newColumnName="newEmail" columnDataType="VARCHAR(50)"/>

    </changeSet>

</databaseChangeLog>
changelog_v4.0.xml
<?xml version="1.1" encoding="UTF-8" standalone="no"?>

<databaseChangeLog xmlns="http://www.liquibase.org/xml/ns/dbchangelog"

                   xmlns:xsi="http://www.w3.org/2001/XMLSchema-instance"

                   xsi:schemaLocation="http://www.liquibase.org/xml/ns/dbchangelog http://www.liquibase.org/xml/ns/dbchangelog/dbchangelog-latest.xsd">

    <changeSet author="ly" id="2023072204-1">

        <!--插入一条数据-->

        <insert tableName="test_create_table">

            <column name="id" value="1"></column>

            <column name="username" value="zs"></column>

            <column name="password" value="123"></column>

            <column name="newEmail" value="zs@163.com"></column>

        </insert>

    </changeSet>

</databaseChangeLog>
(6) SpringBoot配置文件
spring:

  datasource:

    driver-class-name: com.mysql.cj.jdbc.Driver

    url: jdbc:mysql://localhost:3306/qbb01

    username: root

    password: root

  profiles:

    active: dev
(7) Main
package com.ly;

import org.springframework.boot.autoconfigure.SpringBootApplication;

import org.springframework.boot.builder.SpringApplicationBuilder;

import org.springframework.boot.context.properties.EnableConfigurationProperties;

/**

 * @author ly (个人博客:https://www.cnblogs.com/ybbit)

 * @date 2023-07-22  14:52

 * @tags 喜欢就去努力的争取

 */

@EnableConfigurationProperties

@SpringBootApplication

public class LiquibaseApplication {

    public static void main(String[] args) {

        new SpringApplicationBuilder(LiquibaseApplication.class)

                .run(args);

    }

}
(7) 启动日志
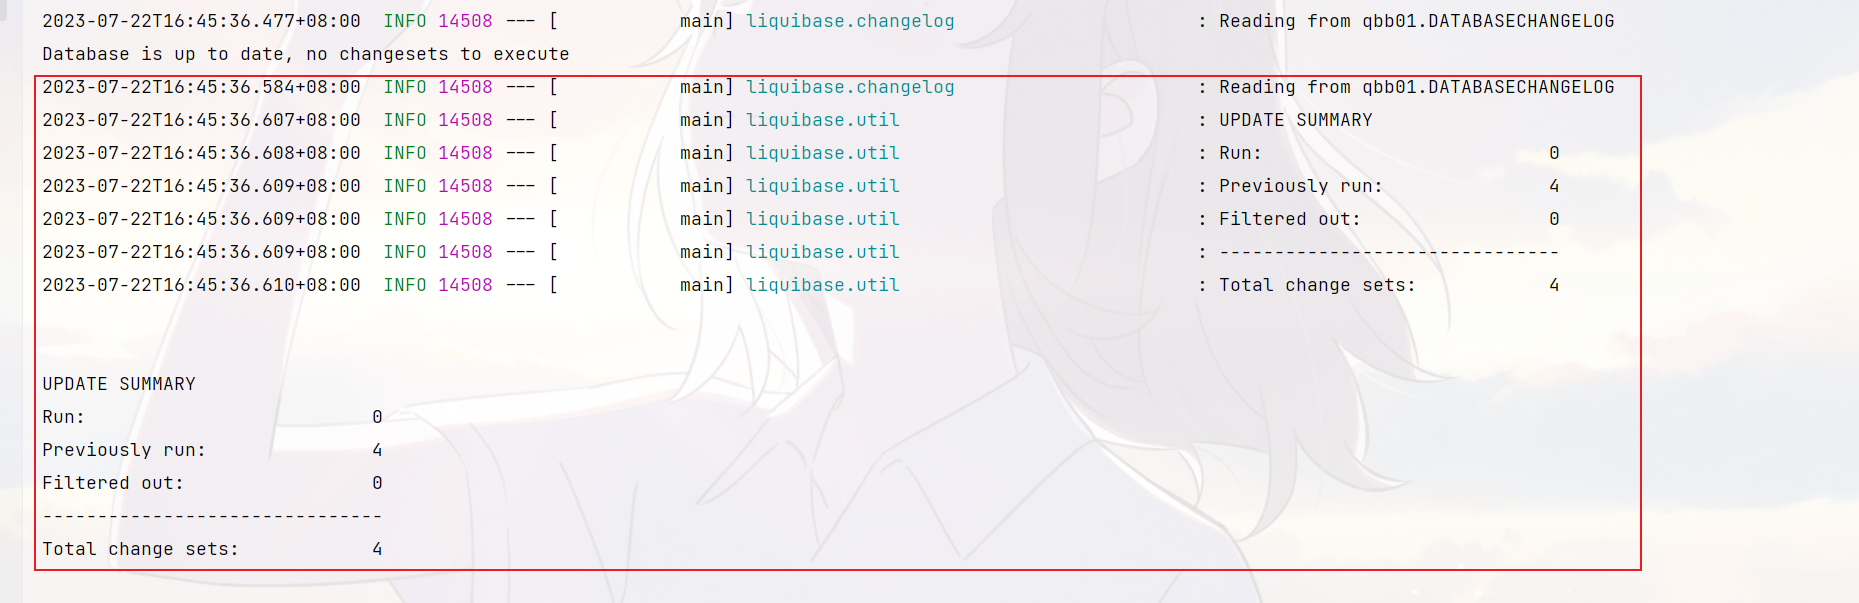
(8) 数据库
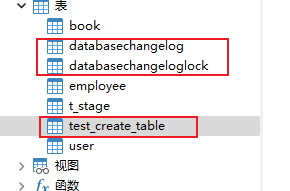
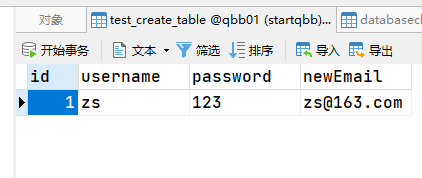
4、ChangeSet标签集与作用
(1) add
| 标签 | 说明 |
|---|---|
| addAutoIncrement | 将已存在的列改为自增列 |
| addColumn | 增加列 |
| addDefaultValue | 增加列的默认值 |
| addForeignKeyConstraint | 增加外键 |
| addLookupTable | 创建外键的关联表 |
| addNotNullConstraint | 增加非空值约束 |
| addPrimaryKey | 增加主键 |
| addUniqueConstraint | 增加唯一值约束 |
(2) create
| 标签 | 说明 |
|---|---|
| createIndex | 创建索引 |
| createProcedure | 创建存储过程 |
| createSequence | 创建序列 |
| createTable | 创建表 |
| createView | 创建视图 |
(3) drop
| 标签 | 说明 |
|---|---|
| dropAllForeignKeyConstraints | 删除全部外键约束 |
| dropColumn | 删除列 |
| dropDefaultValue | 删除默认值 |
| dropForeignKeyConstraint | 删除某一外键约束 |
| dropNotNullConstraint | 删除空值约束 |
| dropPrimaryKey | 删除主键 |
| dropProcedure | 删除存储过程 |
| dropSequence | 删除序列 |
| dropTable | 删除表 |
| dropUniqueConstraint | 删除唯一约束 |
| dropView | 删除视图 |
(4) rename
| 标签 | 说明 |
|---|---|
| renameColumn | 重命名列 |
| renameSequence | 重命名序列 |
| renameTable | 重命名表 |
| renameView | 重命名视图 |
5、sql
| 标签 | 说明 |
|---|---|
| sql | sql语句 |
| sqlFile | sql文件 |
6、其他
| 标签 | 说明 |
|---|---|
| insert | 插入数据 |
| update | 更新数据 |
| delete | 删除数 |
| empty | 空操作 |
| executeCommand | 执行命名 |
| alterSequence | 修改序列 |
| customChange | 自定义操作,需自己实现 |
| loadData | 导入csv数据至已存在的表中 |
| loadUpdateData | 导入csv数据至表中,表不存在则新建 |
| mergeColumns | 合并列 |
| modifyDataType | 修改数据类型 |
| output | 输出日志 |
| setColumnRemarks | 增加列说明 |
| setTableRemarks | 增加表说明 |
| stop | 停止liquibase |
| tagDatabase | 打标签用于将来回滚 |
5、集成Maven插件
(1) 在pom.xml中加入下面的插件配置
<build>

        <plugins>

            <plugin>

                <groupId>org.liquibase</groupId>

                <artifactId>liquibase-maven-plugin</artifactId>

                <configuration>

                    <!--properties文件路径,该文件记录了数据库连接信息等-->

                    <propertyFile>src/main/resources/liquibase.properties</propertyFile>

                    <propertyFileWillOverride>true</propertyFileWillOverride>

                    <!--生成文件的路径-->

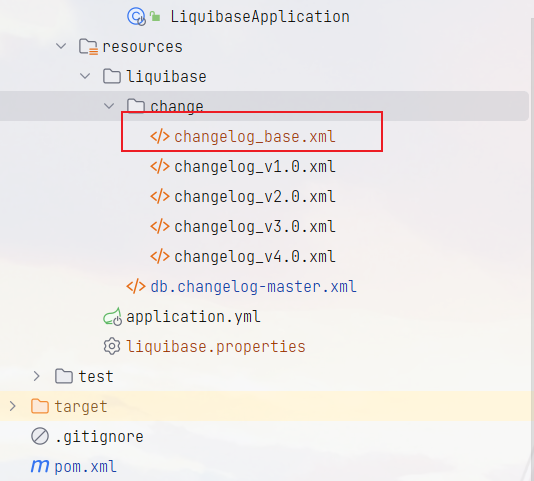
                    <outputChangeLogFile>src/main/resources/liquibase/change/changelog_base.xml

                    </outputChangeLogFile>

                </configuration>

            </plugin>

        </plugins>

    </build>
(2) 在resources目录下加入liquibase.properties配置文件
#要连接库配置信息

driver=com.mysql.cj.jdbc.Driver

url=jdbc:mysql://localhost:3306/qbb01

username=root

password=root

#liquibase

changeLogFile=src/main/resources/liquibase/db.changelog-master.xml
(3) 根据当前配置的数据源生成changelog
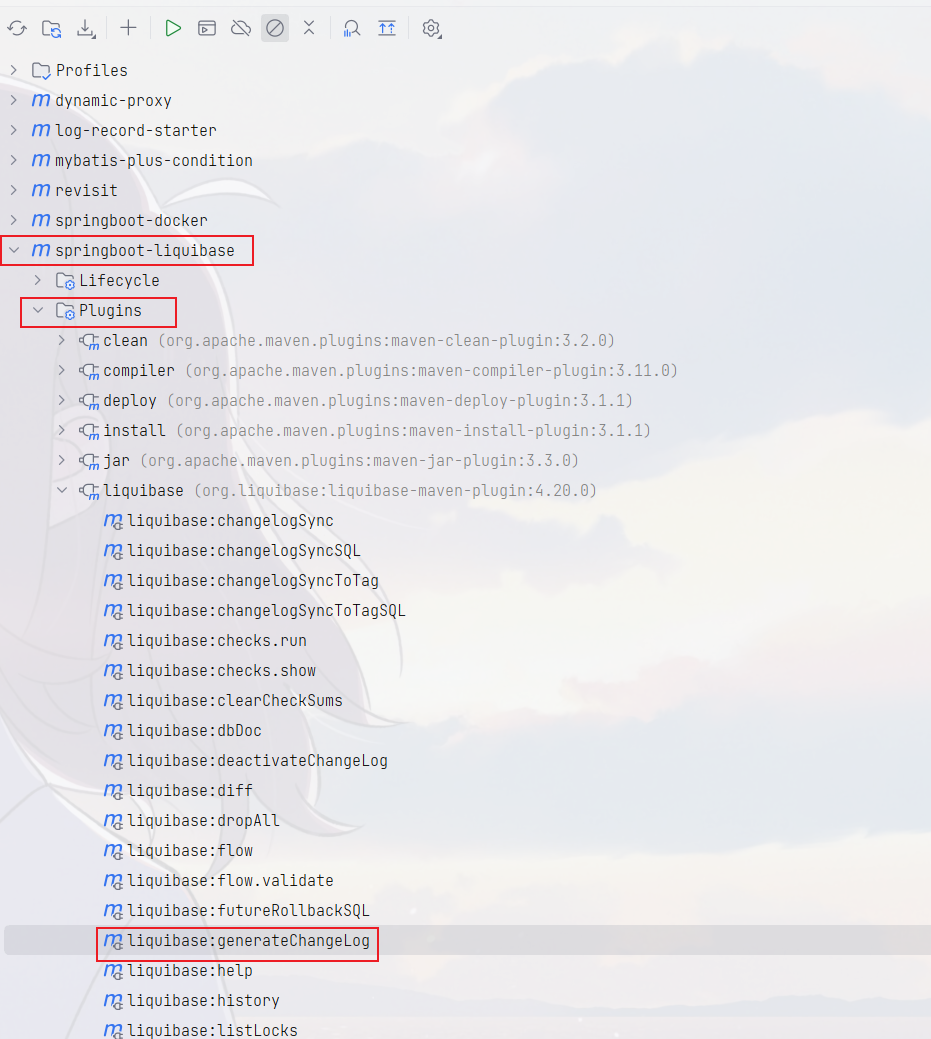
(4) 结果
代码仓库:springboot-liquibase
SpringBoot整合Liquibase的更多相关文章
- springboot集成liquibase,h2数据库
Liquibase是一个用于跟踪.管理和应用数据库变化的开源的数据库重构工具.它将所有数据库的变化(包括结构和数据)都保存在XML文件中,便于版本控制. Liquibase具备如下特性:* 不依赖于特 ...
- spring-boot整合mybatis(1)
sprig-boot是一个微服务架构,加快了spring工程快速开发,以及简便了配置.接下来开始spring-boot与mybatis的整合. 1.创建一个maven工程命名为spring-boot- ...
- SpringBoot整合Mybatis之项目结构、数据源
已经有好些日子没有总结了,不是变懒了,而是我一直在奋力学习springboot的路上,现在也算是完成了第一阶段的学习,今天给各位总结总结. 之前在网上找过不少关于springboot的教程,都是一些比 ...
- springboot整合mq接收消息队列
继上篇springboot整合mq发送消息队列 本篇主要在上篇基础上进行activiemq消息队列的接收springboot整合mq发送消息队列 第一步:新建marven项目,配置pom文件 < ...
- springboot整合mybaits注解开发
springboot整合mybaits注解开发时,返回json或者map对象时,如果一个字段的value为空,需要更改springboot的配置文件 mybatis: configuration: c ...
- SpringBoot整合Redis、ApachSolr和SpringSession
SpringBoot整合Redis.ApachSolr和SpringSession 一.简介 SpringBoot自从问世以来,以其方便的配置受到了广大开发者的青睐.它提供了各种starter简化很多 ...
- SpringBoot整合ElasticSearch实现多版本的兼容
前言 在上一篇学习SpringBoot中,整合了Mybatis.Druid和PageHelper并实现了多数据源的操作.本篇主要是介绍和使用目前最火的搜索引擎ElastiSearch,并和Spring ...
- SpringBoot整合Kafka和Storm
前言 本篇文章主要介绍的是SpringBoot整合kafka和storm以及在这过程遇到的一些问题和解决方案. kafka和storm的相关知识 如果你对kafka和storm熟悉的话,这一段可以直接 ...
- SpringBoot整合SpringCloud搭建分布式应用
什么是SpringCloud? SpringCloud是一个分布式的整体解决方案.SpringCloud为开发者提供了在分布式系统中快速构建的工具,使用SpringCloud可以快速的启动服务或构建应 ...
- SpringBoot整合RabbitMQ-整合演示
本系列是学习SpringBoot整合RabbitMQ的练手,包含服务安装,RabbitMQ整合SpringBoot2.x,消息可靠性投递实现等三篇博客. 学习路径:https://www.imooc. ...
随机推荐
- .NET周刊【8月第4期 2023-08-27】
国内文章 AgileConfig-1.7.0 发布,支持 SSO https://www.cnblogs.com/kklldog/p/agileconfig-170.html AgileConfig ...
- 在 Net7.0 环境下使用 RestSharp 发送 Http(FromBody和FromForm)请求
一.简介 最近,在做一个数据传输的服务,我在一个Worker Service里面需要访问 WebAPI 接口,并传输数据,也可以提交数据.由于第一次使用 RestSharp 发送请求,也遇到了很多问题 ...
- 200PLC转以太网与1200PLC实现PUT GET通信
200PLC转以太网与1200PLC实现PUT GET通信 本案例介绍西门子PLC200PLC 224或226,Port0或者是Port1串口通过兴达易控PPI-ETH-XD1.0plc以太网模块,2 ...
- 爬虫系列——Beautifulsoup4
文章目录 一 介绍 二 基本使用 三 遍历文档树 四 搜索文档树 五 修改文档树 六 总结 一 介绍 Beautiful Soup 是一个可以从HTML或XML文件中提取数据的Python库.它能 ...
- 爬虫系列——requests
文章目录 一 介绍 二 基于GET请求 三 基于POST请求 四 响应Response 五 高级用法 一 介绍 介绍:使用requests可以模拟浏览器的请求,比起之前用到的urllib,reques ...
- 深挖 Python 元组 pt.1
哈喽大家好,我是咸鱼 好久不见甚是想念,2023 年最后一次法定节假日已经结束了,不知道各位小伙伴是不是跟咸鱼一样今天就开始"搬砖"了呢? 我们知道元组(tuple)是 Pytho ...
- 教学法学期末考试MOOC01
期末考试 返回 期末考试试卷为客观题,总分为100分,占课程成绩的40%.其中包含16道单选题,2道多选题.共18道题.单选题每道5分,多选题每道10分,限时90分钟完成. 倒计时: 01:13:4 ...
- springboot整合redis报错:链接失败; Unable to connect to Redis
springboot整合redis报错:链接失败:org.springframework.data.redis.RedisConnectionFailureException: Unable to c ...
- postman导入请求到jmeter进行简单压测,开发同学一学就会
背景 这个事情也是最近做的,因为线上nginx被我换成了openresty,然后接入层服务也做了较大改动,虽然我们这个app(内部办公类)并发不算高,但好歹还是压测一下,上线时心里也稳一点. 于是用j ...
- Java并发编程和多线程的区别
并发编程: 并发编程是一种编程范式,它关注的是编写能够正确和高效处理多个并发任务的程序.并发编程不仅包括多线程,还包括了处理多个独立任务的各种技术和模式,如进程.协程.分布式编程等.并发编程的目标是实 ...