python单元测试pytest
1、pytest简介
pytest是Python的一种单元测试框架,与python自带的unittest测试框架类似,但是比unittest框架使用起来更简洁,效率更高。
- 执行测试过程中可以将某些测试跳过,或者对某些预期失败的case标记成失败
- 能够支持简单的单元测试和复杂的功能测试
- 支持重复执行失败的case
- 支持运行由nose, unittest编写的测试case
- 具有很多第三方插件,并且可以自定义扩展
- 方便的和持续集成工具集成
- 支持参数化
2、安装pytest
pip install pytest
3、举例
(1)单测试case
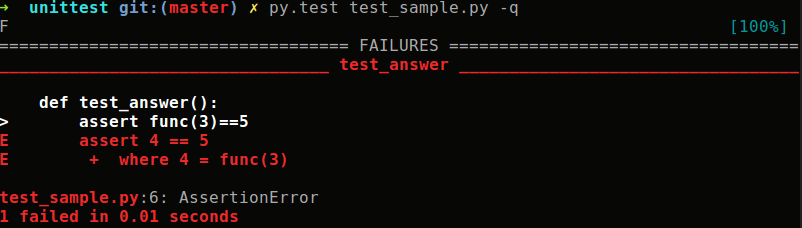
执行测试的时候,我们只需要在测试文件test_sample所在的目录下,运行py.test即可。pytest会在当前目录及其子目录下寻找以test开头的py文件或者以test结尾的py文件(即测试文件),找到测试文件之后,进入到测试文件中寻找test_开头的测试函数并执行。
在当前目录下新建文件 test_champ.py
def func(x):

    return x + 1

def test_answer():

    assert func(3)==5
在命令行输入py.test [-q],加上-q(quiet)输出结果会省去pytest版本信息,便可以看到执行的成功与失败的原因了
(2)多测试case
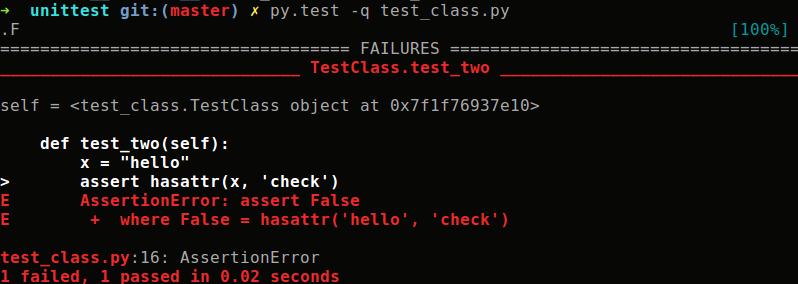
当需要编写多个测试样例的时候,我们可以将其放到一个测试类当中,如:
class TestClass:

        def test_one(self):

                assert "h" in "this"

        def test_two(self):

                x = "hello"

                assert hasattr(x,"check")
我们可以通过执行测试文件的方法,执行上面的测试:py.test -q test_class.py
4、pytest测试样例编写规则
- 测试文件以test_开头(以_test结尾也可以)
- 测试类以Test开头,并且不能带有 __init__ 方法
- 测试函数以test_开头
- 断言使用基本的assert即可
5、如何执行pytest测试样例
py.test               # run all tests below current dir

py.test test_mod.py   # run tests in module

py.test somepath      # run all tests below somepath

py.test -k stringexpr # only run tests with names that match the

                      # the "string expression", e.g. "MyClass and not method"

                      # will select TestMyClass.test_something

                      # but not TestMyClass.test_method_simple

py.test test_mod.py::test_func # only run tests that match the "node ID",

                   # e.g "test_mod.py::test_func" will select

                               # only test_func in test_mod.py
6、测试报告
pytest可以方便的生成测试报告,即可以生成HTML的测试报告,也可以生成XML格式的测试报告用来与持续集成工具集成。
生成txt格式报告:
py.test --resultlog=path/log.txt
生成XML格式的报告:
py.test --junitxml=path/log.xml
将测试报告发送到pastebin服务器,执行下面的命令会生成报告的网址
py.test test_report.py --pastebin=all
只发送失败的报告
py.test test_report.py --pastebin=failed
生成Html格式报告
这个需要安装pytest的第三方插件pytest-html:
pip install pytest-html

py.test test_report.py --html=path/log.html
7、如何获取帮助信息
py.test --version # shows where pytest was imported from

py.test --fixtures # show available builtin function arguments

py.test -h | --help # show help on command line and config file options
与Python自带的unitest测试框架中的setup、teardown类似,pytest提供了fixture函数用以在测试执行前和执行后进行必要的准备和清理工作。但是fixture函数对setup和teardown进行了很大的改进。
- fixture函数可以使用在测试函数中,测试类中,测试文件中以及整个测试工程中。
- fixture支持模块化,fixture可以相互嵌套
- fixture支持参数化
- fixture支持unittest类型的setup和teardown
setup完成测试前的初始化工作,teardown实现测试完成后的垃圾回首工作。如果测试的程序使用jdbc连接数据库,那么setUpBeforeClass()方法中就可以写上初始化数据库连接的一些代码,tearDownAfterClass()方法中就可以写上关闭数据库连接的一些代码。
8、最佳实践
virtualenv .        # create a virtualenv directory in the current directory

source bin/activate # on unix
2、在虚拟环境中安装pytest:
pip install pytest
9、断言的使用
①正常断言
# 子签名类,忽略中间打印的过程,直接表示出错的原因

# assert value == 0, "value was odd, should be even"

# 等于、不等、小于、大于

assert func(2)==3
②异常断言
使用pytest.raise方法(需import pytest)
断言1除以0,将产生一个ZeroDivisionError类型的异常。
import pytest

def test_zero_division():

    with pytest.raises(ZeroDivisionError):

        1 / 0
有的时候,我们可能需要在测试中用到产生的异常中的某些信息,比如异常的类型type,异常的值value等等。下面我们修改下上面的测试
import pytest

def test_recursion_depth():

    with pytest.raises(ZeroDivisionError) as excinfo:

    1/0

    assert excinfo.type == 'RuntimeError'
因为该测试断言产生的异常类型是RuntimeError,而实际上产生的异常类型是ZeroDivisionError,所以测试失败了。在测试结果中,可以看到assert子表达式excinfo.type的值。
python单元测试pytest的更多相关文章
- Python单元测试框架之pytest 4 -- 断言
From: https://www.cnblogs.com/fnng/p/4774676.html Python单元测试框架之pytest -- 断言 2015-08-31 23:57 by 虫师, ...
- Python单元测试框架之pytest 3 -- fixtures
From: https://www.cnblogs.com/fnng/p/4769020.html Python单元测试框架之pytest -- fixtures 2015-08-29 13:05 b ...
- Python单元测试框架之pytest 2 -- 生成测试报告
From: https://www.cnblogs.com/fnng/p/4768239.html Python单元测试框架之pytest -- 生成测试报告 2015-08-29 00:40 by ...
- [Python]使用pytest进行单元测试
安装pytest pipenv install pytest 验证安装的版本: pytest --version This , imported /site-packages/pytest.py 接下 ...
- Python之pytest 基础
pytest是一个非常成熟的全功能的Python测试框架,主要特点有以下几点:1.简单灵活,容易上手:2.支持参数化:3.能够支持简单的单元测试和复杂的功能测试,还可以用来做selenium/appn ...
- python单元测试框架笔记
目录 单元测试概述 什么是单元测试 单元测试什么进行? 单元测试由谁负责? 单元测试需要注意 单元测试覆盖类型 python 单元测试框架 unittest pytest 测试框架 单元测试概述 什么 ...
- The Hacker's Guide To Python 单元测试
The Hacker's Guide To Python 单元测试 基本方式 python中提供了非常简单的单元测试方式,利用nose包中的nosetests命令可以实现简单的批量测试. 安装nose ...
- [译]PyUnit—Python单元测试框架(1)
1. 原文及参考资料 原文链接:http://docs.python.org/2/library/unittest.html# 参考文档: http://pyunit.sourceforge.net/ ...
- Python单元测试PyUnit框架轻度整改
原理 参考:单元测试原理 背景 年后有段时间没写代码了,所以趁着周末找了个python单元测试玩下,测试自己的Android应用.发现PyUnit虽然在单个脚本文件中添加多个测试用例,比如官网提供的方 ...
随机推荐
- (连通图 模板题 出度和入度)Network of Schools--POJ--1236
链接: http://poj.org/problem?id=1236 http://acm.hust.edu.cn/vjudge/contest/view.action?cid=82833#probl ...
- HDU6029 Graph Theory 2017-05-07 19:04 40人阅读 评论(0) 收藏
Graph Theory Time Limit: 2000/1000 M ...
- centos7 磁盘管理—— lvm的使用
Linux用户安装Linux操作系统时遇到的一个常见的难以决定的问题就是如何正确地评估各分区大小,以分配合适的硬盘空间.普通的磁盘分区管理方式在逻辑分区划分好之后就无法改变其大小,当一个逻辑分区存放不 ...
- handsontable 问题
碰到问题了,去官网上找community:http://docs.handsontable.com/0.16.1/tutorial-quick-start.html 1. 描述:把handson ta ...
- ajax如何向后台传递数组,在后台该如何接收的问题(项目积累)
一.后台如何接收从前台接收的数组: 使用request.getParameterValues(String xxx); <input type="text" name=&qu ...
- DelphiXE10.2怎么安装文本转语音(TTS)语音转文本(SR)控件(XE10.2+WIN764)
关资料: http://edn.embarcadero.com/article/29583 http://blog.sina.com.cn/s/blog_53866d7501017r1o.html 问 ...
- [Openwrt 项目开发笔记]:Samba服务&vsFTP服务(四)
[Openwrt项目开发笔记]系列文章传送门:http://www.cnblogs.com/double-win/p/3888399.html 正文: 在上一节中,我们讲述了如何在路由器上挂载U盘,以 ...
- Eclipse ADT 代码注释模版
具体怎么用: 将下面的内容拷贝出来保存为XML文件,进入,Eclipse :Window --> Java --> Code Style --> Code Templates-> ...
- BCP IN示例
参考:http://www.cnblogs.com/qanholas/archive/2011/07/05/2098616.html bcp {dbtable | query} {in | out | ...
- CefSharp禁止弹出新窗体,在同一窗口打开链接,并且支持带type="POST" target="_blank"的链接
1.实现ILifeSpanHandler接口,代码如下: using CefSharp; using CefSharp.WinForms; using System; using System.Col ...