STL漫游之vector
std::vector 源码分析
从源码视角观察 STL 设计,代码实现为 libstdc++(GCC 4.8.5).
由于只关注 vector 的实现,并且 vector 实现几乎全部在头文件中,可以用一个这样的方法里获取比较清爽的源码
// main.cpp

#include <vector>

int main() {

  std::vector<int> v;

  v.emplace_back(1);

}
g++ -E main.cpp -std=c++11 > vector.cpp
在 vscode 中打开 vector.cpp 使用正则 "#.*\n" 把所以编译器相关的行删除,这样再进行格式化,就可以把预编译指令全部过滤了,而且不依赖外部的实现,跳转也没有压力
allocator
对于一个 allocator 需要实现的 trait,至少需要
- allocate 内存的分配
- deallocate 内存的回收
allocator 分配的最小粒度为对象,故要增加一个最大分配的数量
- max_size 最大分配数量
以上是实现一个分配器的最基础功能。在此基础上,扩展对象的构造和析构,对于需要使用分配器的地方比如 STL,容器自身就不用再关注对象的构造和析构的内存相关功能了。
- construct 对象构造,意味着需要使用模版实现,通用化
- destroy 对象销毁
综上,实现 allocator 具有的 alloc_traits 如下:
- allocate 分配
- deallocate 回收
- construct 对象构造,意味着需要使用模版实现,通用化
- destroy 对象销毁
- max_size 最大分配数量
std::allocator
标准库的分配器实现比较简单,分配和回收使用 ::operator new/delete
pointer allocate(size_type __n, const void * = 0) {

  if (__n > this->max_size())

    std::__throw_bad_alloc();

  return static_cast<_Tp *>(::operator new(__n * sizeof(_Tp)));

}

void deallocate(pointer __p, size_type) { ::operator delete(__p); }
对于最大分配数量,整个进程空间(虚拟)都可以进行分配
// sizeof(size_t) = 进程地址宽度

size_type max_size() const throw() { return size_t(-1) / sizeof(_Tp); }
对于对象的构造和析构,则使用布置构造和析构函数
void construct(pointer __p, const _Tp &__val) {

  ::new ((void *)__p) _Tp(__val);

}

void destroy(pointer __p) { __p->~_Tp(); }
std::vector
通用顺序容器,支持自定义内存分配器;
基础实现
libstdc++ 对 vector 的定义如下,里面提供了:
template <typename _Tp, typename _Alloc = std::allocator<_Tp>>

class vector : protected _Vector_base<_Tp, _Alloc> {};
两个模版参数:一个容器内的元素类型,一个分配器类型,并且分配器类型不是必须参数。
使用 protected 继承 _Vector_base,不过这里并没有利用空基类优化(EBO), 更多的是做了类的隔离;
观察 _Vector_base 的实现,包含了一个 impl:
template <typename _Tp, typename _Alloc> struct _Vector_base {

  typedef

      typename __gnu_cxx::__alloc_traits<_Alloc>::template rebind<_Tp>::other

          _Tp_alloc_type;

  typedef typename __gnu_cxx::__alloc_traits<_Tp_alloc_type>::pointer pointer;

  struct _Vector_impl : public _Tp_alloc_type {

    pointer _M_start;

    pointer _M_finish;

    pointer _M_end_of_storage;

  }

public:

  _Vector_impl _M_impl;

}
_Vector_base 提供了 vector 的对内存的操作,包括分配内存和释放,_Vector_impl public 继承 _Tp_alloc_type(默认为 std::allocator<_Tp1>),从 C++ 的语义上说 _Vector_impl 也可以叫做一个分配器(事实也是)。
_Vector_impl
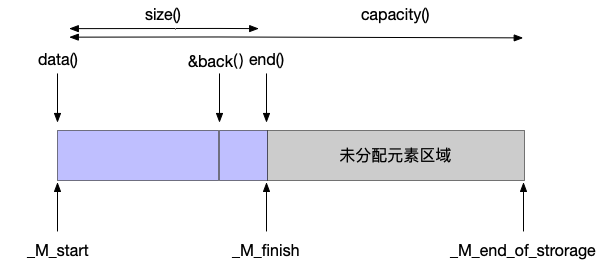
_Vector_impl 实现比较简单,三个核心成员变量,作为 vector 的底层表达
- _M_start 元素空间起始地址,data() 返回的地址
- _M_finish 元空间结束地址, 和 size() 相关
- _M_end_of_storage 元素可用空间结束地址,和 capacity() 相关
struct _Vector_impl : public _Tp_alloc_type {

  pointer _M_start;

  pointer _M_finish;

  pointer _M_end_of_storage;

  _Vector_impl()

      : _Tp_alloc_type(), _M_start(0), _M_finish(0), _M_end_of_storage(0) {}

  _Vector_impl(_Tp_alloc_type const &__a)

      : _Tp_alloc_type(__a), _M_start(0), _M_finish(0),

        _M_end_of_storage(0) {}

  void _M_swap_data(_Vector_impl &__x) {

    std::swap(_M_start, __x._M_start);

    std::swap(_M_finish, __x._M_finish);

    std::swap(_M_end_of_storage, __x._M_end_of_storage);

  }

};
_Vector_base
_Vector_impl 已经提供了底层存储的表达,_Vector_base 则为对底层表达的初始化,及屏蔽内存的实现并对上层提供申请/释放接口
// 只选了一个构造函数展示

_Vector_base(size_t __n) : _M_impl() { _M_create_storage(__n); }

void _M_create_storage(size_t __n) {

  this->_M_impl._M_start = this->_M_allocate(__n);

  this->_M_impl._M_finish = this->_M_impl._M_start;

  this->_M_impl._M_end_of_storage = this->_M_impl._M_start + __n;

}

// 释放内存

~_Vector_base() {

  _M_deallocate(this->_M_impl._M_start,

                this->_M_impl._M_end_of_storage - this->_M_impl._M_start);

}

pointer _M_allocate(size_t __n) {

  return __n != 0 ? _M_impl.allocate(__n) : 0;

}

void _M_deallocate(pointer __p, size_t __n) {

  if (__p)

    _M_impl.deallocate(__p, __n);

}
构造函数
拿了三个构造函数的实现来看,后面两者需要注意构造的时候就会有 size() 个复制的代价
L174 默认构造函数,除了基础的初始化什么都不做
L209 构造拥有 initializer_list init 内容的容器
L214 构造拥有范围 [first, last) 内容的容器
174  explicit vector(const allocator_type &__a) : _Base(__a) {}

209  vector(initializer_list<value_type> __l,

210         const allocator_type &__a = allocator_type())

211      : _Base(__a) {

212    _M_range_initialize(__l.begin(), __l.end(), random_access_iterator_tag());

213  }

214  template <typename _InputIterator,

215            typename = std::_RequireInputIter<_InputIterator>>

216  vector(_InputIterator __first, _InputIterator __last,

217         const allocator_type &__a = allocator_type())

218      : _Base(__a) {

219    _M_initialize_dispatch(__first, __last, __false_type());

220  }
方法
搞明白 std::vector 的底层实现,后面直接看提供的方法了,最基本的增删改查大小。
大小相关
size() 内部的元素个数,实现为
size_type size() const {

  return size_type(this->_M_impl._M_finish - this->_M_impl._M_start);

}
capacity() 可用空间的大小,实现为
size_type capacity() const {

  return size_type(this->_M_impl._M_end_of_storage - this->_M_impl._M_start);

}
push_back
push_back 是使用最频繁的方法,搞清楚它的实现,整个 vector 的变化策略都会比较清晰。
60  void push_back(const value_type &__x) {

61    if (this->_M_impl._M_finish != this->_M_impl._M_end_of_storage) {

62      _Alloc_traits::construct(this->_M_impl, this->_M_impl._M_finish, __x);

63      ++this->_M_impl._M_finish;

64    } else

65      _M_emplace_back_aux(__x);

66  }

67

68  void push_back(value_type &&__x) { emplace_back(std::move(__x)); }

85  template <typename _Tp, typename _Alloc>

86  template <typename... _Args>

87  void vector<_Tp, _Alloc>::emplace_back(_Args && ...__args) {

88    if (this->_M_impl._M_finish != this->_M_impl._M_end_of_storage) {

89      _Alloc_traits::construct(this->_M_impl, this->_M_impl._M_finish,

90                               std::forward<_Args>(__args)...);

91      ++this->_M_impl._M_finish;

92    } else

93      _M_emplace_back_aux(std::forward<_Args>(__args)...);

94  }
push_back() 底层有使用 emplace_back(c++11) 优化的情况:
size() < capacity() 的情况下,直接在最后一个元素后的位置进行复制/移动构造,底层地址偏移+1.
size() == capacity() 的情况下,需要先申请一块新的内存后,再插入新的元素并且需要将之前的元素也移动至新的内存中,实现如下,忽略了异常处理和不需要的分支处理。
11  template <typename _Tp, typename _Alloc>

12  template <typename... _Args>

13  void vector<_Tp, _Alloc>::_M_emplace_back_aux(_Args && ...__args) {

14    const size_type __len =

15        _M_check_len(size_type(1), "vector::_M_emplace_back_aux");

16    pointer __new_start(this->_M_allocate(__len));

17    pointer __new_finish(__new_start);

19    _Alloc_traits::construct(this->_M_impl, __new_start + size(),

20                             std::forward<_Args>(__args)...);

21    __new_finish = 0;

22    __new_finish = std::__uninitialized_move_if_noexcept_a(

23        this->_M_impl._M_start, this->_M_impl._M_finish, __new_start,

24        _M_get_Tp_allocator());

25    ++__new_finish;

26    std::_Destroy(this->_M_impl._M_start, this->_M_impl._M_finish,

27                  _M_get_Tp_allocator());

28    _M_deallocate(this->_M_impl._M_start,

29                  this->_M_impl._M_end_of_storage - this->_M_impl._M_start);

30    this->_M_impl._M_start = __new_start;

31    this->_M_impl._M_finish = __new_finish;

32    this->_M_impl._M_end_of_storage = __new_start + __len;

33  }
_M_check_len 校验是否有足够的空间进行分配,并且返回增长后的大小,实现如下
size_type _M_check_len(size_type __n, const char *__s) const {

  if (max_size() - size() < __n)

    __throw_length_error((__s));

  const size_type __len = size() + std::max(size(), __n);

  return (__len < size() || __len > max_size()) ? max_size() : __len;

}
可以得知,第一次 push_back 后,size() == capacity() == 1,第二次为2,后面依次 *2,最大为 size_t(-1)/sizeof(T).
L14 获取需要分配的的空间大小
L16 申请一块新的内存
L19 对新的元素进行构造
L22 对旧的元素,复制/移动构造至新的内存中
L26 对旧的元素进行析构
L28 对旧的空间进行释放
L30-L32 更新底层实现的索引
所以可以看到 vector 的底层实现一定是顺序表,可以在栈上(自己实现分配器)也可以在堆上(默认)。
关于扩容,增长因子为 2,并且有最大大小限制,还考虑了整数溢出的情况。
关于构造函数,每次插入都会有一个复制构造函数的调用
insert
插入元素到容器中的指定位置。
insert 和 push_back 实现差别不大,多了(size() - pos)次复制/移动构造函数
resize
改变容器中可存储元素的个数
这里只看默认初始化新元素值的实现
298  void resize(size_type __new_size) {

299    if (__new_size > size())

300      _M_default_append(__new_size - size());

301    else if (__new_size < size())

302      _M_erase_at_end(this->_M_impl._M_start + __new_size);

303  }

525  void _M_erase_at_end(pointer __pos) {

526    std::_Destroy(__pos, this->_M_impl._M_finish, _M_get_Tp_allocator());

527    this->_M_impl._M_finish = __pos;

528  }

408  void vector<_Tp, _Alloc>::_M_default_append(size_type __n) {

409    if (__n != 0) {

410      if (size_type(this->_M_impl._M_end_of_storage -

411                    this->_M_impl._M_finish) >= __n) {

412        std::__uninitialized_default_n_a(this->_M_impl._M_finish, __n,

413                                         _M_get_Tp_allocator());

414        this->_M_impl._M_finish += __n;

415      } else {

416        const size_type __len = _M_check_len(__n, "vector::_M_default_append");

417        const size_type __old_size = this->size();

418        pointer __new_start(this->_M_allocate(__len));

419        pointer __new_finish(__new_start);

420        try {

421          __new_finish = std::__uninitialized_move_if_noexcept_a(

422              this->_M_impl._M_start, this->_M_impl._M_finish, __new_start,

423              _M_get_Tp_allocator());

424          std::__uninitialized_default_n_a(__new_finish, __n,

425                                           _M_get_Tp_allocator());

426          __new_finish += __n;

427        } catch (...) {

428          std::_Destroy(__new_start, __new_finish, _M_get_Tp_allocator());

429          _M_deallocate(__new_start, __len);

430          throw;

431        }

432        std::_Destroy(this->_M_impl._M_start, this->_M_impl._M_finish,

433                      _M_get_Tp_allocator());

434        _M_deallocate(this->_M_impl._M_start,

435                      this->_M_impl._M_end_of_storage - this->_M_impl._M_start);

436        this->_M_impl._M_start = __new_start;

437        this->_M_impl._M_finish = __new_finish;

438        this->_M_impl._M_end_of_storage = __new_start + __len;

439      }

440    }

441  }
resize 中也存在三种情况
当需要重置大小等于目前容器的大小时,忽略
当重置大小小于目前容器大小时,处理简单,释放内存,修改 finish 的值
当重置大小大于目前容器大小时:
- 当前重置小于等于容器的容量,直接在尾部以默认构造函数额外的元素
- 当重置的大小大于容器的容器,和push_back一样,需要先申请内存,再复制/移动元素,再重复1的步骤
L416-L412 为申请新的内存,并且复制/移动元素
L424 为在尾部以默认构造函数额外的元素
clear
清除容器内的元素,之后 size() = 0
实现较为简单
521  void clear() noexcept { _M_erase_at_end(this->_M_impl._M_start); }

525  void _M_erase_at_end(pointer __pos) {

526    std::_Destroy(__pos, this->_M_impl._M_finish, _M_get_Tp_allocator());

527    this->_M_impl._M_finish = __pos;

528  }
reserve
预留存储空间, 增加 vector 的容量到(大于或)等于 new_cap 的值.
实现也比较简单,new_cap 的值大于容器的容量时,进行重新分配,再复制/移动到新的内存中,最后更新底层数据结构
566   template <typename _Tp, typename _Alloc>

567   void vector<_Tp, _Alloc>::reserve(size_type __n) {

568     if (__n > this->max_size())

569       __throw_length_error(("vector::reserve"));

570     if (this->capacity() < __n) {

571       const size_type __old_size = size();

572       pointer __tmp = _M_allocate_and_copy(

573           __n, std::__make_move_if_noexcept_iterator(this->_M_impl._M_start),

574           std::__make_move_if_noexcept_iterator(this->_M_impl._M_finish));

575       std::_Destroy(this->_M_impl._M_start, this->_M_impl._M_finish,

576                     _M_get_Tp_allocator());

577       _M_deallocate(this->_M_impl._M_start,

578                     this->_M_impl._M_end_of_storage - this->_M_impl._M_start);

579       this->_M_impl._M_start = __tmp;

580       this->_M_impl._M_finish = __tmp + __old_size;

581       this->_M_impl._M_end_of_storage = this->_M_impl._M_start + __n;

582     }

583   }
shrink_to_fit
请求移除未使用的容量
void shrink_to_fit() { _M_shrink_to_fit(); }

template <typename _Tp, typename _Alloc>

bool vector<_Tp, _Alloc>::_M_shrink_to_fit() {

  if (capacity() == size())

    return false;

  return std::__shrink_to_fit_aux<vector>::_S_do_it(*this);

}

template <typename _Tp> struct __shrink_to_fit_aux<_Tp, true> {

  _Tp(__make_move_if_noexcept_iterator(__c.begin()),

      __make_move_if_noexcept_iterator(__c.end()), __c.get_allocator())

      .swap(__c);

  return true;

};
模板太多看起来费劲,换一种表达
std::vector<int> v;

v.push_back(1); // size()=1 capacity()=1

v.push_back(1); // size()=2 capacity()=2

v.push_back(1); // size()=3 capacity()=4

std::vector<int>(v.begin(), v.end()).swap(v); // size()=3 capacity()=3
时间复杂度分析
| 复杂度 | 方法 | 说明 |
|---|---|---|
| \(O(1)\) | size() | 变量相减 |
| \(O(1)\) | capacity() | 变量相减 |
| \(O(1)\) | push_back() | 均摊最坏情况为3 |
| \(O(n)\) | insert() | 操作需要对size()-pos进行拷贝 |
| \(O(n)\) | clear() | size() 次析构 |
| \(O(n)\) | reserve() | 扩容需要size()次拷贝 |
| \(O(n)\) | shrink_to_fit() | 构造需要size()拷贝,swap()为常数 |
push_back 复杂度证明
以libstdc++为准备,vector的增长因子为2,分析对一个空的 vector 执行 n 个 push_back 的复杂度。
第 \(i\) 个操作的需要的复制构造次数的 \(c_i\),分为两种情况:
- size() < capacity(), \(c_i=1\)
- size() == capacity(),vector 进行扩张,\(c_i=i\)
得到每次的次数为:
\begin{aligned}
i, & 若 i-1 恰为 2 的幂 \\
1, & 其他
\end{aligned}
\right.
\]
n 个 push_back 总的复制构造函数的次数为
\]
n个push_back的上界为 3n,单一的摊还次数为 3,所以复杂度为 \(O(1)\)
STL漫游之vector的更多相关文章
- 转:用STL中的vector动态开辟二维数组
用STL中的vector动态开辟二维数组 源代码:#include <iostream>#include <vector>using namespace std;int mai ...
- STL中的Vector相关用法
STL中的Vector相关用法 标准库vector类型使用需要的头文件:#include <vector>. vector 是一个类模板,不是一种数据类型,vector<int> ...
- (转)C++ STL中的vector的内存分配与释放
C++ STL中的vector的内存分配与释放http://www.cnblogs.com/biyeymyhjob/archive/2012/09/12/2674004.html 1.vector的内 ...
- C++STL中的vector的简单实用
[原创] 使用C++STL中的vector, #include <stdio.h> #include<stdlib.h> #include<vector> usin ...
- STL中的vector实现邻接表
/* STL中的vector实现邻接表 2014-4-2 08:28:45 */ #include <iostream> #include <vector> #include ...
- C/C++解题常用STL大礼包 含vector,map,set,queue(含优先队列) ,stack的常用用法
每次忘记都去查,真难啊 /* C/C++解题常用STL大礼包 含vector,map,set,queue(含优先队列) ,stack的常用用法 */ /* vector常用用法 */ //头文件 #i ...
- [转] C++的STL库,vector sort排序时间复杂度 及常见容器比较
http://www.169it.com/article/3215620760.html http://www.cnblogs.com/sharpfeng/archive/2012/09/18/269 ...
- Linux环境下stl库使用(vector)
step1: #include <iostream> #include <vector> #include <string> using namespace std ...
- stl 中List vector deque区别
stl提供了三个最基本的容器:vector,list,deque. vector和built-in数组类似,它拥有一段连续的内存空间,并且起始地址不变,因此 它能非常好的支持随 ...
随机推荐
- Java 实现订单未支付超时自动取消
在电商上购买商品后,如果在下单而又没有支付的情况下,一般提示30分钟完成支付,否则订单自动.比如在京东下单为完成支付: 超过24小时,就会自动取消订单,下面使用 Java 定时器实现超时取消订单功能. ...
- 传统的DOM渲染方式?
1.什么是DOM渲染? 所谓的DOM渲染是指的是对于浏览器中展现给用户的DOM文档的生成的过程. 2.DOM渲染的过程,大致可以分为三个阶段: --纯后端渲染 --纯前端渲染 --服务端的JS渲染结合 ...
- [JavaWeb]Shiro漏洞集合——代码审计
Shiro漏洞集合 Shiro其实就是一组Filter,他会进行验证,鉴权,会话 Management,再把请求转到web过滤器.所以最好先去对Shiro有个整体性的了解. 复现环境:https:// ...
- MySQL基本使用(开机自启动-环境变量-忘记密码-统一编码)
目录 一:mysql简介 1.什么是MySQL? 2.MySQL的本质 3.MySQL的特点与优势 二:基本操作命令 1.登录服务端 2.2.结束符c 3.查看当前所有的库名称 4.取消之前的命令 5 ...
- IDEA出现Cannot resolve symbol “xxx“(无法解析符号)的解决办法
1,File->Invalidate Caches/Restart 清除缓存并重启 idea 2,检查pom文件中的依赖关系是否正确 3,maven -> Reimport 4,打开pro ...
- 常见线程池 newFixedThreadPool 的简单使用
package com.aaa.threaddemo; import java.util.concurrent.ArrayBlockingQueue; import java.util.concurr ...
- 报错:java.sql.SQLException: Value '0000-00-00 00:00:00' can not be represented as java.sql.Timestamp
感谢原文作者:风起云淡- 原文链接:https://blog.csdn.net/shenguan777/article/details/78615521 异常分析: 在使用MySql时,如果数据库中有 ...
- mysql连接出错:ERROR 1040 (HY000): Too many connections
1.查看mysql的最大连接数:show variables like '%max_connections%'; 2. 查看服务器响应的最大连接数: 3. 设置最大连接数: set GLOBAL m ...
- ubuntu php连接oracle数据库
转载请注明来源:https://www.cnblogs.com/hookjc/ 需要将数据库从mysql迁移到oracle.下了个oracle xe在ubuntu下折腾了好久,都只能启动1521的侦听 ...
- 关于unix下cp命令复制权限不够的问题
例如要将mysql-5.7.17-macos10.12-x86_64.tar.gz 拷贝到/usr/local目录下时,执行cp mysql-5.7.17-macos10.12-x86_64.tar. ...