小峰mybatis(4)mybatis使用注解配置sql映射器
一、基本映射语句:
@Inert
@Update
@Delete
@Select
二、结果集映射语句
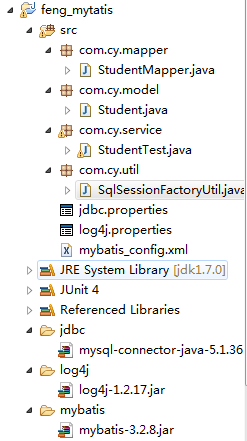
项目结够:
Student.java model实体类:
package com.cy.model;

public class Student{

    private Integer id;

    private String name;

    private Integer age;

    public Student(){

    }

    public Student(String name, Integer age){

        this.name = name;

        this.age = age;

    }

    public Integer getId() {

        return id;

    }

    public void setId(Integer id) {

        this.id = id;

    }

    public String getName() {

        return name;

    }

    public void setName(String name) {

        this.name = name;

    }

    public Integer getAge() {

        return age;

    }

    public void setAge(Integer age) {

        this.age = age;

    }

    @Override

    public String toString() {

        return "Student [id=" + id + ", name=" + name + ", age=" + age + "]";

    }

}
mybatis-config.xml:
<?xml version="1.0" encoding="UTF-8" ?>

<!DOCTYPE configuration

PUBLIC "-//mybatis.org//DTD Config 3.0//EN"

"http://mybatis.org/dtd/mybatis-3-config.dtd">

<configuration>

    <properties resource="jdbc.properties"/>

    <!-- 别名 -->

    <typeAliases>

        <package name="com.cy.model"/>

    </typeAliases>

    <environments default="development">

        <environment id="development">

            <transactionManager type="JDBC" />

                <dataSource type="POOLED">

                    <property name="driver" value="${jdbc.driverClassName}" />

                    <property name="url" value="${jdbc.url}" />

                    <property name="username" value="${jdbc.username}" />

                    <property name="password" value="${jdbc.password}" />

                </dataSource>

        </environment>

        <environment id="test">

            <transactionManager type="JDBC" />

            <dataSource type="POOLED">

                <property name="driver" value="${jdbc.driverClassName}" />

                <property name="url" value="${jdbc.url}" />

                <property name="username" value="${jdbc.username}" />

                <property name="password" value="${jdbc.password}" />

            </dataSource>

        </environment>

    </environments>

    <mappers>

        <package name="com.cy.mapper"/>

    </mappers>

</configuration>
StudentMapper.java 接口:
package com.cy.mapper;

import java.util.List;

import org.apache.ibatis.annotations.Delete;

import org.apache.ibatis.annotations.Insert;

import org.apache.ibatis.annotations.Result;

import org.apache.ibatis.annotations.Results;

import org.apache.ibatis.annotations.Update;

import org.apache.ibatis.annotations.Select;

import com.cy.model.Student;

public interface StudentMapper {

    //插入

    @Insert("insert into t_student values(null, #{name}, #{age})")

    public int inertStudent(Student student);

    //更新

    @Update("update t_student set name=#{name}, age=#{age} where id = #{id}")

    public int updateStudent(Student stu);

    //删除

    @Delete("delete from t_student where id=#{id}")

    public int deleteStudent(int id);

    //根据id查找学生

    @Select("select * from t_student where id=#{id}")

    public Student getStudentById(Integer id);

    //查询所有学生  结果集映射  id主键列

    @Select("select * from t_student")

    @Results(

            {

                @Result(id=true,column="id",property="id"),

                @Result(column="name",property="name"),

                @Result(column="age",property="age")

            }

    )

    public List<Student> findStudents();

}
测试代码StudentTest.java:
package com.cy.service;

import java.util.List;

import org.apache.ibatis.session.SqlSession;

import org.apache.log4j.Logger;

import org.junit.After;

import org.junit.Before;

import org.junit.Test;

import com.cy.mapper.StudentMapper;

import com.cy.model.Student;

import com.cy.util.SqlSessionFactoryUtil;

public class StudentTest {

    private static Logger logger = Logger.getLogger(StudentTest.class);

    private SqlSession sqlSession=null;

    private StudentMapper studentMapper=null;

    @Before

    public void setUp() throws Exception {

        sqlSession=SqlSessionFactoryUtil.openSession();

        studentMapper=sqlSession.getMapper(StudentMapper.class);

    }

    @After

    public void tearDown() throws Exception {

        sqlSession.close();

    }

    @Test

    public void testInsertStudent() {

        logger.info("测试insertStudent");

        Student stu = new Student("cpp", 12);

        int count = studentMapper.inertStudent(stu);

        sqlSession.commit();

    }

    @Test

    public void testUpdateStudent() {

        logger.info("测试updateStudent");

        Student stu = new Student("cppp", 13);

        stu.setId(14);

        int count = studentMapper.updateStudent(stu);

        sqlSession.commit();

    }

    @Test

    public void testDeleteStudent() {

        logger.info("测试删除学生");

        int count = studentMapper.deleteStudent(14);

        sqlSession.commit();

    }

    @Test

    public void testGetById(){

        logger.info("根据id查找学生");

        Student stu = studentMapper.getStudentById(1);

        System.out.println(stu);

    }

    @Test

    public void testFindStudent() {

        logger.info("测试查询所有学生");

        List<Student> students = studentMapper.findStudents();

        for(Student student : students){

            System.out.println(student);

        }

    }

}
三、使用注解 一对一映射:


package com.cy.model;

public class Student{

    private Integer id;

    private String name;

    private Integer age;

    private Address address;

    public Student(){

    }

    public Student(String name, Integer age){

        this.name = name;

        this.age = age;

    }

    public Integer getId() {

        return id;

    }

    public void setId(Integer id) {

        this.id = id;

    }

    public String getName() {

        return name;

    }

    public void setName(String name) {

        this.name = name;

    }

    public Integer getAge() {

        return age;

    }

    public void setAge(Integer age) {

        this.age = age;

    }

    public Address getAddress() {

        return address;

    }

    public void setAddress(Address address) {

        this.address = address;

    }

    @Override

    public String toString() {

        return "Student [id=" + id + ", name=" + name + ", age=" + age

                + ", address=" + address + "]";

    }

}
Address.java 实体:
package com.cy.model;

public class Address {

    private Integer id;

    private String sheng;

    private String shi;

    private String qu;

    public Integer getId() {

        return id;

    }

    public void setId(Integer id) {

        this.id = id;

    }

    public String getSheng() {

        return sheng;

    }

    public void setSheng(String sheng) {

        this.sheng = sheng;

    }

    public String getShi() {

        return shi;

    }

    public void setShi(String shi) {

        this.shi = shi;

    }

    public String getQu() {

        return qu;

    }

    public void setQu(String qu) {

        this.qu = qu;

    }

    @Override

    public String toString() {

        return "Address [id=" + id + ", sheng=" + sheng + ", shi=" + shi

                + ", qu=" + qu + "]";

    }

}
StudentMapper.java接口:
//查询学生,带地址

    @Select("select * from t_student where id=#{id}")

    @Results(

            {

                @Result(id=true,column="id",property="id"),

                @Result(column="name",property="name"),

                @Result(column="age",property="age"),

                @Result(column="addressId",property="address",one=@One(select="com.cy.mapper.AddressMapper.findById"))

            }

    )

    public Student findStudentWithAddress(int id);
AddressMapper.java接口:
public interface AddressMapper {

    @Select("select * from t_address where id=#{id}")

    public Address findById(Integer id);

}
mybatis的实现是:在查找学生的时候,将addressId,传到AddressMapper.findById方法,根据这个addressId查找address;
测试代码:
@Test

    public void testFindStudentWithAddress() {

        logger.info("测试学生,带地址");

        Student student = studentMapper.findStudentWithAddress(15);

        System.out.println(student);

    }
console打印:

四、使用注解,一对多映射
package com.cy.model;

public class Student{

    private Integer id;

    private String name;

    private Integer age;

    private Address address;

    private Grade grade;

    public Student(){

    }

    public Student(String name, Integer age){

        this.name = name;

        this.age = age;

    }

    public Integer getId() {

        return id;

    }

    public void setId(Integer id) {

        this.id = id;

    }

    public String getName() {

        return name;

    }

    public void setName(String name) {

        this.name = name;

    }

    public Integer getAge() {

        return age;

    }

    public void setAge(Integer age) {

        this.age = age;

    }

    public Address getAddress() {

        return address;

    }

    public void setAddress(Address address) {

        this.address = address;

    }

    public Grade getGrade() {

        return grade;

    }

    public void setGrade(Grade grade) {

        this.grade = grade;

    }

    @Override

    public String toString() {

        return "Student [id=" + id + ", name=" + name + ", age=" + age

                + ", address=" + address + ", grade=" + grade + "]";

    }

}
Grade.java:
package com.cy.model;

import java.util.List;

public class Grade {

    private Integer id;

    private String gradeName;

    private List<Student> students;

    public Integer getId() {

        return id;

    }

    public void setId(Integer id) {

        this.id = id;

    }

    public String getGradeName() {

        return gradeName;

    }

    public void setGradeName(String gradeName) {

        this.gradeName = gradeName;

    }

    public List<Student> getStudents() {

        return students;

    }

    public void setStudents(List<Student> students) {

        this.students = students;

    }

    @Override

    public String toString() {

        return "Grade [id=" + id + ", gradeName=" + gradeName +"]";

    }

}
数据库中表,t_student:

t_grade:

1)根据id查找年级,将年级下的学生也查出来:
GradeMapper.java:
public interface GradeMapper {

    //根据id查找年级,将年级下的学生也查出来

    @Select("select * from t_grade where id = #{id}")

    @Results(

            {

                @Result(id=true,column="id",property="id"),

                @Result(column="gradeName",property="gradeName"),

                @Result(column="id",property="students",many=@Many(select="com.cy.mapper.StudentMapper.findStudentByGradeId"))

            }

    )

    public Grade findById(Integer id);

}
StudentMapper.java:
//根据年级查找学生

    @Select("select * from t_student where gradeId=#{gradeId}")

    @Results(

            {

                @Result(id=true,column="id",property="id"),

                @Result(column="name",property="name"),

                @Result(column="age",property="age"),

                @Result(column="addressId",property="address",one=@One(select="com.cy.mapper.AddressMapper.findById"))

            }

    )

    public Student findStudentByGradeId(int gradeId);
测试代码:
//根据id查找年级,将年级下的学生也查出来

    @Test

    public void testFindGradeWithStudents() {

        logger.info("根据id查询年级(带学生)");

        Grade grade=gradeMapper.findById(1);

        System.out.println(grade);

        List<Student> studentList=grade.getStudents();

        for(Student student:studentList){

            System.out.println(student);

        }

    }
结果:

2)根据id查询学生,将年级信息也查出来:
StudentMapper.java:
//根据id查询学生带地址   和 年级

    @Select("select * from t_student where id=#{id}")

    @Results(

            {

                @Result(id=true,column="id",property="id"),

                @Result(column="name",property="name"),

                @Result(column="age",property="age"),

                @Result(column="addressId",property="address",one=@One(select="com.cy.mapper.AddressMapper.findById")),

                @Result(column="gradeId",property="grade",one=@One(select="com.cy.mapper.GradeMapper.findById"))

            }

    )

    public Student findStudentWithAddressAndGrade(int id);
GradeMapper.java中的findById和上面1)中一样;
测试代码:
//根据id查询学生,带地址和年级

    @Test

    public void testSelectStudentWithAddressAndGrade() {

        logger.info("根据id查询学生(带地址、年级)");

        Student student=studentMapper.findStudentWithAddressAndGrade(1);

        System.out.println(student);

    }
打印结果:

小峰mybatis(4)mybatis使用注解配置sql映射器的更多相关文章
- MyBatis 3(中文版) 第四章 使用注解配置SQL映射器
本章将涵盖以下话题: l 在映射器Mapper接口上使用注解 l 映射语句 @Insert,@Update,@Delete,@SeelctStatements l 结果映射 一对一映射 一对多映射 l ...
- MyBatis 3 使用注解配置SQL映射器
l 在映射器Mapper接口上使用注解 l 映射语句 @Insert,@Update,@Delete,@SeelctStatements l 结果映射 一对一映射 一对多映射 l 动态SQL @Sel ...
- 使用注解配置SQL映射器
在上一章,我们看到了我们是怎样在映射器Mapper XML配置文件中配置映射语句的.MyBatis也支持使用注解来配置映射语句.当我们使用基于注解的映射器接口时,我们不再需要在XML配置文件中配置了. ...
- Mybatis基于接口注解配置SQL映射器(一)
上文已经讲解了基于XML配置的SQL映射器,在XML配置的基础上MyBatis提供了简单的Java注解,使得我们可以不配置XML格式的Mapper文件,也能方便的编写简单的数据库操作代码. Mybat ...
- 小峰mybatis(5)mybatis使用注解配置sql映射器--动态sql
一.使用注解配置映射器 动态sql: 用的并不是很多,了解下: Student.java 实体bean: package com.cy.model; public class Student{ pri ...
- Mybatis基于接口注解配置SQL映射器(二)
Mybatis之增强型注解 MyBatis提供了简单的Java注解,使得我们可以不配置XML格式的Mapper文件,也能方便的编写简单的数据库操作代码.但是注解对动态SQL的支持一直差强人意,即使My ...
- Java Persistence with MyBatis 3(中文版) 第三章 使用XML配置SQL映射器
关系型数据库和SQL是经受时间考验和验证的数据存储机制.和其他的ORM 框架如Hibernate不同,MyBatis鼓励开发者可以直接使用数据库,而不是将其对开发者隐藏,因为这样可以充分发挥数据库服务 ...
- Mybatis基于XML配置SQL映射器(二)
Mybatis之XML注解 之前已经讲到通过 mybatis-generator 生成mapper映射接口和相关的映射配置文件: 下面我们将详细的讲解具体内容 首先我们新建映射接口文档 sysUse ...
- Mybatis基于XML配置SQL映射器(一)
Durid和Mybatis开发环境搭建 SpringBoot搭建基于Spring+SpringMvc+Mybatis的REST服务(http://www.cnblogs.com/nbfujx/p/76 ...
随机推荐
- FATAL ERROR: CALL_AND_RETRY_LAST Allocation failed - JavaScript heap out of memory
vue项目 npm run dev 报错 WAIT Compiling...16:36:21 95% emittingFATAL ERROR: CALL_AND_RETRY_LAST Allocati ...
- 返回书签 GotoBookmark
property Bookmark: TBookmark read GetBookmark write GotoBookmark; 直接给Bookmark属性赋值,还是 调用数据集GotoBookma ...
- sql server中的go
1. 作用:向 SQL Server 实用工具发出一批 Transact-SQL 语句结束的信号.2. 语法:一批 Transact-SQL 语句GO如Select 1Select 2Select 3 ...
- ValueError: Argument must be a dense tensor:... got shape [6, 60, 160, 3], but wanted [6].
在将 列表或元组 数据转换成 dataset类型时 import numpy as np import tensorflow as tffrom sklearn.cross_validation im ...
- 1.3 C++引用(Reference)
参考:http://www.weixueyuan.net/view/6328.html 总结: 引用是变量的另外一个别名,不是指针,与原变量名同指相同的内存.可以原变量的值. 在函数中作为形参可以修改 ...
- 未能加载文件或程序集“Microsoft.Office.Interop.Excel
解决方法:未能加载文件或程序集“Microsoft.Office.Interop.Excel...” 2010-07-25 08:06:15 来源:源码之家 站长整理 [大 中 小] ...
- DevExpress v17.2新版亮点—Bootstrap篇(一)
用户界面套包DevExpress v17.2日前终于正式发布,本站将以连载的形式为大家介绍各版本新增内容.本文将介绍了Bootstrap Controls v17.2 的CardView.Charts ...
- 【机器学习算法】Boostrapping算法
参考 1.AdaBoost从原理到实现: 完
- 20155229 2016-2017-2 《Java程序设计》第八周学习总结
20155229 2016-2017-2 <Java程序设计>第八周学习总结 教材学习内容总结 第十四章 NIO使用频道(Channel)来衔接数据节点,在处理数据时,NIO可以设定缓冲区 ...
- (2)字符编码关系和转换(bytes类型)
ASCII 占一个字节,只支持英文 GB2312 占2个字节,只支持6700+汉字 GBK 是GB2312的升级版,支持21000+汉字 Shift-JIS 日本字符编码 ks_c-5601-1987 ...