
Greenplum-cc-web安装
第一章 文档概述
1、 本安装手册描述适用于Greenplum4.0以上版本的安装Greenplum-cc-web操作
第二章 安装介质
针对Greenplum版本下载对应Greenplum-cc-web包体greenplum-cc-web-x.x.x-LINUX-x86_64.zip;
下载地址: https://network.pivotal.io/products/pivotal-gpdb#/releases/1683/file_groups/26nNum=10
第三章 安装Performance Monitor数据收集Agent
gpadmin用户执行如下步骤【仅在master节点】。
3.1、使用gpperfmon_install命令,
Greenplum安装完成后已经包含该命令。安装后会建立名为gpperfmon的数据库,默认使用gpmon用户。命令行中系统用户gpmon的密码。
[gpadmin@mdw ~]$ gpperfmon_install --enable --password gpmon --port
3.2、重启GP数据库
[gpadmin@mdw ~]$ gpstop -r
3.3、确认监控采集进程是否已经启动。
[gpadmin@mdw ~]$ ps -ef |grep gpmmon

gpadmin    : ? :: /gpdb/app/bin/gpmmon -D /data/gpdata/master/gpseg-/gpperfmon/conf/gpperfmon.conf -p
3.4、确认Performance Monitor数据库写入数据是否正常,检查是否有记录写入。
psql -d gpperfmon -c 'select * from system_now;'
3.5、拷贝Master主机拷贝配置文件到Standby Master的相应目录【本例未设置smdw;则无需操作】
gpscp -h smdw $MASTER_DATA_DIRECTORY/pg_hba.conf =:$MASTER_DATA_DIRECTORY/

gpscp -h smdw ~/.pgpass =:~/
第四章 安装Performance Monitor控制台
Performance Monitor控制台通常安装在Master主机上,也可以安装到独立的服务器上。由于安装目录权限问题,建议先使用root用户执行。【仅在master节点】
4.1、下载对应的安装包
查看Greenplum版本;
[gpadmin@mdw ~]$ gpstate -s | awk '/Greenplum Version/{print $8}'|awk 'NR==1'

4.3.8.1
其中greenplum-cc-web-3.3.1-LINUX-x86_64.zip是与之对应的
4.2、运行安装包
安装包解压:
[root@mdw gpdb]# unzip greenplum-cc-web-3.3.-LINUX-x86_64.zip
运行安装文件:
[root@mdw gpdb]# ./greenplum-cc-web-3.3.-LINUX-x86_64.bin

I HAVE READ AND AGREE TO THE TERMS OF THE ABOVE PIVOTAL GREENPLUM DATABASE

END USER LICENSE AGREEMENT.

必须输入YES才可继续安装。

********************************************************************************

Do you accept the Pivotal Greenplum Database end user license

agreement? [yes | no]

********************************************************************************

yes

默认GPDB的安装路径为/usr/local/greenplum-cc-web-**,确认需要输入YES,如果需要安装到其他路径,直接输入要按照的路径即可

********************************************************************************

Provide the installation path for Greenplum Command Center or

press ENTER to accept the default installation path: /usr/local/greenplum-cc-web-3.3.

********************************************************************************

/gpdb/greenplum-cc-web

********************************************************************************

Install Greenplum Command Center into </gpdb/greenplum-cc-web>? [yes | no]

********************************************************************************

yes

********************************************************************************

/gpdb/greenplum-cc-web does not exist.

Create /gpdb/greenplum-cc-web ? [ yes | no ]

(Selecting no will exit the installer)

********************************************************************************

yes

Extracting product to /gpdb/greenplum-cc-web

rm: cannot remove `/gpdb/greenplum-cc-web': Is a directory

********************************************************************************

Installation complete.

Greenplum Command Center is installed in /gpdb/greenplum-cc-web

- symlink created at /gpdb/greenplum-cc-web to install path

Please ensure this installation's gpcc_path.sh file is sourced.

(If /gpdb/greenplum-cc-web/gpcc_path.sh is sourced, this is already done.)

To migrate existing GPCC instances to this version, run: gpcmdr --migrate

To create new GPCC instances, run: gpcmdr --setup

********************************************************************************
当然也可以先前创建安装目录/gpdb/greenplum-cc-web;现已成功安装greenplum-cc-web。
4.3 Monitor安装目录属主修改:
[root@mdw gpdb]# chown -R gpadmin:gpadmin /gpdb/greenplum-cc-web
4.4、修改Master主机gpadmin的.bashrc配置,增加
source /gpdb/greenplum-cc-web/gpcc_path.sh
4.5、将master的GP监控软件同时安装到到其他任何主机
[gpadmin@mdw ~]$ source .bashrc

[gpadmin@mdw ~]$ gpccinstall -f /gpdb/app/config/seg_host
4.6、修改其它主机gpadmin的.bashrc配置,增加
source /gpdb/greenplum-cc-web/gpcc_path.sh
4.7、 配置gpcc实例
[gpadmin@mdw ~]$ gpcmdr --setup

The instance name identifies the GPDB cluster this Greenplum Command Center web UI monitors and controls.

Instance names can contain letters, digits, and underscores and are not case sensitive.

Please enter the instance name

gp_lottu

The display name is shown as the "server" in the web interface and does not need to be

a hostname.Display names can contain letters, digits, and underscores and ARE case sensitive.

Please enter the display name for this instance:(Press ENTER to use instance name)

gp_cc_lottu

A GPCC instance can be set to manage and monitor a remote Greenplum Database.

Is the master host for the Greenplum Database remote? Yy/Nn (default=N)

n

What port does the Greenplum Database use? (default=)

Enable kerberos login for this instance? Yy/Nn (default=N)

Creating instance schema in GPDB. Please wait ...

The Greenplum Command Center runs a small web server for the UI and web API.

This web server by default runs on port , but you may specify any available port.

What port would you like the new web server to use for this instance? (default=)

Users logging in to the Command Center must provide database user

credentials. In order to protect user names and passwords, it is recommended

that SSL be enabled.

Enable SSL for the Web API Yy/Nn (default=N)

n

Copy the instance to a standby master host Yy/Nn (default=Y)

n

Done writing webserver configuration to /gpdb/greenplum-cc-web/instances/gp_lottu/webserver/conf/app.conf

Creating instance at /gpdb/greenplum-cc-web/instances/gp_lottu

Greenplum Command Center UI configuration is now complete.

To change parameters of this instance, edit the configuration file

at /gpdb/greenplum-cc-web/instances/gp_lottu/webserver/conf/app.conf

To configure multi-cluster view, edit the configuration file at /gpdb/greenplum-cc-web/instances/gp_lottu/conf/clusters.conf

The web UI for this instance is located at http://mdw:28080

You can now start the web UI for this instance by running: gpcmdr --start gp_lottu
4.8、启动服务
[gpadmin@mdw ~]$ gpcmdr --start gp_lottu

Starting instance gp_lottu ...

Greenplum Command Center UI for instance 'gp_lottu' - [RUNNING on PORT: , pid ]
4.9、测试Performance Monitor前台连接
打开IE输入Performance Monitor控制台地址:http://192.168.1.201:28080/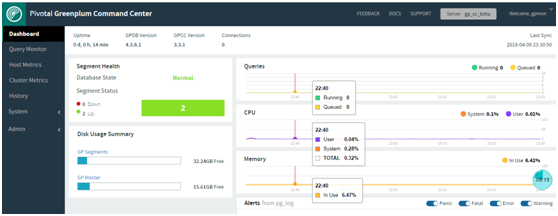
Greenplum-cc-web安装的更多相关文章
- Greenplum 源码安装教程 —— 以 CentOS 平台为例
Greenplum 源码安装教程 作者:Arthur_Qin 禾众 Greenplum 主体以及orca ( 新一代优化器 ) 的代码以可以从 Github 上下载.如果不打算查看代码,想下载编译好的 ...
- Adobe Photoshop CC 2015安装激活
分享一下Adobe Photoshop CC 2015 安装激活步骤 工具/原料 xf-adobecc2015.exe Adobe Photoshop CC 2015官方原版 方法/步骤 1 ...
- ASP.NET Web安装程序
键发布ASP.NET Web安装程序,搞WebForm的童鞋看过来... 前言:最近公司有个Web要发布,但是以前都是由实施到甲方去发布,配置,这几天有点闲,同事让我搞一个一键发布,就和安装软件那样的 ...
- Adobe Photoshop CC 2015安装激活教程
Adobe Photoshop CC 2015安装激活教程(附序列号) Adobe Photoshop CC 2015是Adobe针对旗下的创意云Creative Cloud 套装推出了2015年年度 ...
- Tencent Server Web 安装试用
Tencent Server Web 安装试用 私有环境搭建,使用docker-compose 进行memcache 安装 参考github 代码 https://github.com/rongfen ...
- centos 6.6 下yum安装部署zabbix2.4所遇到web安装页面无法打开的问题
nginx配置zabbix下setup.php(web页面)无法显示,浏览器无法打开 1.检查系统是否安装nginx,以便解析html 已安装,安装方式为yum安装,可以解析其他页面 2.php没有完 ...
- 一键发布ASP.NET Web安装程序
转载自:http://www.cnblogs.com/nangong/p/Web.html 前言:最近公司有个Web要发布,但是以前都是由实施到甲方去发布,配置,这几天有点闲,同事让我搞 ...
- greenplum集群安装
一.环境配置 1.地址分配 192.168.1.201 mdw master 192.168.1.202 sdw1 segment1 192.168.1.203 sdw2 segment2 2.创建用 ...
- photoshop cc 版本安装失败解决办法
好久没有碰ps,看了下在ps版本都到cc了.忍不住也想尝试最新版本,但是安装出现了很多问题,导致我花了很多时间才搞定,现在分享给大家几点经验吧. Exit Code: Please see speci ...
- [原创*精华]一键发布ASP.NET Web安装程序,搞WebForm的童鞋看过来...
重要更新:鉴于很多小伙伴们说看不到图,我这边换了几个浏览器看了下,都看得到的,估计是网速问题,请耐心等待,另外,为了更好的方便大家学习,特此提供源码以及一个word文档,word文档就是本 ...
随机推荐
- mongoDB之监控工具mongostat
mongostat是mongdb自带的状态检测工具,在命令行下使用.它会间隔固定时间获取mongodb的当前运行状态,并输出.如果你发现数据库突然变慢或者有其他问题的话,你第一手的操作就考虑采用mon ...
- jquery 发get post请求
https://www.cnblogs.com/summers/p/3225375.html POST 方法不会缓存数据 $.get(URL,callback); 2个参数 callback 参数是请 ...
- iphone微信 h5页音乐自动播放
iphone微信 h5页音乐自动播放: // iphone自动播放 document.addEventListener("WeixinJSBridgeReady", functio ...
- Python __init__函数的使用
class Cat: def __init__(self,_name): self.name = _name def eat(self): print("i am eating ." ...
- ryu学习笔记(2) 之 ryu-manager运行报错
http://blog.csdn.net/haimianxiaojie/article/details/48769653 ryu在使用的时候最常出现的报错是:address already in us ...
- 编写一个函数,计算字符串中含有的不同字符的个数。字符在ACSII码范围内(0~127)。不在范围内的不作统计。
题目描述 编写一个函数,计算字符串中含有的不同字符的个数.字符在ACSII码范围内(0~127).不在范围内的不作统计. 输入描述: 输入N个字符,字符在ACSII码范围内. 输出描述: 输出范围在( ...
- strcpy_s与strcpy的区别
strcpy_s和strcpy()函数的功能几乎是一样的.];];strcpy_s(str1,,;}#include<iostream> #include<]; ]; strcpy ...
- e839. 使JTabbedPane中的卡片可滚动
By default, all the tabs in a tabbed pane are displayed. When the tabs are wider than the width of t ...
- LCL Socket基类
SocketBase类库主要是方便创建Socket客户端和Socket服务端的基础实现. 抽象基类:主要实现创建Socket public abstract class NetworkBase{} 通 ...
- linux rinetd 端口转发部署
linux下简单好用的工具rinetd,实现端口映射/转发/重定向 Rinetd是为在一个Unix和Linux操作系统中为重定向传输控制协议(TCP)连接的一个工具.Rinetd是单一过程的服务器,它 ...