2.5BatchNormalzation
BatchNormalzation是一种解决深度神经网络层数太多,而没有办法有效前向传递的问题,因为每层的输出值都会有不同的均值和方差,所以输出数据的分布也不一样。
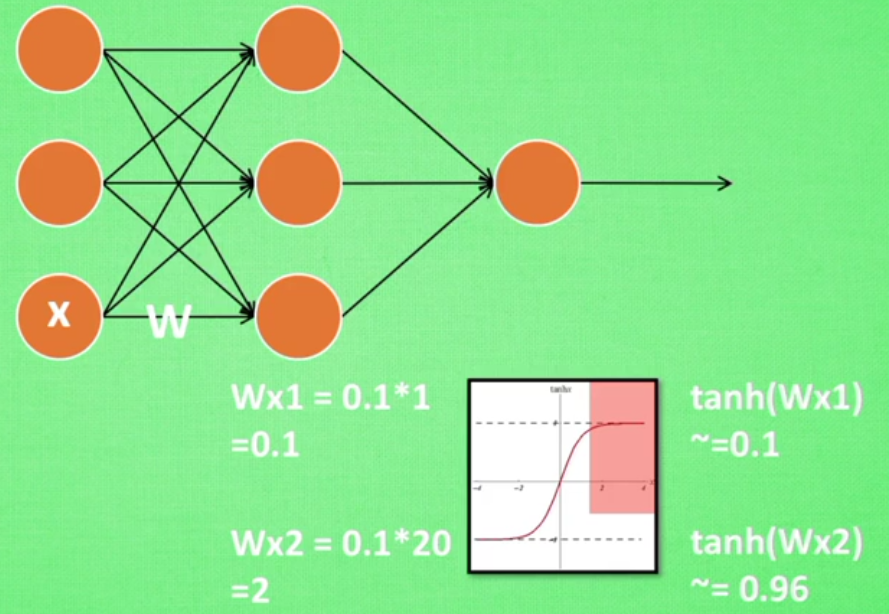
如果对于输入的X*W本身得到的值通过tanh激活函数已经输出为1,在通过下一层的神经元之后结果并没有什么改变,因为该值已经很大(神经网络过敏感问题)
对于这种情况我们可以首先做一些批处理正则化


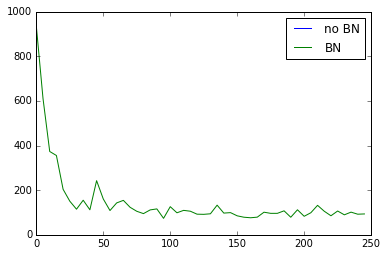
可以看出没有BN的时候,每层的值迅速全部都变为0,也可以说,所有的神经元迅速都已经死去了,而有BN,relu之后,每层的值都能有一个比较好的分布效果
大部分神经元都还活着

relu下的误差对比,no BN的曲线是没有的,很快消失

如果改为tanh,误差变化如下

"""
Build two networks.
1. Without batch normalization
2. With batch normalization Run tests on these two networks.
""" # Batch Normalization import numpy as np
import tensorflow as tf
import matplotlib.pyplot as plt ACTIVATION = tf.nn.relu #tf.nn.tanh
N_LAYERS = 7
N_HIDDEN_UNITS = 30 def fix_seed(seed=1):
# reproducible
np.random.seed(seed)
tf.set_random_seed(seed) def plot_his(inputs, inputs_norm):
# plot histogram for the inputs of every layer
for j, all_inputs in enumerate([inputs, inputs_norm]):
for i, input in enumerate(all_inputs):
plt.subplot(2, len(all_inputs), j*len(all_inputs)+(i+1))
plt.cla()
if i == 0:
the_range = (-7, 10)
else:
the_range = (-1, 1)
plt.hist(input.ravel(), bins=15, range=the_range, color='#FF5733')
plt.yticks(())
if j == 1:
plt.xticks(the_range)
else:
plt.xticks(())
ax = plt.gca()
ax.spines['right'].set_color('none')
ax.spines['top'].set_color('none')
plt.title("%s normalizing" % ("Without" if j == 0 else "With"))
plt.draw()
plt.pause(0.01) def built_net(xs, ys, norm):
def add_layer(inputs, in_size, out_size, activation_function=None, norm=False):
# weights and biases (bad initialization for this case)
Weights = tf.Variable(tf.random_normal([in_size, out_size], mean=0., stddev=1.))
biases = tf.Variable(tf.zeros([1, out_size]) + 0.1) # fully connected product
Wx_plus_b = tf.matmul(inputs, Weights) + biases # normalize fully connected product
if norm:
# Batch Normalize
fc_mean, fc_var = tf.nn.moments(
Wx_plus_b,
axes=[0], # the dimension you wanna normalize, here [0] for batch
# for image, you wanna do [0, 1, 2] for [batch, height, width] but not channel
)
scale = tf.Variable(tf.ones([out_size]))
shift = tf.Variable(tf.zeros([out_size]))
epsilon = 0.001 # apply moving average for mean and var when train on batch
ema = tf.train.ExponentialMovingAverage(decay=0.5)
def mean_var_with_update():
ema_apply_op = ema.apply([fc_mean, fc_var])
with tf.control_dependencies([ema_apply_op]):
return tf.identity(fc_mean), tf.identity(fc_var)
mean, var = mean_var_with_update()
#all parmeter batch normalization
Wx_plus_b = tf.nn.batch_normalization(Wx_plus_b, mean, var, shift, scale, epsilon)
# similar with this two steps:
# Wx_plus_b = (Wx_plus_b - fc_mean) / tf.sqrt(fc_var + 0.001)
# Wx_plus_b = Wx_plus_b * scale + shift # activation
if activation_function is None:
outputs = Wx_plus_b
else:
outputs = activation_function(Wx_plus_b) return outputs fix_seed(1) if norm:
# BN for the first input
fc_mean, fc_var = tf.nn.moments(
xs,
axes=[0],
)
scale = tf.Variable(tf.ones([1]))
shift = tf.Variable(tf.zeros([1]))
epsilon = 0.001
# apply moving average for mean and var when train on batch
ema = tf.train.ExponentialMovingAverage(decay=0.5)
def mean_var_with_update():
ema_apply_op = ema.apply([fc_mean, fc_var])
with tf.control_dependencies([ema_apply_op]):
return tf.identity(fc_mean), tf.identity(fc_var)
mean, var = mean_var_with_update()
xs = tf.nn.batch_normalization(xs, mean, var, shift, scale, epsilon) # record inputs for every layer
layers_inputs = [xs] # build hidden layers
for l_n in range(N_LAYERS):
layer_input = layers_inputs[l_n]
in_size = layers_inputs[l_n].get_shape()[1].value output = add_layer(
layer_input, # input
in_size, # input size
N_HIDDEN_UNITS, # output size
ACTIVATION, # activation function
norm, # normalize before activation
)
layers_inputs.append(output) # add output for next run # build output layer
prediction = add_layer(layers_inputs[-1], 30, 1, activation_function=None) cost = tf.reduce_mean(tf.reduce_sum(tf.square(ys - prediction), reduction_indices=[1]))
train_op = tf.train.GradientDescentOptimizer(0.001).minimize(cost)
return [train_op, cost, layers_inputs] # make up data
fix_seed(1)
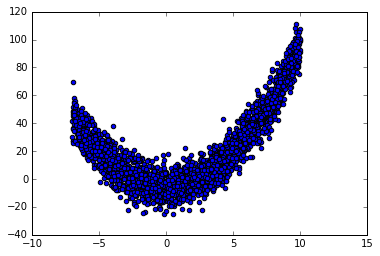
x_data = np.linspace(-7, 10, 2500)[:, np.newaxis]
np.random.shuffle(x_data)
noise = np.random.normal(0, 8, x_data.shape)
y_data = np.square(x_data) - 5 + noise # plot input data
plt.scatter(x_data, y_data)
plt.show() xs = tf.placeholder(tf.float32, [None, 1]) # [num_samples, num_features]
ys = tf.placeholder(tf.float32, [None, 1])
#create 2 neuralnetwork
train_op, cost, layers_inputs = built_net(xs, ys, norm=False) # without BN
train_op_norm, cost_norm, layers_inputs_norm = built_net(xs, ys, norm=True) # with BN sess = tf.Session()
if int((tf.__version__).split('.')[1]) < 12 and int((tf.__version__).split('.')[0]) < 1:
init = tf.initialize_all_variables()
else:
init = tf.global_variables_initializer()
sess.run(init) # record cost
cost_his = []
cost_his_norm = []
record_step = 5 plt.ion()
plt.figure(figsize=(7, 3))
for i in range(250):
if i % 50 == 0:
# plot histogram
all_inputs, all_inputs_norm = sess.run([layers_inputs, layers_inputs_norm], feed_dict={xs: x_data, ys: y_data})
plot_his(all_inputs, all_inputs_norm) # train on batch
sess.run([train_op, train_op_norm], feed_dict={xs: x_data[i*10:i*10+10], ys: y_data[i*10:i*10+10]}) if i % record_step == 0:
# record cost
cost_his.append(sess.run(cost, feed_dict={xs: x_data, ys: y_data}))
cost_his_norm.append(sess.run(cost_norm, feed_dict={xs: x_data, ys: y_data})) plt.ioff()
plt.figure()
plt.plot(np.arange(len(cost_his))*record_step, np.array(cost_his), label='no BN') # no norm
plt.plot(np.arange(len(cost_his))*record_step, np.array(cost_his_norm), label='BN') # norm
plt.legend()
plt.show()
数据集图示

2.5BatchNormalzation的更多相关文章
随机推荐
- 手机APP支付--整合银联支付控件
长话短说,本文根据银联官方说明文档,简单总结下,并且说明下中途碰到问题该如何解决. 一.开发前的准备工作1. 打开https://open.unionpay.com/,后续说的文档下载.FAQ查询等都 ...
- iscroll5实现下拉加载更多
1 下载最新的iscroll5,本文版本是5.1.3 2 提取iscroll-probe.js,选择这个文件的原因是我们要给iscroll扩展一个事件,需要用到probeType 属性 3 修改isc ...
- 让树莓派自动上报IP地址到邮箱,二代B
由于我使用树莓派的场景大多数是在没有显示器.只用terminal连接它的情况下,所以,它的IP地址有时会在重启之后变掉(DHCP的),导致我无法通过terminal连接上它.然后我又要很麻烦地登录路由 ...
- yarn基础架构
Yarn的基本架构 Yarn是Hadoop2.0中的资源管理系统,它的基本设计思想是将MRv1中的JobTracker拆分成两个独立的服务:一个全局的资源管理器ResourceManager和每个应用 ...
- nessus 激活码
nessus激活码的申请 nessus屏蔽了中国的激活码申请,中国IP申请的时候会直接跳转到购买商业版的页面. 解决方法: 使用IE代理或者VPN,用美国的IP最好,然后访问网址: http://ww ...
- 判断App整体处于前台还是后台
1.通过RunningTaskInfo类判断(需要额外权限): 复制代码代码如下: /** *判断当前应用程序处于前台还是后台 */ public static boolean isApplicati ...
- NUC972配置为支持NFS
系统平台:virtualbox3.2.10+ubuntu10.10 安装nfs: #sudo apt-get install nfs-kernel-server ubuntu10.10中的已经是最新版 ...
- make: Warning: File `Makefile' has modification time 17 s in the future
linux下,make makefile文件的时候报警告: make: Warning: File `Makefile' has modification time 17 s in the futur ...
- 原生js--应用程序存储和离线web应用
1.应用程序缓存和其它存储方式的区别: a.不像localStorage和sessionStorage那样只存储web应用程序的数据,它将应用程序自身存储起来. b.不像浏览器缓存一样会过期或者被用户 ...
- What you should know about .so files
In its early days, the Android OS was pretty much supporting only one CPU architecture: ARMv5.Do you ...