Spring Security实现OAuth2.0授权服务 - 基础版
一、OAuth2.0协议
1、OAuth2.0概述
OAuth2.0是一个关于授权的开放网络协议。
该协议在第三方应用与服务提供平台之间设置了一个授权层。第三方应用需要服务资源时,并不是直接使用用户帐号密码登录服务提供平台,而是通过服务提供平台的授权层获取token令牌,用户可以在授权时指定token的权限范围和有效期。第三方应用获取到token以后,才可以访问用户资源。
OAuth 2.0定义了四种授权方式:
- 授权码模式(authorization code):功能最完整、流程最严密的授权模式。特点是通过第三方应用的后台服务器,与服务提供平台的认证服务器进行互动获取资源。
- 简化模式(implicit):不通过第三方应用服务器,直接在浏览器中向认证服务器申请token令牌,跳过了授权码这个步骤。所有步骤在浏览器中完成,token对用户可见,且第三方应用不需要认证。
- 密码模式(resource owner password credentials):用户向第三方应用提供自己的用户名和密码。第三方应用使用这些信息,向服务提供平台索要授权。在这种模式中,用户必须把自己的密码给第三方应用,但是第三方应用不得储存密码。这通常用在用户对第三方应用高度信任的情况下,比如第三方应用是操作系统的一部分,或者由一个著名公司出品。而认证服务器只有在其他授权模式无法执行的情况下,才能考虑使用这种模式。
- 客户端模式(client credentials):指第三方应用以自己的名义,而不是以用户的名义,向服务提供平台进行认证。严格地说,客户端模式并不属于OAuth框架所要解决的问题。在这种模式中,用户直接向第三方应用注册,第三方应用以自己的名义要求服务提供平台提供服务,其实不存在授权问题。
2、授权码模式
假设有X用户、A系统、B系统,X是A系统中的用户,B系统需要访问A系统获取X用户的信息。
- B系统中放置向A系统申请授权的入口;
- X用户点击进入A系统授权页,如果未登录需要登录;
- X用户允许授权给B系统;
- A系统重定向到B系统,并携带authorization_code授权码;
- B系统使用authorization_code授权码到A系统获取token令牌;
- B系统可以使用token令牌到A系统获取用户资源。
再举个授权码模式的例子:某网站QQ快速登录、账号绑定。
- 用户点击网站的QQ登录图标
- 页面跳转到QQ提供的授权页,如果PC上没有登录QQ账号,需要登录
- 用户允许授权
- 重定向到网站回调地址,携带授权码authorization_code
- 网站使用授权码获取token
- 使用token拉取QQ账号信息
- 使用QQ账号信息登录、账号绑定等
3、文档和例子
百度搜索“oauth2.0”

QQ互联官方文档,http://wiki.connect.qq.com
二、Spring Security概述
Spring Security是一个用于快速实现Web应用安全、认证的框架,可以快速和Spring Boot整合。
开发者可以编写配置类继承WebSecurityConfigurerAdapter类,重写config方法自定义登录页面、登录失败逻辑、权限不足逻辑等,并且可以编写Filter实现更加复杂的图片验证码、短信验证码功能。
Spring Security也可以快速实现OAuth2.0授权服务器和资源服务器。在一个Spring Boot应用中,可以使用@EnableAuthorizationServer注解实现授权服务器,使用@EnableResourceServer注解实现资源服务器。
例如
 @SpringBootApplication

 @EnableAuthorizationServer

 @EnableResourceServer

 public class BasicOauth2Application {

     public static void main(String[] args) {

         SpringApplication.run(BasicOauth2Application.class, args);

     }

 }
在application.properties文件配置client-id和client-secret参数
security.oauth2.client.client-id=net5ijy

security.oauth2.client.client-secret=123456
三、Spring Security实现OAuth2.0基础
1、引入依赖
 <parent>

     <groupId>org.springframework.boot</groupId>

     <artifactId>spring-boot-starter-parent</artifactId>

     <version>1.5.13.RELEASE</version>

 </parent>

 <dependencies>

     <dependency>

         <groupId>org.springframework.boot</groupId>

         <artifactId>spring-boot-starter-web</artifactId>

     </dependency>

     <dependency>

         <groupId>org.springframework.boot</groupId>

         <artifactId>spring-boot-starter-security</artifactId>

     </dependency>

     <dependency>

         <groupId>org.springframework.security.oauth</groupId>

         <artifactId>spring-security-oauth2</artifactId>

     </dependency>

 </dependencies>

 <build>

     <plugins>

         <plugin>

             <groupId>org.apache.maven.plugins</groupId>

             <artifactId>maven-compiler-plugin</artifactId>

             <configuration>

                 <source>1.8</source>

                 <target>1.8</target>

                 <encoding>UTF-8</encoding>

             </configuration>

         </plugin>

     </plugins>

 </build>
2、Spring Boot启动类配置
加@EnableAuthorizationServer和@EnableResourceServer注解。
 @SpringBootApplication

 @EnableAuthorizationServer

 @EnableResourceServer

 public class BasicOauth2Application {

     public static void main(String[] args) {

         SpringApplication.run(BasicOauth2Application.class, args);

     }

 }
3、application.properties配置
配置Security登录用户
security.user.name=admin

security.user.password=123456
配置client-id和client-secret参数
security.oauth2.client.client-id=net5ijy

security.oauth2.client.client-secret=123456
4、受保护资源
编写controller
 @RestController

 @RequestMapping(value = "/")

 public class TestController {

     Logger log = LoggerFactory.getLogger(TestController.class);

     @RequestMapping(value = "order/demo")

     public String getDemo() {

         Authentication auth = SecurityContextHolder.getContext()

                 .getAuthentication();

         log.info(auth.toString());

         return "Hello world";

     }

 }
5、测试授权码模式
1)获取authorization_code授权码
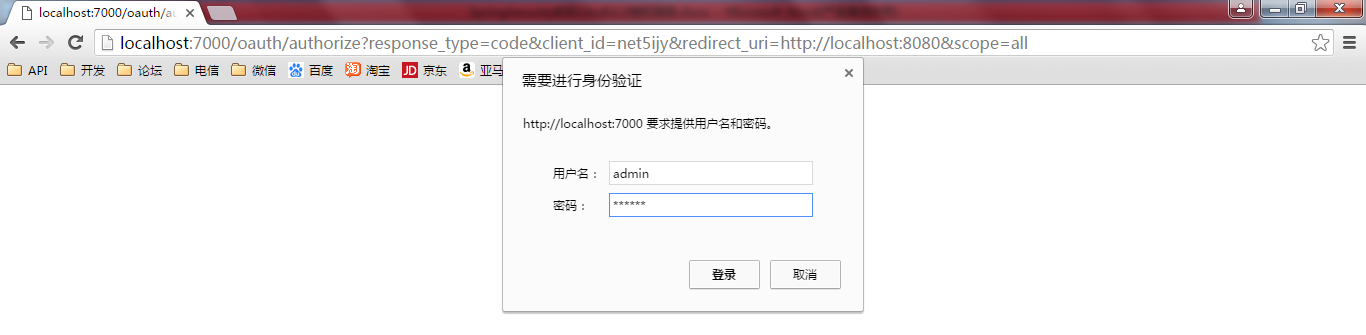
使用浏览器访问:
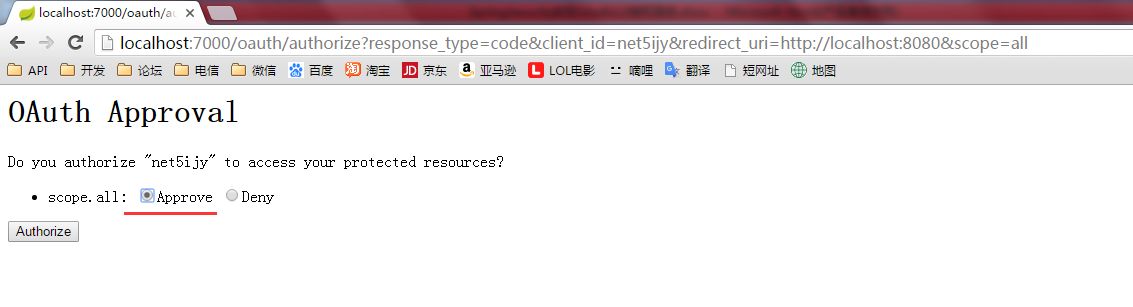
http://localhost:7000/oauth/authorize?response_type=code&client_id=net5ijy&redirect_uri=http://localhost:8080&scope=all
地址
http://localhost:7000/oauth/authorize
参数
|
response_type |
code |
|
client_id |
根据实际的client-id填写,此处写net5ijy |
|
redirect_uri |
生成code后的回调地址,http://localhost:8080 |
|
scope |
权限范围 |

登录,使用的用户名、密码就是在application.properties中配置的admin和123456
security.user.name=admin

security.user.password=123456
允许授权
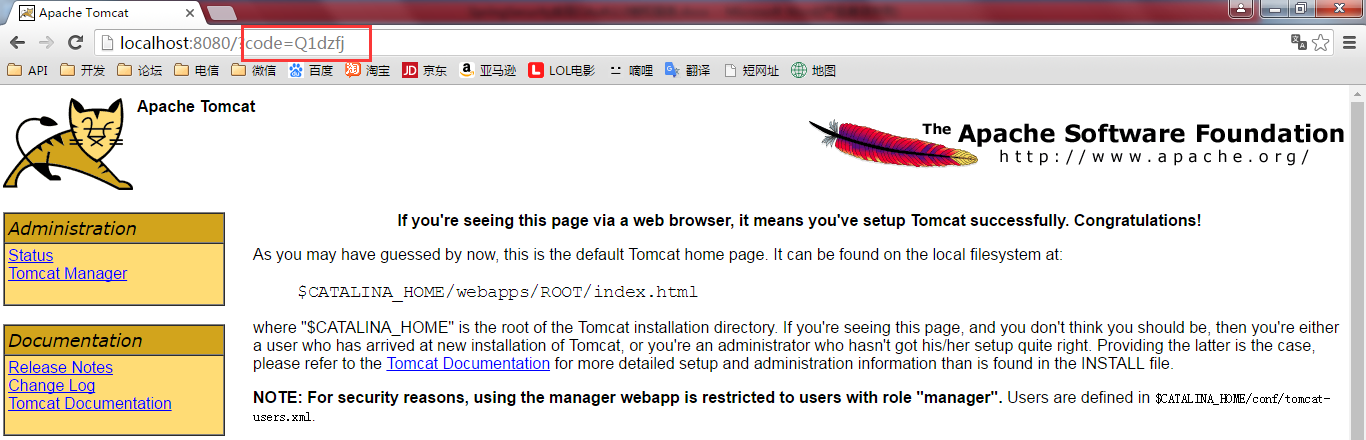
看到浏览器重定向到了http://localhost:8080并携带了code参数,这个code就是授权服务器生成的授权码
2)获取token令牌
使用curl命令获取token令牌
curl --user net5ijy:123456 -X POST -d "grant_type=authorization_code&scope=all&redirect_uri=http%3a%2f%2flocalhost%3a8080&code=Q1dzfj" http://localhost:7000/oauth/token
地址
http://localhost:7000/oauth/token
参数
|
grant_type |
授权码模式,写authorization_code |
|
scope |
权限范围 |
|
redirect_uri |
回调地址,http://localhost:8080需要urlencode |
|
code |
就是上一步生成的授权码 |
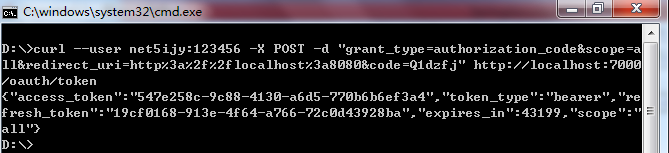
返回值
 {

     "access_token": "547e258c-9c88-4130-a6d5-770b6b6ef3a4",

     "token_type": "bearer",

     "refresh_token": "19cf0168-913e-4f64-a766-72c0d43928ba",

     "expires_in": 43199,

     "scope": "all"

 }
这样就获取到了token令牌,该token的访问权限范围是all权限,在12小时后失效。
3)使用token访问资源
curl http://localhost:7000/order/demo?access_token=547e258c-9c88-4130-a6d5-770b6b6ef3a4

在资源url后面加上access_token参数。
6、测试密码模式
1)获取token令牌
使用curl命令获取token令牌
curl --user net5ijy:123456 -X POST -d "grant_type=password&username=admin&password=123456&scope=all" http://localhost:7000/oauth/token
地址
http://localhost:7000/oauth/token
参数
|
grant_type |
密码模式,写password |
|
scope |
权限范围 |
|
username |
申请授权用户的用户名 |
|
password |
申请授权用户的密码 |
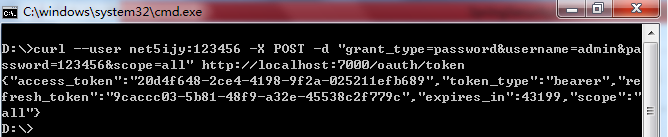
返回值
 {

     "access_token": "20d4f648-2ce4-4198-9f2a-025211efb689",

     "token_type": "bearer",

     "refresh_token": "9caccc03-5b81-48f9-a32e-45538c2f779c",

     "expires_in": 43199,

     "scope": "all"

 }
这样就获取到了token令牌,该token的访问权限范围是all权限,在12小时后失效。
2)使用token访问资源
curl http://localhost:7000/order/demo?access_token=20d4f648-2ce4-4198-9f2a-025211efb689

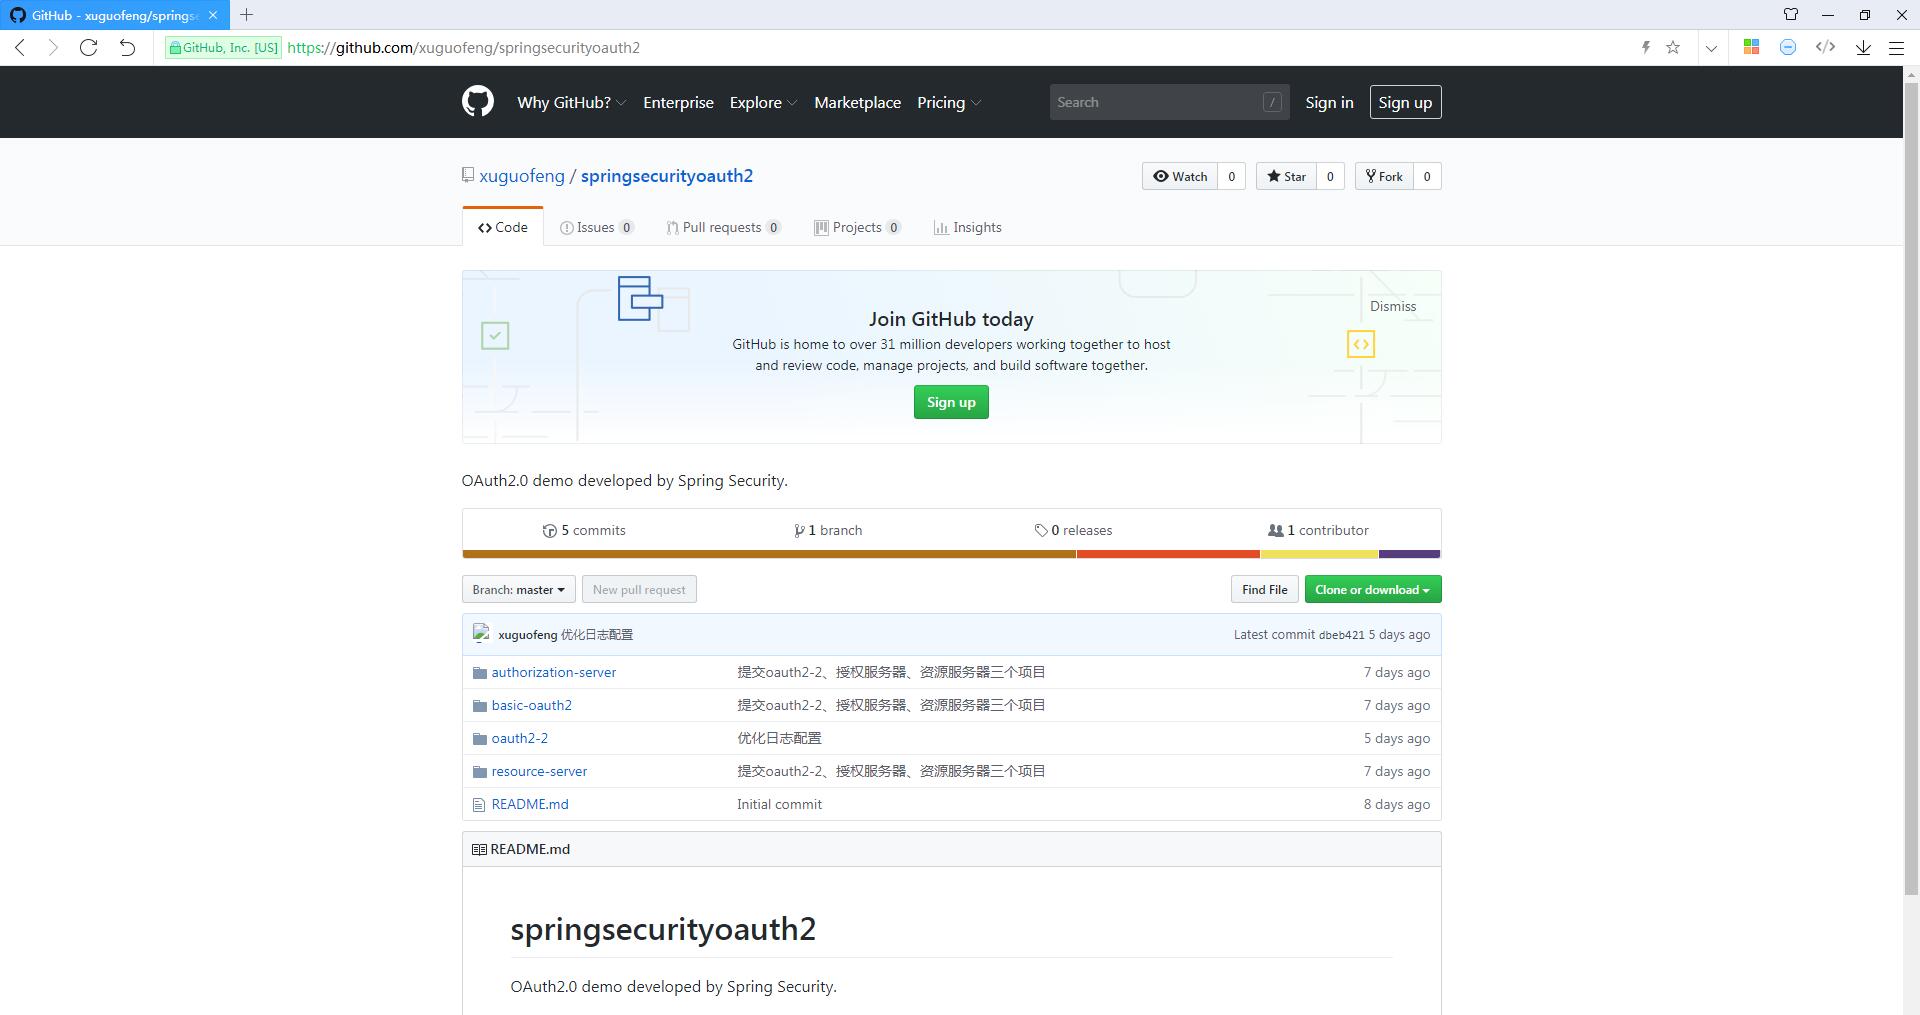
四、Github源码下载
https://github.com/xuguofeng/springsecurityoauth2
Spring Security实现OAuth2.0授权服务 - 基础版的更多相关文章
- Spring Security实现OAuth2.0授权服务 - 进阶版
<Spring Security实现OAuth2.0授权服务 - 基础版>介绍了如何使用Spring Security实现OAuth2.0授权和资源保护,但是使用的都是Spring Sec ...
- Microsoft.Owin.Security.OAuth搭建OAuth2.0授权服务端
Microsoft.Owin.Security.OAuth搭建OAuth2.0授权服务端 目录 前言 OAuth2.0简介 授权模式 (SimpleSSO示例) 使用Microsoft.Owin.Se ...
- SimpleSSO:使用Microsoft.Owin.Security.OAuth搭建OAuth2.0授权服务端
目录 前言 OAuth2.0简介 授权模式 (SimpleSSO示例) 使用Microsoft.Owin.Security.SimpleSSO模拟OpenID认证 通过authorization co ...
- 使用Spring Security和OAuth2实现RESTful服务安全认证
这篇教程是展示如何设置一个OAuth2服务来保护REST资源. 源代码下载github. (https://github.com/iainporter/oauth2-provider)你能下载这个源码 ...
- nodejs实现OAuth2.0授权服务
OAuth是一种开发授权的网络标准,全拼为open authorization,即开放式授权,最新的协议版本是2.0. 举个栗子: 有一个"云冲印"的网站,可以将用户储存在Goog ...
- spring oauth2 ,spring security整合oauth2.0 JdbcTokenStore实现 解决url-pattern .do .action
参考以下两个文章: http://www.cnblogs.com/0201zcr/p/5328847.html http://wwwcomy.iteye.com/blog/2230265 web.xm ...
- Spring官方宣布:新的Spring OAuth2.0授权服务器已经来了
1. 前言 记不记得之前发过一篇文章Spring 官方发起Spring Authorization Server 项目.该项目是由Spring Security主导的一个社区驱动的.独立的孵化项目.由 ...
- Spring Security 与 OAuth2 介绍
个人 OAuth2 全部文章 Spring Security 与 OAuth2(介绍):https://www.jianshu.com/p/68f22f9a00ee Spring Security 与 ...
- Spring Security 与 OAuth2(介绍)
https://www.jianshu.com/p/68f22f9a00ee Spring Security 与 OAuth2(介绍) 林塬 2018.01.23 11:14* 字数 3097 阅读 ...
随机推荐
- react.js知识汇总
首先ract的基本结构 var Input = React.createClass({ getInitialState: function() { return {value: 'Hello!'}; ...
- Logstash 学习资料
学习资料 网址 Logstash Reference(官方) https://www.elastic.co/guide/en/logstash/current/introduction.html
- linux 以导入文件形式添加定时任务(crontab)时需要注意的坑
在实际操作过程中发现,使用导入文件形式添加定时任务时,会将用户已有的定时任务全部覆盖清理(先清空,再重新导入),所以在使用文件导入定时任务时,需要先将已有定时任务导出,然后将新任务进行追加到已有定时任 ...
- 16-C#笔记-枚举
枚举同C++ using System; namespace EnumApplication { class EnumProgram { enum Days { Sun, Mon, tue, Wed, ...
- 攻防世界(Ctf-Web 新手练习区)
题目:view_source 在url的前面加上个 “view-source: ”就看到flag了,或者“CTRL+U”快捷键查看源码 flag:cyberpeace{e07dcafaeeb31df2 ...
- vue : 无法加载文件 C:\Users\xxx\AppData\Roaming\npm\vue.ps1
最近因为电脑太卡,小颖把电脑重装了,重装后再执行 npm install -g @vue/cli 时可能是网络问题,一直不能成功,小颖就把npm指向了淘宝镜像: npm install -g cnpm ...
- Windows空间清理2
最近听说有同事因为电脑C盘不足,让别人重装电脑解决了,感觉有点意料之外又有点情理之中. 一方面居然有某些做技术的同事不知道要如何高效的清理自己的磁盘空间,要花一天时间重装系统.然后装软件.再配置各种开 ...
- 洛谷P1230智力大冲浪 题解
题目描述 小伟报名参加中央电视台的智力大冲浪节目.本次挑战赛吸引了众多参赛者,主持人为了表彰大家的勇气,先奖励每个参赛者m元.先不要太高兴!因为这些钱还不一定都是你的?!接下来主持人宣布了比赛规则: ...
- 关于微信订阅号里自动回复里的a链接的问题
前阵子做了一个微信订阅号的活动,然后发现一个问题:就是回复内容里的a标签微信没有解析出来,而是这样 正常应该是这样: 具体出现这种情况的手机有: 魅族的型号是:M1 metal小米的型号是:MI 5X ...
- JavaScriptDOM编程学习笔记(二)图片库案例
<JavascriptDOM编程艺术>提供一个图片库的demo,主要讲解如何更好的使用JavaScript在网页中,跟随作者的思路来分析一下这个案例 首先需求是将图片发布到网上,但是如果发 ...