Apache Kafka - How to Load Test with JMeter
In this article, we are going to look at how to load test Apache Kafka, a distributed streaming platform, by using Apache JMeter™. First of all, let us study what Kafka is and give a few definitions we will need for further work.
A Brief Overview of Apache Kafka
In a large distributed system, there are usually a lot of services that generate different events: logs, monitoring data, suspicious user actions, and so on. In Kafka, these are called producers. On the other hand, there are services that need the generated data. These are called consumers.
Kafka that solves the problem of interaction between these services. It sits between producers and consumers, while collecting the data from the producers, storing them in a distributed repository of topics and giving each consumer the data by subscription. Kafka is launched as a cluster consisting of one or several servers, each of which is called a broker.
In other words, Kafka is a hybrid of a distributed database and a message queue. It is widely known for its features and is used by many large companies to process terabytes of information. For example, in LinkedIn Apache Kafka is used to stream data about user activity, and Netflix uses it for data collection and buffering for downstream systems like Elasticsearch, Amazon EMR, Mantis etc.
Let’s look at some of Kafka’s features that are important for load testing:
- A long message storing time - a week, by default
- High performance, thanks to sequential I/O
- Convenient clustering
- High availability of data due to the capability to replicate and distribute queues across the cluster
- Not only is it able to transfer data, but it can also process it by using Streaming API
As a rule, Kafka is used to work with a very large amount of data. Therefore, the following aspects should be paid attention to during load testing:
- Constantly writing the data to the disk will affect the capacity of the server. If insufficient, it will reach a denial of service state.
- In addition, the distribution of sections and the number of brokers also affects the use of service capacity. For example, brokers may simply not have enough resources to process the data stream. As a result, the producers will exhaust local buffers for storing messages, and part of the messages may be lost.
- When the replication feature is used, everything becomes even more complicated. This is because its maintenance requires even more resources, and the case when brokers refuse to receive messages becomes even more possible.
Data that is processed in such huge amounts, can be very easily lost, even though most processes are automated. Therefore, testing of these services is important and it is necessary to be able to generate a proper load.
To demonstrate load testing Apache Kafka, it will be installed on Ubuntu. Besides, we will use the Pepper-Box plugin as a producer. It has a more convenient interface to work with message generation than kafkameter does. We will have to implement the consumer on our own, because no plugin provides consumer implementation, and we are going to use the JSR223 Sampler to do that.
Configuring The Producer - Pepper-Box
To install the plugin, you need to compile this source code or download the jar file, then put it in the lib/ext folder and restart JMeter.
This plugin has 3 elements:
- Pepper-Box PlainText Config allows building text messages according to a specified template.
- Pepper-Box Serialized Config allows building a message that is a serialized java object.
- PepperBoxKafkaSampler is designed to send the messages that were built by previous elements.
Let us look at each of them.
Pepper-Box PlainText Config
To add this item, go to the Thread group -> Add -> Config Element -> Pepper-Box PlainText Config

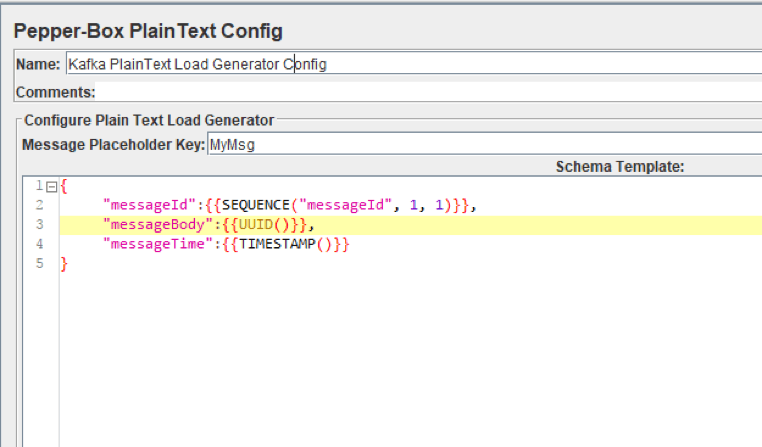
As you can see in the picture above, the element has 2 fields:
- Message Placeholder Key - a key that will need to be specified in the PepperBoxKafkaSampler to use the template from this element.
- Schema Template - a message template in which you can use JMeter variables and functions, and also plugin functions. The structure of the message can be anything, from plain text, to JSON or XML.
For example, in the screenshot above, we are passing the JSON string as a message, using several plugin functions: to specify the message number, to specify the identifier and the sending timestamp.
Pepper-Box Serialized Config
To add this element, go to Thread group -> Add -> Config Element -> Pepper-Box Serialized Config
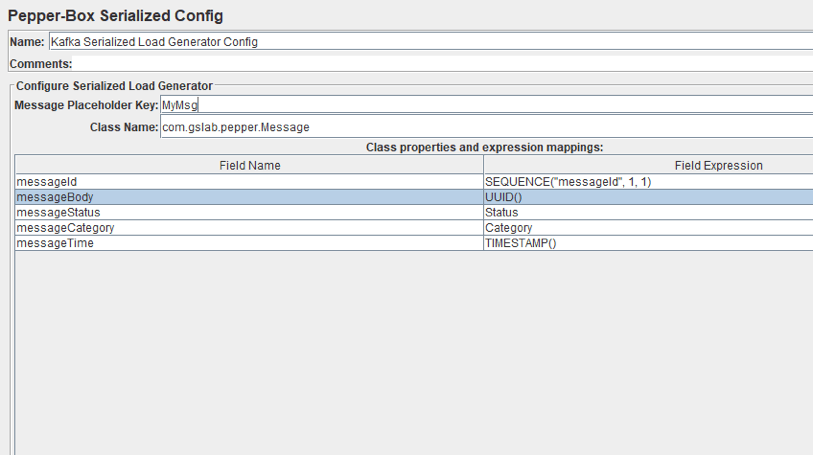
As you can see in the picture above, the element has a field for the key and the Class Name field, which is intended for specifying the Java class. The jar file with the class must be placed in the lib/ext folder. After it is specified, the fields with its properties will appear below, and you can assign desired values to them. We repeated the message from the last element, but it will be a Java object this time.
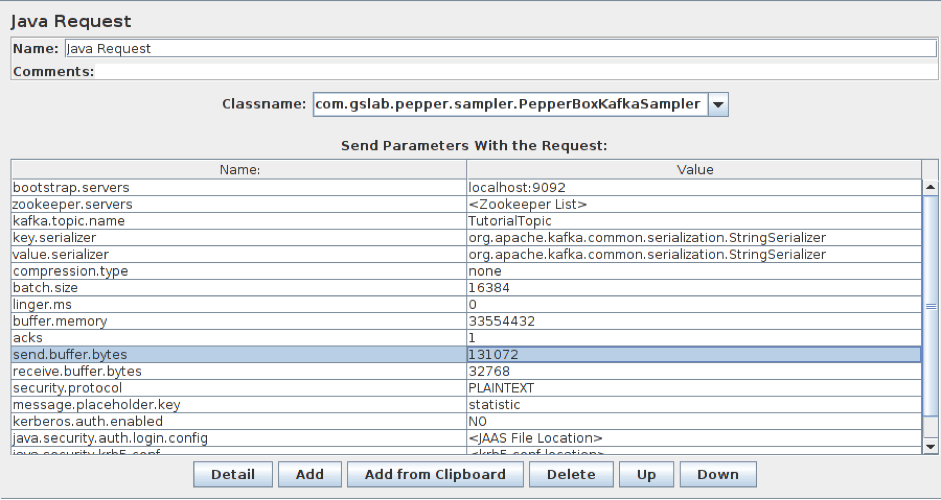
PepperBoxKafkaSampler
To add this element, go to Thread group -> Add -> Sampler -> Java Request. Then, select com.gslab.pepper.sampler.PepperBoxKafkaSampler from the drop-down list.
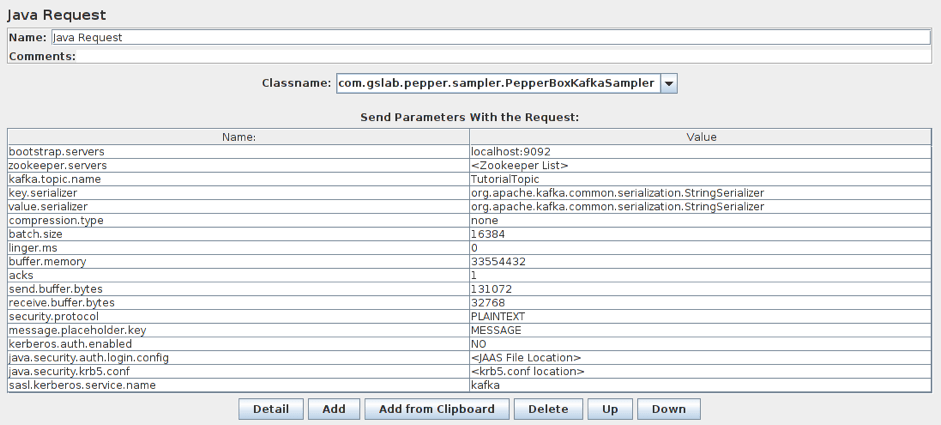
This element has the following settings:
- bootstrap.servers/zookeeper.servers - the addresses of brokers/zookeepers (a zookeeper is an interface that distributes the load from the producers between different brokers) in the format of broker-ip-1: port, broker-ip-2: port, etc.
- kafka.topic.name - is the name of the topic for message publication.
- key.serializer - is a class for key serialization. Leave it unchanged if there is no key in the message.
- value.serializer - is a class for message serialization. For a simple text, the field remains unchanged. When using Pepper-Box Serialized Config, you need to specify "com.gslab.pepper.input.serialized.ObjectSerializer".
- compression.type - is a type of message compression (none/gzip/snappy/lz4)
- batch.size - is the largest message size.
- linger.ms - is the message waiting time.
- buffer.memory - is the producer's buffer size.
- acks - is the quality of service (-1/0/1 - delivery is not guaranteed/the message will surely be delivered/the message will be delivered once).
- receive.buffer.bytes/send.buffer.bytes - the size of the TCP send/receive buffer. -1 - use the default OS value.
- security.protocol - is the encryption protocol (PLAINTEXT/SSL/SASL_PLAINTEXT/ SASL_SSL).
- message.placeholder.key - is the message key, which was specified in the previous elements.
- kerberos.auth.enabled, java.security.auth.login.config, java.security.krb5.conf, sasl.kerberos.service.name - are a field group responsible for the authentication.
Besides, if necessary, you can add additional parameters using the prefix _ before the name, for example, _ssl.key.password.
Configuring the Consumer
Now let us move on to the consumer. While it is the producer that creates the largest load on the server, the service has to deliver messages too. Therefore, we should also add consumers, to more accurately reproduce the situations. They can also be used to check whether all consumer messages have been delivered.
As an example, let us take the following source code and briefly touch upon its steps:
Properties props = new Properties();

      props.put("bootstrap.servers", "localhost:9092");

      props.put("group.id", group);

      props.put("enable.auto.commit", "true");

      props.put("auto.commit.interval.ms", "1000");

      props.put("session.timeout.ms", "30000");

      props.put("key.deserializer",

         "org.apache.kafka.common.serializa-tion.StringDeserializer");

      props.put("value.deserializer",

         "org.apache.kafka.common.serializa-tion.StringDeserializer");

      KafkaConsumer<String, String> consumer = new KafkaConsumer<String, String>(props);

      consumer.subscribe(Arrays.asList(topic));

      System.out.println("Subscribed to topic " + topic);

      int i = 0;

      while (true) {

         ConsumerRecords<String, String> records = con-sumer.poll(100);

            for (ConsumerRecord<String, String> record : records)

               System.out.printf("offset = %d, key = %s, value = %s\n",

               record.offset(), record.key(), record.value());

      }
1. A connection configuration is performed.
2. A topic is to be specified and a subscription is made to it.
3. Messages are received in the cycle of this topic and are brought out to the console.
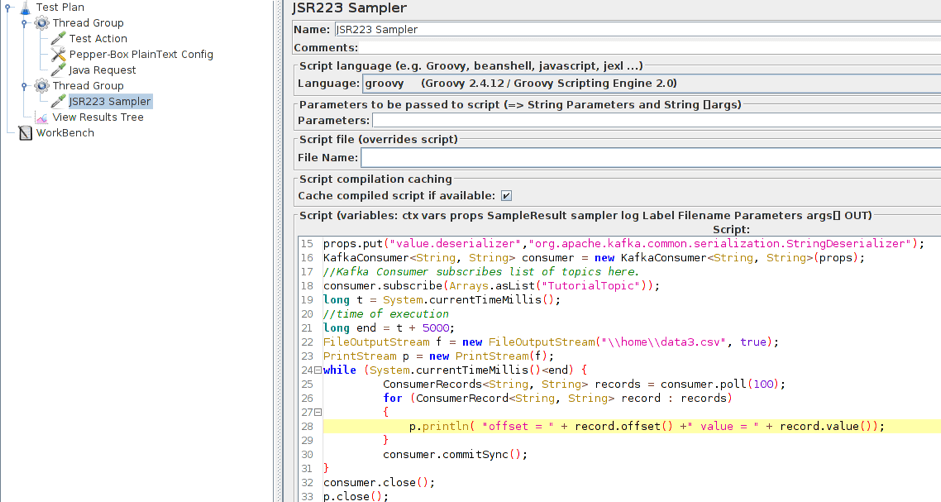
This code with some modifications will be added to the JSR223 Sampler in JMeter.
Building the Load Testing Apache Kafka Scenario in JMeter
Now that we have studied all the necessary elements for creating the load, let’s try posting several messages to the topic of our Kafka service. Let’s imagine that we have a resource from which the data on its activities are collected. The information will be sent as an XML document.
1. Add the Pepper-Box PlainText Config and create a template. The structure of the message will be as follows: Message number, Message-ID, Item ID which the statistics are collected from, the Statistics, Sending date stamp. The message template is shown in the screenshot below.
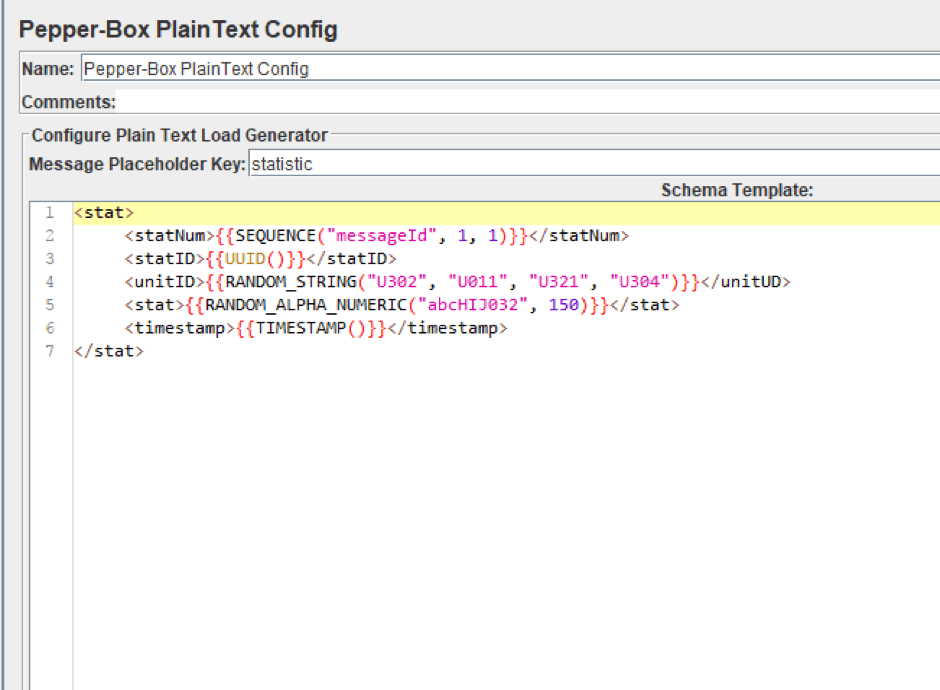
2. Add the PepperBoxKafkaSampler. In it, specify the addresses of bootstrap.servers and kafka.topic.name from our Kafka service. In our case, the address of broker is localhost:9092, topic for demonstration is TuttorialTopic. And we will also specify the placeholder.key from the template element from the previous step.
3. Add the JSR223 Sampler with the consumer code to a separate Thread Group. For it to work, you will also need a kafka-clients-x.x.x.x.jar files that contains classes for working with Kafka. You can find it in your kafka directory - /kafka/lib.
Here, we modified part of the script and now it saves the data to a file rather than displaying it in the console. This has been done for a more convenient analysis of the results. We also added the part that is necessary for setting the execution time of the consumer. For the demonstration it is setted at 5 seconds.
Updated part:
  long t = System.currentTimeMillis();

  long end = t + 5000;

  f = new FileOutputStream(".\\data.csv", true);

  p = new PrintStream(f);

  while (System.currentTimeMillis()<end)

  {

      ConsumerRecords<String, String> records = consumer.poll(100);

      for (ConsumerRecord<String, String> record : records)

     {

         p.println( "offset = " + record.offset() +" value = " + record.value());

     }

     consumer.commitSync();

   }

   consumer.close();

   p.close();

   f.close();
Now the structure of the script looks as follows. Both threads work simultaneously. The Producers begin to publish messages to the specified topics. The Consumers connect to the topics and wait for messages from Kafka. When a message is received by the Consumer, it writes the message to a file.
4. Run the script and view the results.
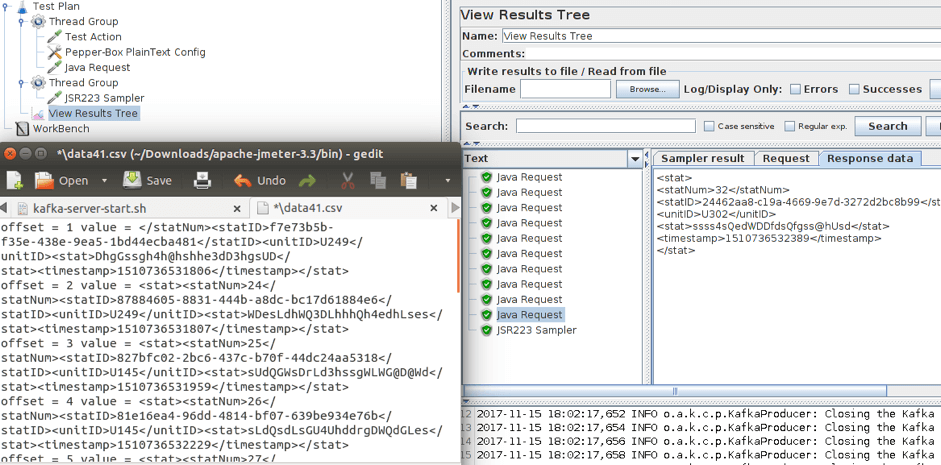
As you can see in the screenshot above, ten messages were sent. You can see the received messages in the opened file. After that, you just have to adjust the number of consumers and producers to increase the load.
Update:
If you get the following error when you try to run the scenario:
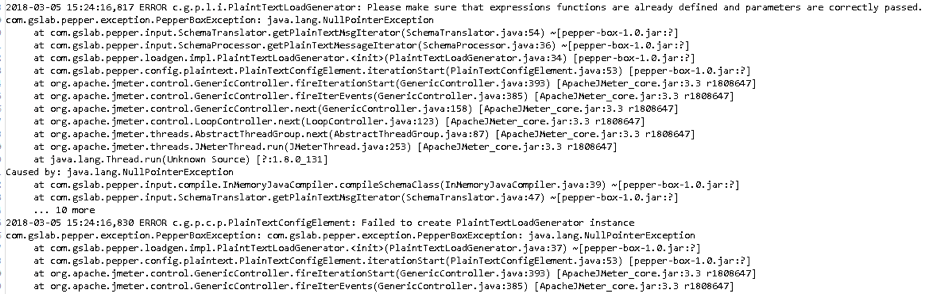
this means that JMeter uses JRE instead of JDK and you need to fix it, because JDK is a Pepper-box requirement.
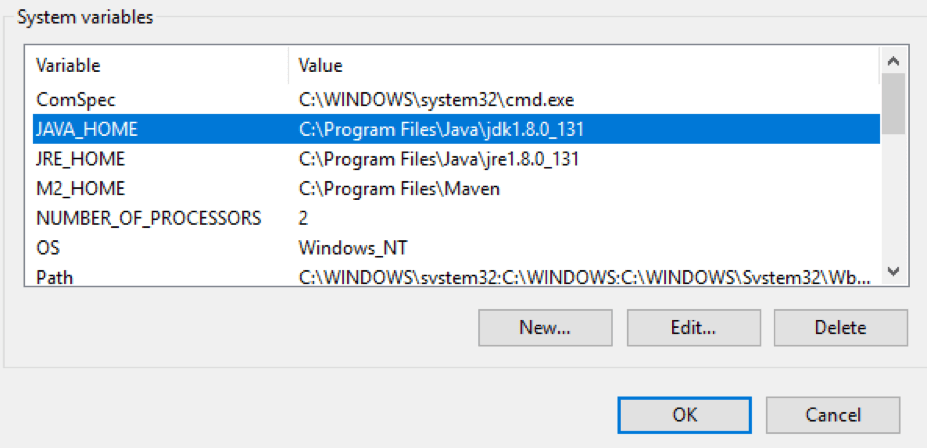
Windows:
- Right click My Computer -> Properties -> Advanced -> Environment Variables
- Set path to JDK in Value field of JAVA_HOME Variable
- Run JMeter using jmeter.bat
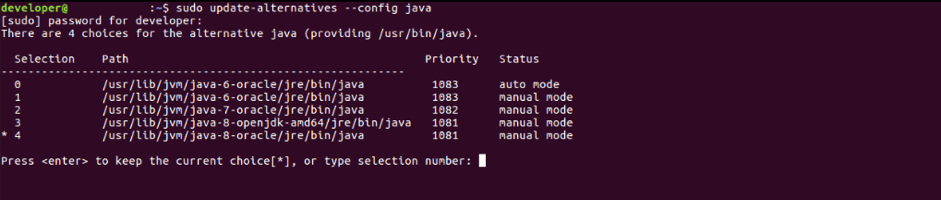
Ubuntu:
- Write sudo update-alternatives --config java and choose the right option (in this case it is 3).
- Run JMeter using jmeter.sh
It is worth reminding that the Apache Kafka is designed for a large number of connections, so you can simply reach the capacity limit of your network load generator. In which case, JMeter maintains the feature of distributed testing.
I would also like to note that there is no point using random data for messages during the testing, since they can differ in size significantly from the current ones, and this difference may affect the test results. Please, take test data seriously.
Apache Kafka - How to Load Test with JMeter的更多相关文章
- 使用JMeter进行Apache Kafka负载测试
1.卡夫卡负载测试 在这个Apache Kafka教程中,我们将了解如何使用Apache JMeter,如何在Apache Kafka上执行Kafka负载测试.此外,这个Kafka负载测试教程教我们如 ...
- JMeter进行Apache Kafka负载测试
1.卡夫卡负载测试 在这个Apache Kafka教程中,我们将了解如何使用Apache JMeter,如何在Apache Kafka上执行Kafka负载测试.此外,这个Kafka负载测试教程教我们如 ...
- Apache Kafka: Next Generation Distributed Messaging System---reference
Introduction Apache Kafka is a distributed publish-subscribe messaging system. It was originally dev ...
- apache kafka系列之-监控指标
apache kafka中国社区QQ群:162272557 1.监控目标 1.当系统可能或处于亚健康状态时及时提醒,预防故障发生 2.报警提示 a.短信方式 b.邮件 2.监控内容 2.1 机器监控 ...
- Configuring Apache Kafka for Performance and Resource Management
Apache Kafka is optimized for small messages. According to benchmarks, the best performance occurs w ...
- Benchmarking Apache Kafka: 2 Million Writes Per Second (On Three Cheap Machines)
I wrote a blog post about how LinkedIn uses Apache Kafka as a central publish-subscribe log for inte ...
- How-to: Do Real-Time Log Analytics with Apache Kafka, Cloudera Search, and Hue
Cloudera recently announced formal support for Apache Kafka. This simple use case illustrates how to ...
- 《Apache kafka实战》读书笔记-kafka集群监控工具
<Apache kafka实战>读书笔记-kafka集群监控工具 作者:尹正杰 版权声明:原创作品,谢绝转载!否则将追究法律责任. 如官网所述,Kafka使用基于yammer metric ...
- 《Apache Kafka 实战》读书笔记-认识Apache Kafka
<Apache Kafka 实战>读书笔记-认识Apache Kafka 作者:尹正杰 版权声明:原创作品,谢绝转载!否则将追究法律责任. 一.kafka概要设计 kafka在设计初衷就是 ...
随机推荐
- vue自学笔记
做前端也做了一段时间了,为了高薪,不能一直做网页不是~~,所以从今天开始整理vue的笔记 内容都是从网上搜集整合并且自己实践过了的,需要注意的点,也在后面标注了“注” 当然了,如果有什么问题的 ...
- pip requirements.txt
生成文件 pip freeze > requirements.txt 依赖库会导到于requirements.txt 比如: image.png 从requirements.txt安装依赖库 ...
- 使用conda安装tensorflow-gpu
1.之前已经安装了anaconda,之前疏忽使用的pip安装的tensorflow,但pycharm还是使用的anaconda环境. 现在把pip的tensorflow删除了 pip uninstal ...
- Python从零开始——基础语法
- MySQL基本库表管理
基本管理指令 mysql登陆 第一种 [root@wei ~]# mysql -u root -p 第二种(带参输入) [root@wei ~]# mysql -uroot -proot 注意:每个命 ...
- 手把手教你如何利用 HeroKu 免费获取一个 Scrapyd 集群
手把手教你如何利用 HeroKu 免费获取一个 Scrapyd 集群 本文原始地址:https://sitoi.cn/posts/48724.html 准备环境 一个 GitHub 的账号 一个 He ...
- AMD Ryzen一代、二代CPU一览表
Ryzen一代(14纳米).二代(12纳米)CPU一览表 http://img30.360buyimg.com/sku/jfs/t1/1134/23/12713/382299/5bd910f9E63b ...
- Hello,DTOS!(上)
主引导程序是软件还是固件?如果是软件,那么由谁开发?如何开发?主引导程序是软件.因为它不是固化于硬件当中的,并不是在出厂之前已经烧到硬件里面去了.因此它必然是软件.既然是软件,那是谁来开发它呢?就目前 ...
- 每天一道Rust-LeetCode(2019-06-01)
每天一道Rust-LeetCode(2019-06-01) 坚持每天一道题,刷题学习Rust. 题目描述 给出两个 非空 的链表用来表示两个非负的整数.其中,它们各自的位数是按照 逆序 的方式存储的, ...
- hdu 6217 A BBP Formula 公式题
题意 已知公式:$\pi=\sum_{k=0}^{\infty}\left[\frac{1}{16^{k}}\left(\frac{4}{8 k+1}-\frac{2}{8 k+4}-\frac{1} ...