
Spring中基于AOP的XML架构
为了使用aop命名空间标签,需要导入spring-aop架构,如下所示:
<?xml version="1.0" encoding="UTF-8"?>

<beans xmlns="http://www.springframework.org/schema/beans"

    xmlns:xsi="http://www.w3.org/2001/XMLSchema-instance"

    xmlns:aop="http://www.springframework.org/schema/aop"

    xsi:schemaLocation="http://www.springframework.org/schema/beans

                        http://www.springframework.org/schema/beans/spring-beans.xsd

                        http://www.springframework.org/schema/aop

                        http://www.springframework.org/schema/aop/spring-aop.xsd">

</beans>
还需要增加而外的jar包用于支持AspectJ:
    <!-- aspectjrt.jar -->

    <!-- https://mvnrepository.com/artifact/org.aspectj/aspectjrt -->

    <dependency>

        <groupId>org.aspectj</groupId>

        <artifactId>aspectjrt</artifactId>

        <version>1.8.10</version>

    </dependency>

    <!-- aspectjweaver.jar -->

    <!-- https://mvnrepository.com/artifact/org.aspectj/aspectjweaver -->

    <dependency>

        <groupId>org.aspectj</groupId>

        <artifactId>aspectjweaver</artifactId>

        <version>1.8.10</version>

    </dependency>
集成步骤:
1、声明一个aspect(方面)
一个aspect是使用<aop:aspect>元素声明的,并使用ref属性引用bean,如下所示:
<aop:config>

   <aop:aspect id="myAspect" ref="aBean">

      ...

   </aop:aspect>

</aop:config>

<bean id="aBean" class="...">

   ...

</bean>
这个“aBean”将被配置和依赖注入就像其他Spring bean一样。
2、声明一个pointcut(切入点)
切入点有助于确定用不同建议执行的关联点(即方法)。在使用基于XML Schema的配置时,切入点将定义如下:
<aop:config>

   <aop:aspect id="myAspect" ref="aBean">

     <aop:pointcut id="businessService" expression="execution(* com.xyz.myapp.service.*.*(..))"/>

     ...

   </aop:aspect>

</aop:config>

<bean id="aBean" class="...">

  ...

</bean>
以下示例定义了一个名为“businessService”的切入点,该切入点将匹配在com.tutorialspoint包中的Student类中可用的getName()方法:
<aop:config>

   <aop:aspect id="myAspect" ref="aBean">

     <aop:pointcut id="businessService" expression="execution(*com.tutorialspoint.Student.getName(..))"/>

     ...

   </aop:aspect>

</aop:config>

<bean id="aBean" class="...">

   ...

</bean>
提示:
①类似:“execution(*com.tutorialspoint.Student.getName(..))”这样的语法叫做AspectJ切入点语法,参考:http://www.cnblogs.com/EasonJim/p/6901806.html
②官方文档关于AspectJ的介绍:https://docs.spring.io/spring/docs/current/spring-framework-reference/html/aop.html#aop-ataspectj
3、声明建议(通知类型)
可以使用<aop:{ADVICE NAME}>五个建议中的任何一个元素在<aop:aspect>内声明,如下所示:
<aop:config>

   <aop:aspect id="myAspect" ref="aBean">

      <aop:pointcut id="businessService" expression="execution(* com.xyz.myapp.service.*.*(..))"/>

      <!-- a before advice definition -->

      <aop:before pointcut-ref="businessService" method="doRequiredTask"/>

      <!-- an after advice definition -->

      <aop:after pointcut-ref="businessService" method="doRequiredTask"/>

      <!-- an after-returning advice definition -->

      <!--The doRequiredTask method must have parameter named retVal -->

      <aop:after-returning pointcut-ref="businessService" returning="retVal" method="doRequiredTask"/>

      <!-- an after-throwing advice definition -->

      <!--The doRequiredTask method must have parameter named ex -->

      <aop:after-throwing pointcut-ref="businessService" throwing="ex" method="doRequiredTask"/>

      <!-- an around advice definition -->

      <aop:around pointcut-ref="businessService" method="doRequiredTask"/>


    ...

   </aop:aspect>

</aop:config>

<bean id="aBean" class="...">

  ...

</bean>
可以对不同的建议使用相同的doRequiredTask或不同的方法。这些方法将被定义为方面模块的一部分。
至此集成完毕。
基于AOP的XML架构的示例:
pom.xml:
<project xmlns="http://maven.apache.org/POM/4.0.0" xmlns:xsi="http://www.w3.org/2001/XMLSchema-instance"

  xsi:schemaLocation="http://maven.apache.org/POM/4.0.0 http://maven.apache.org/xsd/maven-4.0.0.xsd">

  <modelVersion>4.0.0</modelVersion>

  <groupId>com.jsoft.testspring</groupId>

  <artifactId>testaopxml</artifactId>

  <version>0.0.1-SNAPSHOT</version>

  <packaging>jar</packaging>

  <name>testaopxml</name>

  <url>http://maven.apache.org</url>

  <properties>

    <project.build.sourceEncoding>UTF-8</project.build.sourceEncoding>

  </properties>

  <dependencies>

    <dependency>

      <groupId>junit</groupId>

      <artifactId>junit</artifactId>

      <version>3.8.1</version>

      <scope>test</scope>

    </dependency>

    <!-- Spring Core -->

    <!-- http://mvnrepository.com/artifact/org.springframework/spring-core -->

    <dependency>

        <groupId>org.springframework</groupId>

        <artifactId>spring-core</artifactId>

        <version>4.1.4.RELEASE</version>

    </dependency>

    <!-- Spring Context -->

    <!-- http://mvnrepository.com/artifact/org.springframework/spring-context -->

    <dependency>

        <groupId>org.springframework</groupId>

        <artifactId>spring-context</artifactId>

        <version>4.1.4.RELEASE</version>

    </dependency>

    <!-- String AOP -->

    <!-- http://mvnrepository.com/artifact/org.springframework/spring-aop -->

    <dependency>

        <groupId>org.springframework</groupId>

        <artifactId>spring-aop</artifactId>

        <version>4.1.4.RELEASE</version>

    </dependency>

    <!-- aspectjrt.jar -->

    <!-- https://mvnrepository.com/artifact/org.aspectj/aspectjrt -->

    <dependency>

        <groupId>org.aspectj</groupId>

        <artifactId>aspectjrt</artifactId>

        <version>1.8.10</version>

    </dependency>

    <!-- aspectjweaver.jar -->

    <!-- https://mvnrepository.com/artifact/org.aspectj/aspectjweaver -->

    <dependency>

        <groupId>org.aspectj</groupId>

        <artifactId>aspectjweaver</artifactId>

        <version>1.8.10</version>

    </dependency>

  </dependencies>

</project>
Logging.java:
package com.jsoft.testspring.testaopxml;

public class Logging {

    public void beforeAdvice() {

        System.out.println("Going to setup student profile.");

    }

    public void afterAdvice() {

        System.out.println("Student profile has been setup.");

    }

    public void afterReturningAdvice(Object retVal) {

        System.out.println("Returning:" + retVal.toString());

    }

    public void AfterThrowingAdvice(IllegalArgumentException ex) {

        System.out.println("There has been an exception: " + ex.toString());

    }

}
Student.java:
package com.jsoft.testspring.testaopxml;

public class Student {

    private Integer age;

    private String name;

    public void setAge(Integer age) {

        this.age = age;

    }

    public Integer getAge() {

        System.out.println("Age : " + age);

        return age;

    }

    public void setName(String name) {

        this.name = name;

    }

    public String getName() {

        System.out.println("Name : " + name);

        return name;

    }

    public void printThrowException() {

        System.out.println("Exception raised:");

        throw new IllegalArgumentException();

    }

}
beans.xml:
<?xml version="1.0" encoding="UTF-8"?>

<beans xmlns="http://www.springframework.org/schema/beans"

    xmlns:xsi="http://www.w3.org/2001/XMLSchema-instance"

    xmlns:aop="http://www.springframework.org/schema/aop"

    xsi:schemaLocation="http://www.springframework.org/schema/beans

                        http://www.springframework.org/schema/beans/spring-beans.xsd

                        http://www.springframework.org/schema/aop

                        http://www.springframework.org/schema/aop/spring-aop.xsd">

   <aop:config>

      <aop:aspect id="log" ref="logging">

         <aop:pointcut id="selectAll" expression="execution(* com.jsoft..*.*(..))"/>

         <aop:before pointcut-ref="selectAll" method="beforeAdvice"/>

         <aop:after pointcut-ref="selectAll" method="afterAdvice"/>

         <aop:after-returning pointcut-ref="selectAll" returning="retVal" method="afterReturningAdvice"/>

         <aop:after-throwing pointcut-ref="selectAll" throwing="ex" method="AfterThrowingAdvice"/>

      </aop:aspect>

   </aop:config>

   <bean id="student" class="com.jsoft.testspring.testaopxml.Student">

      <property name="name"  value="Zara" />

      <property name="age"  value="11"/>

   </bean>

   <bean id="logging" class="com.jsoft.testspring.testaopxml.Logging"/>

</beans>
App.java:
package com.jsoft.testspring.testaopxml;

import org.springframework.context.ApplicationContext;

import org.springframework.context.support.ClassPathXmlApplicationContext;

/**

 * Hello world!

 *

 */

public class App

{

    public static void main( String[] args )

    {

        ApplicationContext context = new ClassPathXmlApplicationContext("beans.xml");

         Student student = (Student) context.getBean("student");

         student.getName();

         student.getAge();

         student.printThrowException();

    }

}
测试结果:
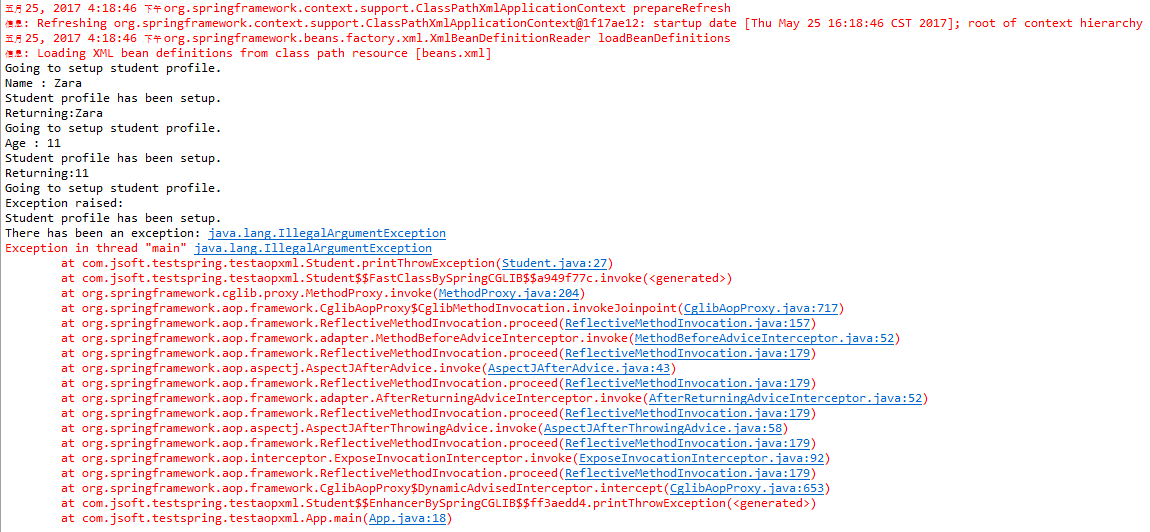
测试工程:https://github.com/easonjim/5_java_example/tree/master/springtest/test16/testaopxml
Spring中基于AOP的XML架构的更多相关文章
- Spring 中基于 AOP 的 XML架构
Spring 中基于 AOP 的 XML架构 为了使用 aop 命名空间标签,你需要导入 spring-aop j架构,如下所述: <?xml version="1.0" e ...
- Spring 中基于 AOP 的 @AspectJ
Spring 中基于 AOP 的 @AspectJ @AspectJ 作为通过 Java 5 注释注释的普通的 Java 类,它指的是声明 aspects 的一种风格. 通过在你的基于架构的 XML ...
- Spring 中基于 AOP 的 @AspectJ注解实例
@AspectJ 作为通过 Java 5 注释注释的普通的 Java 类,它指的是声明 aspects 的一种风格.通过在你的基于架构的 XML 配置文件中包含以下元素,@AspectJ 支持是可用的 ...
- Spring中基于AOP的@AspectJ
以下内容引用自http://wiki.jikexueyuan.com/project/spring/aop-with-spring-framenwork/aspectj-based-aop-with- ...
- spring中的aop的xml配置方式简单实例
aop,即面向切面编程,面向切面编程的目标就是分离关注点,比如:一个骑士只需要关注守护安全,或者远征,而骑士辉煌一生的事迹由谁来记录和歌颂呢,当然不会是自己了,这个完全可以由诗人去歌颂,比如当骑士出征 ...
- spring中基于aop使用ehcache
我就是对着这个博客看的 http://www.cnblogs.com/ctxsdhy/p/6421016.html
- Spring中基于xml的AOP
1.Aop 全程是Aspect Oriented Programming 即面向切面编程,通过预编译方式和运行期动态代理实现程序功能的同一维护的一种技术.Aop是oop的延续,是软件开发中的 一个热点 ...
- Spring 框架的概述以及Spring中基于XML的IOC配置
Spring 框架的概述以及Spring中基于XML的IOC配置 一.简介 Spring的两大核心:IOC(DI)与AOP,IOC是反转控制,DI依赖注入 特点:轻量级.依赖注入.面向切面编程.容器. ...
- spring中基于注解使用AOP
本文内容:spring中如何使用注解实现面向切面编程,以及如何使用自定义注解. 一个场景 比如用户登录,每个请求发起之前都会判断用户是否登录,如果每个请求都去判断一次,那就重复地做了很多事情,只要是有 ...
随机推荐
- 2019年今日头条机试_JAVA后台岗_第二题
使用map的递推,java对象做key需要重写equeal,hashCode方法,使拥有相同属性值的对象被识别为同一对象. import java.util.*; class Cat{ public ...
- 关于html页面元素语义化的一点思考
这几天在看招聘公告前端工程师的要求基本都附带了html语义化的要求,所以稍微关注了下这方面的知识.对于其中的一点就是要求页面元素在去除css样式之后还能有良好的布局引发了我一点思考.作为前端刚入门的我 ...
- 用list去初始化numpy的array数组 numpy的array和python中自带的list之间相互转化
http://blog.csdn.net/baiyu9821179/article/details/53365476 a=([3.234,34,3.777,6.33]) a为python的list类型 ...
- G7或变G6+1?特朗普七国峰会箱友军开炮
今日导读 G7 峰会刚召开完毕,德国总理默克尔发的一张照片就迅速火遍全球.照片中她身体前倾,像是在质问特朗普,而后者则双手交叉胸前,我自岿然不动,这张火药味十足的照片不禁让人脑补当时剑拔弩张的气氛.到 ...
- Win10 启动64位IE浏览器——修改注册表方法
修改注册表[HKEY_CURRENT_USER\Software\Microsoft\Internet Explorer\Main]下的: "TabProcGrowth"=DWOR ...
- ubuntu18.04 server配置静态ip
最新发布的ubuntu18.04 server,启用了新的网络工具netplan,对于命令行配置网络参数跟之前的版本有比较大的差别,现在介绍如下:1.其网络配置文件是放在/etc/netplan/50 ...
- NTP服务和DNS服务
1.NTP时间服务器 作用:NTP主要用于对计算机的时间同步管理操作 1.1 NTP部署 服务端:192.168.16.6 客户端:192.168.16.7 [root@localhost ~]# ...
- 自定义ngCloak
场景: 一个非常复杂的表单页面,页面有5个标签,第五个标签中又有5个标签,也就是说一共有9个标签,每个标签中都有一个表单,表单之间相互关联.所有表单项(包括复合的),有80多个数据.全部东西写在一个h ...
- 第一讲:vcs simulation basic
要求: 1.complie a verilog/systemverilog design using vcs 2.simulate a verilog/systemverilog design vcs ...
- C语言学习12
希尔排序 //希尔排序 #include <stdio.h> void main() { ], i; int shell(int a[], int n); printf("请输入 ...