
ldap配置系列一:ldap的安装
ldap的安装
ldap的简介
LDAP是轻量目录访问协议,英文全称是Lightweight Directory Access Protocol,一般都简称为LDAP。它是基于X.500标准的,但是简单多了并且可以根据需要定制。与X.500不同,LDAP支持TCP/IP,这对访问Internet是必须的。LDAP的核心规范在RFC中都有定义,所有与LDAP相关的RFC都可以在LDAPman RFC网页中找到。
选择一个域名
我个人的域名为linuxpanda.tech,我给ldap服务配置一个域名为ldap.aibeike.com。通过dns解析添加一个A记录值为我自己的ldap服务器的外网ip。
测试域名正确性。
[root@VM_0_15_centos ~]# ping -c  ldap.linuxpanda.tech

PING ldap.linuxpanda.tech (39.106.157.220) () bytes of data.

 bytes from 39.106.157.220 (39.106.157.220): icmp_seq= ttl= time=3.40 ms

 bytes from 39.106.157.220 (39.106.157.220): icmp_seq= ttl= time=3.37 ms

--- ldap.linuxpanda.tech ping statistics ---

 packets transmitted,  received, % packet loss, time 1000ms

rtt min/avg/max/mdev = 3.370/3.385/3.401/0.060 ms
安装openldap服务端
[root@VM_0_15_centos ~]# yum install openldap-servers openldap-clients -y ^C

[root@VM_0_15_centos ~]# cp /usr/share/openldap-servers/DB_CONFIG.example  /var/lib/ldap/DB_CONFIG

[root@VM_0_15_centos ~]# chown -R ldap.ldap /var/lib/ldap

[root@VM_0_15_centos ~]# systemctl enable slapd

Created symlink from /etc/systemd/system/multi-user.target.wants/slapd.service to /usr/lib/systemd/system/slapd.service.

[root@VM_0_15_centos ~]# systemctl start slapd
[root@VM_0_15_centos ~]# systemctl status slapd
设置ldap的管理员用户的密码
# 设置ldap的管理员密码,用户名为root
[root@VM_0_15_centos ~]# slappasswd

New password:

Re-enter new password:

{SSHA}6qygfSS2fBqjb0KhiaPo21btIt9+8EbL


# 创建ldif文件

[root@VM_0_15_centos ldap]# cd /etc/openldap/

[root@VM_0_15_centos openldap]# mkdir myself

[root@VM_0_15_centos openldap]# cd myself/

[root@VM_0_15_centos myself]# vim chrootpw.ldif

dn: olcDatabase={}config,cn=config

changetype: modify

add: olcRootPW

olcRootPW: {SSHA}6qygfSS2fBqjb0KhiaPo21btIt9+8EbL


# 根据文件导入

[root@VM_0_15_centos myself]# ldapadd -Y EXTERNAL -H ldapi:/// -f chrootpw.ldif

SASL/EXTERNAL authentication started

SASL username: gidNumber=+uidNumber=,cn=peercred,cn=external,cn=auth

SASL SSF:

modifying entry "olcDatabase={0}config,cn=config"
添加基础的schema
ldapadd -Y EXTERNAL -H ldapi:/// -f /etc/openldap/schema/cosine.ldif

ldapadd -Y EXTERNAL -H ldapi:/// -f /etc/openldap/schema/nis.ldif

ldapadd -Y EXTERNAL -H ldapi:/// -f /etc/openldap/schema/inetorgperson.ldif
设置根域和数据库超级管理员
这里的根域和上面提到的linuxpanda.tech不是一回事,我们这里为了和自身域名还是保持一致好些,设置为dc=linuxpanda.tech,dc=com。
这里的数据库管理员和上面的超级管理员也不是一回事,为了方便,我们还是使用上面的管理员密码来设置数据库库的密码。
[root@VM_0_15_centos myself]# vim domain-dbadmin.ldif

[root@VM_0_15_centos myself]# cat domain-dbadmin.ldif

dn: olcDatabase={}monitor,cn=config

changetype: modify

replace: olcAccess

olcAccess: {}to *

  by dn.base="gidNumber=0+uidNumber=0,cn=peercred,cn=external,cn=auth" read

  by dn.base="cn=admin,dc=linuxpanda,dc=tech" read

  by * none

dn: olcDatabase={}hdb,cn=config

changetype: modify

replace: olcSuffix

olcSuffix: dc=linuxpanda,dc=tech

dn: olcDatabase={}hdb,cn=config

changetype: modify

replace: olcRootDN

olcRootDN: cn=admin,dc=linuxpanda,dc=tech

dn: olcDatabase={}hdb,cn=config

changetype: modify

add: olcRootPW

olcRootPW: {SSHA}6qygfSS2fBqjb0KhiaPo21btIt9+8EbL

dn: olcDatabase={}hdb,cn=config

changetype: modify

add: olcAccess

olcAccess: {}to attrs=userPassword,shadowLastChange

  by dn="cn=admin,dc=linuxpanda,dc=tech" write

  by anonymous auth

  by self write

  by * none

olcAccess: {}to dn.base=""

  by * read

olcAccess: {}to *

  by dn="cn=admin,dc=linuxpanda,dc=tech" write

  by * read

[root@VM_0_15_centos myself]# ldapadd  -Y EXTERNAL -H ldapi:/// -f domain-dbadmin.ldif
创建基本的用户节点,组节点,数据库管理员
[root@VM_0_15_centos myself]# vim basedomain.ldif

[root@VM_0_15_centos myself]# cat basedomain.ldif

dn: dc=linuxpanda,dc=tech

objectClass: top

objectClass: dcObject

objectclass: organization

o: Example Inc.

dc: linuxpanda

dn: ou=people,dc=linuxpanda,dc=tech

objectClass: organizationalUnit

ou: user

dn: ou=group,dc=linuxpanda,dc=tech

objectClass: organizationalUnit

ou: group

dn: cn=admin,dc=linuxpanda,dc=tech

objectClass: organizationalRole

cn: admin

description: Directory Administrator

[root@VM_0_15_centos myself]# ldapadd  -x -D cn=admin,dc=linuxpanda,dc=tech -W -f basedomain.ldif

Enter LDAP Password:

adding new entry "dc=linuxpanda,dc=tech"

adding new entry "ou=people,dc=linuxpanda,dc=tech"

adding new entry "ou=group,dc=linuxpanda,dc=tech"

adding new entry "cn=admin,dc=linuxpanda,dc=tech"
防火墙设置
[root@VM_0_15_centos myself]# firewall-cmd --permanent --add-service=ldap

success

[root@VM_0_15_centos myself]# firewall-cmd --reload

success
配置日志
[root@VM_0_15_centos myself]# vim log.ldif

[root@VM_0_15_centos myself]# cat log.ldif

dn: cn=config

changetype: modify

add: olcLogLevel

olcLogLevel:

"log.ldif" [New] 4L, 66C written

[root@VM_0_15_centos myself]# ldapmodify -Y EXTERNAL -H ldapi:/// -f log.ldif

SASL/EXTERNAL authentication started

SASL username: gidNumber=+uidNumber=,cn=peercred,cn=external,cn=auth

SASL SSF:

modifying entry "cn=config"

[root@VM_0_15_centos myself]# mkdir -p /var/log/slapd

[root@VM_0_15_centos myself]# chown ldap:ldap /var/log/slapd/

[root@VM_0_15_centos myself]# echo "local4.* /var/log/slapd/slapd.log" >> /etc/rsyslog.conf

[root@VM_0_15_centos myself]# systemctl restart rsyslog
[root@VM_0_15_centos myself]# systemctl restart slapd

[root@VM_0_15_centos myself]# tail -n  /var/log/slapd/slapd.log

Sep   :: VM_0_15_centos slapd[]: => test_filter

Sep   :: VM_0_15_centos slapd[]:    PRESENT

Sep   :: VM_0_15_centos slapd[]: <= test_filter

Sep   :: VM_0_15_centos slapd[]: slapd starting
使用工具连接
有些人喜欢安装套ldap环境来管理ldap用户, 我这里使用ldapadmin.exe来管理。下载地址为:
连接信息如下:
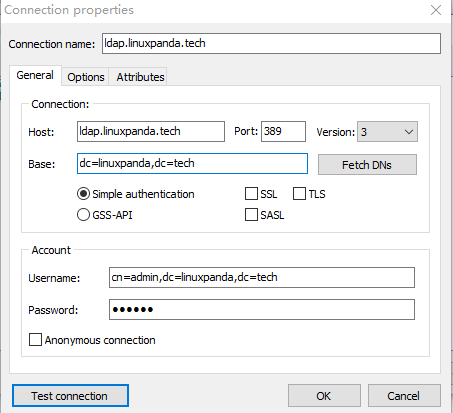
主界面如下:

这里强烈建议给每个用户配置邮箱。
添加用户或者测试组

常用查询命令
# 查询主域下的信息
[root@VM_0_15_centos ~]# ldapsearch  -LLL -w oracle  oracle -x -H ldap://58.87.98.84 -D"cn=admin,dc=linuxpanda,dc=tech" -b "dc=linuxpanda,dc=tech"

dn: dc=linuxpanda,dc=tech

dn: ou=people,dc=linuxpanda,dc=tech

dn: ou=group,dc=linuxpanda,dc=tech

dn: cn=admin,dc=linuxpanda,dc=tech

dn: uid=test01,ou=people,dc=linuxpanda,dc=tech

# 查询people组下面的uid=test01的用户

[root@VM_0_15_centos ~]# ldapsearch  -LLL -w oracle  oracle -x -H ldap://58.87.98.84 -D"cn=admin,dc=linuxpanda,dc=tech" -b "ou=people,dc=linuxpanda,dc=tech" "(uid=test01)"

dn: ou=people,dc=linuxpanda,dc=tech

dn: uid=test01,ou=people,dc=linuxpanda,dc=tech

# 备份

[root@VM_0_15_centos ~]# ldapsearch  -LLL -w oracle  oracle -x -H ldap://58.87.98.84 -D"cn=admin,dc=linuxpanda,dc=tech" -b "dc=linuxpanda,dc=tech" "(uid=test01)" >linuxpanda.tech.ldap.bak
参考
李广慧: https://www.jianshu.com/p/dc7112873e68
ldap-how-to: https://www.itzgeek.com/how-tos/linux/centos-how-tos/step-step-openldap-server-configuration-centos-7-rhel-7.html
wiki: https://en.wikipedia.org/wiki/Lightweight_Directory_Access_Protocol
ldap配置系列一:ldap的安装的更多相关文章
- ldap配置系列二:jenkins集成ldap
ldap配置系列二:jenkins集成ldap jenkins简介 jenkins是一个独立的.开放源码的自动化服务器,它可以用于自动化与构建.测试.交付或部署软件相关的各种任务. jenkins官方 ...
- ldap配置系列三:grafana集成ldap
ldap配置系列三:grafana集成ldap grafana的简介 grafana是一个类似kibana的东西,是对来自各种数据源的数据进行实时展示的平台,拥有这牛逼的外观.给一个官方的demo体验 ...
- java web开发环境配置系列(二)安装tomcat
在今天,读书有时是件“麻烦”事.它需要你付出时间,付出精力,还要付出一份心境.--仅以<java web开发环境配置系列>来祭奠那逝去的…… 1.下载tomcat压缩包,进入官网http: ...
- java web开发环境配置系列(一)安装JDK
在今天,读书有时是件“麻烦”事.它需要你付出时间,付出精力,还要付出一份心境.--仅以<java web开发环境配置系列>来祭奠那逝去的…… 1.下载JDK文件(http://www.or ...
- Centos 7 vsftpd ldap 配置
#ldap 安裝配置 环境Centos7#安装 yum install -y openldap openldap-clients openldap-servers migrationtools pam ...
- ldap配置记录
记录一下最近研究ldap+nfs的情况 ldap这个东西上次研究nis的时候就有人说那是上个世纪的老东西了,不应该继续使用.虽然意识到如此但时间不够还是使用了nis,这次乘着重做就干脆切换到ldap, ...
- centos6.5环境openldap实战之ldap配置详解及web管理工具lam(ldap-account-manager)使用详解
ldap常用名称解释 1.环境搭建 操作系统:centos6.5 x86_64 关闭防火墙.selinux 开启时间同步 # crontab -e 加入 # time sync */5 * * * * ...
- ldap 配置过程详解
ldap常用名称解释 1.环境搭建 操作系统:centos6.5 x86_64关闭防火墙.selinux开启时间同步# crontab -e加入# time sync*/5 * * * * /usr/ ...
- ArcGIS for Server安全与LDAP配置
ArcGIS for Server安全与LDAP配置 1.安全性概述 ArcGIS Server使用基于角色的访问控制来管理对受保护资源的访问.访问GIS资源的权限只能分配给角色.单独的用户只能通过从 ...
随机推荐
- 把H5打包成IOS APP其实可以很简单!签名?越狱?都不需要!
很多小伙伴都在开发自己的app, 有的实现实现比较简单,就是一个h5页面,然后想要打包成app发布出去. 这个想法很单纯 打包生成个app这个是很简单的,网上一堆打包工具,分分钟可以完成 BUT…… ...
- linux-centos基本使用(一)
1. 基本配置 1.常用软件安装 yum install -y bash-completion vim lrzsz wget expect net-tools nc nmap tree dos2uni ...
- windows下编译Boost
当前boost最新版本为1.55,下载地址:http://sourceforge.net/projects/boost/files/boost/1.55.0/或者从官网(www.boost.org)下 ...
- 编程菜鸟的日记-初学尝试编程-C++ Primer Plus 第6章编程练习8
#include <iostream> #include <fstream> #include <cstdlib> const int SIZE=20; using ...
- 在虚拟机中安装Centos系统
1.首先下载VMware 2.然后可以去http://mirrors.aliyun.com下载映像ISO 3.打开VM,点击创建新的虚拟机 4.选择典型模式 5.稍后安装操作系统 6.选择你所要安装的 ...
- Docker容器跨主机通信
默认情况下Docker容器需要跨主机通信两个主机节点都需要在同一个网段下,这时只要两个Docker容器的宿主机能相互通信并且该容器使用net网络模式,改实现方式为网桥模式通信: 除此之外我们还可以通过 ...
- Redis 集群的安装
Redis 集群介绍.特性.规范等Redis 集群的安装(Redis3.0.3 + CentOS6.6_x64)要让 Redis3.0 集群正常工作至少需要 3 个 Master 节点,要想实现高可用 ...
- 解决TCPDF中文乱码,PHP
/* **主要是这个单词控制 stsongstdlight **/ $this->SetFont('stsongstdlight', 'B', 10);
- Python学习笔记【Supervisor】:使用Supervisor监控Tornado进程
Linux常见应用服务配置模式nginx和supervisor:采用主配置文件+项目配置文件 安装(如果使用pip安装注意看是否需要指定使用python2版本) 第一步:在Linux中使用apt-ge ...
- [Swift]LeetCode916.单词子集 | Word Subsets
We are given two arrays A and B of words. Each word is a string of lowercase letters. Now, say that ...