构建web应用之——maven创建以及SpringMVC配置
构建web应用第一步需要创建以及配置maven项目管理,同时配置启动SpringMVC,这里推荐参考CSDN的一篇文章
链接:https://blog.csdn.net/weixin_42222334/article/details/80362126,
下面列出一些要点
一、打开IDEA创建新项目
1.工具栏左侧选择maven(应为要创建maven项目管理)
2.选择自己本地已有的jdk
3.勾选create from archetype(很重要)
4.选择org.apache.maven.archetypes:maven-archetype-webapp(还有一个webapp,别选错了)
5.ArtifactId最好与项目名称一致(我把GourpId也命名成了项目ID)
二、配置maven
1.最好使用自己本地的maven(没有的话可以去官网下载,下载好后还要配置环境变量)
2.将自已下好的maven目录导入maven home directory
3.user setting file为你的maven中settings.xml文件位置,一般在conf目录中
4.Local Repository为你的maven库所在位置(通过settings.xml查看和配置)
5.开始创建过程中,IDE右下角会弹出一个maven项目需要被导入的对话框,点击enable auto-import使其自动导入
6.终端中显示maven execution finished则代表maven创建成功
三、配置SpringMVC
1.在pom.xml中添加相关依赖,这里只是一些基本依赖,后续还会加入其它依赖
<dependencies>

    <dependency>

      <groupId>junit</groupId>

      <artifactId>junit</artifactId>

      <version>4.11</version>

      <scope>test</scope>

    </dependency>

    <!-- 日志 -->

    <dependency>

      <groupId>org.slf4j</groupId>

      <artifactId>slf4j-log4j12</artifactId>

      <version>1.8.0-beta2</version>

    </dependency>

    <!-- J2EE -->

    <dependency>

      <groupId>javax.servlet</groupId>

      <artifactId>javax.servlet-api</artifactId>

      <version>4.0.1</version><!--配置web.xml要使用的版本-->

    </dependency>

    <dependency>

      <groupId>javax.servlet.jsp</groupId>

      <artifactId>jsp-api</artifactId>

      <version>2.2.1-b03</version>

    </dependency>

    <dependency>

      <groupId>javax.servlet</groupId>

      <artifactId>jstl</artifactId>

      <version>1.2</version>

    </dependency>

    <!-- springframework -->

    <dependency>

      <groupId>org.springframework</groupId>

      <artifactId>spring-web</artifactId>

      <version>5.1.3.RELEASE</version>

    </dependency>

    <dependency>

      <groupId>org.springframework</groupId>

      <artifactId>spring-webmvc</artifactId>

      <version>5.1.3.RELEASE</version>

    </dependency>

    <dependency>

      <groupId>org.springframework</groupId>

      <artifactId>spring-context</artifactId>

      <version>5.1.3.RELEASE</version>

    </dependency>

  </dependencies>
2.添加SpringMVC框架:项目右键-添加框架支持,勾选Spring以及SpringMVC
若没有Spring,代表我们的项目中已经存在Spring(但不一定完整)。通过File-project structure-facets
找到Spring,并右键删除后再添加
3.配置web.xml,dispatcher-servlet.xml,applicationContext.xml(核心步骤)
web.xml
<?xml version="1.0" encoding="UTF-8"?>

<web-app version="4.0"

    xmlns="http://xmlns.jcp.org/xml/ns/javaee"

    xmlns:xsi="http://www.w3.org/2001/XMLSchema-instance"

    xsi:schemaLocation="http://xmlns.jcp.org/xml/ns/javaee http://xmlns.jcp.org/xml/ns/javaee/web-app_4_0.xsd">

    <!-- 配置上下文参数,将applicationContext.xml配置进来-->

    <context-param>

        <param-name>contextConfigLocation</param-name>

        <param-value>/WEB-INF/applicationContext.xml</param-value>

    </context-param>

    <!-- 注册ContextLoaderListener-->

    <listener>

        <listener-class>org.springframework.web.context.ContextLoaderListener</listener-class>

    </listener>

    <!-- 注册DispatcherServlet -->

    <servlet>

        <servlet-name>dispatcherServlet</servlet-name>

        <servlet-class>org.springframework.web.servlet.DispatcherServlet</servlet-class>

        <!-- 指定DispatcherServlet配置文件的位置 -->

        <init-param>

            <param-name>contextConfigLocation</param-name>

            <param-value>WEB-INF/dispatcher-servlet.xml</param-value>

        </init-param>

        <load-on-startup>1</load-on-startup>

    </servlet>

    <!-- 配置DispatcherServlet映射 -->

    <servlet-mapping>

        <servlet-name>dispatcherServlet</servlet-name>

        <url-pattern>/</url-pattern>

    </servlet-mapping>

</web-app>
dispatcher-servlet.xml
<?xml version="1.0" encoding="UTF-8"?>

<beans xmlns="http://www.springframework.org/schema/beans"

       xmlns:xsi="http://www.w3.org/2001/XMLSchema-instance"

       xmlns:mvc="http://www.springframework.org/schema/mvc"

       xmlns:context="http://www.springframework.org/schema/context"

       xsi:schemaLocation="http://www.springframework.org/schema/beans

       http://www.springframework.org/schema/beans/spring-beans.xsd

        http://www.springframework.org/schema/context

         http://www.springframework.org/schema/context/spring-context.xsd

            http://www.springframework.org/schema/mvc

            http://www.springframework.org/schema/mvc/spring-mvc.xsd">

    <!-- 负责整个mvc中的配置-->

    <!-- 启用spring的注解 -->

    <context:annotation-config/>

    <!-- 配置注解驱动,要使用注解必须要配置 -->

    <mvc:annotation-driven/>

    <!-- 静态资源映射-->

    <!-- 把静态资源放在webapp的statics目录下-->

    <mvc:resources mapping="/css/**" location="statics/css/"/>

    <mvc:resources mapping="/js/**" location="statics/js/"/>

    <mvc:resources mapping="/image/**" location="statics/images/"/>

    <mvc:default-servlet-handler/><!-- 配置静态资源的处理,实现解耦,很关键 -->

    <!-- 配置视图解析器-->

    <!-- InternalResourceViewResolver最为简单,解析jsp

        若要使用jstl标签处理,则需要将InternalResourceViewResolver解析为jstlView-->

    <bean id="viewResolver"

          class="org.springframework.web.servlet.view.InternalResourceViewResolver">

        <property name="prefix" value="/WEB-INF/views/"/>

        <property name="suffix" value=".jsp"/>

    </bean>

    <!-- 自动扫描装配 -->

    <context:component-scan base-package="example.controller"/>

</beans>
applicationContext.xml
<?xml version="1.0" encoding="UTF-8"?>

<beans xmlns="http://www.springframework.org/schema/beans"

       xmlns:xsi="http://www.w3.org/2001/XMLSchema-instance"

       xmlns:context="http://www.springframework.org/schema/context"

       xsi:schemaLocation="http://www.springframework.org/schema/beans http://www.springframework.org/schema/beans/spring-beans.xsd http://www.springframework.org/schema/context http://www.springframework.org/schema/context/spring-context.xsd">

    <!-- 负责mvc组建的配置 -->

    <context:component-scan base-package="example"/>

</beans>
注意:在使用context,mvc等spring框架下的标签时,需要同时声明库以及库解析器(mvc, spring-mvc.xsd)否则会报告500状态码
四、配置tomcat
1.点击Run/edit configuration配置tomcat(先配置development后配置server)
2.选择artifacts,选择末尾带expluded的那个(很重要)
3.在server中吧on update action以及on frame deactivation都选择update classes and resources(不用重新启动tomcat,每次只需刷新就可看到页面变化)
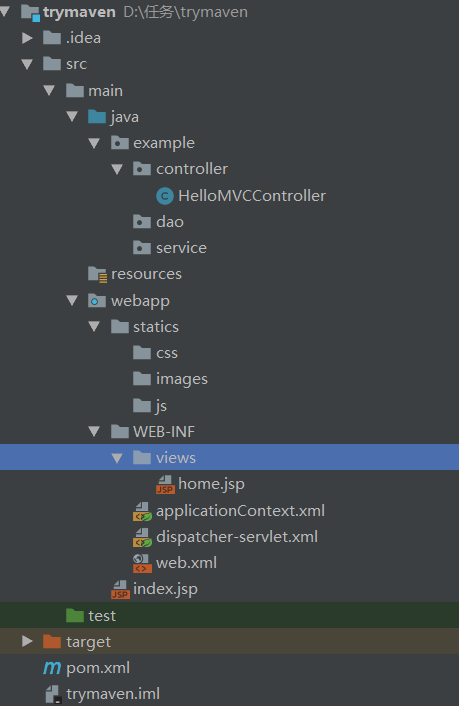
整个项目结构:
构建web应用之——maven创建以及SpringMVC配置的更多相关文章
- 在Intellij Idea中使用Maven创建Spring&SpringMVC项目
环境及版本 Jetbrains Intellij Idea 15.0.6 Spring 4.1.6 JDK 1.8.0_20 Tomcat 8 Windows 10 从 Maven archetype ...
- ADF_Starting系列7_使用EJB/JPA/JSF通过ADF构建Web应用程序之创建UI View
2013-05-01 Created By BaoXinjian
- Maven学习- 使用Maven构建Web项目
从网上查了一些资料,才算明白(也就是怎么操作吧),怎么使用Maven构建一个Web项目,找到一篇文档,主要都是从这里学到的: 下载地址:使用Eclipse构建Maven的Web项目.docx 现自己在 ...
- Maven创建web项目:SpringMVC+Mybatis 【转】
IDEA14创建Maven管理的SpringMVC+Mybatis,web项目 项目构建步骤 1.File->New->Project 勾选Create from archetype 点击 ...
- IDEA下使用maven构建web项目(SpringMVC+Mybatis整合)
需求背景:由于最近总是接到一些需求,需要配合前端团队快速建设移动端UI应用或web应用及后台业务逻辑支撑的需求,若每次都复用之前复杂业务应用的项目代码,总会携带很多暂时不会用到的功能或组件,这样的初始 ...
- 【Maven】Eclipse 使用Maven创建SpringMVC Web项目
创建环境 系统:win 10 软件:eclipse,maven. 创建步骤 创建一个Maven Web项目,可以参照:[Maven]Eclipse 使用Maven创建Java Web项目 添加spri ...
- java使用maven创建springmvc web项目
创建maven项目,使用maven-archetype-webapp 创建完成后首先是在pom.xml里增加maven的依赖 <dependencies> <dependency&g ...
- 简述泛型、用Maven创建Web项目以及在Web项目上整合SpringMVC
表设计 Timestamp列是否取消"根据当前时间戳自动更新" 是否null及默认值选择合理不合理 外键命名规范及更新和删除时的动作是否合理 泛型 类型参数 --允许在外部指定 ...
- 新版本IntelliJ IDEA 构建maven,并用Maven创建一个web项目
之前都没试过用maven来管理过项目,但是手动找包导包确实不方便,于是今天用2016版的IDEA进行了maven的初尝试. 打开IDEA,创建新项目: 然后选择Maven,以及选择自己电脑的jdk: ...
随机推荐
- maven的两种打包插件 ,防止 将无用文件打入META_INF,找不到主类的问题
第三种 打依赖包 将依赖其他jar的包都打进去 <plugin> <artifactId>maven-assembly-plugin</artifactId> &l ...
- JS中if判断 非空即为真 非0即为真
1.字符串参与判断时:非空即为真判断字符串为空的方法if(str!=null && str!=undefined && str !='')可简写为if(!str){ ...
- cent OS 7查询IP
环境: win7旗舰版 VMware Workstation Pro (虚拟机软件) CentOS-7-x86_64-DVD-1804.iso 安装时选择了默认配置,最小系统安装. 安装好后用 if ...
- RSA非对称加密,公钥加密/私钥解密
非对称加密 package test; import java.io.File; import java.io.FileInputStream; import java.io.FileNotFound ...
- Web 前端编程运维必备
Html 1.Html 标签初知 2.Html 标签种类 3.Html 符号 4.Html Title 标签 5.Html meta 标签 6.Html Link 标签 7.Html p 标签 8.H ...
- 《一些神奇的JS功效》
1: async 异步回调 (ES6) async function test(){ console.log("hello wolrd"); } test().then(funct ...
- ORA-19606: Cannot copy or restore to snapshot control file
delete obsolete; 发现出现报错 ORA-19606: Cannot copy or restore to snapshot control file 解决办法:CONFIGURE SN ...
- VMware虚拟机扩展Ubuntu系统磁盘空间
1 首先给虚拟机扩容 虚拟机->设置->硬盘->实用程序->扩展磁盘容量 2 启动Ubuntu系统 2.1 打开终端安装gparted,sudo apt-get install ...
- vue--vant组件库Dialog弹出框
安装vant UI框架: cnpm install vant –-save-dev 导入组件-在main.js里: import Vant from 'vant'; import'vant/lib/v ...
- SSM单元测试时出现:Failed to load ApplicationContext的一种可能解决办法
SSM单元测试时出现: 严重: Caught exception while allowing TestExecutionListener [org.springframework.test.cont ...