ESP32(WeMos D1 R32)开发资料
1.乐鑫官网
2.ESP32踩坑
ESP32控制摇杆,定义sw的引脚时一定要设置为上拉才行。
微信控制ESP8266操控舵机(使用MicroPython)


import network

import socket     #网络套接字和python一样

from machine import Pin,PWM

import time

UDP_server_addr = ('115.28.93.201', 7005)  #115.28.93.201 端口:UDP 7005

SSID = your_wifi_ssid    #路由器名称

PASSWORD = your_wifi_password    #路由器密码

wlan = network.WLAN(network.STA_IF)

UserID = your_user_ID

DeviceID = your_device_id

MM = your_mm    #16位密码

servo1 = PWM(Pin(12), freq = 50)

servo1.duty(130)

servo2 = PWM(Pin(14), freq = 50)

servo2.duty(130)

time.sleep(2)

servo1.deinit()

servo2.deinit()

client = socket.socket(socket.AF_INET, socket.SOCK_DGRAM)  #生成新的套接字对象

Heart = r"004532A01" + DeviceID + MM +  r"123401hi05" #心跳包

# 连接网络

def do_connect():

    wlan.active(True)

    if not wlan.isconnected():

        print('connecting to network...')

        wlan.connect(SSID, PASSWORD)

    start = time.time()

    while not wlan.isconnected():

        time.sleep(1)

        if time.time()-start > 5:

            print("connect timeout!")

            break

    #如果连接成功

    if wlan.isconnected():

        print('network connect success . \nnetwork config:', wlan.ifconfig())

def shakeHand_UDP_server():

    global client

    client = socket.socket(socket.AF_INET, socket.SOCK_DGRAM)  #生成新的套接字对象

    client.settimeout(5)  #设置连接超时时间

    while True:

        print("sendto: " + Heart)

        len = client.sendto(Heart, UDP_server_addr)  #向服务器发送心跳包

        print("sendlen : " + str(len) )

        time.sleep(0.5)

        try:

            print("now recv...")

            data, addr = client.recvfrom(64)  #接收心跳包数据

            print(b"recv :" + data)

            break

        except:

            print("recv error!")

        time.sleep(10)

def revMsgAndKeepConnect ():

    client.settimeout(20)  #设置连接超时时间

    time.sleep(0.2)

    try:

        print("try recv data...")

        data, addr = client.recvfrom(64)  #从服务器接收数据

        print(b"recv: " + data)

        if b'open' in  data:

            DataFlag = data[9:13]

            SendData = b'005532A01' +  DeviceID + MM  + DataFlag + b'09' + UserID + b'OK05'

            print(b"sendto: " + SendData)

            servo1.init(duty = 20)

            servo2.init(duty = 20)

            client.sendto(SendData, UDP_server_addr)  #向服务器发送数据转为bytes

            time.sleep(4)

            servo1.duty(130)

            servo2.duty(130)

            time.sleep(1)

            servo1.deinit()

            servo2.deinit()

        else:

            pass

    except:

        client.sendto(Heart, UDP_server_addr)  #向服务器发送心跳包

        print("sendto heart:" + Heart)

if __name__=='__main__':

    time.sleep(1)

    do_connect()

    shakeHand_UDP_server()

    while True:

        revMsgAndKeepConnect()
微信控制ESP8266操控舵机
ESP32与PC端使用阿里云物联网平台通过MQTT发布订阅消息(使用MicroPython)


from umqtt.simple import MQTTClient

import usocket as socket

import time

import wifi

wifi.connect()

#Demo_01

ProductKey = "*********"#使用你自己的

ClientId = "1234|securemode=3,signmethod=hmacsha1|"

DeviceName = "Demo_01"

DeviceSecret = "*******************************"#使用你自己的

strBroker = ProductKey + ".iot-as-mqtt.cn-shanghai.aliyuncs.com"

Brokerport = 1883

user_name = "Demo_01&*********"#使用你自己的

user_password = "**********************************************"#使用你自己的

print("clientid:",ClientId,"\n","Broker:",strBroker,"\n","User Name:",user_name,"\n","Password:",user_password,"\n")

def connect():

    client = MQTTClient(client_id = ClientId,server= strBroker,port=Brokerport,user=user_name, password=user_password,keepalive=60)

    #please make sure keepalive value is not 0

    client.connect()

    temperature =25.00

    while temperature < 30:

        temperature += 0.5

        send_mseg = '{"params": {"IndoorTemperature": %s},"method": "thing.event.property.post"}' % (temperature)

        client.publish(topic="/sys/*************/Demo_01/thing/event/property/post", msg=send_mseg,qos=1, retain=False)#*号处为product id

        time.sleep(3)

    while True:

        pass

    #client.disconnect()
ESP32 上的代码


# coding=utf-8

import datetime

import time

import hmac

import hashlib

import math

try:

    import paho.mqtt.client as mqtt

except ImportError:

    print("MQTT client not find. Please install as follow:")

    print("pip install paho-mqtt")

# 设置连接信息

#Demo_02

ProductKey = "*********"#使用你自己的

ClientId = "2234"  # 自定义clientId

DeviceName = "Demo_02"

DeviceSecret ="************************************8**"#使用你自己的

# 获取时间戳(当前时间毫秒值)

us = math.modf(time.time())[0]

ms = int(round(us * 1000))

timestamp = str(ms)

# 计算密码(签名值)

def calculation_sign(signmethod):

    data = "".join(("clientId", ClientId, "deviceName", DeviceName,

                    "productKey", ProductKey, "timestamp", timestamp))

    if "hmacsha1" == signmethod:

        # ret = hmac.new(bytes(DeviceSecret),

        #                bytes(data), hashlib.sha1).hexdigest()

        ret = hmac.new(bytes(DeviceSecret, encoding="utf-8"),

                       bytes(data, encoding="utf-8"),

                       hashlib.sha1).hexdigest()

    elif "hmacmd5" == signmethod:

        # ret = hmac.new(bytes(DeviceSecret, encoding="utf-8"),

        #                bytes(data, encoding="utf-8"), hashlib.md5).hexdigest()

        ret = hmac.new(bytes(DeviceSecret, encoding="utf-8"),

                       bytes(data, encoding="utf-8"),

                       hashlib.md5).hexdigest()

    else:

        raise ValueError

    return ret

# ======================================================

strBroker = ProductKey + ".iot-as-mqtt.cn-shanghai.aliyuncs.com"

port = 1883

client_id = "".join((ClientId,

                     "|securemode=3",

                     ",signmethod=", "hmacsha1",

                     ",timestamp=", timestamp,

                     "|"))

username = "".join((DeviceName, "&", ProductKey))

password = calculation_sign("hmacsha1")

print("="*60)

print(strBroker)

print("client_id:", client_id)

print("username:", username)

print("password:", password)

print("="*60)

# 成功连接后的操作

def on_connect(client, userdata, flags, rc):

    print("OnConnetc, rc: " + str(rc))

# 成功发布消息的操作

def on_publish(client, msg, rc):

    if rc == 0:

        print("publish success, msg = " + msg)

# 成功订阅消息的操作

def on_subscribe(mqttc, obj, mid, granted_qos):

    print("Subscribed: " + str(mid) + " " + str(granted_qos))

def on_log(mqttc, obj, level, string):

    print("Log:" + string)

def on_message(mqttc, obj, msg):

    curtime = datetime.datetime.now()

    strcurtime = curtime.strftime("%Y-%m-%d %H:%M:%S")

    print(strcurtime + ": " + msg.topic + " " + str(msg.qos) + " " + str(msg.payload))

    on_exec(str(msg.payload))

def on_exec(strcmd):

    print("Exec:", strcmd)

    strExec = strcmd

if __name__ == '__main__':

    mqttc = mqtt.Client(client_id)

    mqttc.username_pw_set(username, password)

    mqttc.on_message = on_message

    mqttc.on_connect = on_connect

    mqttc.on_publish = on_publish

    mqttc.on_subscribe = on_subscribe

    mqttc.on_log = on_log

    mqttc.connect(strBroker, port, 120)

    # mqttc.loop_start()

    time.sleep(1)

    temperature =27.55

    mqttc.subscribe("/sys/************/Demo_02/thing/service/property/set", qos=1)  # 换成自己的

    #send_mseg = '{"pm_25": %s,"area":"%s","time":"%s"}' % (0, 0, datetime.datetime.now())

    #send_mseg = '{"id": "1234", "version": "1.0","params": {"IndoorTemperature": %s},"method": "thing.event.property.post"}'%(temperature)

    send_mseg = '{"params": {"IndoorTemperature": %s},"method": "thing.event.property.post"}' % (temperature)

    print('send_mseg is : ',send_mseg)

    mqttc.loop_forever()
PC端python代码
6.APP控制ESP32
点灯blinker app:
三分钟实现手机控制Arduino/esp8266/esp32
Blynk app:
7.微信公众号控制ESP32
使用MicroPython开发ESP32(04):无线网络使用和WebREPL
ESP32教程大全:http://mc.dfrobot.com.cn/thread-271930-1-1.html
成果:
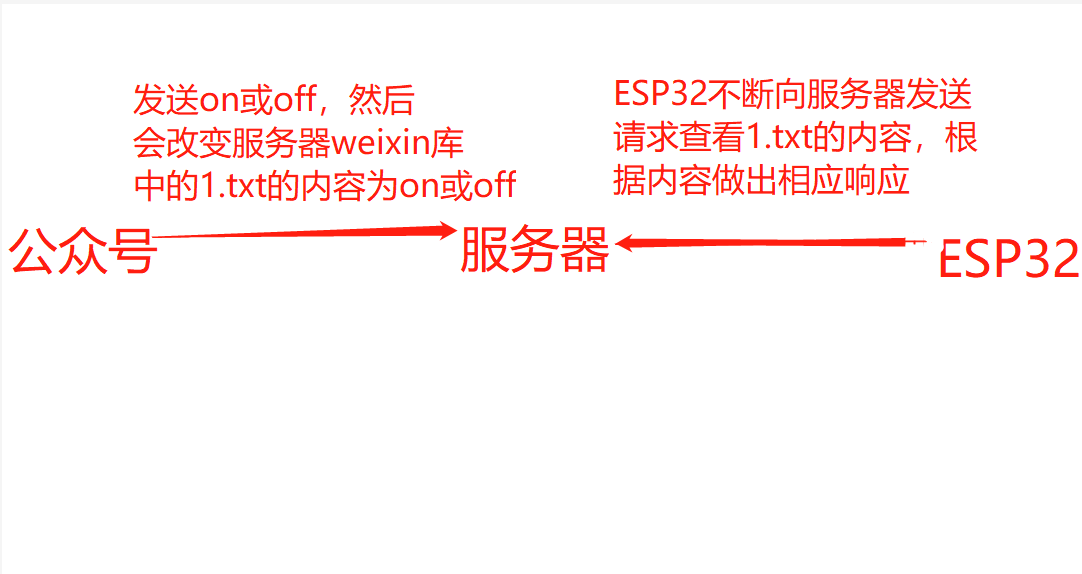
7.1微信公众号控制LED(缺点:所有人修改同一个文件,不适合多人使用)
第一步:在阿里云或其他云买服务器和域名,服务器开启8888 20 443 22等端口,然后上传weixin库到根目录

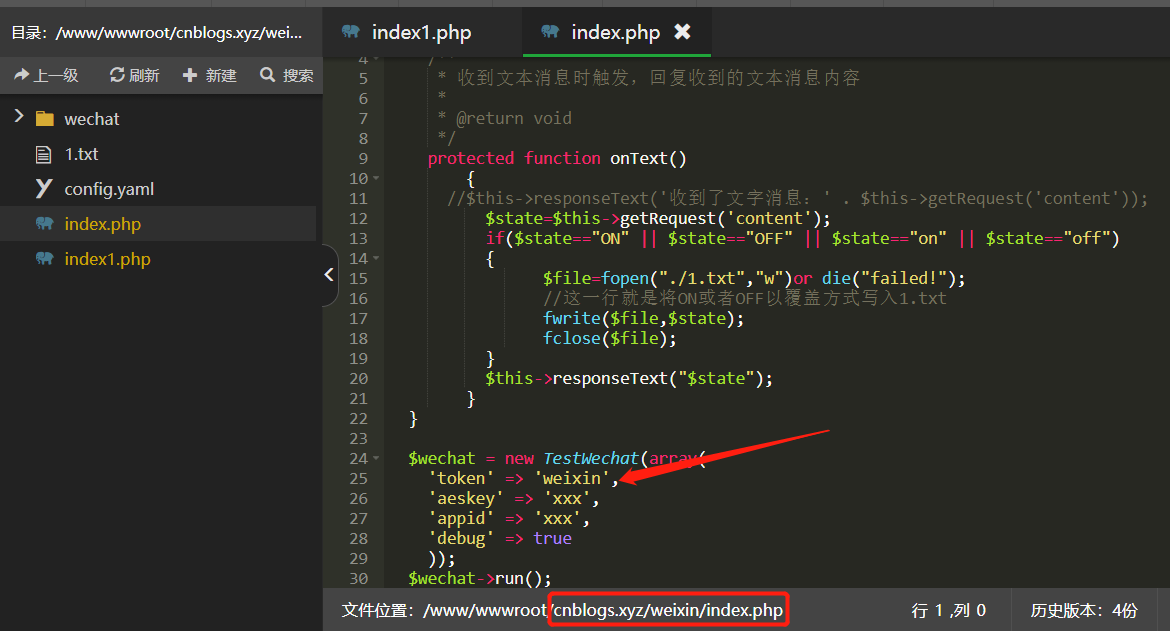
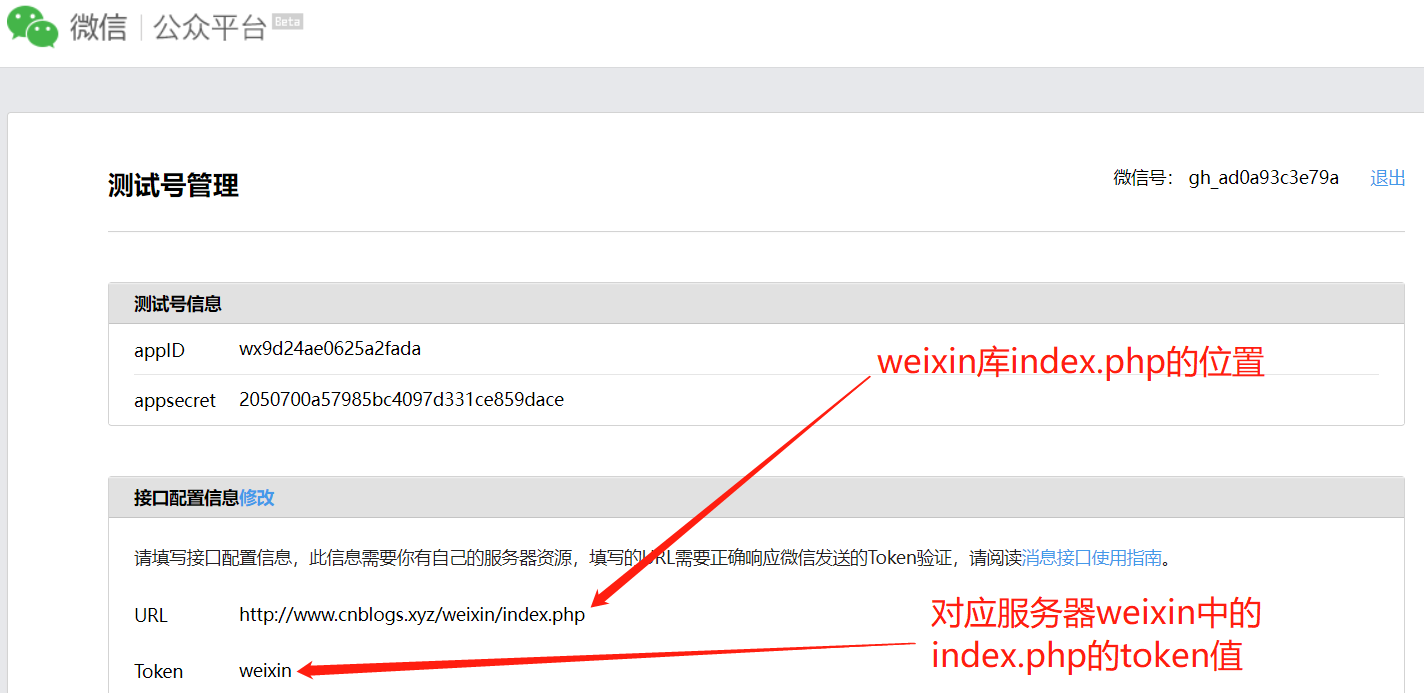
第二步:申请公众号(这里可以使用微信公众平台测试账号)并开启设备功能然后绑定服务器接口(URL填写weixin库的index.php的位置,这里我填的是http://www.cnblogs.xyz/weixin/index.php, token填写index.php文件中token的值,这里我填的是weixin)

第三步:上载urequests.py库(文件中已上传)到ESP32开发板中,示例代码也可以另存到ESP32开发板中;然后插上传感器,运行代码,打开公众号发送‘on’或‘off’来控制红灯亮灭。


# 说明:微信公众号控制LED

# 使用ESP32 micropython API中提供的库来创建web服务器

try:

  import usocket as socket

except:

  import socket

from machine import Pin

import network  # 使用ESP32 micropython API中提供的network库来建立网络连接

import urequests

import esp

esp.osdebug(None)

import gc

gc.collect()  # 清理内存

# wifi名称及密码

ssid = 'TP-LINK_ZLTech'

password = 'zhonglingkeji'

# 把wifi模式设置为STA模式,连接路由器模式并激活

station = network.WLAN(network.STA_IF)

station.active(True)

station.connect(ssid, password)

while station.isconnected() == False:  # 判断wifi连接是否成功

  pass

print('Connection successful')

print(station.ifconfig())  # 显示IP地址

led = Pin(26, Pin.OUT)

try:

  while True:

    res = urequests.get('http://www.cnblogs.xyz/weixin/1.txt').text

    # print(res)

    if res == 'on' or res == 'ON':

      print('LED ON')

      led.value(1)

    if res == 'off' or res == 'OFF':

      print('LED OFF')

      led.value(0)

    print()

finally:

    print('Connection closed')
微信公众号控制LED示例代码

注意:坑1:使用过另一个urequests.py库,不过在ESP32发送请求时会每隔一段时间报错一次OSError23,不好用。
ESP32(WeMos D1 R32)开发资料的更多相关文章
- Arduino WeMos D1 开发环境搭建
更新记录 2022年4月16日:本文迁移自Panda666原博客,原发布时间:2021年9月2日. WeMos D1介绍 WeMos D1开发板全称是WeMos D1 WiFI UNO R3开发板,基 ...
- 【Android开发资料分享】自己整理的Android开发资料,非常全面
学习Android以来,不知不觉中收集了大量非常优秀的Android开发资料,一直没有系统的整理,最近抽时间把收藏夹中的资料做了一下整理,现在分享给大家,希望能够帮助到需要的人.这份资料我还会不断的更 ...
- 如何查找STM32开发资料
Ⅰ.概述 该文写给那些处于初学ST芯片开发.英文不好而又想偷懒的人. 该文主要的目的是提醒大家:学习一门技术是需要舍得花功夫,捷径是你在起点与终点之间不断的探索,最终总结出来的一条适合自己的路. 下面 ...
- 推荐资料——最受网友力荐的30份HTML前端开发资料
w3cmark最近会新增一个栏目,专注于搜集前端资源的下载,包括和前端相关的电子书.文档PPT.手册.视频教程等等.而下载的媒介是用微博的微盘,至于为什么选择微盘的,那是因为和微博关联起来,通过微盘上 ...
- 基于STM32L4的开源NBIOT开发资料
基于STM32L4的开源NBIOT开发资料 1. 参考路径:http://www.stmcu.org/module/forum/forum.php?mod=viewthread&tid=615 ...
- WP7 开发资料
前言 离Windows Phone 7正式发布已过去几个月了,但国内关于Windows Phone 7的中文书籍资料太少了,大多数是英文资料,一本真正的中文开发教程书都没有, 要啃英文资料对大部分的开 ...
- BACnet开发资料与调试工具
一.开发资料 1.认识BACnet协议 2.BACnet网络讲义: 链接:https://pan.baidu.com/s/1A6OOUxvJe1zIYbockqTEsQ提取码:wz49 二.调试工具 ...
- 史上最全USB HID开发资料
史上最全USB HID开发资料 史上最全USB HID开发资料,悉心整理一个月,亲自测试. 涉及STM32 C51 8051F例子都有源码,VC上位机例子以及源码,USB协议,HID协议,USB抓包工 ...
- 物联网 软硬件系统 树莓派 单片机 esp32 小程序 网页 开发 欢迎相互交流学习~
物联网软硬件开发 知识分享 多年学生项目开发经验 物联网 软硬件系统 树莓派 单片机 esp32 小程序 网页 开发 欢迎相互交流学习~ http://39.105.218.125:9000/
- Excel Xll开发资料
下载地址:http://bbs.jjxj.org/forum.php?mod=viewthread&tid=37943&extra=page%3D1&page=1& 财 ...
随机推荐
- -behaviour()的使用,他具体有什么作用
Eralng 编程中的OTP OTP里面创建进程时 常用有四大behaviour • supervisor • gen_server • gen_fsm • gen_event 在erlang的编译器 ...
- eNSP报错41解决方法
1.点击右上角的菜单 2.工具>>注册设备,全部勾选,然后注册,就行了.
- 华为交换机,改vlan的方法
telnet 登录1.1.1.111, 如果登录再到其他交换机,需要在用户状态,telnet其他的ip.不能在系统用户状态下跳转登录. sys改为系统用户 状态符由尖括号,改为方括号 display ...
- django的注意事项
1 允许 0.0.0.0:8000 ALLOWED_HOSTS = ['*'] 2 py文件的import ,要新建一个文件夹 如tool,与manage.py同级 再去导入
- 10 个常用的 JS 工具库,80% 的项目都在用!
Day.js 一个极简的处理时间和日期的 JavaScript 库,和 Moment.js 的 API 设计保持一样, 但体积仅有2KB. npm install dayjs 基本用法 import ...
- vulnhub:easy_cloudantivirus靶机
kali:192.168.111.111 靶机:192.168.111.177 信息收集 端口扫描 nmap -A -v -sV -T5 -p- --script=http-enum 192.168. ...
- 2020ICPC沈阳I - Rise of Shadows
剩余系 Problem - I - Codeforces 题意 给定 \(H,M,A\) \(2<=H,M<=10^9,\;0<=A<=\frac {H*M}2\) 假设一个钟 ...
- python读取、写入txt文本
1. 读取txt文本 1.1 read() 一次性读全部内容 一次性读取文本中全部的内容,以字符串的形式返回结果 with open("text.txt", "r& ...
- deployment.yml参考
apiVersion: apps/v1kind: Deploymentmetadata: labels: com.xx.service: xxxxxxxxxxxxx name: xxxxxxxxxxx ...
- AD中添加原理图文档模板-转载
(24条消息) AD中添加原理图文档模板_shuguang552的博客-CSDN博客_ad原理图模板
