【推理引擎】ONNX 模型解析
定义模型结构
首先使用 PyTorch 定义一个简单的网络模型:
class ConvBnReluBlock(nn.Module):

    def __init__(self) -> None:

        super().__init__()

        self.conv1 = nn.Conv2d(3, 64, 3)

        self.bn1 = nn.BatchNorm2d(64)

        self.maxpool1 = nn.MaxPool2d(3, 1)

        self.conv2 = nn.Conv2d(64, 32, 3)

        self.bn2 = nn.BatchNorm2d(32)

        self.relu = nn.ReLU()

    def forward(self, x):

        out = self.conv1(x)

        out = self.bn1(out)

        out = self.relu(out)

        out = self.maxpool1(out)

        out = self.conv2(out)

        out = self.bn2(out)

        out = self.relu(out)

        return out
在导出模型之前,需要提前定义一些变量:
model = ConvBnReluBlock()     # 定义模型对象

x = torch.randn(2, 3, 255, 255)      # 定义输入张量
然后使用 PyTorch 官方 API(torch.onnx.export)导出 ONNX 格式的模型:
# way1:

torch.onnx.export(model, (x), "conv_bn_relu_evalmode.onnx", input_names=["input"], output_names=['output'])

# way2:

import torch._C as _C

TrainingMode = _C._onnx.TrainingMode

torch.onnx.export(model, (x), "conv_bn_relu_trainmode.onnx", input_names=["input"], output_names=['output'],

                opset_version=12,                    # 默认版本为9,但是如果低于12,将不能正确导出 Dropout 和 BatchNorm 节点

                training=TrainingMode.TRAINING,      # 默认模式为 TrainingMode.EVAL

                do_constant_folding=False)           # 常量折叠,默认为True,但是如果使用TrainingMode.TRAINING模式,则需要将其关闭

# way3

torch.onnx.export(model,

                (x),

                "conv_bn_relu_dynamic.onnx",

                input_names=['input'],

                output_names=['output'],

                dynamic_axes={'input': {0: 'batch_size', 2: 'input_width', 3: 'input_height'},

                            'output': {0: 'batch_size', 2: 'output_width', 3: 'output_height'}})
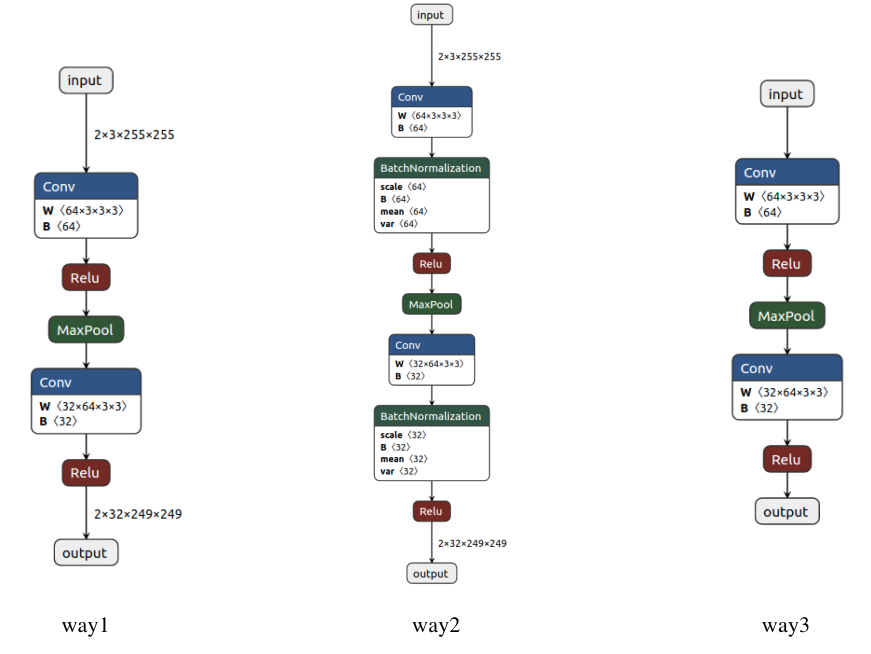
可以看到,这里主要以三种方式导出模型,下面分别介绍区别:
- way1:如果模型中存在 BatchNorm 或者 Dropout,我们在导出模型前会首先将其设置成 eval 模式,但是这里我们即使忘记设置也无所谓,因为在导出模型时会自动设置(export函数中training参数的默认值为TrainingMode.EVAL)。
- way2:如果我们想导出完整的模型结构,包括 BatchNorm 和 Dropout,则应该将 training 属性设置为 train 模式。
- way3:如果想要导出动态输入的模型结构,则需要设置 dynamic_axes 属性,比如这里我们将第一、三和四维设置成动态结构,那么我们就可以输入任何Batch大小、任何长宽尺度的RGB图像。
下图分别将这三种导出方式的模型结构使用 Netron 可视化:
分析模型结构
这里参考了BBuf大佬的讲解:【传送门:https://zhuanlan.zhihu.com/p/346511883】
接下来主要针对 way1 方式导出的ONNX模型进行深入分析。
ONNX格式定义:https://github.com/onnx/onnx/blob/master/onnx/onnx.proto
在这个文件中,定义了多个核心对象:ModelProto、GraphProto、NodeProto、ValueInfoProto、TensorProto 和 AttributeProto。
在加载ONNX模型之后,就获得了一个ModelProto,其中包含一些
- 版本信息(本例中:ir_version = 7)
- 生成者信息:producer_name: pytorch,producer_version: 1.10,这两个属性主要用来说明由哪些框架哪个版本导出的onnx
- 核心组件:GraphProto
在 GraphProto 中,有如下几个属性需要注意:
- name:本例中:name = 'torch-jit-export'
- input 数组:
[name: "input"

type {

  tensor_type {

    elem_type: 1

    shape {

      dim {

        dim_value: 2

      }

      dim {

        dim_value: 3

      }

      dim {

        dim_value: 255

      }

      dim {

        dim_value: 255

      }

    }

  }

}

]
- output 数组:
[name: "output"

type {

  tensor_type {

    elem_type: 1

    shape {

      dim {

        dim_value: 2

      }

      dim {

        dim_value: 32

      }

      dim {

        dim_value: 249

      }

      dim {

        dim_value: 249

      }

    }

  }

}

]
- node 数组,该数组中包含了模型中所有的计算节点(本例中:"Conv_0"、"Relu_1"、"MaxPool_2"、"Conv_3"、"Relu_4"),以及各个节点的属性,:
 [input: "input"

input: "23"

input: "24"

output: "22"

name: "Conv_0"

op_type: "Conv"

attribute {

  name: "dilations"

  ints: 1

  ints: 1

  type: INTS

}

attribute {

  name: "group"

  i: 1

  type: INT

}

attribute {

  name: "kernel_shape"

  ints: 3

  ints: 3

  type: INTS

}

attribute {

  name: "pads"

  ints: 0

  ints: 0

  ints: 0

  ints: 0

  type: INTS

}

attribute {

  name: "strides"

  ints: 1

  ints: 1

  type: INTS

}

,

input: "22"

output: "17"

name: "Relu_1"

op_type: "Relu"

, input: "17"

output: "18"

name: "MaxPool_2"

op_type: "MaxPool"

attribute {

  name: "kernel_shape"

  ints: 3

  ints: 3

  type: INTS

}

attribute {

  name: "pads"

  ints: 0

  ints: 0

  ints: 0

  ints: 0

  type: INTS

}

attribute {

  name: "strides"

  ints: 1

  ints: 1

  type: INTS

}

,

input: "18"

input: "26"

input: "27"

output: "25"

name: "Conv_3"

op_type: "Conv"

attribute {

  name: "dilations"

  ints: 1

  ints: 1

  type: INTS

}

attribute {

  name: "group"

  i: 1

  type: INT

}

attribute {

  name: "kernel_shape"

  ints: 3

  ints: 3

  type: INTS

}

attribute {

  name: "pads"

  ints: 0

  ints: 0

  ints: 0

  ints: 0

  type: INTS

}

attribute {

  name: "strides"

  ints: 1

  ints: 1

  type: INTS

}

,

input: "25"

output: "output"

name: "Relu_4"

op_type: "Relu"

]
通过以上 node 的输入输出信息,可提取出节点之间的拓扑关系,构建出一个完整的神经网络。
- initializer 数组:存放模型的权重参数。
[dims: 64

dims: 3

dims: 3

dims: 3

data_type: 1

name: "23"

raw_data: "\220\251\001>\232\326&>\253\227\372 ... 省略一眼望不到头的内容 ... "

dims: 64

data_type: 1

name: "24"

raw_data: "Rt\347\275\005\203\0 ..."

dims: 32

dims: 64

dims: 3

dims: 3

data_type: 1

name: "26"

raw_data: "9\022\273;+^\004\2 ..."

...
至此,我们已经分析完 GraphProto 的内容,下面根据图中的一个节点可视化说明以上内容:
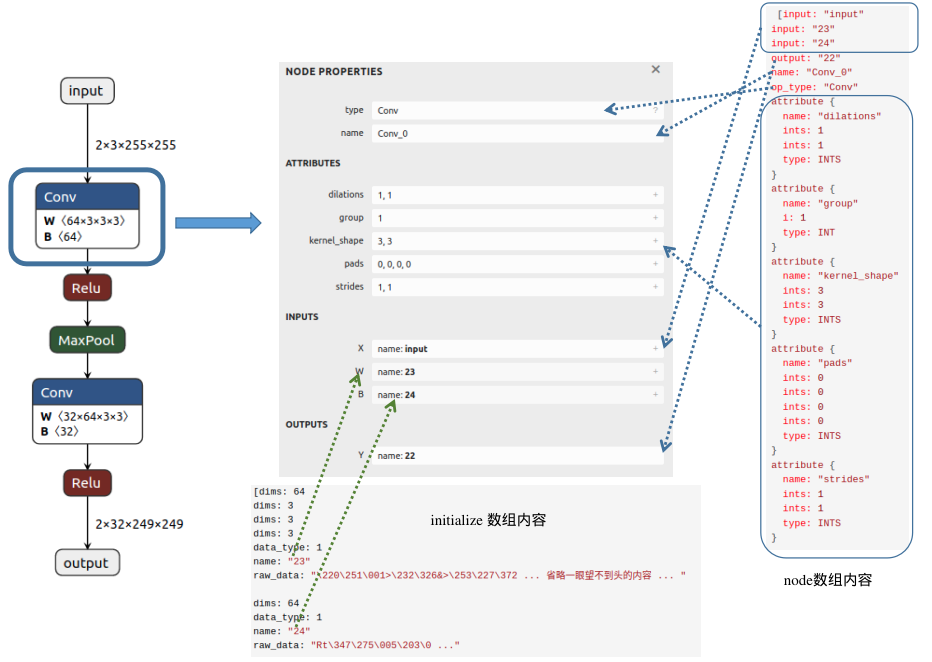
从图中可以发现,Conv 节点的输入包含三个部分:输入的图像(input)、权重(这里以数字23代表该节点权重W的名字)以及偏置(这里以数字24表示该节点偏置B的名字);输出内容的名字为22;属性信息包括dilations、group、kernel_shape、pads和strides,不同节点会具有不同的属性信息。在initializer数组中,我们可以找到该Conv节点权重(name:23)对应的值(raw_data),并且可以清楚地看到维度信息(64X3X3X3)。
【推理引擎】ONNX 模型解析的更多相关文章
- 阿里开源!轻量级深度学习端侧推理引擎 MNN
阿里妹导读:近日,阿里正式开源轻量级深度学习端侧推理引擎“MNN”. AI科学家贾扬清如此评价道:“与 Tensorflow.Caffe2 等同时覆盖训练和推理的通用框架相比,MNN 更注重在推理时的 ...
- 阿里开源首个移动AI项目,淘宝同款推理引擎
淘宝上用的移动AI技术,你也可以用在自己的产品中了. 刚刚,阿里巴巴宣布,开源自家轻量级的深度神经网络推理引擎MNN(Mobile Neural Network),用于在智能手机.IoT设备等端侧加载 ...
- 滴滴推理引擎IFX:千万规模设备下AI部署实践
桔妹导读:「滴滴技术」将于本月开始,联合各技术团队为大家带来精彩分享.你想了解的技术干货,深度专访,团队及招聘将于每周三与你准时见面.本月为「滴滴云平台事业群分享月」,在今天的内容中,云平台事业群-机 ...
- 【推理引擎】从源码看ONNXRuntime的执行流程
目录 前言 准备工作 构造 InferenceSession 对象 & 初始化 让模型 Run 总结 前言 在上一篇博客中:[推理引擎]ONNXRuntime 的架构设计,主要从文档上对ONN ...
- 全场景AI推理引擎MindSpore Lite, 助力HMS Core视频编辑服务打造更智能的剪辑体验
移动互联网的发展给人们的社交和娱乐方式带来了很大的改变,以vlog.短视频等为代表的新兴文化样态正受到越来越多人的青睐.同时,随着AI智能.美颜修图等功能在图像视频编辑App中的应用,促使视频编辑效率 ...
- Caffe学习笔记(一):Caffe架构及其模型解析
Caffe学习笔记(一):Caffe架构及其模型解析 写在前面:关于caffe平台如何快速搭建以及如何在caffe上进行训练与预测,请参见前面的文章<caffe平台快速搭建:caffe+wind ...
- 人体姿态和形状估计的视频推理:CVPR2020论文解析
人体姿态和形状估计的视频推理:CVPR2020论文解析 VIBE: Video Inference for Human Body Pose and Shape Estimation 论文链接:http ...
- 【模型推理】Tengine 模型转换及量化
欢迎关注我的公众号 [极智视界],回复001获取Google编程规范 O_o >_< o_O O_o ~_~ o_O 本文介绍一下 Tengine 模型转换 ...
- 【推理引擎】ONNXRuntime 的架构设计
ONNXRuntime,深度学习领域的神经网络模型推理框架,从名字中可以看出它和 ONNX 的关系:以 ONNX 模型作为中间表达(IR)的运行时(Runtime). 本文许多内容翻译于官方文档:ht ...
随机推荐
- Solution -「NOI 模拟赛」出题人
\(\mathcal{Description}\) 给定 \(\{a_n\}\),求一个 \(\{b_{n-1}\}\),使得 \(\forall x\in\{a_n\},\exists i,j\ ...
- 利用 pip download 打包软件来提供离线安装
文章目录 1.通过 pip download 下载安装包 2.利用 pip install --no-index 离线安装 1.通过 pip download 下载安装包 linux-oz6w:~ # ...
- Linux下使用Shell处理文本时最常用的工具
find 文件查找 查找txt和pdf文件 find . \( -name "*.txt" -o -name "*.pdf" \) -print 正则方式查找. ...
- 通俗理解.NET 6 Minimal APIs
.NET 6,微软称为"最快的.NET",带有了许多令人兴奋的新功能.语言和性能改进.这是自 .NET Core 3.1 以来的第一个 LTS 版本,将支持三年. 本次大版本发布, ...
- JS 逻辑运算符的特点
致谢 首先说一下,其他数据类型转换为布尔类型的规则: null.undefined.0.NaN.空字符串转换为false,其他转化为 true. 1. 取反 ! 首先把数据转化为布尔值,然后取反,结果 ...
- 简单excel饼状图怎么做,bi工具怎么做饼状图
饼状图是为了在一个整体体现个体所占的比例,比如一块蛋糕每人各分多大份.了解了饼状图的含义,就来学习饼状图怎么做吧. 首先,我们准备excel表格饼状图的初始数据 然后选择excel表格上方的插入,选择 ...
- 从零搭建Pytorch模型教程(一)数据读取
前言 本文介绍了classdataset的几个要点,由哪些部分组成,每个部分需要完成哪些事情,如何进行数据增强,如何实现自己设计的数据增强.然后,介绍了分布式训练的数据加载方式,数据读取的整个 ...
- Shell脚本编写登陆小程序.sh
转至:https://www.cnblogs.com/gaohongyu/articles/12072594.html #!/bin/bash #Author:GaoHongYu #QQ:106176 ...
- Java课程设计---Eclipse基本环境配置
1.设置eclipse编码 2.设置提示
- Java基本规范
1.Java是区分大小写的语言,关键字的大小不能写错,例如把class写成Class或者CLASS,都会导致出错. 2.在一个类的内部不能定义其他的类,即类和类之间是平行而非嵌套的关系. 3.一个程序 ...