实验: spring-boot 整合 fluent-mybatis 实验过程!!!!
1.参考:
简单整合,会报错误
https://segmentfault.com/a/1190000040467885?utm_source=sf-similar-article
利用maven编译,
https://blog.csdn.net/zhiweihongyan1/article/details/120848199?ops_request_misc=%257B%2522request%255Fid%2522%253A%2522164592123216780274162555%2522%252C%2522scm%2522%253A%252220140713.130102334.pc%255Fall.%2522%257D&request_id=164592123216780274162555&biz_id=0&utm_medium=distribute.pc_search_result.none-task-blog-2~all~first_rank_ecpm_v1~rank_v31_ecpm-5-120848199.pc_search_result_cache&utm_term=fluent+mybatis&spm=1018.2226.3001.4187
打开目标显示才不会错误。
2. 新建工程
附:idea 建立spring-boot程序抓图:参考连接。 https://www.cnblogs.com/cqmcu/p/15926462.html
添加pom


<properties>
<java.version>1.8</java.version>
<fluent-mybatis.version>1.6.13</fluent-mybatis.version>
</properties> <dependencies> <dependency>
<groupId>org.springframework.boot</groupId>
<artifactId>spring-boot-starter-web</artifactId>
</dependency> <dependency>
<groupId>org.springframework.boot</groupId>
<artifactId>spring-boot-starter-test</artifactId>
<scope>test</scope>
</dependency> <dependency>
<groupId>mysql</groupId>
<artifactId>mysql-connector-java</artifactId>
<scope>runtime</scope>
</dependency> <dependency>
<groupId>org.projectlombok</groupId>
<artifactId>lombok</artifactId>
<optional>true</optional>
</dependency> <!-- 引入fluent-mybatis 运行依赖包, scope为compile -->
<dependency>
<groupId>com.github.atool</groupId>
<artifactId>fluent-mybatis</artifactId>
<version>${fluent-mybatis.version}</version>
</dependency>
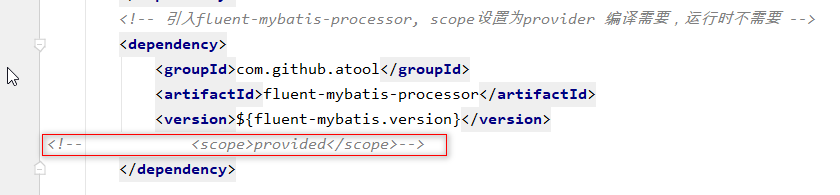
<!-- 引入fluent-mybatis-processor, scope设置为provider 编译需要,运行时不需要 -->
<dependency>
<groupId>com.github.atool</groupId>
<artifactId>fluent-mybatis-processor</artifactId>
<version>${fluent-mybatis.version}</version>
<!-- <scope>provided</scope>-->
</dependency> <dependency>
<groupId>org.mybatis.spring.boot</groupId>
<artifactId>mybatis-spring-boot-starter</artifactId>
<version>2.2.2</version>
</dependency> </dependencies> <build>
<plugins>
<plugin>
<groupId>org.apache.maven.plugins</groupId>
<artifactId>maven-resources-plugin</artifactId>
<version>3.1.0</version>
</plugin> <plugin>
<groupId>org.springframework.boot</groupId>
<artifactId>spring-boot-maven-plugin</artifactId>
</plugin>
</plugins>
</build>
注意,mawen编译插件,没有则有问题。
<plugin>
    <groupId>org.apache.maven.plugins</groupId>
    <artifactId>maven-resources-plugin</artifactId>
    <version>3.1.0</version>
</plugin>

3. application.yml配置
server:

  port: 8080 # 端口号

spring:

  datasource: # 数据库参数配置

    driver-class-name: com.mysql.cj.jdbc.Driver

    url: jdbc:mysql://127.0.0.1:3306/test_db?useUnicode=true&characterEncoding=utf8

    username: root

    password: 123456
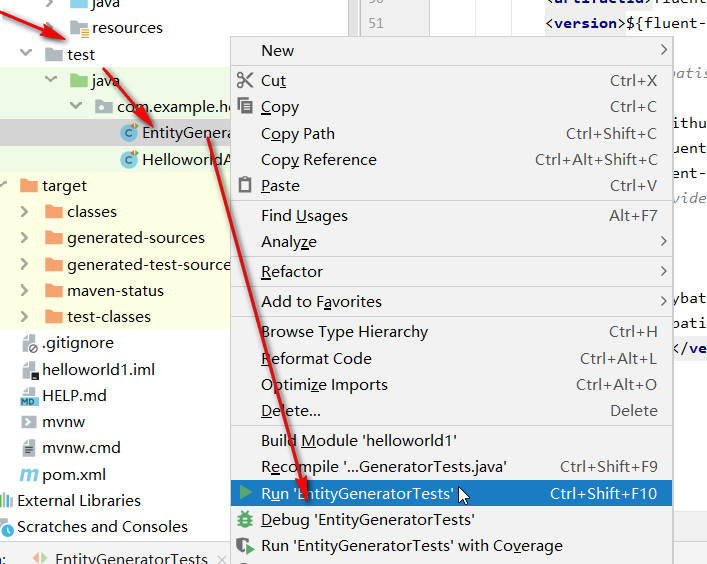
4. EntityGeneratorTests.java 自动代码生成

package com.example.helloworld;

import cn.org.atool.generator.FileGenerator;

import cn.org.atool.generator.annotation.Table;

import cn.org.atool.generator.annotation.Tables;

import org.junit.jupiter.api.Test;

import org.springframework.boot.test.context.SpringBootTest;

@SpringBootTest

public class EntityGeneratorTests {

    // 数据源 url

    static final String url = "jdbc:mysql://127.0.0.1:3306/test_db?useUnicode=true&characterEncoding=utf8";

    // 数据库用户名

    static final String username = "root";

    // 数据库密码

    static final String password = "123456";

    @Test

    public void generate() {

        // 引用配置类,build方法允许有多个配置类

        FileGenerator.build(Empty.class);

    }

    @Tables(

            // 设置数据库连接信息

            url = url, username = username, password = password,

            // 设置entity类生成src目录, 相对于 user.dir

            srcDir = "src/main/java",

            // 设置entity类的package值

            basePack = "com.example.helloworld",

            // 设置dao接口和实现的src目录, 相对于 user.dir

            daoDir = "src/main/java",

            // 设置哪些表要生成Entity文件

            tables = {@Table(value = {"person"})}

    )

    static class Empty { //类名随便取, 只是配置定义的一个载体

    }

}
5. 利用maven编译

6.显示target
7.编译产生代码
8. 产生目标代码
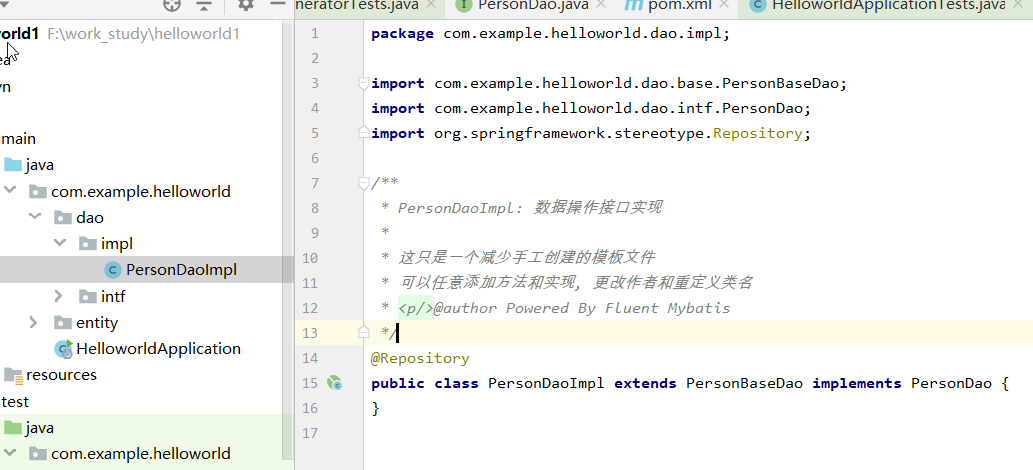

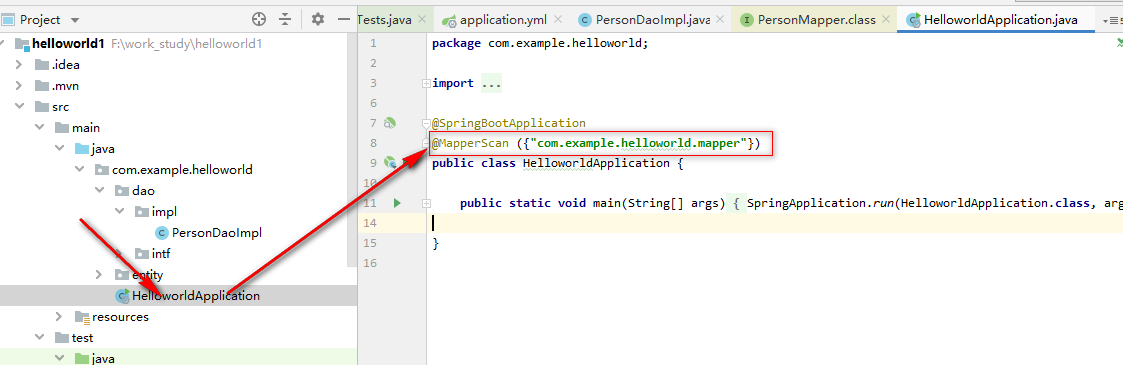
9.添加映射扫描
10.Controller测试代码编写
@RestController
@RequestMapping("/person")
public class PersonController {
@Resource
PersonDao personDao; @Resource
PersonMapper personMapper; //数据库的操作:增删改查
/**
* 根据ID查询数据1
* @param id
* @return
*/
@GetMapping("/getById")
public PersonEntity getById(Integer id){
return personDao.selectById(id);
} /**
* 根据ID删除
* @param id
*/
@GetMapping("/deleteById")
public void deleteById(Integer id){
personDao.deleteById(id);
} /**
* 根据ID进行更新
* @param personEntity
* @return
*/
@PostMapping("/updateById")
public PersonEntity updateById(@RequestBody PersonEntity personEntity){
boolean b = personDao.updateById(personEntity);
if (b){
return personDao.selectById(personEntity.getId());
}
return null;
} /**
* 新增
* @param personEntity
* @return
*/
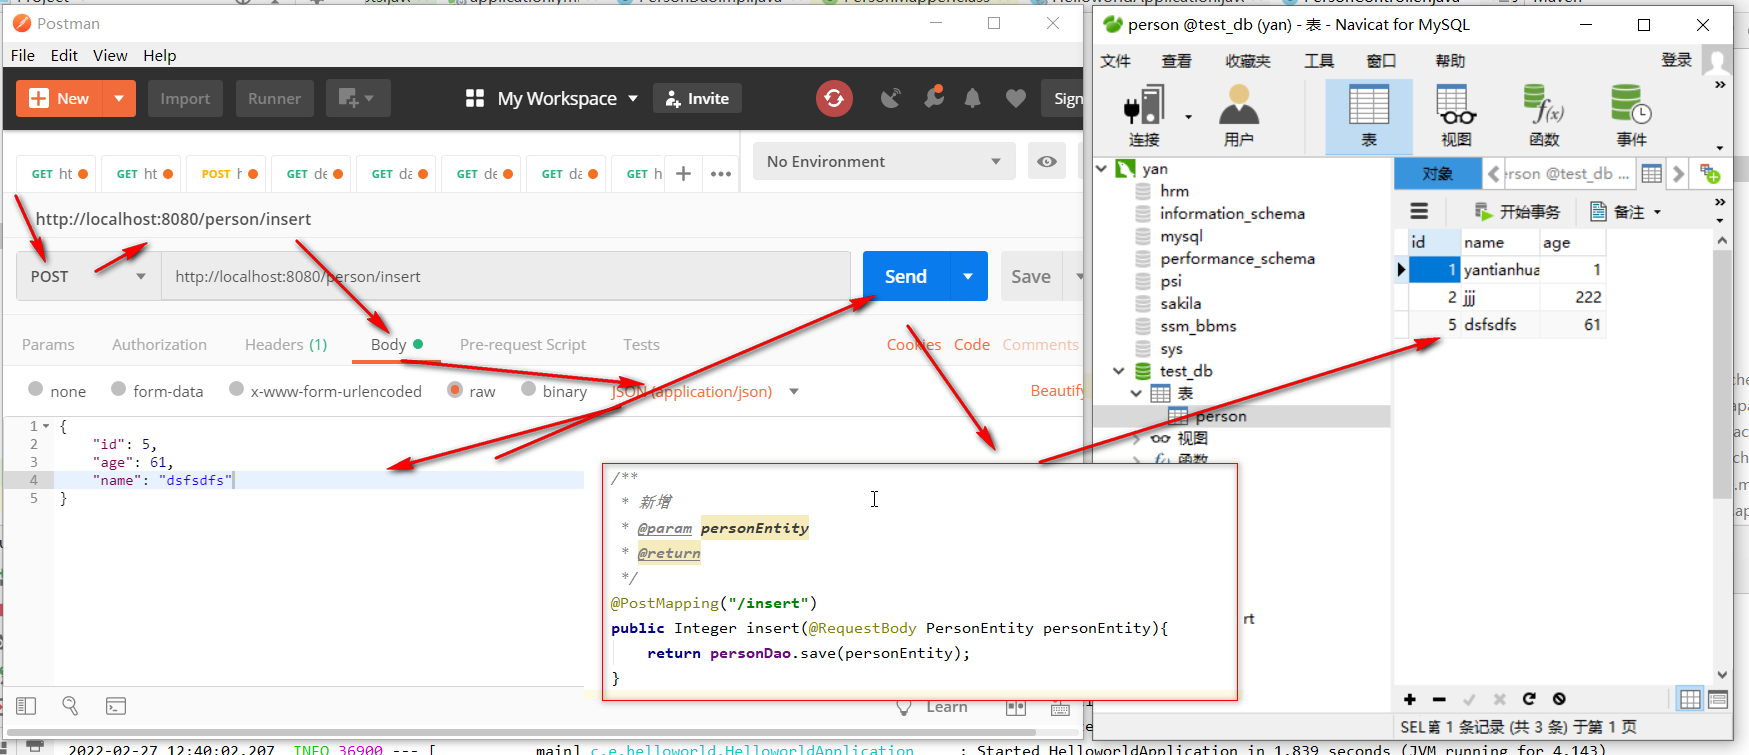
@PostMapping("/insert")
public Integer insert(@RequestBody PersonEntity personEntity){
return personDao.save(personEntity);
} }
11.利用postman工具测试

12-完整代码下载地址:
链接:https://pan.baidu.com/s/1YCuKfQHFyCmIVxkYFnHIOw
提取码:ca61
--来自百度网盘超级会员V5的分享
实验: spring-boot 整合 fluent-mybatis 实验过程!!!!的更多相关文章
- Spring Boot整合tk.mybatis及pageHelper分页插件及mybatis逆向工程
Spring Boot整合druid数据源 1)引入依赖 <dependency> <groupId>com.alibaba</groupId> <artif ...
- spring boot 2.x 系列 —— spring boot 整合 druid+mybatis
源码Gitub地址:https://github.com/heibaiying/spring-samples-for-all 一.说明 1.1 项目结构 项目查询用的表对应的建表语句放置在resour ...
- spring boot整合 springmvc+mybatis
需要以下依赖 <dependencies> <dependency> <groupId>org.springframework.boot</groupId&g ...
- Spring Boot 整合 Druid
Spring Boot 整合 Druid 概述 Druid 是阿里巴巴开源平台上的一个项目,整个项目由数据库连接池.插件框架和 SQL 解析器组成.该项目主要是为了扩展 JDBC 的一些限制,可以让程 ...
- Spring Boot整合Mybatis并完成CRUD操作
MyBatis 是一款优秀的持久层框架,被各大互联网公司使用,本文使用Spring Boot整合Mybatis,并完成CRUD操作. 为什么要使用Mybatis?我们需要掌握Mybatis吗? 说的官 ...
- spring boot 整合 mybatis 以及原理
同上一篇文章一样,spring boot 整合 mybatis过程中没有看见SqlSessionFactory,sqlsession(sqlsessionTemplate),就连在spring框架整合 ...
- 适合初学者的一个分布式环境搭建过程(spring boot + zookeeper + dubbo + mybatis + mysql)
本人也是才开始接触 阿里巴巴的开源分布式框架 dubbo,因为现在微服务框架 spring boot也非常的火,然后结合dubbo的官网搭建这个开发环境. 一.首先 zookeeper作为集群管理服务 ...
- Spring boot整合Mybatis
时隔两个月的再来写博客的感觉怎么样呢,只能用“棒”来形容了.闲话少说,直接入正题,之前的博客中有说过,将spring与mybatis整个后开发会更爽,基于现在springboot已经成为整个业界开发主 ...
- Spring Boot 中使用 MyBatis 整合 Druid 多数据源
2017 年 10 月 20 日 Spring Boot 中使用 MyBatis 整合 Druid 多数据源 本文将讲述 spring boot + mybatis + druid 多数据源配置方 ...
- Spring Boot 整合mybatis时遇到的mapper接口不能注入的问题
现实情况是这样的,因为在练习spring boot整合mybatis,所以自己新建了个项目做测试,可是在idea里面mapper接口注入报错,后来百度查询了下,把idea的注入等级设置为了warnin ...
随机推荐
- unixbench测试CPU性能工具
UnixBench是一个类unix系(Unix,BSD,Linux)统下的性能测试工具,一个开源工具,被广泛用与测试linux系统主机的性能.Unixbench的主要测试项目有:系统调用.读写.进程. ...
- Firefox彻底禁用自动更新提示
实验版本:96 安装目录下新建文件夹:distribution 新建文件:policies.json 文件内容为: { "policies": { "DisableApp ...
- slitaz中tazpkg更改软件源
在tazpkg手册中可以查到保存tazpkg软件源网址的文件,/var/lib/tazpkg/mirror
- HBase对表增查操作 API
public class HBaseDML { //静态属性 public static Connection conn = HBaseConnection2.conn; //添加数据 public ...
- open-local部署和使用
Open-Local简介 Open-local 是阿里巴巴开源,由多个组件构成的本地磁盘管理系统,目标是解决当前kubernetes本地存储能力缺失问题. Open-Local包含四大类组件: • S ...
- 【PS】PS如何扩展画布?
[PS]PS如何扩展画布? 选择裁剪,拉伸图片 选择上方工具栏的勾 即可扩展图片
- python peewee
from peewee import MySQLDatabase, Model from peewee import CharField, IntegerField, BooleanField # 引 ...
- git的相关命令
1.将文件添加至版本库的暂存区(stage)的命令是git add 1.1. 添加完所有有被修改的文件:git add . 1.2. 添加指定文件:git add 指定文件 2.将文件提交至本地仓库 ...
- 安装kubernetes dashboard以及用户授权
kubernetes 版本v1.25.3 1.安装 版本查看:https://github.com/kubernetes/dashboard/releases kubectl apply -f htt ...
- loadrunner---脚本录制常见问题
一:loadrunner录制脚本时ie浏览器不弹出? 1.IE浏览器取消勾选[启用第三方浏览器扩展]启动IE,从[工具]进入[Internet选项],切到高级,去掉[启用第三方浏览器扩展(需要重启动) ...