基于Python+Sqlite3实现最简单的CRUD
一、基本描述
使用Python,熟悉sqlite3的基本操作(查插删改),以及基本数据类型、事务(ACID)。
准备工作:在sqlite3的官网上下载预编译的sqlite文件(windows),包括tools和dll这两个文件。下载后,将它们解压后的文件放到一个文件夹中,并设置sqlite的环境变量。这样就可以直接在命令行打开sqlite3.exe。使用sqlite3.exe是为了方便操作,例如查看表、表头,以及实现交互式的数据库操作。
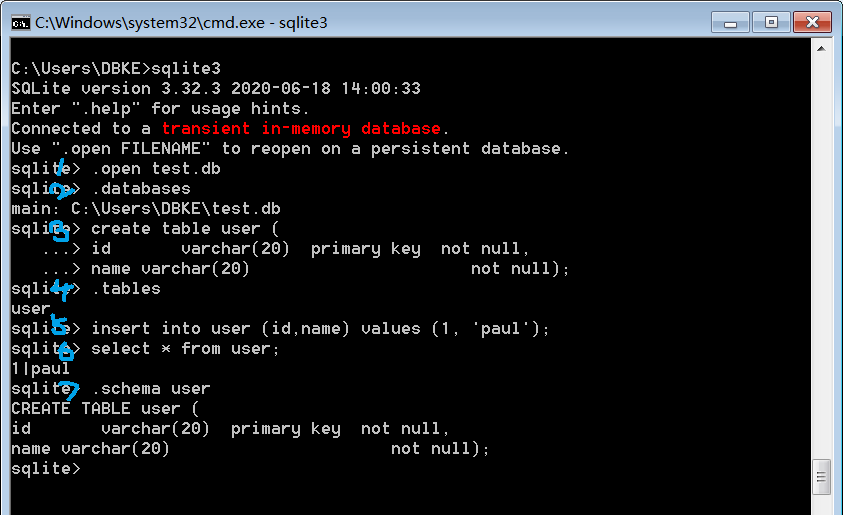
先使用命令行熟悉,sqlite3。第一步打开cmd,输入sqlite3进入sqlite的命令行模式,输入.open test.db可以创建数据库(open是打开数据库,但若目录下不存在相应文件则会自动创建)。然后输入以下命令新建一张很简单的user表,并插入一条记录。( Enter ".help" for instructions。Enter SQL statements terminated with a ";" 数据库描述和操作语言都需要加;作为命令的结束符)
create table user (

id   varchar(20)  primary key  not null,

name varchar(20)               not null);

insert into user (id,name) values (1, 'paul');
此时可以使用.databases查看数据库,使用.tables查当前数据库中的表,也可以使用.schema user查看user表的关系模式。可以使用select语句查看数据。
select * from user;
可以使用begin;开始一个事务,例如执行插入、删除或更新一条记录,然后执行commit;或rollback;, rollback指令会将上一次事务结束(就是commit或rollback后)的所有数据库操作回滚,恢复至上一次事务结束的状态。
二、简易程序
首先在python中首先创建数据库文件test.db,同样的,若目录下不存在相应文件则会自动创建。
import os

import sqlite3 #导入SQLite驱动:

def create_table(db_name):

    #连接到SQlite数据库 'test.db',创建数据库并新建一张表

    conn = sqlite3.connect(db_name) #数据库文件是test.db,不存在,则自动创建

    print("Database {} created successfully".format(db_name))

    cursor = conn.cursor()

    # sqlite3中EXECTUEM命令,不区分大小写

    cursor.execute('''create table user (

                    id           varchar(20)     primary key  not null,

                    name         varchar(20)              not null);''')

    cursor.close()

    conn.commit()

    conn.close()

    print("Table {} created successfully".format('user'))
然后定义CRUD操作
def insert_info(db_name, values):

    conn = sqlite3.connect(db_name) #数据库文件是test.db,不存在,则自动创建

    cursor = conn.cursor()

    #插入一条记录: cursor.execute('insert into user (id, name) values (\'1\', \'Michael\')')

    cursor.execute("insert into user values (?, ?);", (values[0], values[1]))

    print(cursor.rowcount) #通过rowcount获得插入的行数:reusult 1

    cursor.close()

    conn.commit()  #提交事务begin commit rollback end transaction

    print("Records created successfully")

    conn.close()

def select_info(db_name, id):

    conn = sqlite3.connect(db_name) #数据库文件是test.db,不存在,则自动创建

    cursor = conn.cursor()

    cursor.execute('select * from user where id=?;', (id,))

    values = cursor.fetchall() # rows of info

    cursor.close()

    conn.close()

    print(values)

def update_info(db_name, values):

    conn = sqlite3.connect(db_name) #数据库文件是test.db,不存在,则自动创建

    cursor = conn.cursor()

    cursor.execute('update user set name=?  where id=?;', (values[1], values[0]))

    conn.commit()

    cursor.close()

    conn.close()

    print("updated")

def delete_info(db_name, id):

    conn = sqlite3.connect(db_name) #数据库文件是test.db,不存在,则自动创建

    cursor = conn.cursor()

    cursor.execute('delete from user where id=?;', (id))

    conn.commit()

    print("Total number of rows deleted :", conn.total_changes)

    c = conn.execute('select * from user')

    for row in c:

       print("id: {}, name: {}".format(row[0], row[1]))

    c.close()

    cursor.close()

    conn.close()

    print("delete done successfully")

def show_all(db_name):

    conn = sqlite3.connect(db_name)

    c = conn.execute('select * from user')

    cnt = 1

    for row in c:

        print("id:{}, name:{}".format(row[0], row[1]), end="   ")

        if cnt % 3 == 0:

            print("")

        cnt += 1

    c.close()

    conn.close()
最后是主程序:
def main():
   db_name = 'test.db'
   root_path = os.path.split(os.path.realpath(__file__))[0] + os.sep

    file_path = root_path + db_name

    print(file_path)

    cwd_path = os.getcwd()

    print("Current Python Working Directory is " + cwd_path)

    os.chdir(root_path)     # 将python的工作目录切换到源文件所在目录

    print("\nChange Directory to:", root_path)

    if not os.path.exists(file_path):

        create_table(db_name) # 检查db文件

    else:

        print("{} file exist already!".format(db_name))

    flag = True         # 指示位,控制循环

    operation = 0        # 操作码, 代表各种操作

    op_table = ["Select", "Insert", "Update", "Delete", "ShowAll"]

    op_idx = {op:i for i, op in enumerate(op_table)}

    idx_op = {i:op for i, op in enumerate(op_table)}

    print("\nTest Sqlite3")

    while flag != False:

        for key, val in op_idx.items():

            print("{}:{}  ".format(key, val), end=" ")

        oper = input("\nPlease input your choice:")

        oper = int(oper)

        if 4 >= oper >= 0:

            print("\nExecute {}".format(idx_op[oper]))

        else:

            print("Operation code {} error! Please retry!".format(oper))

            continue

        if oper == 0:

            print("Please input id for query")   # select

            query_id = input()

            select_info(db_name, query_id)

        elif oper == 1:

            print("Please input id and name")    # insert

            text = input()

            values = text.split(" ")

            insert_info(db_name, values)

        elif oper == 2:

            print("Please input id and name")    # update

            text = input()

            values = text.split(" ")

            update_info(db_name, values)

        elif oper == 3:

            print("Please input id for delelte") # delete

            del_id = input()

            delete_info(db_name, del_id)

        elif oper == 4:

            show_all(db_name)

        sign = input("\nContinue or not,: 0 stop, 1 continue:")

        if int(sign) == 0:

            flag = False

            print("Close Application")

if __name__ == "__main__":

    main()
基于Python+Sqlite3实现最简单的CRUD的更多相关文章
- 基于Python使用SVM识别简单的字符验证码的完整代码开源分享
关键字:Python,SVM,字符验证码,机器学习,验证码识别 1 概述 基于Python使用SVM识别简单的验证字符串的完整代码开源分享. 因为目前有了更厉害的新技术来解决这类问题了,但是本文作 ...
- Python 基于Python及zookeeper实现简单分布式任务调度系统设计思路及核心代码实现
基于Python及zookeeper实现简单分布式任务调度系统设计思路及核心代码实现 by:授客 QQ:1033553122 测试环境 功能需求 实现思路 代码实践(关键技术点实现) 代码模块组织 ...
- 如何简单实现接口自动化测试(基于 python) 原博主地址https://blog.csdn.net/gitchat/article/details/77849725
如何简单实现接口自动化测试(基于 python) 2017年09月05日 11:52:25 阅读数:9904 GitChat 作者:饿了么技术社区 原文:如何简单实现接口自动化测试(基于 python ...
- 一次简单完整的自动化登录测试-基于python+selenium进行cnblog的自动化登录测试
Web登录测试是很常见的测试,手动测试大家再熟悉不过了,那如何进行自动化登录测试呢!本文就基于python+selenium结合unittest单元测试框架来进行一次简单但比较完整的cnblog自动化 ...
- Websocket - Websocket原理(握手、解密、加密)、基于Python实现简单示例
一.Websocket原理(握手.解密.加密) WebSocket协议是基于TCP的一种新的协议.WebSocket最初在HTML5规范中被引用为TCP连接,作为基于TCP的套接字API的占位符.它实 ...
- 简单实现接口自动化测试(基于python+unittest)
简单实现接口自动化测试(基于python+unittest) 简介 本文通过从Postman获取基本的接口测试Code简单的接口测试入手,一步步调整优化接口调用,以及增加基本的结果判断,讲解Pytho ...
- 实用的Python(3)超简单!基于Python搭建个人“云盘”
1 简介 当我们想要从本地向云服务器上传文件时,比较常用的有pscp等工具,但避免不了每次上传都要写若干重复的代码,而笔者最近发现的一个基于Python的工具updog,可以帮助我们在服务器上搭建类似 ...
- python sqlite3简单操作
python sqlite3简单操作(原创)import sqlite3class CsqliteTable: def __init__(self): pass def linkSqlite3(sel ...
- 超简单!基于Python搭建个人“云盘”
1. 简介 当我们想要从本地向云服务器上传文件时,比较常用的有pscp等工具,但避免不了每次上传都要写若干重复的代码,而笔者最近发现的一个基于Python的工具updog,可以帮助我们在服务器上搭建类 ...
随机推荐
- Java基础语法Day_07(1-3 常用API第一部分)
常用API第一部分 第1节 Scanner类 day07_01_API概述和使用步骤(使用最基本的三个步骤 搜索 构造方法 方法) day07_02_Scanner概述及其API文档 ...
- [笔记] Slope Trick:解决一类凸代价函数的DP优化问题
原理 当序列 DP 的转移代价函数满足 连续: 凸函数: 分段线性函数. 时,可以通过记录分段函数的最右一段 \(f_r(x)\) 以及其分段点 \(L\) 实现快速维护代价的效果. 如:$ f(x) ...
- 小白必看:零基础安装Linux系统(超级详细)
我们以最新发布的CentOS 8.1为例,学习下如何安装Linux系统 准备工作: 1.一台可以访问互联网的电脑 2.VMware Workstation安装包 3.CentOS8.1镜像(CentO ...
- 经典!服务端 TCP 连接的 TIME_WAIT 过多问题的分析与解决
开源Linux 专注分享开源技术知识 本文给出一个 TIME_WAIT 状态的 TCP 连接过多的问题的解决思路,非常典型,大家可以好好看看,以后遇到这个问题就不会束手无策了. 问题描述 模拟高并发的 ...
- 羽夏 Bash 简明教程(上)
写在前面 该文章根据 the unix workbench 中的 Bash Programming 进行汉化处理并作出自己的整理,并参考 Bash 脚本教程 和 BashPitfalls 相关内容 ...
- 基于Python的渗透测试信息收集系统的设计和实现
信息收集系统的设计和实现 渗透测试是保卫网络安全的一种有效且必要的技术手段,而渗透测试的本质就是信息收集,信息搜集整理可为后续的情报跟进提供强大的保证,目标资产信息搜集的广度,决定渗透过程的复杂程度, ...
- 关于『进击的Markdown』:第二弹
关于『进击的Markdown』:第二弹 建议缩放90%食用 众里寻他千百度,蓦然回首,Markdown却在灯火灿烂处 MarkdownYYDS! 各位早上好! 我果然鸽稿了 Markdown 语法 ...
- 2006NOIP普及组:明明的随机数
明明的随机数 时间限制:1000ms 内存限制:65536KB 题目描述: 明明想在学校中请一些同学一起做一项问卷调查,为了实验的客观性,他先用计算机生成了N个1到1000之间的随机整数 ...
- 2021年第十二届蓝桥杯javaA组省赛部分题目
试题 D: 路径 本题总分:10 分 [问题描述] 小蓝学习了最短路径之后特别高兴,他定义了一个特别的图,希望找到图 中的最短路径. 小蓝的图由 2021 个结点组成,依次编号 1 至 2021. 对 ...
- 聊聊 C# 中的多态底层 (虚方法调用) 是怎么玩的
最近在看 C++ 的虚方法调用实现原理,大概就是说在 class 的首位置存放着一个指向 vtable array 指针数组 的指针,而 vtable array 中的每一个指针元素指向的就是各自的 ...