
Glide源码解析二---into方法
转载请标明出处,维权必究: https://www.cnblogs.com/tangZH/p/12543154.html
Glide作为一个强大的图片加载框架,已经被android官方使用,所以,明白Glide的加载流程以及原理对加深我们对glide的理解是很重要的。
本文基于glide 4.11
Glide.with(this).load("").into(new ImageView(this));
我们从这一句入手,上次我们看了Glide的初始化过程,也就是Glide.with(this)这个方法。现在我们来看into方法。
    @NonNull

    public ViewTarget<ImageView, TranscodeType> into(@NonNull ImageView view) {

        Util.assertMainThread();

        //检查view是否为null

        Preconditions.checkNotNull(view);

        //根据view.getScaleType()设置不同的transform变换,这个transform变换我们单独讲

        BaseRequestOptions<?> requestOptions = this;

        if (!requestOptions.isTransformationSet()

                && requestOptions.isTransformationAllowed()

                && view.getScaleType() != null) {

            // Clone in this method so that if we use this RequestBuilder to load into a View and then

            // into a different target, we don't retain the transformation applied based on the previous

            // View's scale type.

            switch (view.getScaleType()) {

                case CENTER_CROP:

                    requestOptions = requestOptions.clone().optionalCenterCrop();

                    break;

                case CENTER_INSIDE:

                    requestOptions = requestOptions.clone().optionalCenterInside();

                    break;

                case FIT_CENTER:

                case FIT_START:

                case FIT_END:

                    requestOptions = requestOptions.clone().optionalFitCenter();

                    break;

                case FIT_XY:

                    requestOptions = requestOptions.clone().optionalCenterInside();

                    break;

                case CENTER:

                case MATRIX:

                default:

                    // Do nothing.

            }

        }

        return into(

                //根据transcodeClass的类型构造不同的Target

                glideContext.buildImageViewTarget(view, transcodeClass),

                /*targetListener=*/ null,

                requestOptions,

                Executors.mainThreadExecutor());

    }
构建不同的target
glideContext.buildImageViewTarget(view, transcodeClass),跟着代码点进去,最后跟踪到了这里:
  public <Z> ViewTarget<ImageView, Z> buildTarget(

      @NonNull ImageView view, @NonNull Class<Z> clazz) {

    if (Bitmap.class.equals(clazz)) {

      return (ViewTarget<ImageView, Z>) new BitmapImageViewTarget(view);

    } else if (Drawable.class.isAssignableFrom(clazz)) {

      return (ViewTarget<ImageView, Z>) new DrawableImageViewTarget(view);

    } else {

      throw new IllegalArgumentException(

          "Unhandled class: " + clazz + ", try .as*(Class).transcode(ResourceTranscoder)");

    }

  }
如果说我们最终要将资源解码为bitmap,那么就构造BitmapImageViewTarget,如果要将资源解码为Drawable,那么就构造DrawableImageViewTarget。
    private <Y extends Target<TranscodeType>> Y into(

            @NonNull Y target,

            @Nullable RequestListener<TranscodeType> targetListener,

            BaseRequestOptions<?> options,

            Executor callbackExecutor) {

        Preconditions.checkNotNull(target);

        //检测是否已经调用过load方法

        if (!isModelSet) {

            throw new IllegalArgumentException("You must call #load() before calling #into()");

        }

        //构造request

        Request request = buildRequest(target, targetListener, options, callbackExecutor);

        //获取改target是否已经有绑定的request

        Request previous = target.getRequest();

        /**

         * 这里修复了一个bug,详见 https://github.com/bumptech/glide/issues/2270

         */

        if (request.isEquivalentTo(previous)

                && !isSkipMemoryCacheWithCompletePreviousRequest(options, previous)) {

            // If the request is completed, beginning again will ensure the result is re-delivered,

            // triggering RequestListeners and Targets. If the request is failed, beginning again will

            // restart the request, giving it another chance to complete. If the request is already

            // running, we can let it continue running without interruption.

            if (!Preconditions.checkNotNull(previous).isRunning()) {

                // Use the previous request rather than the new one to allow for optimizations like skipping

                // setting placeholders, tracking and un-tracking Targets, and obtaining View dimensions

                // that are done in the individual Request.

                previous.begin();

            }

            return target;

        }

        requestManager.clear(target);

        //将该request设置给target

        target.setRequest(request);

        requestManager.track(target, request);

        return target;

    }
先看一下buildRequest(target, targetListener, options, callbackExecutor);做了什么
追踪进去,调用buildRequestRecursive方法。
然后主要是这两个方法:
    Request mainRequest =

        buildThumbnailRequestRecursive(

            requestLock,

            target,

            targetListener,

            parentCoordinator,

            transitionOptions,

            priority,

            overrideWidth,

            overrideHeight,

            requestOptions,

            callbackExecutor);
    Request errorRequest =

        errorBuilder.buildRequestRecursive(

            requestLock,

            target,

            targetListener,

            errorRequestCoordinator,

            errorBuilder.transitionOptions,

            errorBuilder.getPriority(),

            errorOverrideWidth,

            errorOverrideHeight,

            errorBuilder,

            callbackExecutor);
最后设置给ErrorRequestCoordinator
errorRequestCoordinator.setRequests(mainRequest, errorRequest);
ErrorRequestCoordinator负责管理这些请求,如果请求失败就运行错误的请求。
我们看这个方法:buildThumbnailRequestRecursive
  private Request buildThumbnailRequestRecursive(

      Object requestLock,

      Target<TranscodeType> target,

      RequestListener<TranscodeType> targetListener,

      @Nullable RequestCoordinator parentCoordinator,

      TransitionOptions<?, ? super TranscodeType> transitionOptions,

      Priority priority,

      int overrideWidth,

      int overrideHeight,

      BaseRequestOptions<?> requestOptions,

      Executor callbackExecutor) {

    if (thumbnailBuilder != null) {

      // Recursive case: contains a potentially recursive thumbnail request builder.

      if (isThumbnailBuilt) {

        throw new IllegalStateException(

            "You cannot use a request as both the main request and a "

                + "thumbnail, consider using clone() on the request(s) passed to thumbnail()");

      }

      TransitionOptions<?, ? super TranscodeType> thumbTransitionOptions =

          thumbnailBuilder.transitionOptions;

      // Apply our transition by default to thumbnail requests but avoid overriding custom options

      // that may have been applied on the thumbnail request explicitly.

      if (thumbnailBuilder.isDefaultTransitionOptionsSet) {

        thumbTransitionOptions = transitionOptions;

      }

      Priority thumbPriority =

          thumbnailBuilder.isPrioritySet()

              ? thumbnailBuilder.getPriority()

              : getThumbnailPriority(priority);

      int thumbOverrideWidth = thumbnailBuilder.getOverrideWidth();

      int thumbOverrideHeight = thumbnailBuilder.getOverrideHeight();

      if (Util.isValidDimensions(overrideWidth, overrideHeight)

          && !thumbnailBuilder.isValidOverride()) {

        thumbOverrideWidth = requestOptions.getOverrideWidth();

        thumbOverrideHeight = requestOptions.getOverrideHeight();

      }

      ThumbnailRequestCoordinator coordinator =

          new ThumbnailRequestCoordinator(requestLock, parentCoordinator);

      Request fullRequest =

          obtainRequest(

              requestLock,

              target,

              targetListener,

              requestOptions,

              coordinator,

              transitionOptions,

              priority,

              overrideWidth,

              overrideHeight,

              callbackExecutor);

      isThumbnailBuilt = true;

      // Recursively generate thumbnail requests.

      Request thumbRequest =

          thumbnailBuilder.buildRequestRecursive(

              requestLock,

              target,

              targetListener,

              coordinator,

              thumbTransitionOptions,

              thumbPriority,

              thumbOverrideWidth,

              thumbOverrideHeight,

              thumbnailBuilder,

              callbackExecutor);

      isThumbnailBuilt = false;

      coordinator.setRequests(fullRequest, thumbRequest);

      return coordinator;

    } else if (thumbSizeMultiplier != null) {

      // Base case: thumbnail multiplier generates a thumbnail request, but cannot recurse.

      ThumbnailRequestCoordinator coordinator =

          new ThumbnailRequestCoordinator(requestLock, parentCoordinator);

      Request fullRequest =

          obtainRequest(

              requestLock,

              target,

              targetListener,

              requestOptions,

              coordinator,

              transitionOptions,

              priority,

              overrideWidth,

              overrideHeight,

              callbackExecutor);

      BaseRequestOptions<?> thumbnailOptions =

          requestOptions.clone().sizeMultiplier(thumbSizeMultiplier);

      Request thumbnailRequest =

          obtainRequest(

              requestLock,

              target,

              targetListener,

              thumbnailOptions,

              coordinator,

              transitionOptions,

              getThumbnailPriority(priority),

              overrideWidth,

              overrideHeight,

              callbackExecutor);

      coordinator.setRequests(fullRequest, thumbnailRequest);

      return coordinator;

    } else {

      // Base case: no thumbnail.

      return obtainRequest(

          requestLock,

          target,

          targetListener,

          requestOptions,

          parentCoordinator,

          transitionOptions,

          priority,

          overrideWidth,

          overrideHeight,

          callbackExecutor);

    }

  }
首先对缩略图及是否对Target设置参数的判断(是否使用了thumbnail()方法和sizeMultiplier()方法),如果有使用thunmnail()方法,则生成原始图片和缩略图的请求,并由ThumbnailRequestCoordinator对象来协调管理,使用了sizeMultiplier()方法,则同样的处理(前者递归的获得缩略图的Request,后者不递归),否则就只生成原始图片的请求。
他们最终都会调用obtainRequest方法,追踪进去可以发现该方法最终返回的是SingleRequest对象。初始化request的时候传递的参数很多:
  public static <R> SingleRequest<R> obtain(

      Context context,

      GlideContext glideContext,

      Object requestLock,

      Object model,

      Class<R> transcodeClass,

      BaseRequestOptions<?> requestOptions,

      int overrideWidth,

      int overrideHeight,

      Priority priority,

      Target<R> target,

      RequestListener<R> targetListener,

      @Nullable List<RequestListener<R>> requestListeners,

      RequestCoordinator requestCoordinator,

      Engine engine,

      TransitionFactory<? super R> animationFactory,

      Executor callbackExecutor) {
1.GlideContext glideContext : 全局上下文
2.Object model :加载的资源类型
3.Class transcodeClass :转换的类型
4.RequestOptions requestOptions:设置选项(包括:skipMemoryCache,errorDrawable,placeholder,timeoutOf,encodeFormatOf等等)
5.int overrideWidth:目标宽度在所需资源的像素点。
6.int overrideHeight:目标高度在所需资源的像素点。
7. Priority priority:加载的优先级(IMMEDIATE,HIGH,NORMAL,LOW)
8.Target target:上面刚讲过,绑定的target
9.RequestListener requestListener:请求加载时候的监听器
10.RequestCoordinator requestCoordinator:请求协调器(用来协调具有相同Target的协调器)
11.Engine engine:负责启动负载和管理活动和缓存资源。
12.TransitionFactory<? super R> animationFactory:一个工厂类,可以根据请求的状态产生不同的转换。
我们再回到into代码中,获取了request之后我们就要开始请求了。
我们看着一句requestManager.track(target, request);
  synchronized void track(@NonNull Target<?> target, @NonNull Request request) {

    targetTracker.track(target);

    requestTracker.runRequest(request);

  }
runRequest就是执行请求的代码:
  /** Starts tracking the given request. */

  public void runRequest(@NonNull Request request) {

    requests.add(request);

    if (!isPaused) {

      request.begin();

    } else {

      request.clear();

      if (Log.isLoggable(TAG, Log.VERBOSE)) {

        Log.v(TAG, "Paused, delaying request");

      }

      pendingRequests.add(request);

    }

  }
判断Glide当前是不是处理暂停状态,如果不是暂停状态就调用Request的begin()方法来执行Request,否则的话就先将Request添加到待执行队列里面,等暂停状态解除了之后再执行。
我们来看begin方法:
  @Override

  public void begin() {

    synchronized (requestLock) {

      assertNotCallingCallbacks();

      stateVerifier.throwIfRecycled();

      startTime = LogTime.getLogTime();

      if (model == null) {

        if (Util.isValidDimensions(overrideWidth, overrideHeight)) {

          width = overrideWidth;

          height = overrideHeight;

        }

        // Only log at more verbose log levels if the user has set a fallback drawable, because

        // fallback Drawables indicate the user expects null models occasionally.

        int logLevel = getFallbackDrawable() == null ? Log.WARN : Log.DEBUG;

        onLoadFailed(new GlideException("Received null model"), logLevel);

        return;

      }

      if (status == Status.RUNNING) {

        throw new IllegalArgumentException("Cannot restart a running request");

      }


      如果说这个资源已经被加载过了,那么我们直接调用onResourceReady

      // If we're restarted after we're complete (usually via something like a notifyDataSetChanged

      // that starts an identical request into the same Target or View), we can simply use the

      // resource and size we retrieved the last time around and skip obtaining a new size, starting

      // a new load etc. This does mean that users who want to restart a load because they expect

      // that the view size has changed will need to explicitly clear the View or Target before

      // starting the new load.

      if (status == Status.COMPLETE) {

        onResourceReady(resource, DataSource.MEMORY_CACHE);

        return;

      }

      // Restarts for requests that are neither complete nor running can be treated as new requests

      // and can run again from the beginning.

      status = Status.WAITING_FOR_SIZE;

      if (Util.isValidDimensions(overrideWidth, overrideHeight)) {

        onSizeReady(overrideWidth, overrideHeight);

      } else {

        target.getSize(this);

      }

      if ((status == Status.RUNNING || status == Status.WAITING_FOR_SIZE)

          && canNotifyStatusChanged()) {

        target.onLoadStarted(getPlaceholderDrawable());

      }

      if (IS_VERBOSE_LOGGABLE) {

        logV("finished run method in " + LogTime.getElapsedMillis(startTime));

      }

    }

  }
如果model为null,说明我们没有调用load方法,这时候会回调onLoadFailed,将status设置为Status.FAILED,然后调用setErrorPlaceholder,这个方法里面最终调用target.onLoadFailed(error);将资源置空,然后显示错误图片。
    @Override

    public void begin() {

        synchronized (requestLock) {

            assertNotCallingCallbacks();

            stateVerifier.throwIfRecycled();

            startTime = LogTime.getLogTime();

            if (model == null) {

                if (Util.isValidDimensions(overrideWidth, overrideHeight)) {

                    width = overrideWidth;

                    height = overrideHeight;

                }

                // Only log at more verbose log levels if the user has set a fallback drawable, because

                // fallback Drawables indicate the user expects null models occasionally.

                int logLevel = getFallbackDrawable() == null ? Log.WARN : Log.DEBUG;

                onLoadFailed(new GlideException("Received null model"), logLevel);

                return;

            }

            if (status == SingleRequest.Status.RUNNING) {

                throw new IllegalArgumentException("Cannot restart a running request");

            }

            /**

             * 如果完成后重新启动(通常是通过notifyDataSetChanged之类的方法

             * 将相同的请求发送到相同的Target或View),我们可以简单地使用

             * 我们最后一次检索的资源和大小,然后跳过获取新大小的步骤,

             * 不用开始一个新的加载。这确实意味着要重新加载的用户,因为他们

             * 更改视图大小,那么需要先明确清除view和target,然后

             * 开始新的加载。

             */

            if (status == SingleRequest.Status.COMPLETE) {

                onResourceReady(resource, DataSource.MEMORY_CACHE);

                return;

            }

            // Restarts for requests that are neither complete nor running can be treated as new requests

            // and can run again from the beginning.

            status = SingleRequest.Status.WAITING_FOR_SIZE;

            /**

             * 这里会判断Util.isValidDimensions(overrideWidth, overrideHeight)

             * 如果你在使用时候调用了override() API为图片指定了一个固定的宽高,就会按照你给定的去加载;第二种情况是没有给定的情况,

             * 那么target.getSize()方法的内部会根据ImageView的layout_width和layout_height值做一系列的计算,来算出图片应该的宽高,

             * 具体计算就在getSize里面

             * 但是不管怎样,最后都会调用onSizeReady()。

             */

            if (Util.isValidDimensions(overrideWidth, overrideHeight)) {

                onSizeReady(overrideWidth, overrideHeight);

            } else {

                target.getSize(this);

            }

            if ((status == SingleRequest.Status.RUNNING || status == SingleRequest.Status.WAITING_FOR_SIZE)

                    && canNotifyStatusChanged()) {

                target.onLoadStarted(getPlaceholderDrawable());

            }

            if (IS_VERBOSE_LOGGABLE) {

                logV("finished run method in " + LogTime.getElapsedMillis(startTime));

            }

        }

    }
我们进去onSizeReady看看
    @Override

    public void onSizeReady(int width, int height) {

        //如果对象以及被回收了,那么抛出异常

        stateVerifier.throwIfRecycled();

        synchronized (requestLock) {

            if (IS_VERBOSE_LOGGABLE) {

                logV("Got onSizeReady in " + LogTime.getElapsedMillis(startTime));

            }

            //说明没有设置大小或者没有获取到计算后的大小

            if (status != SingleRequest.Status.WAITING_FOR_SIZE) {

                return;

            }

            status = SingleRequest.Status.RUNNING;

            float sizeMultiplier = requestOptions.getSizeMultiplier();

            this.width = maybeApplySizeMultiplier(width, sizeMultiplier);

            this.height = maybeApplySizeMultiplier(height, sizeMultiplier);

            if (IS_VERBOSE_LOGGABLE) {

                logV("finished setup for calling load in " + LogTime.getElapsedMillis(startTime));

            }

            loadStatus =

                    engine.load(

                            glideContext,

                            model,

                            requestOptions.getSignature(),

                            this.width,

                            this.height,

                            requestOptions.getResourceClass(),

                            transcodeClass,

                            priority,

                            requestOptions.getDiskCacheStrategy(),

                            requestOptions.getTransformations(),

                            requestOptions.isTransformationRequired(),

                            requestOptions.isScaleOnlyOrNoTransform(),

                            requestOptions.getOptions(),

                            requestOptions.isMemoryCacheable(),

                            requestOptions.getUseUnlimitedSourceGeneratorsPool(),

                            requestOptions.getUseAnimationPool(),

                            requestOptions.getOnlyRetrieveFromCache(),

                            this,

                            callbackExecutor);

            // This is a hack that's only useful for testing right now where loads complete synchronously

            // even though under any executor running on any thread but the main thread, the load would

            // have completed asynchronously.

            if (status != SingleRequest.Status.RUNNING) {

                loadStatus = null;

            }

            if (IS_VERBOSE_LOGGABLE) {

                logV("finished onSizeReady in " + LogTime.getElapsedMillis(startTime));

            }

        }

    }
主要的代码是engine.load。
    /**

     * /**

     *  所有的请求流程都如下:

     *  1.检查内存缓存并提供缓存的资源

     *  2.检查当前使用的资源,并返回当前的活跃资源

     *  3.检查当前的加载进度,并将cb添加到正在进行的加载进度中

     *  4.开始一个新的加载

     *

     * @param glideContext

     * @param model

     * @param signature

     * @param width

     * @param height

     * @param resourceClass

     * @param transcodeClass

     * @param priority

     * @param diskCacheStrategy

     * @param transformations

     * @param isTransformationRequired

     * @param isScaleOnlyOrNoTransform

     * @param options

     * @param isMemoryCacheable

     * @param useUnlimitedSourceExecutorPool

     * @param useAnimationPool

     * @param onlyRetrieveFromCache

     * @param cb

     * @param callbackExecutor

     * @param <R>

     * @return

     */

    public <R> Engine.LoadStatus load(

            GlideContext glideContext,

            Object model,

            Key signature,

            int width,

            int height,

            Class<?> resourceClass,

            Class<R> transcodeClass,

            Priority priority,

            DiskCacheStrategy diskCacheStrategy,

            Map<Class<?>, Transformation<?>> transformations,

            boolean isTransformationRequired,

            boolean isScaleOnlyOrNoTransform,

            Options options,

            boolean isMemoryCacheable,

            boolean useUnlimitedSourceExecutorPool,

            boolean useAnimationPool,

            boolean onlyRetrieveFromCache,

            ResourceCallback cb,

            Executor callbackExecutor) {

        long startTime = VERBOSE_IS_LOGGABLE ? LogTime.getLogTime() : 0;

        //构造一个key

        EngineKey key =

                keyFactory.buildKey(

                        model,

                        signature,

                        width,

                        height,

                        transformations,

                        resourceClass,

                        transcodeClass,

                        options);

        EngineResource<?> memoryResource;

        synchronized (this) {

            //通过这个key去缓存中看是不是存在资源,loadFromMemory里面会先去活跃资源缓存池中获取,

            // 没有的话再去内存缓存中获取,活跃资源即现在正在被其他组件使用的资源。

            memoryResource = loadFromMemory(key, isMemoryCacheable, startTime);

            if (memoryResource == null) {

                return waitForExistingOrStartNewJob(

                        glideContext,

                        model,

                        signature,

                        width,

                        height,

                        resourceClass,

                        transcodeClass,

                        priority,

                        diskCacheStrategy,

                        transformations,

                        isTransformationRequired,

                        isScaleOnlyOrNoTransform,

                        options,

                        isMemoryCacheable,

                        useUnlimitedSourceExecutorPool,

                        useAnimationPool,

                        onlyRetrieveFromCache,

                        cb,

                        callbackExecutor,

                        key,

                        startTime);

            }

        }

        // Avoid calling back while holding the engine lock, doing so makes it easier for callers to

        // deadlock.

        cb.onResourceReady(memoryResource, DataSource.MEMORY_CACHE);

        return null;

    }
如果找得到资源,那么就回调cb.onResourceReady,不然的话会走waitForExistingOrStartNewJob。
我们进去看一下:
    private <R> Engine.LoadStatus waitForExistingOrStartNewJob(

            GlideContext glideContext,

            Object model,

            Key signature,

            int width,

            int height,

            Class<?> resourceClass,

            Class<R> transcodeClass,

            Priority priority,

            DiskCacheStrategy diskCacheStrategy,

            Map<Class<?>, Transformation<?>> transformations,

            boolean isTransformationRequired,

            boolean isScaleOnlyOrNoTransform,

            Options options,

            boolean isMemoryCacheable,

            boolean useUnlimitedSourceExecutorPool,

            boolean useAnimationPool,

            boolean onlyRetrieveFromCache,

            ResourceCallback cb,

            Executor callbackExecutor,

            EngineKey key,

            long startTime) {

        //通过key获取EngineJob,EngineJob负责开启线程异步加载。

        EngineJob<?> current = jobs.get(key, onlyRetrieveFromCache);

        if (current != null) {

            current.addCallback(cb, callbackExecutor);

            if (VERBOSE_IS_LOGGABLE) {

                logWithTimeAndKey("Added to existing load", startTime, key);

            }

            return new Engine.LoadStatus(cb, current);

        }

        //没有EngineJob则构建一个

        EngineJob<R> engineJob =

                engineJobFactory.build(

                        key,

                        isMemoryCacheable,

                        useUnlimitedSourceExecutorPool,

                        useAnimationPool,

                        onlyRetrieveFromCache);

        //负责给图片解码等一些复杂操作

        DecodeJob<R> decodeJob =

                decodeJobFactory.build(

                        glideContext,

                        model,

                        key,

                        signature,

                        width,

                        height,

                        resourceClass,

                        transcodeClass,

                        priority,

                        diskCacheStrategy,

                        transformations,

                        isTransformationRequired,

                        isScaleOnlyOrNoTransform,

                        onlyRetrieveFromCache,

                        options,

                        engineJob);

        jobs.put(key, engineJob);

        engineJob.addCallback(cb, callbackExecutor);

        //运行

        engineJob.start(decodeJob);

        if (VERBOSE_IS_LOGGABLE) {

            logWithTimeAndKey("Started new load", startTime, key);

        }

        return new Engine.LoadStatus(cb, engineJob);

    }
  public synchronized void start(DecodeJob<R> decodeJob) {

    this.decodeJob = decodeJob;

    GlideExecutor executor =

        decodeJob.willDecodeFromCache() ? diskCacheExecutor : getActiveSourceExecutor();

    executor.execute(decodeJob);

  }
如果要从磁盘缓存中去解码的话,就获取diskCacheExecutor,否则就用针对原始资源的一个执行器。
在executor.execute(decodeJob)之后便切换到子线程了,我们到DecodeJob里面去看一下。
  @Override

  public void run() {

    // This should be much more fine grained, but since Java's thread pool implementation silently

    // swallows all otherwise fatal exceptions, this will at least make it obvious to developers

    // that something is failing.

    GlideTrace.beginSectionFormat("DecodeJob#run(model=%s)", model);

    // Methods in the try statement can invalidate currentFetcher, so set a local variable here to

    // ensure that the fetcher is cleaned up either way.

    DataFetcher<?> localFetcher = currentFetcher;

    try {

      if (isCancelled) {

        notifyFailed();

        return;

      }

      runWrapped();

    } catch (CallbackException e) {

      // If a callback not controlled by Glide throws an exception, we should avoid the Glide

      // specific debug logic below.

      throw e;

    } catch (Throwable t) {

      // Catch Throwable and not Exception to handle OOMs. Throwables are swallowed by our

      // usage of .submit() in GlideExecutor so we're not silently hiding crashes by doing this. We

      // are however ensuring that our callbacks are always notified when a load fails. Without this

      // notification, uncaught throwables never notify the corresponding callbacks, which can cause

      // loads to silently hang forever, a case that's especially bad for users using Futures on

      // background threads.

      if (Log.isLoggable(TAG, Log.DEBUG)) {

        Log.d(

            TAG,

            "DecodeJob threw unexpectedly" + ", isCancelled: " + isCancelled + ", stage: " + stage,

            t);

      }

      // When we're encoding we've already notified our callback and it isn't safe to do so again.

      if (stage != Stage.ENCODE) {

        throwables.add(t);

        notifyFailed();

      }

      if (!isCancelled) {

        throw t;

      }

      throw t;

    } finally {

      // Keeping track of the fetcher here and calling cleanup is excessively paranoid, we call

      // close in all cases anyway.

      if (localFetcher != null) {

        localFetcher.cleanup();

      }

      GlideTrace.endSection();

    }

  }
主要是runWrapped();
  private void runWrapped() {

    switch (runReason) {

      case INITIALIZE:

        stage = getNextStage(Stage.INITIALIZE);

        currentGenerator = getNextGenerator();

        runGenerators();

        break;

      case SWITCH_TO_SOURCE_SERVICE:

        runGenerators();

        break;

      case DECODE_DATA:

        decodeFromRetrievedData();

        break;

      default:

        throw new IllegalStateException("Unrecognized run reason: " + runReason);

    }

  }
当INITIALIZE或者SWITCH_TO_SOURCE_SERVICE的时候,走runGenerators()。这两种是没有缓存的情况下。
runGenerators():
  private void runGenerators() {

    currentThread = Thread.currentThread();

    startFetchTime = LogTime.getLogTime();

    boolean isStarted = false;

    while (!isCancelled

        && currentGenerator != null

        && !(isStarted = currentGenerator.startNext())) {

      stage = getNextStage(stage);

      currentGenerator = getNextGenerator();

      if (stage == Stage.SOURCE) {

        reschedule();

        return;

      }

    }

    // We've run out of stages and generators, give up.

    if ((stage == Stage.FINISHED || isCancelled) && !isStarted) {

      notifyFailed();

    }

    // Otherwise a generator started a new load and we expect to be called back in

    // onDataFetcherReady.

  }
重点:currentGenerator.startNext()。实现startNext方法的有三个: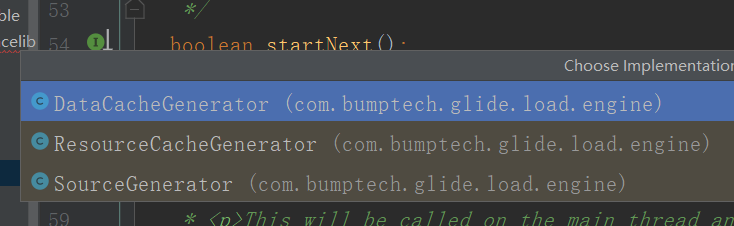
而我们的currentGenerator是哪一个呢?
回头看runWrapped
case INITIALIZE:

        stage = getNextStage(Stage.INITIALIZE);

        currentGenerator = getNextGenerator();

        runGenerators();
点进去getNextGenerator,结合status的值便可以知道返回的是SourceGenerator。(我们讨论的是初次加载没有缓存的情况)
我们来到SourceGenerator的startNext()方法:
    @Override

    public boolean startNext() {

        if (dataToCache != null) {

            Object data = dataToCache;

            dataToCache = null;

            cacheData(data);

        }

        if (sourceCacheGenerator != null && sourceCacheGenerator.startNext()) {

            return true;

        }

        sourceCacheGenerator = null;

        loadData = null;

        boolean started = false;

        while (!started && hasNextModelLoader()) {

            loadData = helper.getLoadData().get(loadDataListIndex++);

            if (loadData != null

                    && (helper.getDiskCacheStrategy().isDataCacheable(loadData.fetcher.getDataSource())

                    || helper.hasLoadPath(loadData.fetcher.getDataClass()))) {

                started = true;

                startNextLoad(loadData);

            }

        }

        return started;

    }
如果sourceCacheGenerator 不为null,就调用它的startNext,在里面去获取modelLoader,然后去加载资源,modelLoader即模型加载器,Glide初始化的时候注册了很多模型加载器。
registry

        .append(int.class, InputStream.class, resourceLoaderStreamFactory)

        .append(int.class, ParcelFileDescriptor.class, resourceLoaderFileDescriptorFactory)

        .append(Integer.class, InputStream.class, resourceLoaderStreamFactory)

        .append(Integer.class, ParcelFileDescriptor.class, resourceLoaderFileDescriptorFactory)

        .append(Integer.class, Uri.class, resourceLoaderUriFactory)

        .append(int.class, AssetFileDescriptor.class, resourceLoaderAssetFileDescriptorFactory)

        .append(Integer.class, AssetFileDescriptor.class, resourceLoaderAssetFileDescriptorFactory)

        .append(int.class, Uri.class, resourceLoaderUriFactory)

        .append(String.class, InputStream.class, new DataUrlLoader.StreamFactory<String>())

        .append(Uri.class, InputStream.class, new DataUrlLoader.StreamFactory<Uri>())
如append(Uri.class, InputStream.class, new DataUrlLoader.StreamFactory<Uri>())
将Uri对象转换为InputStream,模型加载器为DataUrlLoader.StreamFactory,也就是说我们加载的时候如果传进来的是一个uri对象,那么最终会被转换为InputStream。
我们不进去看,直接看接下来的代码。
loadData = helper.getLoadData().get(loadDataListIndex++);
loadData里面包含着:
sourceKey:标识这个加载的原始资源的key
alternateKeys:备用的缓存key指向相同的数据
DataFetcher:用来获取没有在缓存中发现的数据(即需要去加载的,modelLoader中都包含着这个)
接下来看:
startNextLoad(loadData);
private void startNextLoad(final LoadData<?> toStart) {

  loadData.fetcher.loadData(

      helper.getPriority(),

      new DataCallback<Object>() {

        @Override

        public void onDataReady(@Nullable Object data) {

          if (isCurrentRequest(toStart)) {

            onDataReadyInternal(toStart, data);

          }

        }

        @Override

        public void onLoadFailed(@NonNull Exception e) {

          if (isCurrentRequest(toStart)) {

            onLoadFailedInternal(toStart, e);

          }

        }

      });

}
loadData.fetcher.loadData:这里是我们真正去加载资源的地方。
点击进去loadeData,发现好多实现了该方法的类。那我们这里的Fetcher究竟是哪一个呢?
首先从名字来看,如果我们加载的是网络资源,那么就是:HttpUrlFetcher。

这个HttpUrlFetcher跟我们的modelLoader是什么关系呢
我们可以看出LoadData在ModelLoader类中。
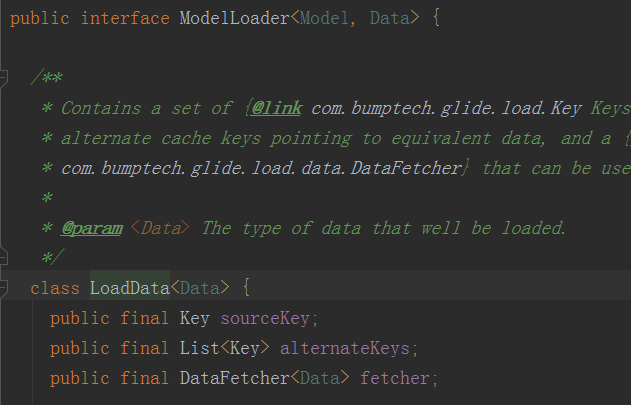
查看HttpUrlFetcher的调用可以追溯到HttpGlideUrlLoader。

  @Override

  public LoadData<InputStream> buildLoadData(

      @NonNull GlideUrl model, int width, int height, @NonNull Options options) {

    // GlideUrls memoize parsed URLs so caching them saves a few object instantiations and time

    // spent parsing urls.

    GlideUrl url = model;

    if (modelCache != null) {

      url = modelCache.get(model, 0, 0);

      if (url == null) {

        modelCache.put(model, 0, 0, model);

        url = model;

      }

    }

    int timeout = options.get(TIMEOUT);

    return new LoadData<>(url, new HttpUrlFetcher(url, timeout));

  }
我们可以看出HttpGlideUrlLoader实现了ModelLoader的方法,buildLoadData,而在buildLoadData中返回了一个LoadData对象,这个对象传入的就是HttpUrlFetcher。
这个buildLoadData什么时候被调用的呢?
我们回到startNext方法,loadData = helper.getLoadData().get(loadDataListIndex++);的getLoadData()里面:
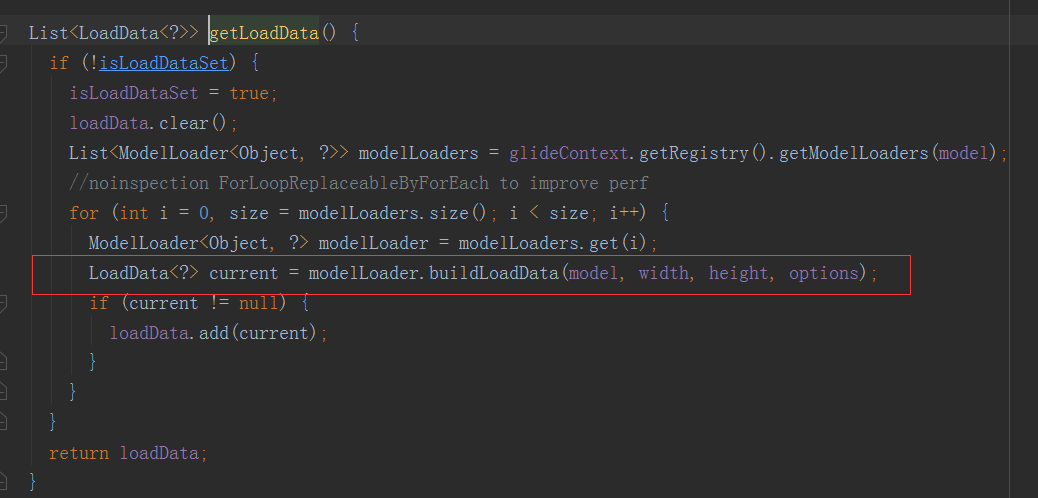
好,那么我们看HttpUrlFetcher的loadData();
  @Override

  public void loadData(

      @NonNull Priority priority, @NonNull DataCallback<? super InputStream> callback) {

    long startTime = LogTime.getLogTime();

    try {

      InputStream result = loadDataWithRedirects(glideUrl.toURL(), 0, null, glideUrl.getHeaders());

      callback.onDataReady(result);

    } catch (IOException e) {

      if (Log.isLoggable(TAG, Log.DEBUG)) {

        Log.d(TAG, "Failed to load data for url", e);

      }

      callback.onLoadFailed(e);

    } finally {

      if (Log.isLoggable(TAG, Log.VERBOSE)) {

        Log.v(TAG, "Finished http url fetcher fetch in " + LogTime.getElapsedMillis(startTime));

      }

    }

  }
loadDataWithRedirects返回了InputStream,然后callback回调。
我们进去loadDataWithRedirects看可以发现这个方法其实是去请求网络,我们就不细看了。
  private void startNextLoad(final LoadData<?> toStart) {

    loadData.fetcher.loadData(

        helper.getPriority(),

        new DataCallback<Object>() {

          @Override

          public void onDataReady(@Nullable Object data) {

            if (isCurrentRequest(toStart)) {

              onDataReadyInternal(toStart, data);

            }

          }

          @Override

          public void onLoadFailed(@NonNull Exception e) {

            if (isCurrentRequest(toStart)) {

              onLoadFailedInternal(toStart, e);

            }

          }

        });

  }
回调后调用onDataReadyInternal(toStart, data);
且看一下:
@SuppressWarnings("WeakerAccess")

@Synthetic

void onDataReadyInternal(LoadData<?> loadData, Object data) {

  DiskCacheStrategy diskCacheStrategy = helper.getDiskCacheStrategy();

  if (data != null && diskCacheStrategy.isDataCacheable(loadData.fetcher.getDataSource())) {

    dataToCache = data;

    // We might be being called back on someone else's thread. Before doing anything, we should

    // reschedule to get back onto Glide's thread.

    cb.reschedule();

  } else {

    cb.onDataFetcherReady(

        loadData.sourceKey,

        data,

        loadData.fetcher,

        loadData.fetcher.getDataSource(),

        originalKey);

  }

}
我们看这个方法:onDataFetcherReady
查看一下便可以知道会回调DecodeJob中的方法:
  @Override

  public void onDataFetcherReady(

      Key sourceKey, Object data, DataFetcher<?> fetcher, DataSource dataSource, Key attemptedKey) {

    this.currentSourceKey = sourceKey;

    this.currentData = data;

    this.currentFetcher = fetcher;

    this.currentDataSource = dataSource;

    this.currentAttemptingKey = attemptedKey;

    if (Thread.currentThread() != currentThread) {

      runReason = RunReason.DECODE_DATA;

      callback.reschedule(this);

    } else {

      GlideTrace.beginSection("DecodeJob.decodeFromRetrievedData");

      try {

        decodeFromRetrievedData();

      } finally {

        GlideTrace.endSection();

      }

    }

  }
到此我们就完成了加网络资源的过程,接下来就是解码等等的操作了。
我们看decodeFromRetrievedData:
里面有一句:
resource = decodeFromData(currentFetcher, currentData, currentDataSource);
将资源解码成Resource。
我们追踪进去:
decodeFromData -> decodeFromFetcher -> runLoadPath -> path.load -> loadWithExceptionList
loadWithExceptionList里面便开始进行我们的解码操作了。
  private Resource<Transcode> loadWithExceptionList(

      DataRewinder<Data> rewinder,

      @NonNull Options options,

      int width,

      int height,

      DecodePath.DecodeCallback<ResourceType> decodeCallback,

      List<Throwable> exceptions)

      throws GlideException {

    Resource<Transcode> result = null;

    //noinspection ForLoopReplaceableByForEach to improve perf

    for (int i = 0, size = decodePaths.size(); i < size; i++) {

      DecodePath<Data, ResourceType, Transcode> path = decodePaths.get(i);

      try {

        result = path.decode(rewinder, width, height, options, decodeCallback);

      } catch (GlideException e) {

        exceptions.add(e);

      }

      if (result != null) {

        break;

      }

    }
我们看:
result = path.decode(rewinder, width, height, options, decodeCallback);
  public Resource<Transcode> decode(

      DataRewinder<DataType> rewinder,

      int width,

      int height,

      @NonNull Options options,

      DecodeCallback<ResourceType> callback)

      throws GlideException {

    Resource<ResourceType> decoded = decodeResource(rewinder, width, height, options);

    Resource<ResourceType> transformed = callback.onResourceDecoded(decoded);

    return transcoder.transcode(transformed, options);

  }
我们看decodeResource -> decodeResourceWithList
   @NonNull

    private Resource<ResourceType> decodeResourceWithList(

            DataRewinder<DataType> rewinder,

            int width,

            int height,

            @NonNull Options options,

            List<Throwable> exceptions)

            throws GlideException {

        Resource<ResourceType> result = null;

        //noinspection ForLoopReplaceableByForEach to improve perf

        //遍历获取解码器

        for (int i = 0, size = decoders.size(); i < size; i++) {

            ResourceDecoder<DataType, ResourceType> decoder = decoders.get(i);

            try {

                DataType data = rewinder.rewindAndGet();

                //该解码器是否可以解码该数据

                if (decoder.handles(data, options)) {

                    //获取数据

                    data = rewinder.rewindAndGet();

                    //解码

                    result = decoder.decode(data, width, height, options);

                }

                // Some decoders throw unexpectedly. If they do, we shouldn't fail the entire load path, but

                // instead log and continue. See #2406 for an example.

            } catch (IOException | RuntimeException | OutOfMemoryError e) {

                if (Log.isLoggable(TAG, Log.VERBOSE)) {

                    Log.v(TAG, "Failed to decode data for " + decoder, e);

                }

                exceptions.add(e);

            }

            if (result != null) {

                break;

            }

        }

        if (result == null) {

            throw new GlideException(failureMessage, new ArrayList<>(exceptions));

        }

        return result;

    }
获取对应的解码器后用decode方法进行解码。Glide初始化的时候便注册了一大堆解码器,如:
.append(

            Registry.BUCKET_GIF,

            InputStream.class,

            GifDrawable.class,

            new StreamGifDecoder(imageHeaderParsers, byteBufferGifDecoder, arrayPool))
对于Gif类型,将InputStream解码为GifDrawable,解码器为StreamGifDecoder
接下来我们回到这个方法:
  public Resource<Transcode> decode(

      DataRewinder<DataType> rewinder,

      int width,

      int height,

      @NonNull Options options,

      DecodeCallback<ResourceType> callback)

      throws GlideException {

    Resource<ResourceType> decoded = decodeResource(rewinder, width, height, options);

    Resource<ResourceType> transformed = callback.onResourceDecoded(decoded);

    return transcoder.transcode(transformed, options);

  }
Resource<ResourceType> transformed = callback.onResourceDecoded(decoded);
这个方法里面便是对我们的资源进行了变换。
往下追溯到这个方法:
  @Synthetic

  @NonNull

  <Z> Resource<Z> onResourceDecoded(DataSource dataSource, @NonNull Resource<Z> decoded) {

    @SuppressWarnings("unchecked")

    Class<Z> resourceSubClass = (Class<Z>) decoded.get().getClass();

    Transformation<Z> appliedTransformation = null;

    Resource<Z> transformed = decoded;

    if (dataSource != DataSource.RESOURCE_DISK_CACHE) {

      appliedTransformation = decodeHelper.getTransformation(resourceSubClass);

      transformed = appliedTransformation.transform(glideContext, decoded, width, height);

    }

    // TODO: Make this the responsibility of the Transformation.

    if (!decoded.equals(transformed)) {

      decoded.recycle();

    }

    final EncodeStrategy encodeStrategy;

    final ResourceEncoder<Z> encoder;

    if (decodeHelper.isResourceEncoderAvailable(transformed)) {

      encoder = decodeHelper.getResultEncoder(transformed);

      encodeStrategy = encoder.getEncodeStrategy(options);

    } else {

      encoder = null;

      encodeStrategy = EncodeStrategy.NONE;

    }

    Resource<Z> result = transformed;

    boolean isFromAlternateCacheKey = !decodeHelper.isSourceKey(currentSourceKey);

    if (diskCacheStrategy.isResourceCacheable(

        isFromAlternateCacheKey, dataSource, encodeStrategy)) {

      if (encoder == null) {

        throw new Registry.NoResultEncoderAvailableException(transformed.get().getClass());

      }

      final Key key;

      switch (encodeStrategy) {

        case SOURCE:

          key = new DataCacheKey(currentSourceKey, signature);

          break;

        case TRANSFORMED:

          key =

              new ResourceCacheKey(

                  decodeHelper.getArrayPool(),

                  currentSourceKey,

                  signature,

                  width,

                  height,

                  appliedTransformation,

                  resourceSubClass,

                  options);

          break;

        default:

          throw new IllegalArgumentException("Unknown strategy: " + encodeStrategy);

      }

      LockedResource<Z> lockedResult = LockedResource.obtain(transformed);

      deferredEncodeManager.init(key, encoder, lockedResult);

      result = lockedResult;

    }

    return result;

  }
首先获取Transformation,然后调用transform方法进行变换处理。
返回resource之后回到decodeFromRetrievedData方法。
  private void decodeFromRetrievedData() {

    if (Log.isLoggable(TAG, Log.VERBOSE)) {

      logWithTimeAndKey(

          "Retrieved data",

          startFetchTime,

          "data: "

              + currentData

              + ", cache key: "

              + currentSourceKey

              + ", fetcher: "

              + currentFetcher);

    }

    Resource<R> resource = null;

    try {

      resource = decodeFromData(currentFetcher, currentData, currentDataSource);

    } catch (GlideException e) {

      e.setLoggingDetails(currentAttemptingKey, currentDataSource);

      throwables.add(e);

    }

    if (resource != null) {

      notifyEncodeAndRelease(resource, currentDataSource);

    } else {

      runGenerators();

    }

  }
我们沿着方法进入notifyEncodeAndRelease ---> notifyComplete ----> onResourceReady ------> notifyCallbacksOfResult
。。。。算了写的到这里好累,接下来不写了自己看,就是去设置资源。

Glide源码解析二---into方法的更多相关文章
- Mybatis源码解析(二) —— 加载 Configuration
Mybatis源码解析(二) -- 加载 Configuration 正如上文所看到的 Configuration 对象保存了所有Mybatis的配置信息,也就是说mybatis-config. ...
- RxJava2源码解析(二)
title: RxJava2源码解析(二) categories: 源码解析 tags: 源码解析 rxJava2 前言 本篇主要解析RxJava的线程切换的原理实现 subscribeOn 首先, ...
- Sentinel源码解析二(Slot总览)
写在前面 本文继续来分析Sentinel的源码,上篇文章对Sentinel的调用过程做了深入分析,主要涉及到了两个概念:插槽链和Node节点.那么接下来我们就根据插槽链的调用关系来依次分析每个插槽(s ...
- Spring源码解析之八finishBeanFactoryInitialization方法即初始化单例bean
Spring源码解析之八finishBeanFactoryInitialization方法即初始化单例bean 七千字长文深刻解读,Spirng中是如何初始化单例bean的,和面试中最常问的Sprin ...
- jQuery 源码解析二:jQuery.fn.extend=jQuery.extend 方法探究
终于动笔开始 jQuery 源码解析第二篇,写文章还真是有难度,要把自已懂的表述清楚,要让别人听懂真的不是一见易事. 在 jQuery 源码解析一:jQuery 类库整体架构设计解析 一文,大致描述了 ...
- erlang下lists模块sort(排序)方法源码解析(二)
上接erlang下lists模块sort(排序)方法源码解析(一),到目前为止,list列表已经被分割成N个列表,而且每个列表的元素是有序的(从大到小) 下面我们重点来看看mergel和rmergel ...
- iOS即时通讯之CocoaAsyncSocket源码解析二
原文 前言 本文承接上文:iOS即时通讯之CocoaAsyncSocket源码解析一 上文我们提到了GCDAsyncSocket的初始化,以及最终connect之前的准备工作,包括一些错误检查:本机地 ...
- 多线程爬坑之路-Thread和Runable源码解析之基本方法的运用实例
前面的文章:多线程爬坑之路-学习多线程需要来了解哪些东西?(concurrent并发包的数据结构和线程池,Locks锁,Atomic原子类) 多线程爬坑之路-Thread和Runable源码解析 前面 ...
- Common.Logging源码解析二
Common.Logging源码解析一分析了LogManager主入口的整个逻辑,其中第二步生成日志实例工厂类接口分析的很模糊,本随笔将会详细讲解整个日志实例工厂类接口的生成过程! (1).关于如何生 ...
随机推荐
- 如何理解 Spring 中的代理?
将 Advice 应用于目标对象后创建的对象称为代理.在客户端对象的情况下,目 标对象和代理对象是相同的. Advice + Target Object = Proxy
- nginx搭建简单直播服务器
1.下载模块(nginx-rtmp-module) 1 cd /data/nginx 2 yum install git3 git clone https://github.com/arut/ngin ...
- 学习Tomcat(一)
一.jdk和tomcat基础 1.web应用对比 apache: 两种方式运行php,一是用模块,二是用fastcgi nginx: 通过fastcgi处理动态请求,也可转发到tomcat 2.tom ...
- SDT v0.0.1 上线
自己的第一个开源组件,断断续续写了有一段时间,感觉可以发布 v0.0.1.SDT 是 SVG Drag Tree 的缩写,一个可以通过拖放 SVG 图标,来生成拥有树形结构的视图与相应数据的前端组件. ...
- web音频流转发之AudioNode
前言 上一章地址: web音频流转发之音频源下一张地址:web音频流转发之音视频直播在这一章我说几个我们需要用到的音频处理模块也就3个吧,包括我们转发流是需要用到的核心模块.更多模块请看MDN,或者看 ...
- java语言和jdk、jre基础
Java语言平台 * J2SE(Java 2 Platform Standard Edition)标准版 * 是为开发普通桌面和商务应用程序提供的解决方案,该技术体系是其他两者的基础,可以完成一些桌 ...
- 小程序获取自定义属性之e.target与e.currentTarget
彻底弄懂小程序e.target与e.currentTarget 一.小程序中关于事件对象 e 的属性中有两个特别重要的属性:target与currentTarget属性:对于这两个属性,官方文档上 ...
- python---括号匹配
""" 括号匹配 输入: "()[]{}" 输出true 输入:"([)]" 输出false 输入:")(()))&qu ...
- 数组-LeetCode-笔试
目录 数组理论基础 二分查找 二分法第一种写法 二分法第二种写法 ACM 移除元素 暴力解法 双指针法(快慢指针) ACM 有序数组的平方 暴力排序 双指针法 长度最小的子数组 暴力解法 滑动窗口 相 ...
- 两数之和_LeetCode_1
LeetCode_1原题链接:https://leetcode-cn.com/problems/two-sum/ 剑指 Offer 57原题链接: https://leetcode-cn.com/pr ...