通过Shell脚本自动安装Hive&JDBC测试&提供CDH5网盘地址
〇、参考地址
1、Linux下编写脚本自动安装hive
2、如何运行.sh脚本文件
https://blog.csdn.net/weixin_55821558/article/details/125830542
3、hive教程:启动hiveserver2,通过jdbc方式访问hive☆
https://blog.csdn.net/a12355556/article/details/124565395
2、CDH安装hadoop与版本比较
https://www.freesion.com/article/8763708397/
一、代码编写
1、下载Hive
原生:http://archive.apache.org/dist/hive/hive-1.1.0/
CDH版本(已失效):https://archive.cloudera.com/p/cdh5/cdh/5 注意:登录名为邮箱,密码大小写数字+符号!
命令下载(已失效):wget https://archive.cloudera.com/cdh5/cdh/5/hive-1.1.0-cdh5.14.2.tar.gz
CDH5网盘备份:链接:https://pan.baidu.com/s/1XUGRMpjTbrJWDy9QCT9vTw?pwd=gmyf
比较:CDH版本比原生的兼容性更强,下载哪个都可以
2、编写脚本
vi hive_insatll.sh
echo "----------安装hive----------"

#-C 指定目录

tar -zxf /usr/local/hive-1.1.0-cdh5.14.2.tar.gz -C /usr/local/

#改名

mv /usr/local/hive-1.1.0-cdh5.14.2 /usr/local/hive110

#配置环境变量

echo '#hive' >>/etc/profile

echo 'export HIVE_HOME=/usr/local/hive110' >>/etc/profile

echo 'export PATH=$PATH:$HIVE_HOME/bin' >>/etc/profile

#创建配置文件hive-site.xml

touch /usr/local/hive110/conf/hive-site.xml

path="/usr/local/hive110/conf/hive-site.xml"

#编写配置

echo '<?xml version="1.0" encoding="UTF-8" standalone="no"?>' >> $path

echo '<?xml-stylesheet type="text/xsl" href="configuration.xsl"?>' >> $path

echo '<configuration>' >> $path

#和jdbc如出一辙,更换自己的ip地址和用户名密码即可

echo '<property><name>javax.jdo.option.ConnectionURL</name><value>jdbc:mysql://192.168.91.137:3306/hive137?createDatabaseIfNotExist=true</value></property>' >> $path

echo '<property><name>javax.jdo.option.ConnectionDriverName</name><value>com.mysql.jdbc.Driver</value></property>' >> $path

echo '<property><name>javax.jdo.option.ConnectionUserName</name><value>root</value></property>' >> $path

echo '<property><name>javax.jdo.option.ConnectionPassword</name><value>123123</value></property>' >> $path

echo '<property><name>hive.server2.thift.client.user</name><value>root</value></property>' >> $path

echo '<property><name>hive.server2.thift.client.password</name><value>123123</value></property>' >> $path

echo '</configuration>' >>$path
3、调用
添加执行权限:chmod u+x hive_insatll.sh
执行.sh文件:./hive_insatll.sh 或 sh hive_insatll.sh
4、使环境变量生效
source /etc/profile
二、运行后的其他操作
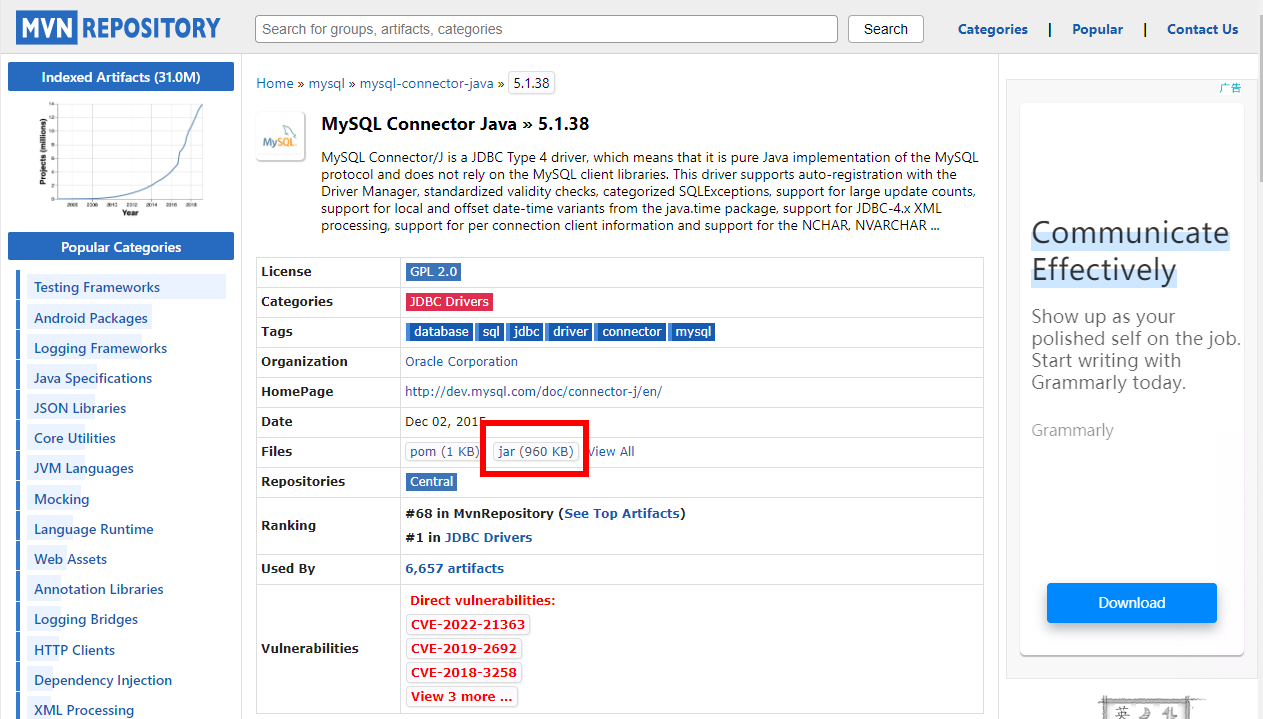
1、下载mysql的jar包
下载地址:https://mvnrepository.com/artifact/mysql/mysql-connector-java/5.1.38
其他jar包:mysql-binlog-connector-java、 eventuate-local-java-cdc-connector-mysql-binlog……
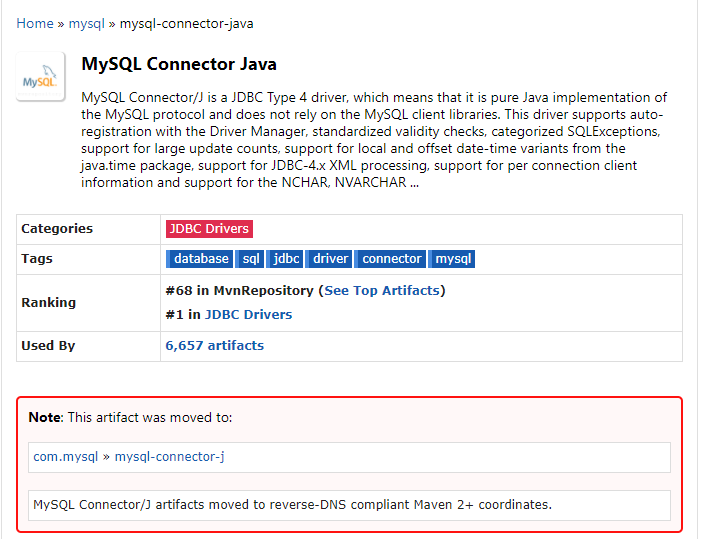
注意:已经转至新目录
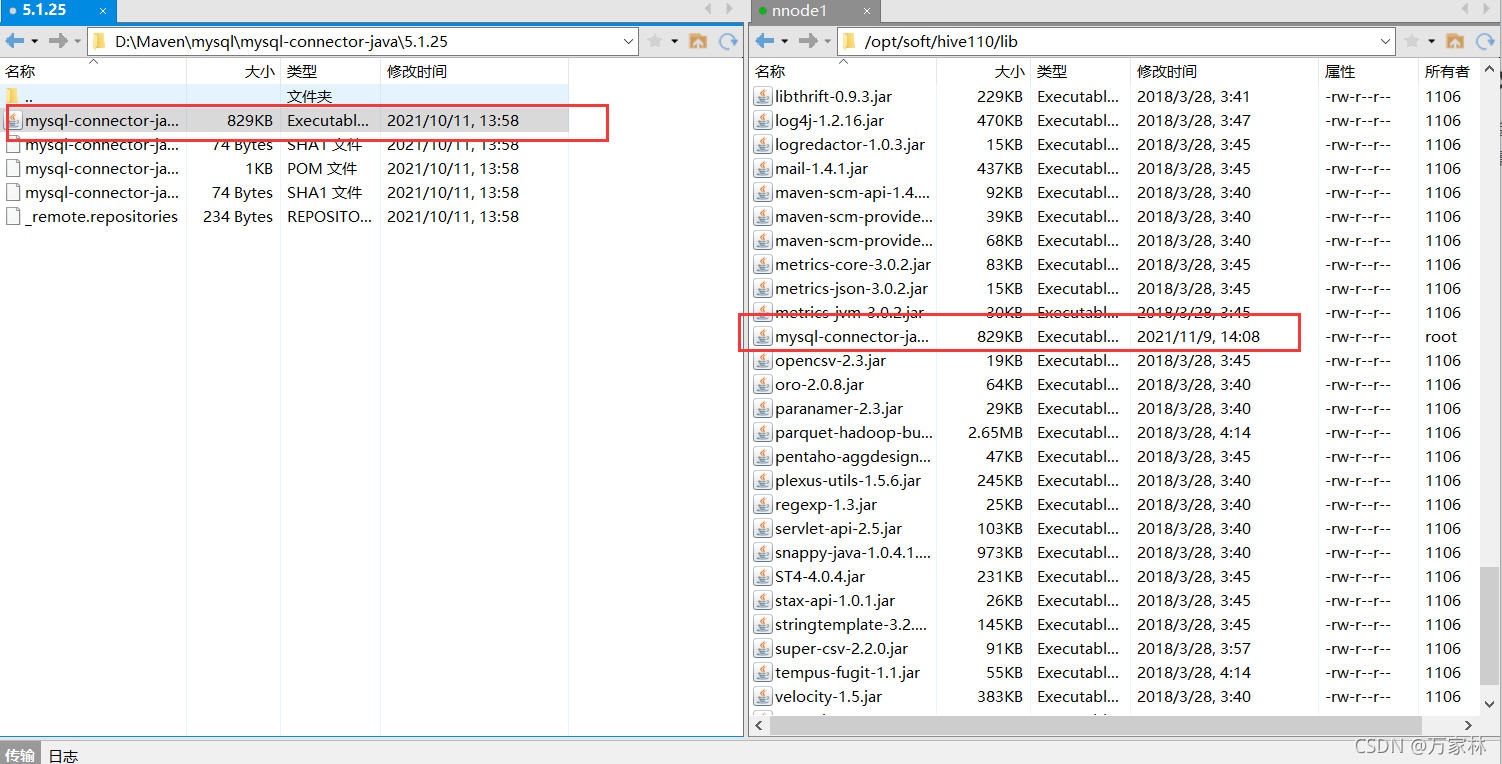
2、放入hive110/lib目录
3、执行格式化操作
schematool -dbType mysql -initSchema
4、启动hiveserver2
前台启动:hive --service hiveserver2
后台启动:nohup hive --service hiveserver2 2>&1 &
组合使用: nohup [xxx 命令操作]> file 2>&1 &,表示将 xxx 命令运行的结 果输出到 file 中(第一个2表示错误输出,另外0表示标准输入,1表示标准输出)
三、配置与验证
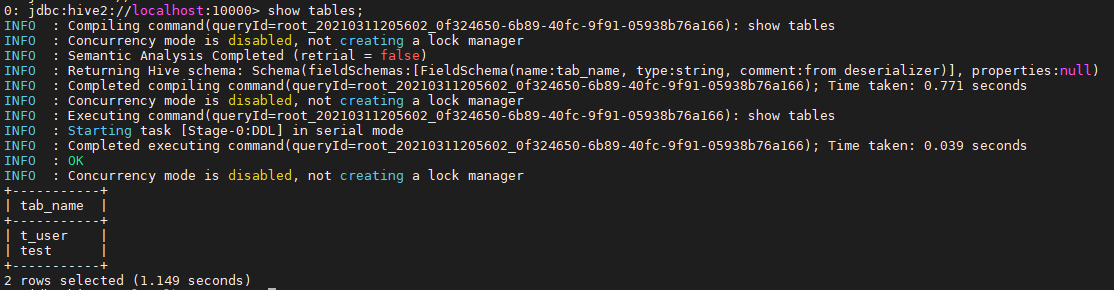
1、beeline 客户端连接hive
连接:beeline -u jdbc:hive2://localhost:10000 -n root

执行语句:show databases;
2、java验证
(1)引入依赖
<dependency>

      <groupId>org.apache.hive</groupId>

      <artifactId>hive-jdbc</artifactId>

      <version>1.1.0</version>

      <exclusions>

        <exclusion>

          <groupId>org.eclipse.jetty.aggregate</groupId>

          <artifactId>jetty-all</artifactId>

        </exclusion>

        <exclusion>

          <groupId>org.apache.hive</groupId>

          <artifactId>hive-shims</artifactId>

        </exclusion>

      </exclusions>

    </dependency>
(2)代码验证
import java.sql.SQLException;

import java.sql.Connection;

import java.sql.ResultSet;

import java.sql.Statement;

import java.sql.DriverManager;

public class HiveAPITest {

    private static String driverName = "org.apache.hive.jdbc.HiveDriver";

    public static void main(String[] args) throws SQLException {

        try {

            Class.forName(driverName);

        } catch (ClassNotFoundException e) {

            // TODO Auto-generated catch block

            e.printStackTrace();

            System.exit(1);

        }

        //replace "hive" here with the name of the user the queries should run as

        Connection con = DriverManager.getConnection("jdbc:hive2://localhost:10000/default",

"hive", "");

        Statement stmt = con.createStatement();

        String tableName = "testHiveDriverTable";

        stmt.execute("drop table if exists " + tableName);

        stmt.execute("create table " + tableName + " (key int, value string) row format delimited fields terminated by '\t'");

        // show tables

        String sql = "show tables '" + tableName + "'";

        System.out.println("Running: " + sql);

        ResultSet res = stmt.executeQuery(sql);

        if (res.next()) {

            System.out.println(res.getString(1));

        }

        // describe table

        sql = "describe " + tableName;

        System.out.println("Running: " + sql);

        res = stmt.executeQuery(sql);

        while (res.next()) {

            System.out.println(res.getString(1) + "\t" + res.getString(2));

        }

        // load data into table

        // NOTE: filepath has to be local to the hive server

        // NOTE: /opt/tmp/a.txt is a \t separated file with two fields per line

        String filepath = "/opt/tmp/a.txt";

        sql = "load data local inpath '" + filepath + "' into table " + tableName;

        System.out.println("Running: " + sql);

        stmt.execute(sql);

        // select * query

        sql = "select * from " + tableName;

        System.out.println("Running: " + sql);

        res = stmt.executeQuery(sql);

        while (res.next()) {

            System.out.println(String.valueOf(res.getInt(1)) + "\t" + res.getString(2));

        }

        // regular hive query

        sql = "select count(1) from " + tableName;

        System.out.println("Running: " + sql);

        res = stmt.executeQuery(sql);

        while (res.next()) {

            System.out.println(res.getString(1));

        }

    } }
3、Zeppelin验证
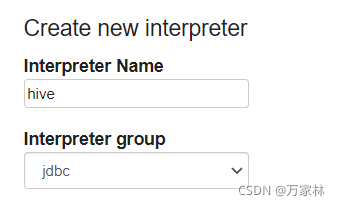
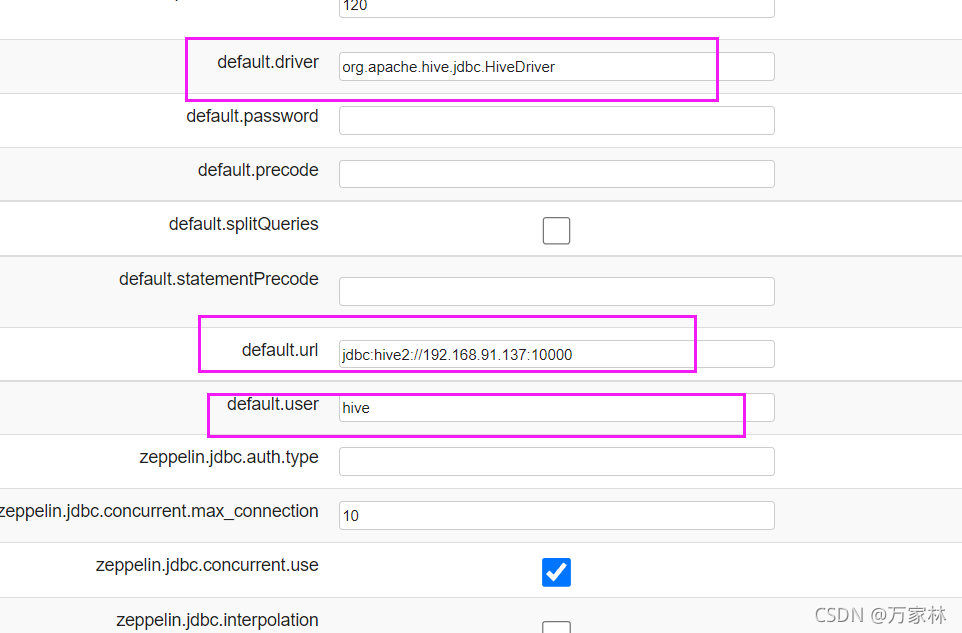
(1)配置interpreter
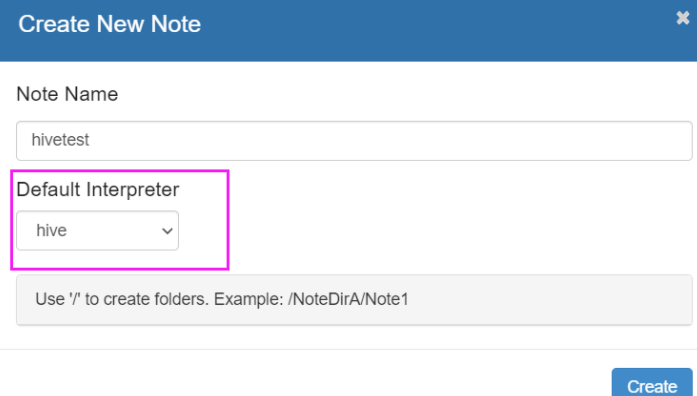
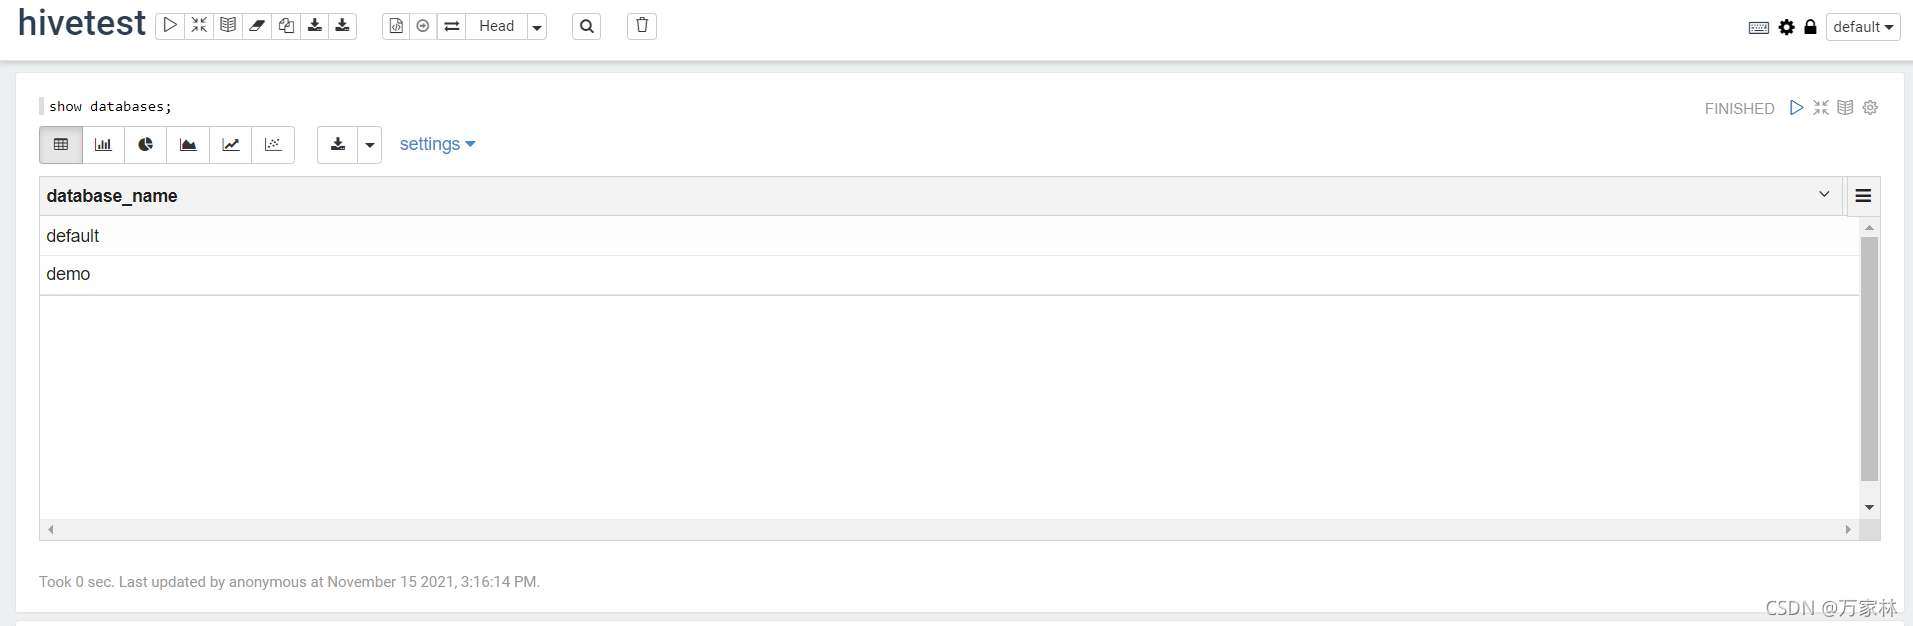
(2)验证-Note
通过Shell脚本自动安装Hive&JDBC测试&提供CDH5网盘地址的更多相关文章
- docker安装 之 ---CentOS 7 系统脚本自动安装
[使用脚本自动安装] 在测试或开发环境中Docker官方为了简化安装流程,提供了一套便捷的安装脚本,CentOS系统上可以使用这套脚本安装: $ curl -fsSL get.docker.com - ...
- 安装完Ubuntu后通过shell脚本一键安装软件
安装完Ubuntu后通过shell脚本一键安装软件 以下代码中#是单行注释 :<<! ! 是多行注释. 运行的时候需要把多行注释去掉. 比如把以下代码保存为install.sh, 那么在终 ...
- CentOS/Linux内存占用大,用Shell脚本自动定时清除/释放内存
CentOS/Linux内存占用大,用Shell脚本自动定时清除/释放内存来自:互联网 时间:2020-03-22 阅读:114以下情况可能造成Linux内存占用过高服务配置存在直接分配错误,或隐性分 ...
- Centos 6.4上面用Shell脚本一键安装vsftpd
Centos 6.4上面用Shell脚本一键安装vsftpd install.sh #!/bin/bash if [ `uname -m` == "x86_64" ];then m ...
- Centos 6.4上面用Shell脚本一键安装mysql 5.6.15
Centos 6.4上面用Shell脚本一键安装mysql 5.6.15 #!/bin/bash if [ `uname -m` == "x86_64" ];then machi ...
- shell脚本自动清理服务器日志、图片等信息
在做性能测试的时候,linux服务器时常会产生大量数据,如日志信息,图片信息,文件信息等,压测一段时间后,导致服务器磁盘空间暂满而崩溃,每天手动清理比较麻烦, 利用shell脚本自动清理,脚本如下 1 ...
- Ubuntu/CentOS下使用脚本自动安装 Docker
Ubuntu.Debian 系列安装 Docker 系统要求 Docker 支持以下版本的 Ubuntu 和 Debian 操作系统: Ubuntu Xenial 16.04 (LTS) Ubuntu ...
- nginx脚本自动安装
nginx脚本自动安装 脚本功能: 自动安装nginx 自动判别系统是否安装nginx 自定义安装nginx路径 自定义安装nginx版本. #!/bin/bash #2019年10月30日16:00 ...
- shell 脚本自动插入文件头
vim编辑shell脚本自动插入文件头部信息,将下面的代码写入home目录xia .vimrc 文件即可. shell 文件头: 1 autocmd BufNewFile *.sh exec &quo ...
- 使用 shell 脚本自动获取发版指标数据
问题背景 大一点的公司都会建立一套规章流程来避免低级错误,例如合入代码前必需经过同行评审:上线前必需提测且通过 QA 验证:全量前必需经过 1%.5%.10%.20%.50% 的灰度过程.尤其是最后一 ...
随机推荐
- Python数据分析教程(二):Pandas
Pandas导入 Pandas是Python第三方库,提供高性能易用数据类型和分析工具 Pandas基于NumPy实现,常与NumPy和Matplotlib一同使用 两个数据类型:Series, Da ...
- Java开发学习(三十五)----SpringBoot快速入门及起步依赖解析
一.SpringBoot简介 SpringBoot 是由 Pivotal 团队提供的全新框架,其设计目的是用来简化 Spring 应用的初始搭建以及开发过程. 使用了 Spring 框架后已经简化了我 ...
- C语言[char**]与[malloc]的组合使用
简介 首先!要搞懂char**是什么? 我们知道 char* 是字符指针,是一个地址,指向一个字符串. 那么 char** 就是指向 char* 的指针,也是一个地址,指向指针的指针. 使用char* ...
- Kubernetes 监控--Alertmanager
前面我们学习 Prometheus 的时候了解到 Prometheus 包含一个报警模块,就是我们的 AlertManager,Alertmanager 主要用于接收 Prometheus 发送的告警 ...
- Elasticsearch 索引生命周期管理 ILM 实战指南
文章转载自:https://mp.weixin.qq.com/s/7VQd5sKt_PH56PFnCrUOHQ 1.什么是索引生命周期 在基于日志.指标.实时时间序列的大型系统中,集群的索引也具备类似 ...
- SonarQube支持Gitlab授权登录
部署好SonarQube之后,由于我们内部使用的是自建的Gitlab仓库,即每个开发同学都有Gitlab账号,SonarQube我们就可以使用上Gitlab登录,这样就不需要再维护一套用户体系了. S ...
- PVC-U排水管及管件
- centos离线安装nvm
PS:因为项目需,客户现场不能联网需要不同的node版本来切换,里面已经内置好了node 8.11.2和12.1.0 两个版本,使用nvm可以切换 链接:https://pan.baidu.com/s ...
- 关于Oracle-VM-VirtualBox的安装与说明
VirtualBox 是一款开源虚拟机软件.VirtualBox 是由德国 Innotek 公司开发,由Sun Microsystems公司出品的软件 使用Qt编写,在 Sun 被 Oracle 收购 ...
- .NET下数据库的负载均衡(有趣实验)(续)
.NET下数据库的负载均衡(有趣实验)这篇文章发表后,受到了众多读者的关注与好评,其中不乏元老级程序员. 读者来信中询问最多的一个问题是:它是否能支持"异种数据库"的负载均衡?? ...