WPF 制作 Windows 屏保
分享如何使用WPF 制作 Windows 屏保
WPF 制作 Windows 屏保
作者:驚鏵
原文链接:https://github.com/yanjinhuagood/ScreenSaver
框架使用
.NET452;Visual Studio 2019;项目使用 MIT 开源许可协议;
更多效果可以通过GitHub[1]|码云[2]下载代码;
也可以自行添加天气信息等。
正文
屏保程序的本质上就是一个
Win32窗口应用程序;把编译好一个窗口应用程序之后,把扩展名更改为 scr,于是你的屏幕保护程序就做好了;

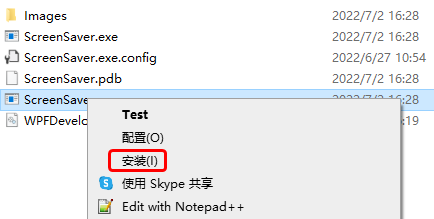
选中修改好的 scr程序上点击右键,可以看到一个安装选项,点击之后就安装了;
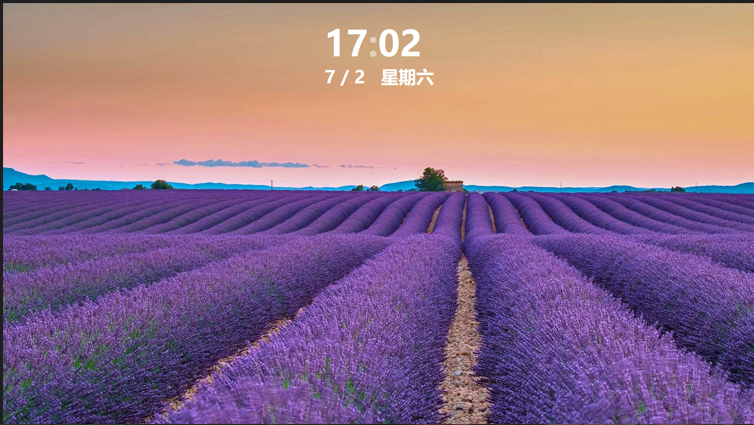
安装之后会立即看到我们的屏幕保护程序已经运行起来了;
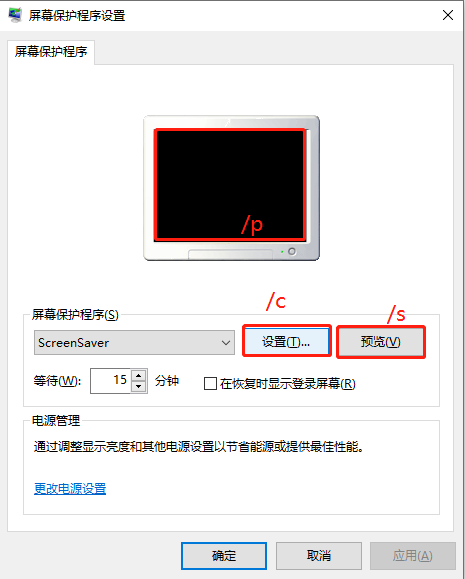
处理屏幕保护程序参数如下
/s 屏幕保护程序开始,或者用户点击了 预览按钮;/c 用户点击了 设置按钮;/p 用户选中屏保程序之后,在预览窗格中显示;
1)MainWindow.xaml 代码如下;
<Window x:Class="ScreenSaver.MainWindow"
        xmlns="http://schemas.microsoft.com/winfx/2006/xaml/presentation"
        xmlns:x="http://schemas.microsoft.com/winfx/2006/xaml"
        xmlns:d="http://schemas.microsoft.com/expression/blend/2008"
        xmlns:mc="http://schemas.openxmlformats.org/markup-compatibility/2006"
        xmlns:system="clr-namespace:System;assembly=mscorlib"
        xmlns:drawing="http://www.microsoft.net/drawing"
        xmlns:local="clr-namespace:ScreenSaver"
        mc:Ignorable="d" WindowStyle="None"
        Title="MainWindow" Height="450" Width="800">
    <Grid x:Name="MainGrid">
        <drawing:PanningItems ItemsSource="{Binding stringCollection,RelativeSource={RelativeSource AncestorType=local:MainWindow}}"
                              x:Name="MyPanningItems">
            <drawing:PanningItems.ItemTemplate>
                <DataTemplate>
                    <Rectangle>
                        <Rectangle.Fill>
                            <ImageBrush ImageSource="{Binding .}"/>
                        </Rectangle.Fill>
                    </Rectangle>
                </DataTemplate>
            </drawing:PanningItems.ItemTemplate>
        </drawing:PanningItems>
        <Grid  HorizontalAlignment="Center"
               VerticalAlignment="Top"
                Margin="0,50,0,0">
            <Grid.RowDefinitions>
                <RowDefinition/>
                <RowDefinition/>
            </Grid.RowDefinitions>
            <Grid.Resources>
                <Style TargetType="TextBlock">
                    <Setter Property="FontSize" Value="90"/>
                    <Setter Property="FontWeight" Value="Black"/>
                    <Setter Property="Foreground" Value="White"/>
                </Style>
            </Grid.Resources>
            <WrapPanel>
                <TextBlock Text="{Binding Hour,RelativeSource={RelativeSource AncestorType=local:MainWindow}}"/>
                <TextBlock Text=":" x:Name="PART_TextBlock">
                    <TextBlock.Triggers>
                        <EventTrigger RoutedEvent="FrameworkElement.Loaded">
                            <BeginStoryboard>
                                <Storyboard>
                                    <DoubleAnimation Duration="00:00:01"
                                                 From="1"
                                                 To="0"
                                                 Storyboard.TargetName="PART_TextBlock"
                                                 Storyboard.TargetProperty="Opacity"
                                                 RepeatBehavior="Forever"
                                                 FillBehavior="Stop"/>
                                </Storyboard>
                            </BeginStoryboard>
                        </EventTrigger>
                    </TextBlock.Triggers>
                </TextBlock>
                <TextBlock Text="{Binding Minute,RelativeSource={RelativeSource AncestorType=local:MainWindow}}"/>
            </WrapPanel>
            <TextBlock Grid.Row="1" FontSize="45" HorizontalAlignment="Center" Text="{Binding Date,RelativeSource={RelativeSource AncestorType=local:MainWindow}}"/>
        </Grid>
    </Grid>
</Window>
2) MainWindow.xaml.cs 代码如下;
当屏保启动后需要注意如下 将鼠标设置为不可见 Cursors.None;将窗体设置为最大化 WindowState.Maximized;WindowStyle设置为"None";注意监听 鼠标按下和键盘按键则退出屏保;
using System;
using System.Collections.ObjectModel;
using System.Globalization;
using System.IO;
using System.Windows;
using System.Windows.Input;
using System.Windows.Threading;

namespace ScreenSaver
{
    /// <summary>
    ///     MainWindow.xaml 的交互逻辑
    /// </summary>
    public partial class MainWindow : Window
    {
        public static readonly DependencyProperty stringCollectionProperty =
            DependencyProperty.Register("stringCollection", typeof(ObservableCollection<string>), typeof(MainWindow),
                new PropertyMetadata(null));

        public static readonly DependencyProperty HourProperty =
            DependencyProperty.Register("Hour", typeof(string), typeof(MainWindow), new PropertyMetadata(null));

        public static readonly DependencyProperty MinuteProperty =
            DependencyProperty.Register("Minute", typeof(string), typeof(MainWindow), new PropertyMetadata(null));

        public static readonly DependencyProperty SecondProperty =
            DependencyProperty.Register("Second", typeof(string), typeof(MainWindow), new PropertyMetadata(null));

        public static readonly DependencyProperty DateProperty =
            DependencyProperty.Register("Date", typeof(string), typeof(MainWindow), new PropertyMetadata());

        private readonly DispatcherTimer timer = new DispatcherTimer();

        public MainWindow()
        {
            InitializeComponent();
            Loaded += delegate
            {
                WindowState = WindowState.Maximized;
                Mouse.OverrideCursor = Cursors.None;
                var date = DateTime.Now;
                Hour = date.ToString("HH");
                Minute = date.ToString("mm");
                Date =
                    $"{date.Month} / {date.Day}   {CultureInfo.CurrentCulture.DateTimeFormat.GetDayName(date.DayOfWeek)}";
                stringCollection = new ObservableCollection<string>();
                var path = Path.Combine(AppDomain.CurrentDomain.BaseDirectory, "Images");
                var directoryInfo = new DirectoryInfo(path);
                foreach (var item in directoryInfo.GetFiles())
                {
                    if (Path.GetExtension(item.Name) != ".jpg") continue;
                    stringCollection.Add(item.FullName);
                }

                timer.Interval = TimeSpan.FromSeconds(1);
                timer.Tick += delegate
                {
                    date = DateTime.Now;
                    Hour = date.ToString("HH");
                    Minute = date.ToString("mm");
                    Date =
                        $"{date.Month} / {date.Day}   {CultureInfo.CurrentCulture.DateTimeFormat.GetDayName(date.DayOfWeek)}";
                };
                timer.Start();
            };
            MouseDown += delegate { Application.Current.Shutdown(); };
            KeyDown += delegate { Application.Current.Shutdown(); };
        }

        public ObservableCollection<string> stringCollection
        {
            get => (ObservableCollection<string>)GetValue(stringCollectionProperty);
            set => SetValue(stringCollectionProperty, value);
        }

        public string Hour
        {
            get => (string)GetValue(HourProperty);
            set => SetValue(HourProperty, value);
        }

        public string Minute
        {
            get => (string)GetValue(MinuteProperty);
            set => SetValue(MinuteProperty, value);
        }

        public string Second
        {
            get => (string)GetValue(SecondProperty);
            set => SetValue(SecondProperty, value);
        }

        public string Date
        {
            get => (string)GetValue(DateProperty);
            set => SetValue(DateProperty, value);
        }
    }
}
参考①[3]
参考②[4]
参考资料
GitHub: https://github.com/yanjinhuagood/ScreenSaver
[2]
码云: https://gitee.com/yanjinhua/ScreenSaver
[3]
参考①: https://blog.walterlv.com/post/write-a-windows-screen-saver-using-wpf.html
[4]
参考②: https://wbsimms.com/create-screensaver-net-wpf/
WPF 制作 Windows 屏保的更多相关文章
- C#制作简易屏保(转)
C#制作简易屏保[原创] 原始网址: http://www.cnblogs.com/drizzlecrj/archive/2006/10/06/522182.html 2006-10-06 16:25 ...
- C#制作简易屏保
前言:前段时间,有个网友问我C#制作屏保的问题,我瞬间懵逼了(C#还可以制作屏保!).于是我去查阅相关资料,下面把C#如何制作屏保的过程及我学习过程的心得也记录下来,希望对需要的人能有帮助. 基本思路 ...
- 一个仿windows泡泡屏保的实现
一个仿windows泡泡屏保的实现 有天看到有人在百度知道上问windows 泡泡屏保该怎么用C#做,一时有趣,就做了一个出来,对于其中几个要点总结如下: 一,屏保程序的制作要求 屏保程序的扩展名是. ...
- wpf 制作播放视频的屏保程序、而且能分屏显示
这个程序用到了WPF里 “visual_Brush”(主要是为了实现分屏显示) , “UserControl” ,这两个知识点: 在屏保状态下播放指定文件夹下的视频,而且能分屏显示: 把编译好的屏保 ...
- WPF中桌面屏保的制作(主要代码)
原文:WPF中桌面屏保的制作(主要代码) 制作要点:(1) 使用System.Windows.Threading.DispatcherTimer;(2) 将Window属性设置为: this ...
- C# 制作屏保(图片位置随机变化)
最近无所事事,闲着无聊,在网上翻看资料时碰巧看到了屏保制作,根据大神的思路也理解到屏保也不是很难.因此根据我自己的理解,动手谢了一个屏保. 首先,打开VS2010创建一个Windows窗体应用程序,名 ...
- 制作Windows XP万能克隆镜像
制作Windows XP万能克隆镜像 战前分析:对于Windows XP,制作万能克隆时的一个重要问题就是系统激活,因为Windows XP为了防止盗版,采取了激活机制,当硬件发生改变时,系统就会要求 ...
- Linux关闭休眠和屏保模式
本人因为特殊需求,想让某台Linux主机始终显示某个程序,显示器不能关机或者休眠或进入屏保模式. 环境:Ubuntu 11.10 最小化模式安装并安装有轻量级桌面openbox(非gnome).因为X ...
- Win XP 如何禁用屏保
如果你试过 “在桌面空白处点击右键-[属性]-[屏幕保护程序],选择[无],点击[确定]”后,当时是可以去掉屏保.但如果重启计算机或者从待机状态唤醒后,屏保依然会出现,那么你可以试试下面的方法. 首先 ...
随机推荐
- latex中显示代码
如何在latex中添加代码模块 首先在开头导入以下的包 \usepackage{listings} \usepackage{ctex} % 用来设置附录中代码的样式 \lstset{ basicsty ...
- mapboxgl 中插值表达式的应用场景
目录 一.前言 二.语法 三.对地图颜色进行拉伸渲染 1. 热力图 2. 轨迹图 2. 模型网格渲染 四.随着地图缩放对图形属性进行插值 五.interpolate的高阶用法 六.总结 一.前言 in ...
- 27个常用Linux命令
1.查找文件 find / -name filename.txt 根据名称查找/目录下的filename.txt文件. 2.查看一个程序是否运行 ps –ef|grep tomcat 查看所有有关to ...
- 用crash tool观察ARM64 Linux地址转换
初学者学习Linux系统地址转换时,如果只是学习理论,又或者研读代码,那可能感觉比较枯燥.此时如果可以利用某些工具实际观察一下地址转换的过程,那可能会给枯燥的内核学习带来些微的乐趣.crash too ...
- 设计模式存在哪些关联关系,六种关系傻傻分不清--- UML图示详解
前言 UML俗称统一建模语言.我们可以简单理解成他是一套符号语言.不同的符号对应不同的含义.在之前设计模式章节中我们文章中用到的就是UML类图,UML除了类图意外还有用例图,活动图,时序图. 关于UM ...
- 揭秘华为云GaussDB(for Influx):数据直方图
摘要:本文带您了解直方图在不同产品中的实现,以及GaussDB(for Influx)中直方图的使用方法. 本文分享自华为云社区<华为云GaussDB(for Influx)揭秘第九期:最佳实践 ...
- SQL语句中LEFT JOIN ON WHERE和LEFT JOIN ON AND的区别
先上代码: declare @tb table (name varchar(10),sex int) declare @tb2 table (name varchar(10),age int) ins ...
- 手把手教你使用 Spring Boot 3 开发上线一个前后端分离的生产级系统(一) - 介绍
项目简介 novel 是一套基于时下最新 Java 技术栈 Spring Boot 3 + Vue 3 开发的前后端分离的学习型小说项目,配备详细的项目教程手把手教你从零开始开发上线一个生产级别的 J ...
- Kafka 的稳定性
一.事务 1. 事务简介 1.1 事务场景 producer发的多条消息组成⼀个事务这些消息需要对consumer同时可⻅或者同时不可⻅ producer可能会给多个topic,多个partition ...
- Eclipse历史版本下载和选择对应的java版本
下载Eclipse 官网: https://www.eclipse.org/ 直达 直接进入连接:https://www.eclipse.org/downloads/packages/installe ...