CentOS7上搭建LDAP-PDC并且将windows 2008 R2加入LDAP-PDC域
由于测试原因,要涉及到将windows机器加入到ldap域,所以查看各种文档进行ldap-pdc域的搭建,并成功将windows 2008r2加入到ldap-pdc域中。下面简单记录一下搭建过程
Linux : CentOS7.4.1708 ip:10.2.48.125
Windows : Windows 2008 R2 ip:10.2.48.86
配置了163yum源,并且把seLinux关闭
先安装openldap 和 samba
yum install openldap openldap-clients openldap-servers migrationtools samba
更改配置文件
 cp /usr/share/doc/samba-4.7./LDAP/samba.ldif  /etc/openldap/schema/

 cp /usr/share/openldap-servers/slapd.ldif  /home/
生成ldap的管理密码slappasswd
 [root@ldap-pdc ~]# slappasswd

 New password:

 Re-enter new password:

 {SSHA}sGQJ/b8qamHOmbbBxdxUldfxm3R6ODIj
将slapd.ldif中的dc=my-doamin,dc=com修改为自己的域名,例如我的dc=ldap-pdc,dc=com,并添加部分配置文件,贴出配置文件,标红的位置需要修改
 #

 # See slapd-config() for details on configuration options.

 # This file should NOT be world readable.

 #

 dn: cn=config

 objectClass: olcGlobal

 cn: config

 olcArgsFile: /var/run/openldap/slapd.args

 olcPidFile: /var/run/openldap/slapd.pid

 #

 # TLS settings

 #

 olcTLSCACertificatePath: /etc/openldap/certs

 olcTLSCertificateFile: "OpenLDAP Server"

 olcTLSCertificateKeyFile: /etc/openldap/certs/password

 #

 # Do not enable referrals until AFTER you have a working directory

 # service AND an understanding of referrals.

 #

 #olcReferral: ldap://root.openldap.org

 #

 # Sample security restrictions

 #       Require integrity protection (prevent hijacking)

 #       Require -bit (3DES or better) encryption for updates

 #       Require -bit encryption for simple bind

 #

 #olcSecurity: ssf= update_ssf= simple_bind=

 #

 # Load dynamic backend modules:

 # - modulepath is architecture dependent value (/-bit system)

 # - back_sql.la backend requires openldap-servers-sql package

 # - dyngroup.la and dynlist.la cannot be used at the same time

 #

 #dn: cn=module,cn=config

 #objectClass: olcModuleList

 #cn: module

 #olcModulepath: /usr/lib/openldap

 #olcModulepath: /usr/lib64/openldap

 #olcModuleload: accesslog.la

 #olcModuleload: auditlog.la

 #olcModuleload: back_dnssrv.la

 #olcModuleload: back_ldap.la

 #olcModuleload: back_mdb.la

 #olcModuleload: back_meta.la

 #olcModuleload: back_null.la

 #olcModuleload: back_passwd.la

 #olcModuleload: back_relay.la

 #olcModuleload: back_shell.la

 #olcModuleload: back_sock.la

 #olcModuleload: collect.la

 #olcModuleload: constraint.la

 #olcModuleload: dds.la

 #olcModuleload: deref.la

 #olcModuleload: dyngroup.la

 #olcModuleload: dynlist.la

 #olcModuleload: memberof.la

 #olcModuleload: pcache.la

 #olcModuleload: ppolicy.la

 #olcModuleload: refint.la

 #olcModuleload: retcode.la

 #olcModuleload: rwm.la

 #olcModuleload: seqmod.la

 #olcModuleload: smbk5pwd.la

 #olcModuleload: sssvlv.la

 #olcModuleload: syncprov.la

 #olcModuleload: translucent.la

 #olcModuleload: unique.la

 #olcModuleload: valsort.la

 #

 # Schema settings

 #

 dn: cn=schema,cn=config

 objectClass: olcSchemaConfig

 cn: schema

 81 include: file:///etc/openldap/schema/core.ldif

 82 include: file:///etc/openldap/schema/corba.ldif

 83 include: file:///etc/openldap/schema/cosine.ldif

 84 include: file:///etc/openldap/schema/duaconf.ldif

 85 include: file:///etc/openldap/schema/dyngroup.ldif

 86 include: file:///etc/openldap/schema/inetorgperson.ldif

 87 include: file:///etc/openldap/schema/java.ldif

 88 include: file:///etc/openldap/schema/misc.ldif

 89 include: file:///etc/openldap/schema/nis.ldif

 90 include: file:///etc/openldap/schema/openldap.ldif

 91 include: file:///etc/openldap/schema/ppolicy.ldif

 92 include: file:///etc/openldap/schema/collective.ldif

 93 include: file:///etc/openldap/schema/samba.ldif

 #

 # Frontend settings

 #

 dn: olcDatabase=frontend,cn=config

 objectClass: olcDatabaseConfig

 objectClass: olcFrontendConfig

 olcDatabase: frontend

 #

 # Sample global access control policy:

 #       Root DSE: allow anyone to read it

 #       Subschema (sub)entry DSE: allow anyone to read it

 #       Other DSEs:

 #               Allow self write access

 #               Allow authenticated users read access

 #               Allow anonymous users to authenticate

 #

 #olcAccess: to dn.base="" by * read

 #olcAccess: to dn.base="cn=Subschema" by * read

 #olcAccess: to *

 #       by self write

 #       by users read

 #       by anonymous auth

 #

 # if no access controls are present, the default policy

 # allows anyone and everyone to read anything but restricts

 # updates to rootdn.  (e.g., "access to * by * read")

 #

 # rootdn can always read and write EVERYTHING!

 #

 #

 # Configuration database

 #

 dn: olcDatabase=config,cn=config

 objectClass: olcDatabaseConfig

 olcDatabase: config

 olcAccess: to * by dn.base="gidNumber=0+uidNumber=0,cn=peercred,cn=external,c

  n=auth" manage by * none

 #

 # Server status monitoring

 #

 dn: olcDatabase=monitor,cn=config

 objectClass: olcDatabaseConfig

 olcDatabase: monitor

 olcAccess: to * by dn.base="gidNumber=0+uidNumber=0,cn=peercred,cn=external,c

  n=auth" read by dn.base="cn=Manager,dc=ldap-pdc,dc=com" read by * none

 #

 # Backend database definitions

 #

 dn: olcDatabase=hdb,cn=config

 objectClass: olcDatabaseConfig

 objectClass: olcHdbConfig

 olcDatabase: hdb

155 olcSuffix: dc=ldap-pdc,dc=com

156 olcRootDN: cn=Manager,dc=ldap-pdc,dc=com

 olcDbDirectory: /var/lib/ldap

158 olcDbIndex: objectClass eq,pres

159 olcDbIndex: ou,cn,mail,surname,givenname eq,pres,sub

160 olcRootPW:      {SSHA}CC+i80oqumZigXsWtKf4PJFHEfmyUtTd     #密码前边是TAB贱,注意不要留空格
执行命令
 rm -rf /etc/openldap/slapd.d/*

 slapadd -F /etc/openldap/slapd.d/ -n 0 -l /home/slapd.ldif

 slaptest -u -F /etc/openldap/slapd.d/
当出现
 [root@ldap-pdc home]# slaptest -u -F /etc/openldap/slapd.d/

 config file testing succeeded

 [root@ldap-pdc home]#
代表配置文件没有问题。可以往下进行
执行命令
 chown -Rv ldap.ldap /etc/openldap/slapd.d

 cp /usr/share/openldap-servers/DB_CONFIG.example /var/lib/ldap/DB_CONFIG

 chown -Rv ldap.ldap /var/lib/ldap/DB_CONFIG

 systemctl start slapd.service
当显示
 [root@ldap-pdc home]# systemctl status slapd.service

 ● slapd.service - OpenLDAP Server Daemon

    Loaded: loaded (/usr/lib/systemd/system/slapd.service; disabled; vendor preset: disabled)

    Active: active (running) since Wed -- :: CST;  day 8h ago

      Docs: man:slapd

            man:slapd-config

            man:slapd-hdb

            man:slapd-mdb

            file:///usr/share/doc/openldap-servers/guide.html

   Process:  ExecStart=/usr/sbin/slapd -u ldap -h ${SLAPD_URLS} $SLAPD_OPTIONS (code=exited, status=/SUCCESS)

   Process:  ExecStartPre=/usr/libexec/openldap/check-config.sh (code=exited, status=/SUCCESS)

  Main PID:  (slapd)

    CGroup: /system.slice/slapd.service

            └─ /usr/sbin/slapd -u ldap -h ldapi:/// ldap:///
生成基本的ldap数据
 vim /usr/share/migrationtools/migrate_common.ph

 # Default DNS domain

 $DEFAULT_MAIL_DOMAIN = "ldap-pdc.com";

 # Default base

 $DEFAULT_BASE = "dc=ldap-pdc,dc=com";

 chmod +x /usr/share/migrationtools/migrate_common.ph

 /usr/share/migrationtools/migrate_base.pl > /root/base.ldif

 /usr/share/migrationtools/migrate_passwd.pl /etc/passwd /root/user.ldif

 /usr/share/migrationtools/migrate_group.pl /etc/group /root/group.ldif
在bash.ldif和user.ldif以及group.ldif文件中删除与ldap无关的信息,之后进行数据的导入
 ldapadd -D "cn=Manager,dc=ldap-pdc,dc=com" -W -x -f base.ldif

 ldapadd -D "cn=Manager,dc=ldap-pdc,dc=com" -W -x -f group.ldif

 ldapadd -D "cn=Manager,dc=ldap-pdc,dc=com" -W -x -f user.ldif
如果无报错信息,就代表数据正常导入。
配置ldap日志
 vi /etc/rsyslog.conf

 local4.*    /var/log/ldap.log    #尾部添加

 touch /var/log/ldap.log         #创建日志文件

 systemctl restart rsyslog.service   重启服务
下面配置samba
 yum  install nss-pam-ldapd samba-winbind sssd-ldap perl perl-LDAP.noarch epel-release smbldap-tools.noarch   sssd* pam_ldap openldap-clients

 cp /etc/samba/smb.conf /etc/samba/smb.conf.bak

 cp /usr/share/doc/smbldap-tools-0.9./smb.conf.example /etc/samba/smb.conf
 vim /etc/samba/smb.conf

 [global]

         workgroup = ldap-pdc

         netbios name = PDC-SRV

         deadtime =

         log level =

         log file = /var/log/samba/log.%m

         max log size =

         debug pid = yes

         debug uid = yes

         utmp = yes

         security = user

         domain logons = yes

         os level =

         logon path =

         logon home =

         logon drive =

         logon script =

         passdb backend = ldapsam:"ldap://10.2.48.125"

         ldap ssl = no

         ldap admin dn = cn=Manager,dc=ldap-pdc,dc=com

         ldap delete dn = no

         ## Sync UNIX password with Samba password

         ## Method :

         unix password sync = no

         ldap password sync = yes

         ## Method :

         ;ldap password sync = no

         ;unix password sync = yes

         ;passwd program = /usr/sbin/smbldap-passwd -u '%u'

         ;passwd chat = "Changing *\nNew password*" %n\n "*Retype new password*" %n\n"

         ldap suffix = dc=ldap-pdc,dc=com

         ldap user suffix = ou=Users

         ldap group suffix = ou=Groups

         ldap machine suffix = ou=Computers

         ldap idmap suffix = ou=Idmap

         add user script = /usr/sbin/smbldap-useradd -m '%u' -t

         rename user script = /usr/sbin/smbldap-usermod -r '%unew' '%uold'

         delete user script = /usr/sbin/smbldap-userdel '%u'

         set primary group script = /usr/sbin/smbldap-usermod -g '%g' '%u'

         add group script = /usr/sbin/smbldap-groupadd -p '%g'

         delete group script = /usr/sbin/smbldap-groupdel '%g'

         add user to group script = /usr/sbin/smbldap-groupmod -m '%u' '%g'

         delete user from group script = /usr/sbin/smbldap-groupmod -x '%u' '%g'

         add machine script = /usr/sbin/smbldap-useradd -w '%u' -t

 [NETLOGON]

         path = /var/lib/samba/netlogon

         browseable = no

 [PROFILES]

         path = /var/lib/samba/profiles

         browseable = no

         writeable = yes

         create mask =

         directory mask =

         csc policy = disable

         map system = yes

         map hidden = yes
上述内容根据需要进行定制。
 systemctl startt smb

 smbldap-config

 smbldap-populate
修改nsswitch.conf
 # To use db, put the "db" in front of "files" for entries you want to be

 # looked up first in the databases

 #

 # Example:

 #passwd:    db files nisplus nis

 #shadow:    db files nisplus nis

 #group:     db files nisplus nis

 9 passwd:     files ldap

10 shadow:     files ldap

11 group:      files ldap

 #initgroups: files sss

 #hosts:     db files nisplus nis dns

 hosts:      files ldap myhostname

 # Example - obey only what nisplus tells us...

 #services:   nisplus [NOTFOUND=return] files

 #networks:   nisplus [NOTFOUND=return] files

 #protocols:  nisplus [NOTFOUND=return] files

 #rpc:        nisplus [NOTFOUND=return] files

 #ethers:     nisplus [NOTFOUND=return] files

 #netmasks:   nisplus [NOTFOUND=return] files

 bootparams: nisplus [NOTFOUND=return] files

 ethers:     files

 netmasks:   files

 networks:   files

 protocols:  files

 rpc:        files

 services:   files sss

 netgroup:   files  ldap

 publickey:  nisplus

 automount:  files ldap

 aliases:    files nisplus
修改/etc/nslcd.conf文件
 # This is the configuration file for the LDAP nameservice

 # switch library's nslcd daemon. It configures the mapping

 # between NSS names (see /etc/nsswitch.conf) and LDAP

 # information in the directory.

 # See the manual page nslcd.conf() for more information.

 # The user and group nslcd should run as.

 uid nslcd

 gid ldap

 # The uri pointing to the LDAP server to use for name lookups.

 # Multiple entries may be specified. The address that is used

 # here should be resolvable without using LDAP (obviously).

 #uri ldap://127.0.0.1/

 #uri ldaps://127.0.0.1/

 #uri ldapi://%2fvar%2frun%2fldapi_sock/

 # Note: %2f encodes the '/' used as directory separator

 18 uri ldap://10.2.48.125/

 # The LDAP version to use (defaults to

 # if supported by client library)

 #ldap_version

 # The distinguished name of the search base.

 25 base dc=ldap-pdc,dc=com

 # The distinguished name to bind to the server with.

 # Optional: default is to bind anonymously.

 #binddn cn=proxyuser,dc=example,dc=com

 # The credentials to bind with.

 # Optional: default is no credentials.

 # Note that if you set a bindpw you should check the permissions of this file.

 #bindpw secret

 # The distinguished name to perform password modifications by root by.

 #rootpwmoddn cn=admin,dc=example,dc=com

 # The default search scope.

 #scope sub

 #scope one

 #scope base

 # Customize certain database lookups.

 #base   group  ou=Groups,dc=example,dc=com

 #base   passwd ou=People,dc=example,dc=com

 #base   shadow ou=People,dc=example,dc=com

 #scope  group  onelevel

 #scope  hosts  sub

 # Bind/connect timelimit.

 #bind_timelimit

 # Search timelimit.

 #timelimit

 # Idle timelimit. nslcd will close connections if the

 # server has not been contacted for the number of seconds.

 #idle_timelimit

 # Use StartTLS without verifying the server certificate.

 #ssl start_tls

 #tls_reqcert never

 # CA certificates for server certificate verification

 #tls_cacertdir /etc/ssl/certs

 #tls_cacertfile /etc/ssl/ca.cert

 # Seed the PRNG if /dev/urandom is not provided

 #tls_randfile /var/run/egd-pool

 # SSL cipher suite

 # See man ciphers for syntax

 #tls_ciphers TLSv1

 # Client certificate and key

 # Use these, if your server requires client authentication.

 #tls_cert

 #tls_key

 # Mappings for Services for UNIX 3.5

 #filter passwd (objectClass=User)

 #map    passwd uid              msSFU30Name

 #map    passwd userPassword     msSFU30Password

 #map    passwd homeDirectory    msSFU30HomeDirectory

 #map    passwd homeDirectory    msSFUHomeDirectory

 #filter shadow (objectClass=User)

 #map    shadow uid              msSFU30Name

 #map    shadow userPassword     msSFU30Password

 #filter group  (objectClass=Group)

 #map    group  member           msSFU30PosixMember

 # Mappings for Services for UNIX 2.0

 #filter passwd (objectClass=User)

 #map    passwd uid              msSFUName

 #map    passwd userPassword     msSFUPassword

 #map    passwd homeDirectory    msSFUHomeDirectory

 #map    passwd gecos            msSFUName

 #filter shadow (objectClass=User)

 #map    shadow uid              msSFUName

 #map    shadow userPassword     msSFUPassword

 #map    shadow shadowLastChange pwdLastSet

 #filter group  (objectClass=Group)

 #map    group  member           posixMember

 # Mappings for Active Directory

 #pagesize

 #referrals off

 #idle_timelimit

 #filter passwd (&(objectClass=user)(!(objectClass=computer))(uidNumber=*)(unixHomeDirectory=*))

 #map    passwd uid              sAMAccountName

 #map    passwd homeDirectory    unixHomeDirectory

 #map    passwd gecos            displayName

 #filter shadow (&(objectClass=user)(!(objectClass=computer))(uidNumber=*)(unixHomeDirectory=*))

 #map    shadow uid              sAMAccountName

 #map    shadow shadowLastChange pwdLastSet

 #filter group  (objectClass=group)

 # Alternative mappings for Active Directory

 # (replace the SIDs in the objectSid mappings with the value for your domain)

 #pagesize

 #referrals off

 #idle_timelimit

 #filter passwd (&(objectClass=user)(objectClass=person)(!(objectClass=computer)))

 #map    passwd uid           cn

 #map    passwd uidNumber     objectSid:S------

 #map    passwd gidNumber     objectSid:S------

 #map    passwd homeDirectory "/home/$cn"

 #map    passwd gecos         displayName

 #map    passwd loginShell    "/bin/bash"

 #filter group (|(objectClass=group)(objectClass=person))

 #map    group gidNumber      objectSid:S------

 # Mappings for AIX SecureWay

 #filter passwd (objectClass=aixAccount)

 #map    passwd uid              userName

 #map    passwd userPassword     passwordChar

 #map    passwd uidNumber        uid

 #map    passwd gidNumber        gid

 #filter group  (objectClass=aixAccessGroup)

 #map    group  cn               groupName

 #map    group  gidNumber        gid

 # This comment prevents repeated auto-migration of settings.

 ssl no

 tls_cacertdir /etc/openldap/cacerts
修改 /etc/openldap/ldap.conf
#

# LDAP Defaults

#

# See ldap.conf() for details

# This file should be world readable but not world writable.

#SIZELIMIT

#TIMELIMIT

#DEREF          never

TLS_CACERTDIR /etc/openldap/cacerts

# Turning this off breaks GSSAPI used with krb5 when rdns = false

SASL_NOCANON    on

URI ldap://10.2.48.125/

BASE dc=ldap-pdc,dc=com
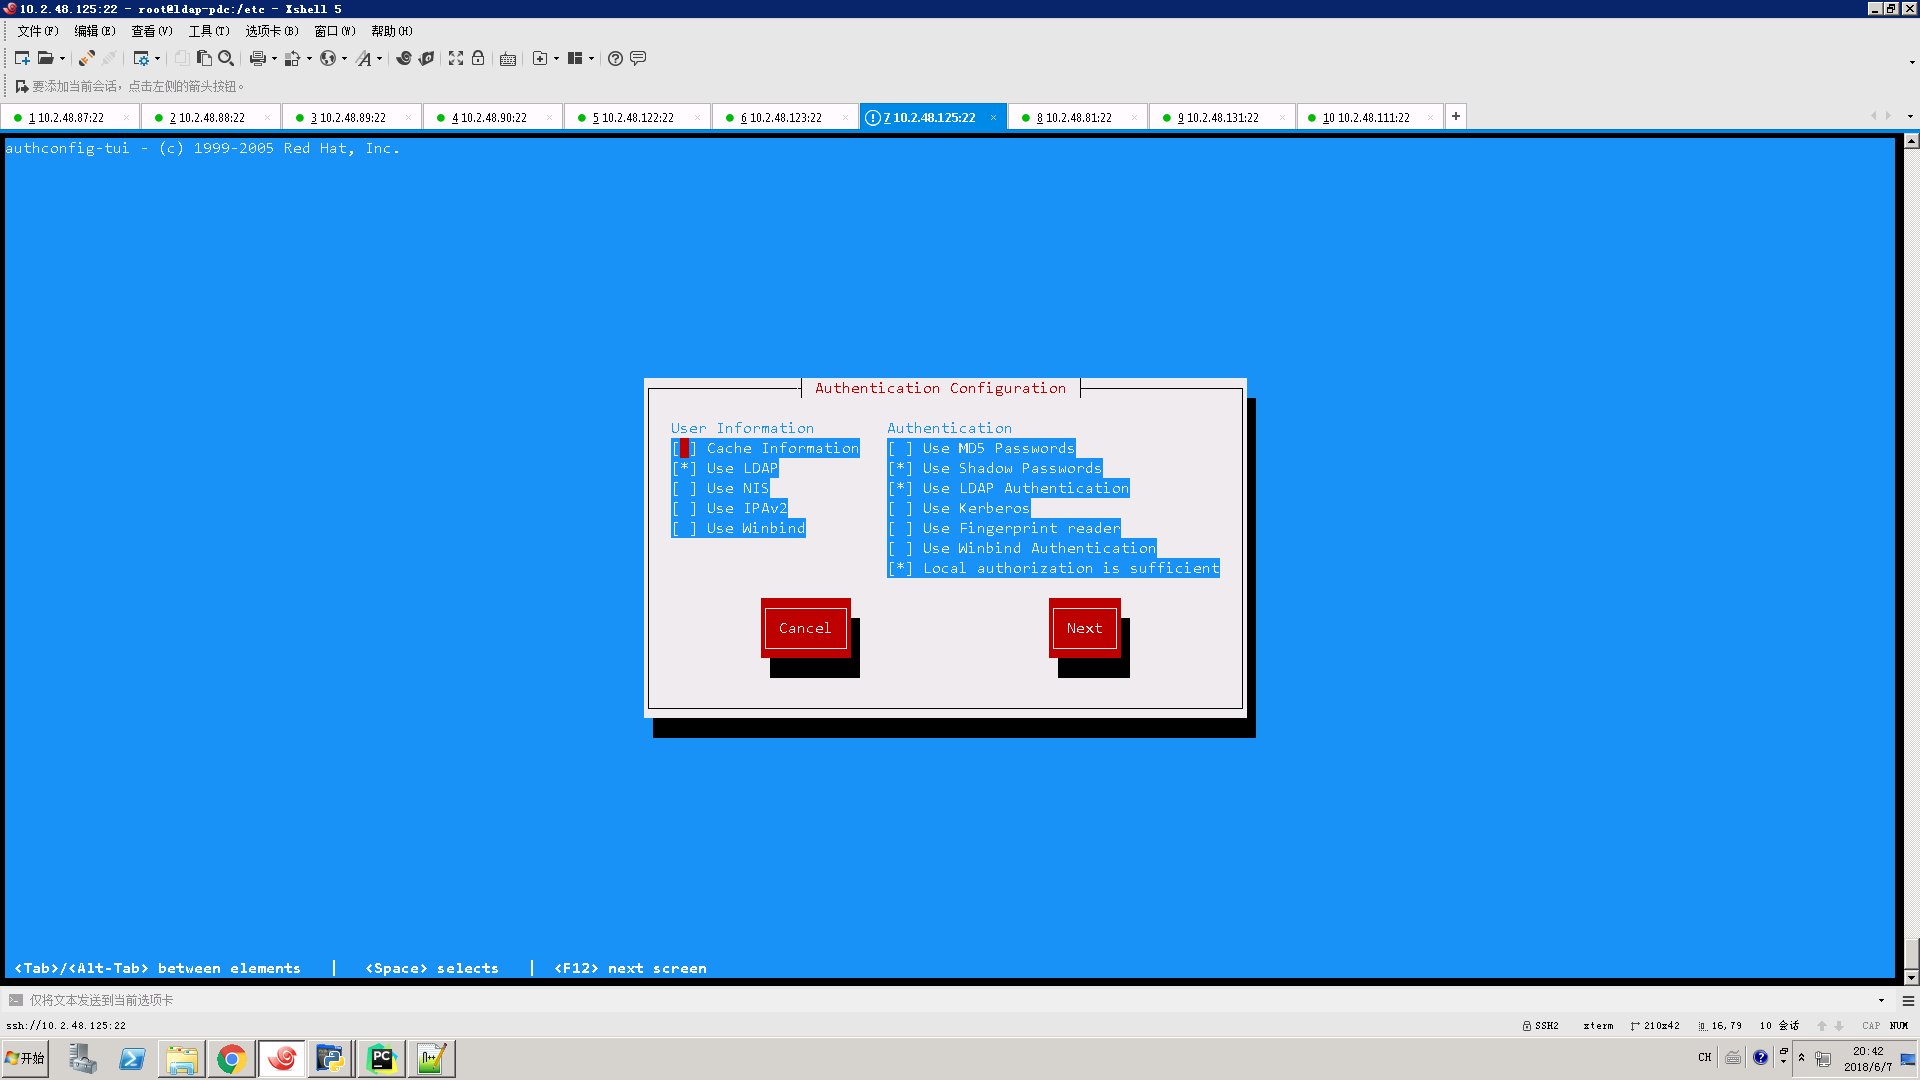
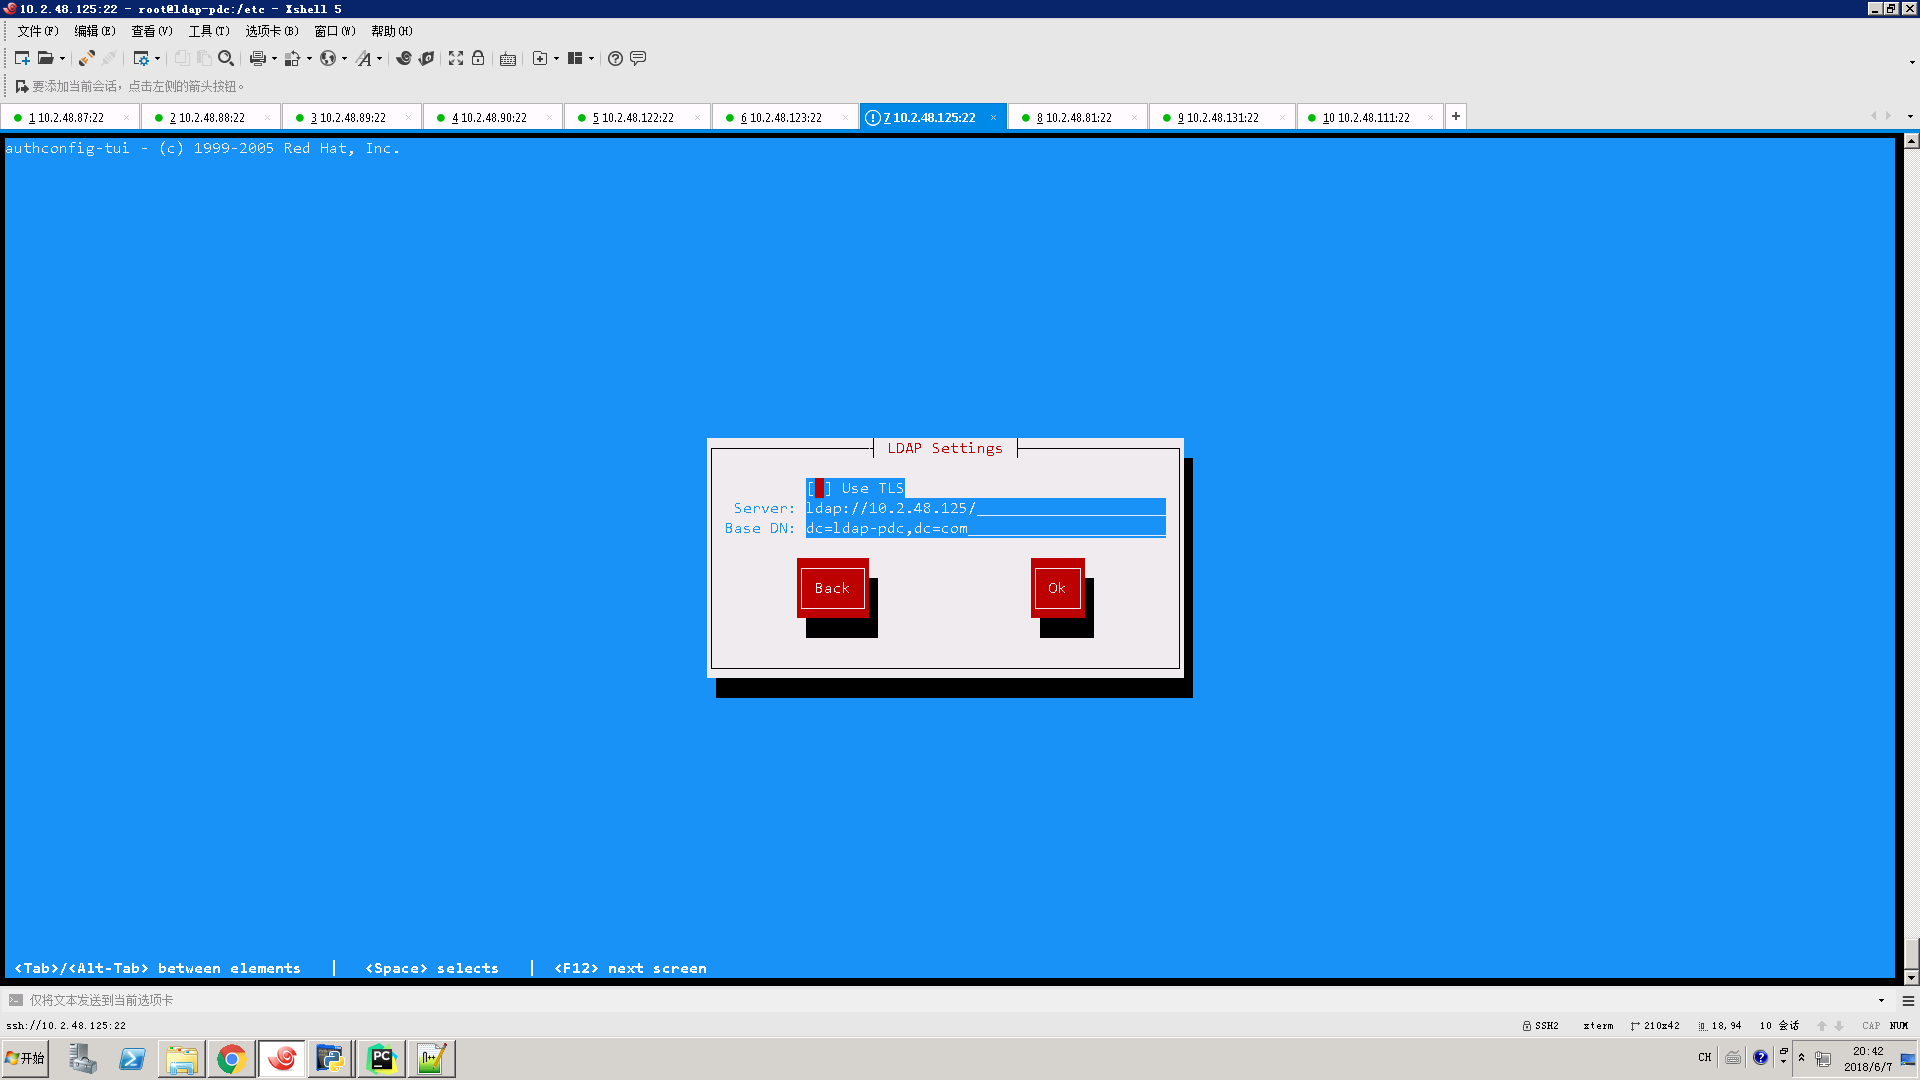
执行authconfig-tui
重启几个服务
systemctl restart slapd

systemctl restart smb

systemctl restart nmb

systemctl restart nslcd

systemctl restart nscd

systemctl restart winbind.service
测试本机加入ldap-pdc域
 net rpc join -U root%

 net rpc testjoin
 [root@ldap-pdc etc]# net rpc testjoin

 Join to 'LDAP-PDC' is OK

 [root@ldap-pdc etc]#
ok.ldap-pdc服务器配置完毕,
windows机器首先需要将其dns服务器改成ldap-pdc服务器的地址,其次需要更改注册表
[HKEY_LOCAL_MACHINE\SYSTEM\CurrentControlset\services\LanmanWorkstation\

Parameters]

“DomainCompatibilityMode”=dword:

“DNSNameResolutionRequired”=dword:
之后就可以正常加入LDAP-PDC域啦
CentOS7上搭建LDAP-PDC并且将windows 2008 R2加入LDAP-PDC域的更多相关文章
- Windows 8.1 系统上用Oracle VM VirtualBox 安装windows 2008 R2 SP1 的虚拟机 出现 Error Code: 0x000000C4
Windows 8.1 本来可以安装Hyper-v来安装虚拟机,但是我现在需要使用Oracle VM VirtualBox来安装虚拟机, 所以必须先卸载Hyper-v VirtualBox 安装的虚拟 ...
- Windows 2008 R2 域控制器迁移至windows 2016记录
文章参考 https://social.technet.microsoft.com/Forums/zh-CN/21a5f5e9-feee-4454-acad-fd22989d7bed/22495296 ...
- centos7上搭建开源系统jforum
centos7上搭建好tomcat,mysql; 将 jforum-2.6.2.war放到tomcat目录的webapps下: 启动tomcat,./startup.sh ,查看webapp下jfor ...
- Windows 2008 R2 64位上安装wamp失败的原因
Exception Exception in module wampmanager.exe at 000F15A0... 因测试PHP程序需要,需要在windows系统上布署WAMP环境测试程序,对性 ...
- Deploy 11.2.0.3 RAC+DG on Windows 2008 R2 Step by Step
环境规划: 节点1: tc1 192.168.56.101 内存:2G 节点2: tc2 192.168.56.102 内存:2G 物理备库:tcdg192.168.56.108内存:1.5G 操作系 ...
- Windows 2008 R2 配置 DNS 实现二级域名
本文内容 域名解析 准备工作 安装 DNS 服务器 建立 DNS 区域 建立主机头 服务器网络设置 测试二级域名 IIS 建立 Web 站点 其他 DNS 服务 域名解析 域名解析,是域名到 IP 地 ...
- Windows 2008 R2防火墙,允许被ping
netsh firewall set icmpsetting 8 1. 准备 1) 原因 出于安全因素考虑,在Windows 2008 R2上是不允许从外部对其Ping ...
- Windows 2008 R2 X64 安装WebsitePanel(WSP虚拟主机管理面板)
Windows 2008 R2 X64 安装WebsitePanel(WSP2.0虚拟主机管理面板) 估计很多同学都还不知道WebsitePanel是什么东东吧,Web ...
- Windows 2008 R2防火墙,允许被ping的设置方法
这篇文章主要介绍了Windows 2008 R2防火墙,允许被ping的设置方法,需要的朋友可以参考下 1.准备 1)原因 出于安全因素考虑,在Windows 2008 R2上是不允许从外部对其P ...
随机推荐
- java list集合运算
list集合运算 import java.io.ByteArrayInputStream; import java.io.ByteArrayOutputStream; import java.io.I ...
- 课程一(Neural Networks and Deep Learning),第二周(Basics of Neural Network programming)—— 1、10个测验题(Neural Network Basics)
--------------------------------------------------中文翻译---------------------------------------------- ...
- Scala之隐式转换implicit详解
假设我们有一个表示文本的行数的类LineNumber: class LineNumber ( val num : Int ) 我们可以用这个类来表示一本书中每一页的行数: val lineNumOfP ...
- Spark程序提交到Yarn集群时所遇异常
Exception 1:当我们将任务提交给Spark Yarn集群时,大多会出现以下异常,如下: 14/08/09 11:45:32 WARN component.AbstractLifeCycle: ...
- ADO.NET 4.5中的异步与流特性
.NET 4.5为仍在选择直接与DataReader系列类打交道的.NET开发人员带来了一些新的异步与流特性支持.SqlDataReader允许开发人员在减少一些便利性的基础上获得更好的性能.例如,该 ...
- Flexbox指南
Flexbox布局(Flexible Box)模块旨在提供一个更加有效的方式制定.调整和分布一个容器里的项目布局,即使他们的大小是未知或者是动态的.(这里我们称为Flex). Flex布局主要思想是让 ...
- Redis随笔(六)RESP的协议规范
1.官网文档 https://redis.io/topics/protocol http://www.redis.cn/topics/protocol.html 2.协议介绍 redis协议规范(Re ...
- Android_对android虚拟机的理解,包括内存管理机制垃圾回收机制。dalvik和art区别
虚拟机很小,空间很小,谈谈移动设备的虚拟机的大小限制 16M ,谈谈加载图片的时候怎么处理大图片的,outmemoryExceptionBitmapFactory.option 垃圾回收,没有引用的对 ...
- 【原创】贡献一个项目中用到的js身份证验证-超级准!!!
前言 百度百科解释:身份证号码 首先贡献一个大神的链接:js验证身份证超准 代码 function checkIdcard(idcard) { var Errors = new Array( &quo ...
- ajax传递数组到后台,js传递数组到后台
用angular做商品搜索功能,后台接口那边过滤条件必须传递数组过去,结果比较尴尬的事情发生了,每次传递数组过去,查看请求发送的数据,自动被转成了对象,很头疼. 数据传递前 传递后我查看了请求的数据 ...