
iOS一个简单的设置圆角不引起性能问题的分类
http://www.cocoachina.com/articles/18756
iOS设置圆角矩形和阴影效果
https://www.cnblogs.com/rayshen/p/4900336.html
////
iOS_使用UIBezierPath对象实现视图控件的立体阴影效果和半透明背景效果
https://blog.csdn.net/Sponge_CMZ/article/details/48498885
核心API
Class : UIBezierPath, CALayer
涉及的API:(API的官方详细注释详见本章结尾)
/** CALayer 的shadowPath属性. */
@property CGPathRef shadowPath
/** 创建UIBezierPath对象的相关类方法. */
+ (UIBezierPath *)bezierPathWithRect:(CGRect)rect
+ (UIBezierPath *)bezierPathWithRoundedRect:(CGRect)rect cornerRadius:(CGFloat)cornerRadius
+ (UIBezierPath *)bezierPathWithOvalInRect:(CGRect)rect
功能实现
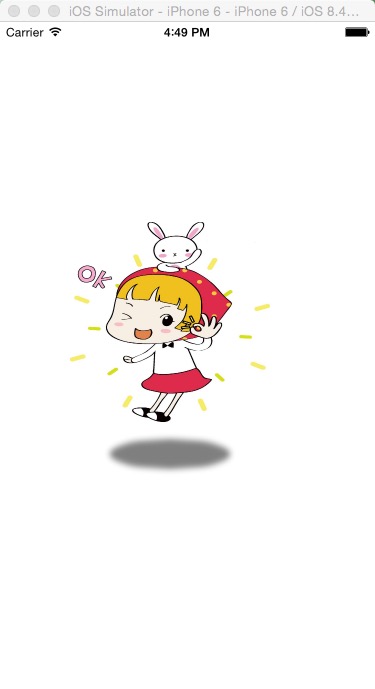
1 . 椭圆形阴影效果
效果图:
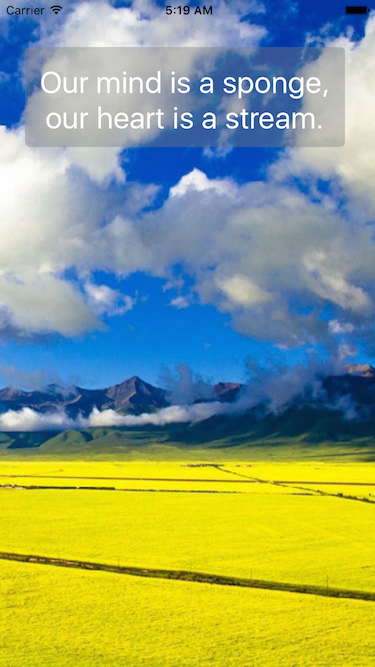
2 . 半透明背景
效果图:
Code:
1 . 椭圆形阴影效果
- (void)layoutOvalShadow
{
/** 1. 创建一个UIImageView的对象. */
UIImage *image = [UIImage imageNamed:@"1.jpg"];
UIImageView *imageView = [[UIImageView alloc] initWithFrame:CGRectMake(70, 200, 150, 200)];
imageView.image = image;
[self.view addSubview:imageView];
[imageView release];
/**
* @brief 2. 创建UIBezierPath的对象(椭圆形状).
* @param 椭圆形状位置和大小(参考的坐标系是要设置阴影的视图)
*/
UIBezierPath *path = [UIBezierPath bezierPathWithOvalInRect:CGRectMake(25, 230, 100, 20)];
/** 3. 设置imageView的阴影, 制造立体效果. */
imageView.layer.shadowPath = path.CGPath; /**< 指定path对象. */
imageView.layer.shadowOpacity = 0.5; /**< 阴影透明度.*/
imageView.layer.shadowRadius = 0; /**< 阴影模糊效果的半径. */
imageView.layer.shadowColor = [UIColor grayColor].CGColor; /**< 阴影颜色.*/
}
2 . 半透明背景
- (void)bezierPathBackground
{
/** 1. 创建一个UIImageView的对象, 当做背景图片. */
UIImage *image = [UIImage imageNamed:@"33.jpg"];
UIImageView *imageView = [[UIImageView alloc] initWithFrame:self.view.frame];
imageView.image = image;
[self.view addSubview:imageView];
[imageView release];
/** 2. 创建UILabel的对象. */
UILabel *label = [[UILabel alloc] initWithFrame:CGRectMake(25, 50, 320, 100)];
label.text = @"Our mind is a sponge, our heart is a stream.";
label.font = [UIFont systemFontOfSize:30];
label.textColor = [UIColor whiteColor];
label.backgroundColor = [UIColor clearColor];
label.numberOfLines = 0;
label.textAlignment = NSTextAlignmentCenter;
[imageView addSubview:label];
[label release];
/**
* @brief 3. 创建UIBezierPath的对象(圆角效果的矩形)
* @param 1: 矩形的位置和大小(参考的坐标系是要设置阴影的视图)
* @param 2: 圆角的半径
*/
UIBezierPath *backgroundPath = [UIBezierPath bezierPathWithRoundedRect:CGRectMake(0, 0, 320, 100) cornerRadius:5];
/** 4. 设置label的阴影, 制造半透明背景效果. */
label.layer.shadowPath = backgroundPath.CGPath;
label.layer.shadowOpacity = 0.4;
label.layer.shadowRadius = 0;
label.layer.shadowColor = [UIColor grayColor].CGColor;
}
核心API
功能实现
Code
API 官方注释
API 官方注释
/**
* @brief Creates and returns a new UIBezierPath object initialized with a rectangular path.
* @param <rect> The rectangle describing the path to create.
* @return A new path object with the rectangular path.
*/
+ (UIBezierPath *)bezierPathWithRect:(CGRect)rect
/**
* @brief Creates and returns a new UIBezierPath object initialized with an oval path inscribed in the specified rectangle
* @ param <rect> The rectangle in which to inscribe an oval.
*/
+ (UIBezierPath *)bezierPathWithOvalInRect:(CGRect)rect
/**
* @brief Creates and returns a new UIBezierPath object initialized with a rounded rectangular path.
* @param <rect> The rectangle that defines the basic shape of the path
* @param <cornerRadius> The radius of each corner oval. A value of 0 results in a rectangle without rounded corners. Values larger than half the rectangle’s width or height are clamped appropriately to half the width or height.
* @return A new path object with the rounded rectangular path.
*/
+ (UIBezierPath *)bezierPathWithRoundedRect:(CGRect)rect cornerRadius:(CGFloat)cornerRadius
---------------------
作者:Sponge_CMZ
来源:CSDN
原文:https://blog.csdn.net/Sponge_CMZ/article/details/48498885
版权声明:本文为博主原创文章,转载请附上博文链接!
iOS一个简单的设置圆角不引起性能问题的分类的更多相关文章
- iOS8 超简单的设置圆角按钮 ImageView等UIView
button.layer.cornerRadius = // 这个值根据你想要的效果可以更改 button.clipsToBounds = true 这种方法不止可以设置按钮,UIView应该都可以设 ...
- 一个简单的创建圆角图像的UIImage扩展实现
- (UIImage *)roundedCornerImageWithCornerRadius:(CGFloat)cornerRadius { CGFloat w = self.size.width; ...
- iOS 一个简单的单例
比如我有一个Singleton的类(DemoStatusManage),他有一个实例方法currentStatus会返回一个1-100的随机数. @interface DemoStatusManage ...
- iOS - 一个简单的带标题的图标的实现
代码不复杂,直接上代码: ImageViewButton.h // // ImageViewButton.h// // 带有图片.底部标题或者顶部的按钮 // // #import <UIKit ...
- 【小白学PyTorch】15 TF2实现一个简单的服装分类任务
[新闻]:机器学习炼丹术的粉丝的人工智能交流群已经建立,目前有目标检测.医学图像.时间序列等多个目标为技术学习的分群和水群唠嗑的总群,欢迎大家加炼丹兄为好友,加入炼丹协会.微信:cyx64501661 ...
- 用nodejs搭建一个简单的服务器
使用nodejs搭建一个简单的服务器 nodejs优点:性能高(读写文件) 数据操作能力强 官网:www.nodejs.org 验证是否安装成功:cmd命令行中输入node -v 如果显示版本号表示安 ...
- ios开发UI篇—使用纯代码自定义UItableviewcell实现一个简单的微博界面布局
本文转自 :http://www.cnblogs.com/wendingding/p/3761730.html ios开发UI篇—使用纯代码自定义UItableviewcell实现一个简单的微博界面布 ...
- iOS开发UI篇—使用嵌套模型完成的一个简单汽车图标展示程序
iOS开发UI篇—使用嵌套模型完成的一个简单汽车图标展示程序 一.plist文件和项目结构图 说明:这是一个嵌套模型的示例 二.代码示例: YYcarsgroup.h文件代码: // // YYcar ...
- iOS开发UI篇—使用xib自定义UItableviewcell实现一个简单的团购应用界面布局
iOS开发UI篇—使用xib自定义UItableviewcell实现一个简单的团购应用界面布局 一.项目文件结构和plist文件 二.实现效果 三.代码示例 1.没有使用配套的类,而是直接使用xib文 ...
随机推荐
- 初探日志分析常用的linux命令
了解linux常用命令,有助于提升我们的生产力,提升工作效率,更快速地定位问题,当然也是为了更好地解决问题.这两天,趁着在家办公的时间,我把linux系统中常用的命令整理了一下,主要涉及到查找.查看, ...
- Web前端性能优化总结——如何提高网页加载速度
一.提高网页加载速度的必要性 国际知名的一组来自Jupiter Research的数据显示:购物者在访问网站过程中的不满会导致销售损失和品牌受损,其中 77%的人将不再访问网站 ,62%的人不再从该网 ...
- Ubuntu中获取和使用uiautomatorviewer
图省事的办法是直接在网上找个android platform tools的某个版本下载下来 比如这个网站里面的:Android SDK工具——Platform-tools 个人比较倾向于先下载andr ...
- gcc 简单使用笔记
编译生成可执行文件(bin文件): gcc test.c //默认生成可执行文件名为a.out 指定可执行文件名: gcc -o test test.c 编译生成目标文件(.o文件): gcc -c ...
- angular 中引入 markdown
ngx-markdown 是 Angular2+ 的一个第三方库,它的主要功能是将md文件转换为HTML格式,并且支持语法高亮. GITHUB地址:https://github.com/jfcere/ ...
- 每天进步一点点------SOPC的Avalon-MM IP核(四) KEY_LED IP定制
/********************************************************************************* * Company : * Eng ...
- 安卓开发:图片的显示Mode
安卓开发中将图片放置在ImageView中展示,涉及到图片显示的模式,跟iOS开发中UIView的contentMode属性是一个意思,在安卓UI元素中使用的属性是scaleType,其中枚举值的效果 ...
- Nexus:hardware type changed to No-Transceiver
如下是相关的案例: 1.N5K & Cat3750 较新版本的NX-OS在N5K上支持1G或10G,但N5K不支持auto-speed sensing 如下是故障信息的体现:3750和N5K之 ...
- 【PAT甲级】1077 Kuchiguse (20 分)(cin.ignore()吃掉输入n以后的回车接着用getine(cin,s[i])输入N行字符串)
题意: 输入一个正整数N(<=100),接着输入N行字符串.输出N行字符串的最长公共后缀,否则输出nai. AAAAAccepted code: #include<bits/stdc++. ...
- ASP.NET Core中的依赖注入【上】
此为系列文章,对MSDN ASP.NET Core 的官方文档进行系统学习与翻译.其中或许会添加本人对 ASP.NET Core 的浅显理解 ASP.NET Core支持DI软件设计模式,其是一种为了 ...