(上)python3 selenium3 从框架实现学习selenium让你事半功倍
本文感谢以下文档或说明提供的参考。
Selenium-Python中文文档
Selenium Documentation
Webdriver 参考
如有错误欢迎在评论区指出,作者将即时更改。文章从我的个人CSDN搬过来的,所以有水印未去
环境说明
- 操作系统:Windows7 SP1 64
- python 版本:3.7.7
- 浏览器:谷歌浏览器
- 浏览器版本: 80.0.3987 (64 位)
- 谷歌浏览器驱动:驱动版本需要对应浏览器版本,不同的浏览器使用对应不同版本的驱动,点击下载
- 如果是使用火狐浏览器,查看火狐浏览器版本,点击 GitHub火狐驱动下载地址 下载(英文不好的同学右键一键翻译即可,每个版本都有对应浏览器版本的使用说明,看清楚下载即可)
简介
Selenium是一个涵盖了一系列工具和库的总体项目,这些工具和库支持Web浏览器的自动化。并且在执行自动化时,所进行的操作会像真实用户操作一样。
Selenium有3个版本,分别是 Selenium 1.0、Selenium2.0、Selenium3.0;
Selenium 1.0 主要是调用JS注入到浏览器;最开始Selenium的作者Jason Huggins开发了JavaScriptTestRunner作为测试工具,当时向多位同事进行了展示(这个作者也是个很有趣的灵魂)。从这个测试工具的名字上可以看出,是基于JavaScript进行的测试。这个工具也就是Selenium的“前身”。
Selenium 2.0 基于 WebDriver 提供的API,进行浏览器的元素操作。WebDriver 是一个测试框架也可以说是一个集成的API接口库。
Selenium 3.0 基于 Selenium 2.0 进行扩展,基本差别不大;本文将以Selenium 3.0 版本进行技术说明。
在官方介绍中介绍了有关支持浏览器的说明:“通过WebDriver,Selenium支持市场上所有主流浏览器,例如Chrom(ium),Firefox,Internet Explorer,Opera和Safari。”
简单开始
安装好环境后,简单的使用selenium让浏览器打开CSDN官网。
在环境配置时需要注意:必须把驱动给配置到系统环境,或者丢到你python的根目录下。
首先引入 webdriver :
from selenium.webdriver import Chrome
当然也可以:
from selenium import webdriver
引入方式因人而异,之后使用不同的方法新建不同的实例。
from selenium.webdriver import Chrome

driver = Chrome()
或者
from selenium import webdriver

driver = webdriver.Chrome()
一般性的python语法将不会在下文赘述。
之前所提到,需要把驱动配置到系统环境之中,但不外乎由于其它原因导致的不能驱动路径不能加入到系统环境中,在这里提供一个解决方法:
from selenium import webdriver

driver = webdriver.Chrome(executable_path=r'F:\python\dr\chromedriver_win32\chromedriver.exe')
这里使用 executable_path 指定驱动地址,这个地址是我驱动所存放的位置。当然这个位置可以根据自己需求制定,并且以更加灵活;本文为了更好说明,所以使用了绝对路径传入。
火狐浏览器:
from selenium import webdriver

driver = webdriver.Firefox()

driver.get("http://www.csdn.net")
谷歌浏览器:
from selenium import webdriver

driver = webdriver.Chrome()

driver.get("http://www.csdn.net")
火狐浏览器与谷歌浏览器只有实例化方法不同,其它的操作方法均一致。
在代码最开头引入 webdriver ,在代码中实例化浏览器对象后,使用get方法请求网址,打开所需要的网址。
实现剖析
查看 webdriver.py 实现(from selenium import webdriver):
import warnings

from selenium.webdriver.remote.webdriver import WebDriver as RemoteWebDriver

from .remote_connection import ChromeRemoteConnection

from .service import Service

from .options import Options

class WebDriver(RemoteWebDriver):

    """

    Controls the ChromeDriver and allows you to drive the browser.

    You will need to download the ChromeDriver executable from

    http://chromedriver.storage.googleapis.com/index.html

    """

    def __init__(self, executable_path="chromedriver", port=0,

                 options=None, service_args=None,

                 desired_capabilities=None, service_log_path=None,

                 chrome_options=None, keep_alive=True):

        """

        Creates a new instance of the chrome driver.

        Starts the service and then creates new instance of chrome driver.

        :Args:

         - executable_path - path to the executable. If the default is used it assumes the executable is in the $PATH

         - port - port you would like the service to run, if left as 0, a free port will be found.

         - options - this takes an instance of ChromeOptions

         - service_args - List of args to pass to the driver service

         - desired_capabilities - Dictionary object with non-browser specific

           capabilities only, such as "proxy" or "loggingPref".

         - service_log_path - Where to log information from the driver.

         - chrome_options - Deprecated argument for options

         - keep_alive - Whether to configure ChromeRemoteConnection to use HTTP keep-alive.

        """

        if chrome_options:

            warnings.warn('use options instead of chrome_options',

                          DeprecationWarning, stacklevel=2)

            options = chrome_options

        if options is None:

            # desired_capabilities stays as passed in

            if desired_capabilities is None:

                desired_capabilities = self.create_options().to_capabilities()

        else:

            if desired_capabilities is None:

                desired_capabilities = options.to_capabilities()

            else:

                desired_capabilities.update(options.to_capabilities())

        self.service = Service(

            executable_path,

            port=port,

            service_args=service_args,

            log_path=service_log_path)

        self.service.start()

        try:

            RemoteWebDriver.__init__(

                self,

                command_executor=ChromeRemoteConnection(

                    remote_server_addr=self.service.service_url,

                    keep_alive=keep_alive),

                desired_capabilities=desired_capabilities)

        except Exception:

            self.quit()

            raise

        self._is_remote = False

    def launch_app(self, id):

        """Launches Chrome app specified by id."""

        return self.execute("launchApp", {'id': id})

    def get_network_conditions(self):

        return self.execute("getNetworkConditions")['value']

    def set_network_conditions(self, **network_conditions):

        self.execute("setNetworkConditions", {

            'network_conditions': network_conditions

        })

    def execute_cdp_cmd(self, cmd, cmd_args):

        return self.execute("executeCdpCommand", {'cmd': cmd, 'params': cmd_args})['value']

    def quit(self):

        try:

            RemoteWebDriver.quit(self)

        except Exception:

            # We don't care about the message because something probably has gone wrong

            pass

        finally:

            self.service.stop()

    def create_options(self):

        return Options()
从注释中表明这是 “创建chrome驱动程序的新实例,并且创建chrome驱动程序的实例”。
在此只列出本篇文章使用到的参数:
- executable_path:可执行文件的路径。如果使用默认值,则假定可执行文件位于PATH中;其中的PATH为系统环境根目录
在 selenium 实现自动化过程中,必要的一步是启动服务,查看 init初始化方法中,发现了以下代码:
self.service = Service(

            executable_path,

            port=port,

            service_args=service_args,

            log_path=service_log_path)

self.service.start()
以上代码实例化了Service类,并且传入相关参数,之后启动服务;在这里最主要的参数为 executable_path,也就是启动驱动。查看 Service 类(selenium.service):
from selenium.webdriver.common import service

class Service(service.Service):

    """

    Object that manages the starting and stopping of the ChromeDriver

    """

    def __init__(self, executable_path, port=0, service_args=None,

                 log_path=None, env=None):

        """

        Creates a new instance of the Service

        :Args:

         - executable_path : Path to the ChromeDriver

         - port : Port the service is running on

         - service_args : List of args to pass to the chromedriver service

         - log_path : Path for the chromedriver service to log to"""

        self.service_args = service_args or []

        if log_path:

            self.service_args.append('--log-path=%s' % log_path)

        service.Service.__init__(self, executable_path, port=port, env=env,

                                 start_error_message="Please see https://sites.google.com/a/chromium.org/chromedriver/home")

    def command_line_args(self):

        return ["--port=%d" % self.port] + self.service_args
查看基类 start 方法实现(由于基类过长不全部展出,基类在selenium.webdriver.common import service 中):
def start(self):

        """

        Starts the Service.

        :Exceptions:

         - WebDriverException : Raised either when it can't start the service

           or when it can't connect to the service

        """

        try:

            cmd = [self.path]

            cmd.extend(self.command_line_args())

            self.process = subprocess.Popen(cmd, env=self.env,

                                            close_fds=platform.system() != 'Windows',

                                            stdout=self.log_file,

                                            stderr=self.log_file,

                                            stdin=PIPE)

        except TypeError:

            raise

        except OSError as err:

            if err.errno == errno.ENOENT:

                raise WebDriverException(

                    "'%s' executable needs to be in PATH. %s" % (

                        os.path.basename(self.path), self.start_error_message)

                )

            elif err.errno == errno.EACCES:

                raise WebDriverException(

                    "'%s' executable may have wrong permissions. %s" % (

                        os.path.basename(self.path), self.start_error_message)

                )

            else:

                raise

        except Exception as e:

            raise WebDriverException(

                "The executable %s needs to be available in the path. %s\n%s" %

                (os.path.basename(self.path), self.start_error_message, str(e)))

        count = 0

        while True:

            self.assert_process_still_running()

            if self.is_connectable():

                break

            count += 1

            time.sleep(1)

            if count == 30:

                raise WebDriverException("Can not connect to the Service %s" % self.path)
其中发现:
try:

      cmd = [self.path]

      cmd.extend(self.command_line_args())

      self.process = subprocess.Popen(cmd, env=self.env,

                                      close_fds=platform.system() != 'Windows',

                                      stdout=self.log_file,

                                      stderr=self.log_file,

                                      stdin=PIPE)

except TypeError:

            raise

        except OSError as err:

            if err.errno == errno.ENOENT:

                raise WebDriverException(

                    "'%s' executable needs to be in PATH. %s" % (

                        os.path.basename(self.path), self.start_error_message)

                )

            elif err.errno == errno.EACCES:

                raise WebDriverException(

                    "'%s' executable may have wrong permissions. %s" % (

                        os.path.basename(self.path), self.start_error_message)

                )

            else:

                raise

        except Exception as e:

            raise WebDriverException(

                "The executable %s needs to be available in the path. %s\n%s" %

                (os.path.basename(self.path), self.start_error_message, str(e)))

        count = 0

        while True:

            self.assert_process_still_running()

            if self.is_connectable():

                break

            count += 1

            time.sleep(1)

            if count == 30:

                raise WebDriverException("Can not connect to the Service %s" % self.path)
启动子进程开启驱动。在出现异常时接收抛出异常并且报错。开启驱动打开浏览器。
在异常抛出检测到此已知道了selenium如何启动服务。接下来查看get请求网址的实现流程。
查看webdriver基类(selenium.webdriver.remote.webdriver),找到get方法:
def get(self, url):

    """

    Loads a web page in the current browser session.

    """

    self.execute(Command.GET, {'url': url})

def execute(self, driver_command, params=None):

        """

        Sends a command to be executed by a command.CommandExecutor.

        :Args:

         - driver_command: The name of the command to execute as a string.

         - params: A dictionary of named parameters to send with the command.

        :Returns:

          The command's JSON response loaded into a dictionary object.

        """

        if self.session_id is not None:

            if not params:

                params = {'sessionId': self.session_id}

            elif 'sessionId' not in params:

                params['sessionId'] = self.session_id

        params = self._wrap_value(params)

        response = self.command_executor.execute(driver_command, params)

        if response:

            self.error_handler.check_response(response)

            response['value'] = self._unwrap_value(

                response.get('value', None))

            return response

        # If the server doesn't send a response, assume the command was

        # a success

        return {'success': 0, 'value': None, 'sessionId': self.session_id}
通过get方法得知,调用了 execute 方法,传入了 Command.GET 与 url。
查看Command.GET的类Command(selenium.webdriver.remote.command)得知,Command为标准WebDriver命令的常量;找到GET常量:
GET = "get"
从文件上,应该是执行命令方式的类文件。
首先整理一下流程:
- 启动服务→调用get方法
其中get方法具体流程:
- get方法调用execute方法,传入参数为 Command.GET与url,查看Command的值是标准常量。 在execute方法中,
其中 execute 的实现为:
def execute(self, driver_command, params=None):

        """

        Sends a command to be executed by a command.CommandExecutor.

        :Args:

         - driver_command: The name of the command to execute as a string.

         - params: A dictionary of named parameters to send with the command.

        :Returns:

          The command's JSON response loaded into a dictionary object.

        """

        if self.session_id is not None:

            if not params:

                params = {'sessionId': self.session_id}

            elif 'sessionId' not in params:

                params['sessionId'] = self.session_id

        params = self._wrap_value(params)

        response = self.command_executor.execute(driver_command, params)

        if response:

            self.error_handler.check_response(response)

            response['value'] = self._unwrap_value(

                response.get('value', None))

            return response

        # If the server doesn't send a response, assume the command was

        # a success

        return {'success': 0, 'value': None, 'sessionId': self.session_id}
其中核心代码为:
params = self._wrap_value(params)

response = self.command_executor.execute(driver_command, params)

if response:

    self.error_handler.check_response(response)

    response['value'] = self._unwrap_value(

        response.get('value', None))

    return response
主要查看:
self.command_executor.execute(driver_command, params)
其中 command_executor 为初始化后实例,查看派生类 webdriver(selenium import webdriver) command_executor 的实例化为:
RemoteWebDriver.__init__(

                self,

                command_executor=ChromeRemoteConnection(

                    remote_server_addr=self.service.service_url,

                    keep_alive=keep_alive),

                desired_capabilities=desired_capabilities)
查看 ChromeRemoteConnection 类(selenium import remote_connection):
from selenium.webdriver.remote.remote_connection import RemoteConnection

class ChromeRemoteConnection(RemoteConnection):

    def __init__(self, remote_server_addr, keep_alive=True):

        RemoteConnection.__init__(self, remote_server_addr, keep_alive)

        self._commands["launchApp"] = ('POST', '/session/$sessionId/chromium/launch_app')

        self._commands["setNetworkConditions"] = ('POST', '/session/$sessionId/chromium/network_conditions')

        self._commands["getNetworkConditions"] = ('GET', '/session/$sessionId/chromium/network_conditions')

        self._commands['executeCdpCommand'] = ('POST', '/session/$sessionId/goog/cdp/execute')
得知调用的是基类初始化方法,查看得知 execute 方法实现为:
def execute(self, command, params):

        """

        Send a command to the remote server.

        Any path subtitutions required for the URL mapped to the command should be

        included in the command parameters.

        :Args:

         - command - A string specifying the command to execute.

         - params - A dictionary of named parameters to send with the command as

           its JSON payload.

        """

        command_info = self._commands[command]

        assert command_info is not None, 'Unrecognised command %s' % command

        path = string.Template(command_info[1]).substitute(params)

        if hasattr(self, 'w3c') and self.w3c and isinstance(params, dict) and 'sessionId' in params:

            del params['sessionId']

        data = utils.dump_json(params)

        url = '%s%s' % (self._url, path)

        return self._request(command_info[0], url, body=data)

    def _request(self, method, url, body=None):

        """

        Send an HTTP request to the remote server.

        :Args:

         - method - A string for the HTTP method to send the request with.

         - url - A string for the URL to send the request to.

         - body - A string for request body. Ignored unless method is POST or PUT.

        :Returns:

          A dictionary with the server's parsed JSON response.

        """

        LOGGER.debug('%s %s %s' % (method, url, body))

        parsed_url = parse.urlparse(url)

        headers = self.get_remote_connection_headers(parsed_url, self.keep_alive)

        resp = None

        if body and method != 'POST' and method != 'PUT':

            body = None

        if self.keep_alive:

            resp = self._conn.request(method, url, body=body, headers=headers)

            statuscode = resp.status

        else:

            http = urllib3.PoolManager(timeout=self._timeout)

            resp = http.request(method, url, body=body, headers=headers)

            statuscode = resp.status

            if not hasattr(resp, 'getheader'):

                if hasattr(resp.headers, 'getheader'):

                    resp.getheader = lambda x: resp.headers.getheader(x)

                elif hasattr(resp.headers, 'get'):

                    resp.getheader = lambda x: resp.headers.get(x)

        data = resp.data.decode('UTF-8')

        try:

            if 300 <= statuscode < 304:

                return self._request('GET', resp.getheader('location'))

            if 399 < statuscode <= 500:

                return {'status': statuscode, 'value': data}

            content_type = []

            if resp.getheader('Content-Type') is not None:

                content_type = resp.getheader('Content-Type').split(';')

            if not any([x.startswith('image/png') for x in content_type]):

                try:

                    data = utils.load_json(data.strip())

                except ValueError:

                    if 199 < statuscode < 300:

                        status = ErrorCode.SUCCESS

                    else:

                        status = ErrorCode.UNKNOWN_ERROR

                    return {'status': status, 'value': data.strip()}

                # Some of the drivers incorrectly return a response

                # with no 'value' field when they should return null.

                if 'value' not in data:

                    data['value'] = None

                return data

            else:

                data = {'status': 0, 'value': data}

                return data

        finally:

            LOGGER.debug("Finished Request")

            resp.close()
从以上实现得知,execute 为向远程服务器发送请求;execute中调用的_request方法为发送http请求并且返回相关结果,请求结果通过浏览器进行响应。
官方说明中说明了请求原理:
At its minimum, WebDriver talks to a browser through a driver.
Communication is two way: WebDriver passes commands to the browser through the driver, and receives information back via the same route.
The driver is specific to the browser, such as ChromeDriver for Google’s Chrome/Chromium, GeckoDriver for Mozilla’s Firefox, etc. Thedriver runs on the same system as the browser. This may, or may not be, the same system where the tests themselves are executing.
This simple example above is direct communication. Communication to the browser may also be remote communication through Selenium Server or RemoteWebDriver. RemoteWebDriver runs on the same system as the driver and the browser.
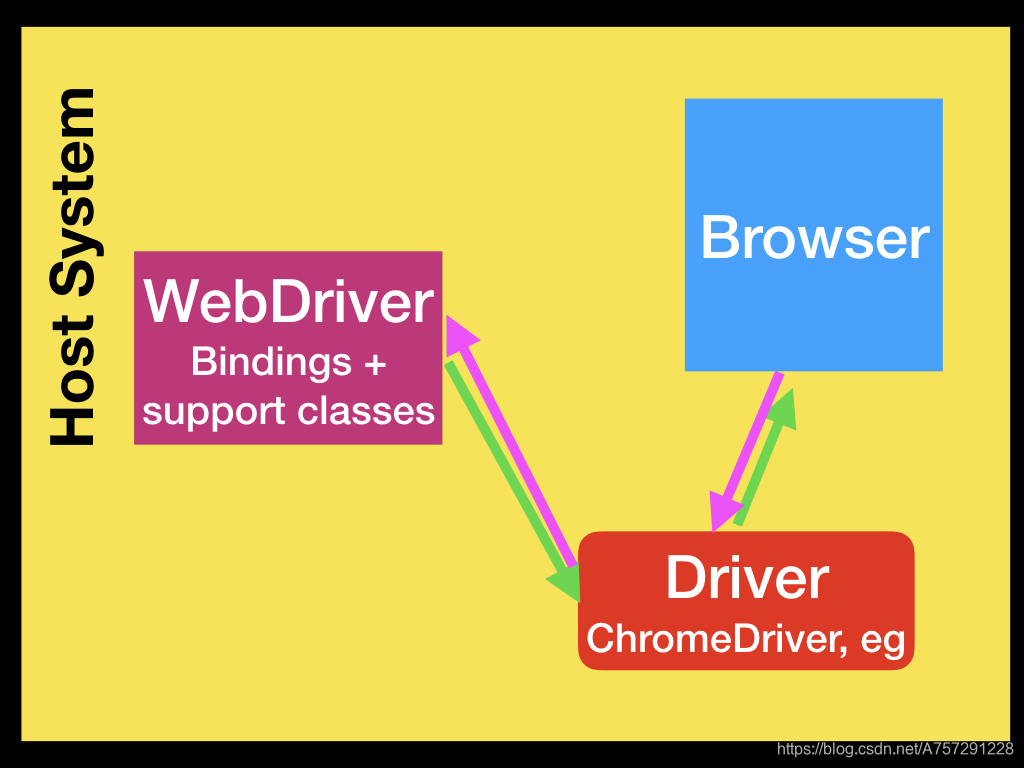
言而总之我们通过webdriver与浏览器进行对话,从而浏览器进行响应。
通过以上实例得知,使用 execute 向远程服务器发送请求会通过 webdriver 与浏览器交互,且发送已定义的命令常量可获得一些相关信息。
由于在代码中我们实例的是 webdriver 实例,去 webdriver基类(selenium.webdriver.remote.webdriver)中查询相关信息,是否有相关函数可以获取信息。发现以下函数:
def title(self):

    """Returns the title of the current page.

    :Usage:

        title = driver.title

    """

    resp = self.execute(Command.GET_TITLE)

    return resp['value'] if resp['value'] is not None else ""

@property

def current_url(self):

    """

    Gets the URL of the current page.

    :Usage:

        driver.current_url

    """

    return self.execute(Command.GET_CURRENT_URL)['value']

@property

def page_source(self):

    """

    Gets the source of the current page.

    :Usage:

        driver.page_source

    """

    return self.execute(Command.GET_PAGE_SOURCE)['value']
以上并没有列全,我们简单的尝试以上函数的使用方法,使用方法在函数中已经说明。尝试获取 title(标题)、current_url(当前url)、page_source(网页源代码):
from selenium import webdriver

driver = webdriver.Chrome()

driver.get("http://www.csdn.net")

print(driver.title)

print(driver.current_url)

print('作者博客:https://blog.csdn.net/A757291228')

#支持原创,转载请贴上原文链接

# print(driver.page_source)
结果成功获取到网页标题以及当前网址:

试试 page_source:
from selenium import webdriver
driver = webdriver.Chrome()
driver.get("http://www.csdn.net")
print(driver.title)
print(driver.current_url)
print('作者博客:https://blog.csdn.net/A757291228')
#支持原创,转载请贴上链接
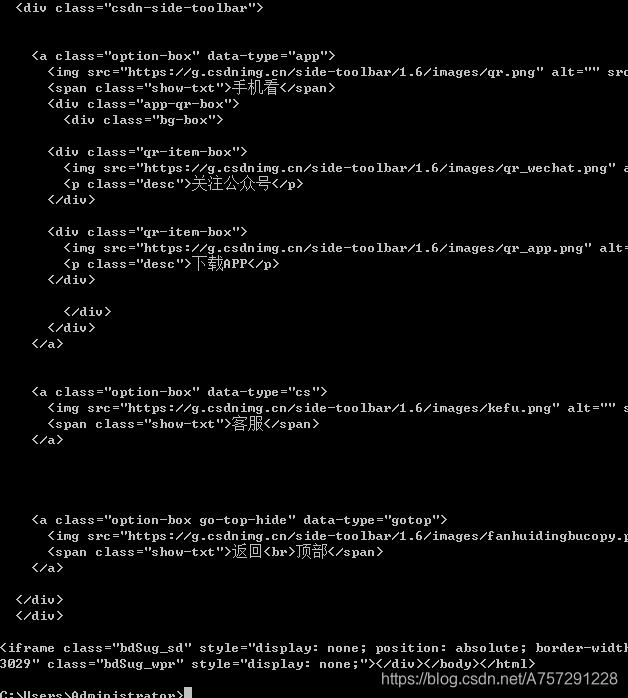
print(driver.page_source)
成功获取:
原创不易,看到这里点个赞支持一下呗!谢谢
(上)python3 selenium3 从框架实现学习selenium让你事半功倍的更多相关文章
- 『心善渊』Selenium3.0基础 — 1、Selenium自动化测试框架介绍
目录 1.Selenium介绍 2.Selenium的特点 3.Selenium版本说明 4.拓展:WebDriver与Selenium RC的区别 5.Webdriver工作原理 1.Seleniu ...
- 『心善渊』Selenium3.0基础 — 2、Selenium测试框架环境搭建(Windows)
目录 1.浏览器安装 2.浏览器驱动下载 (1)ChromeDriver for Chrome (2)Geckodriver for Firefox (3)IEDriverServer for IE ...
- Python+selenium测试环境成功搭建,简单控制浏览器(firefox)接下来,继续学习其他浏览器上的测试环境搭建;学习Python语言,利用Python语言来写测试用例。加油!!!
Python+selenium测试环境成功搭建,简单控制浏览器(firefox)接下来,继续学习其他浏览器上的测试环境搭建:学习Python语言,利用Python语言来写测试用例.加油!!!
- 新手学习selenium路线图(老司机亲手绘制)-学前篇
前言: 本来这篇是只在微信公众号(yoyoketang)上发布的,最近一搜,发现本很多人copy(copy公众号的,图片是加载不出来的)了,还没注明出处,不想多说什么,博客上也同步更新这篇吧! 最近群 ...
- 新手学习selenium路线图(老司机亲手绘制)-学前篇【转载】
前言: 本来这篇是只在微信公众号(yoyoketang)上发布的,最近一搜,发现本很多人copy(copy公众号的,图片是加载不出来的)了,还没注明出处,不想多说什么,博客上也同步更新这篇吧! 最近群 ...
- 新手学习selenium路线图(老司机亲手绘制)
前言: 最近群里有不少小白,想入手selenium,但是一直没找到学习路线,还没入门就迷路了,于是小编亲手绘制了一幅学习路线图.希望能帮助小白快速入门,帮助已经入门的,尽快提升! 学习selenium ...
- 浅谈学习selenium的一些知识点的总结
学习自动化测试,先得学习一门语言.自动化对语言要求掌握的程度不深,但必须得会基本的入门语法. 我学习的是python2,简单,易懂,上手快. 每天敲就是了. 我的学习路径是: 先学习一段时间pytho ...
- 学习selenium需要具备的知识或技术
因为有QTP和JAVA的基础,selenium学起来会快很多,总结下学习selenium所需要具备的知识或技术 1.selenium进行的自动化测试是基于ui层面的,所以html,css,javasc ...
- 学习selenium所须要具备的技术
学习selenium所须要具备的知识或技术 1.selenium进行的自己主动化測试是基于ui层面的,所以html,css,javascript基本上是不可缺少的,至于javascript,有非常多的 ...
随机推荐
- ServerVariables集合
当讨论Request对象内容时,要研究的集合之一就是ServerVariables集合.这个集合包含了两种值的结合体,一种是随同页面请求从客户端发送到服务器的HTTP报头中的值,另外一种是由服务器在接 ...
- 【K8S】K8S部署Metrics-Server服务
写在前面 在新版的K8S中,系统资源的采集均使用Metrics-Server服务,可以通过Metrics-Server服务采集节点和Pod的内存.磁盘.CPU和网络的使用率等信息. 读者可参考< ...
- POJ 2188 Cow Laundry
Cow Laundry Time Limit: 1000MS Memory Limit: 65536K Total Submissions: 1376 Accepted: 886 Descriptio ...
- 图论--2-SAT--暴力染色法模板(字典序最小解) RQ的板子
//暴力DFS,求字典序最小的解,也是求字典序唯一的方法 #include<cstdio> #include<cstring> #include<vector> u ...
- Git上传本地仓库项目到gitee远程仓库(命令篇)
前言:最近整理了一下自己之前的自学代码,包括一些练习的项目.发现有些杂乱,故想使用Gitte(码云)管理.加上不少公司使用Git,所以写了这篇文章记录. 如果我们本地有了项目,那么如何上传到码云上呢? ...
- B站弹幕系统架构——GOIM解读
架构图 说明: 1.logic启动http服务器, 接受http请求,用于将数据推送到kafka以及获取在线用户信息,websocket身份校验 2.comet组件起动webdocket/tcp服务, ...
- golang server示例
一个简单的web服务器 package main import ( "fmt" "log" "net/http" ) func main() ...
- 使用Codemirror打造Markdown编辑器
前几天突然想给自己的在线编译器加一个Markdown编辑功能,于是花了两三天敲敲打打初步实现了这个功能. 一个Markdown编辑器需要有如下常用功能: 粗体 斜体 中划线 标题 链接 图片 引用 代 ...
- spring mvc从后台往前台传参数的三种方式
第一种:使用Model对象(常用) 第一步:使用model对象往前台传递数据 第二步:在jsp中接收从后台传递过来的参数 第二种:使用HttpServletRequest对象 第一步:使用HttpSe ...
- D365,实现批量上传和下载文件的工具
这里演示下批量上传文件到D365的小程序工具,下载功能也是一样的思路跟逻辑. 通过文件名的前缀跟各个主档表的主键进行绑定来决定将附件挂在哪里. 1.上传界面. 2.查看附件上传结果.