centos7源码安装Apache及Tomcat
源码安装Apache
(1)
一.通过 https://apr.apache.org/ 下载 APR 和 APR-util
通过 http://httpd.apache.org/download.cgi 下载 httpd
通过 https://ftp.pcre.org/pub/pcre/ 下载 pcre
二、配置安装环境
yum -y install gcc gcc-c++ make expat-devel
三、解压与编译安装
mkdir /data
(1)编译安装 APR
tar xf apr-1.7.0.tar.gz -C /data
cd /data
mv apr-1.7.0/ apr
cd apr/
./configure --prefix=/data/apr && make && make install
(2)编译安装 APR-util
tar xf apr-util-1.6.1.tar.gz -C /data
cd /data
mv apr-util-1.6.1/ apr-util
cd apr-util/
./configure --prefix=/data/apr-util --with-apr=/data/apr && make && make install
(3)编译安装 pcre
tar xf pcre-8.43.tar.gz -C /data
cd /data
mv pcre-8.43/ pcre
cd pcre/
./configure --prefix=/data/pcre && make && make install
(4)编译安装 httpd
tar xf httpd-2.4.41.tar.gz -C /data
cd /data
mv httpd-2.4.41/ apache
cd apache/
./configure --prefix=/data/apache --with-apr=/data/apr --with-apr-util=/data/apr-util && make && make install
四、启动与关闭
/data/apache/bin/apachectl start //启动
/data/apache/bin/apachectl stop //关闭
开放80端口
firewall-cmd --permanent --and-port=80/tcp
firewall-cmd -reload
配置开机自启
(1)将 apachectl 命令拷贝到 /etc/init.d 目录下,改名为httpd
cp /data/apache/bin/apachectl /etc/init.d/httpd
(2)编辑 /etc/init.d/httpd 文件,在第一行 #!/bin/bash 的后面添加如下两行
chkconfig: 2345 70 40
说明:2345 表示脚本运行的级别,即在2、3、4、5这4种模式下都可以运行,70 表示脚本启动的顺序号,40 表示系统关闭时,脚本的停止顺序号
description:apache
(3)将 Apache 服务加入到系统服务
chkconfig --add httpd
chkconfig --list httpd
(4)通过使用 systemctl 命令控制 Apache 的启动和停止
启动 Apache 服务
systemctl start httpd.service
查看 Apache 服务运行状态
systemctl status httpd.service
关闭 Apache 服务
systemctl stop httpd.service
五、安装中遇到的问题以及解决办法
错误:configure:error:no acceptable C compiler found in $PATH
解决:需要安装 gcc
错误:rm:cannot remove ‘libtoolT’:No such file or directory
解决:编辑 /data/apr/configure , 找到 $RM '$cfgfile' 进行注释
错误:configure:error:APR not found. Please read the documentation.
解决:需要安装 APR 和 APR-util
错误:xml/apr_xml.c:35:19: 致命错误:expat.h:没有那个文件或目录
解决:需要安装 expat-devel 包
错误:configure:error:pcre-config for libpcre not found. PCRE is required and availab le from
解决:需要安装 pcre
错误:如果报多个 .so:undefined reference to 'XXX'
解决:有可能是下载的 APR-util 包 有问题。换一个下载就好了。
(2)
[root@localhost ~]# yum -y install gcc //安装gcc
[root@localhost ~]# yum -y install make //安装make
[root[root@localhost ~]# yum -y install gcc-c++ //安装gcc-c++
[root@localhost ~]# yum -y install lynx //安装lynx
@localhost ~]# tar -xf httpd-2.2.17.tar.gz -C /usr/src //解包
[root@localhost ~]# cd /usr/src/httpd-2.2.17/ //进入httpd-2.2.17文件目录
[root@localhost httpd-2.2.17]# config --prefix =/usr/local/apache //安装目录
[root@localhost httpd-2.2.17]# make //执行make命令
[root@localhost httpd-2.2.17]# make install //执行make install命令
root@localhost httpd-2.2.17]# cd /usr/local/apache/conf //切换目录
[root@localhost conf]# cp httpd.conf httpd.conf.bak
[root@localhost conf]# cd /usr/src/httpd-2.2.17/
[root@localhost conf]# vim httpd.conf
ServerName www.example.com:80
[root@localhost ~]# /usr/local/apache/bin/apachectl start //启动Apache
[root[root@localhost ~]# lynx 127.0.0.1 //运行
源码安装Tomcat
(1)查看是否安装jdk
(2)卸载jdk的方式
方法一:which java
rm -rf /usr/bin/java
方法二:rpm -qa | grep -i openjdk
rpm -e java-1.7.0-openjdk
rpm -e java-1.7.0-openjdk-headless
rpm -e java-1.7.0-openjdk --nodeps
rpm -e java-1.7.0-openjdk-headless
rpm -qa | grep -i openjdk
(3)jdk安装
软件包jdk-8u191-linux-x64.tar.gz
解压当前目录下
用mv 移动到/usr/local/取名
定义环境变量 vim /etc/profile
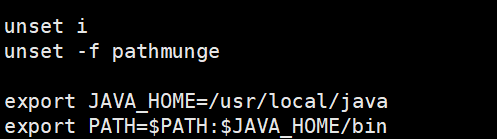
设置java 根目录
在PATH 环境变量中添加Java 根目录的bin 子目录
用 source执行生效
安装tomcat
apache-tomcat-8.5.40.tar.gz
解压软件包当地
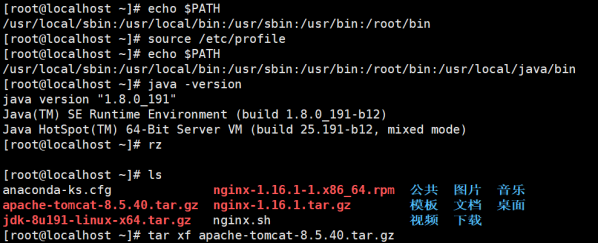
用ls 查看
解压后生成文件夹apache-tomcat-8.5.40
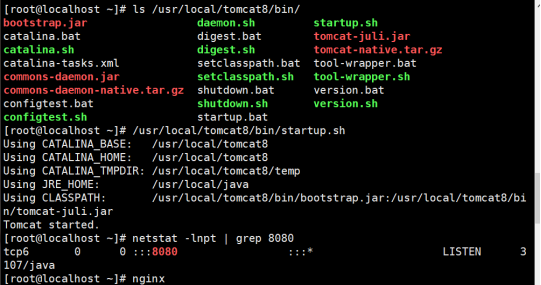
将文件夹移动到/usr/local/下,并改名为tomcat8

启动tomcat
查看8080端口
开启nginx 服务
用谷歌查看本地的ip 地址:8080

centos7源码安装Apache及Tomcat的更多相关文章
- Centos7源码安装Apache和PHP
源码安装Apache 安装需要的依赖 yum -y install gcc autoconf automake make pcre pcre-devel openssl openssl-devel# ...
- 烂泥:源码安装apache
本文由秀依林枫提供友情赞助,首发于烂泥行天下. 最近要开始学习nagios监控方面的知识了,但是nagios与apache结合的比较紧密,所以本篇文章就先把apache的源码安装学习下. 我们现在分以 ...
- 源码安装apache
目标:源码安装apache 依赖包:apr.apr-util和pcre.其中pcre正则库要先安装,apr和apr-util(已解压)可以复制到apache下的资源库srclib下. 安装pcre: ...
- linux下源码安装apache服务
1.搭建静态网站是,我们只需要搭建apache服务即可满足要求. 例如:如果我再客户端游览器输入地址,他会找到192.168.1.100这个服务器,然后根据端口会找到apache服务器.apache他 ...
- centos7源码安装Python3的前提条件
centos7源码安装Python3的前提条件: # yum -y install openssl-devel bzip2-devel expat-devel gdbm-devel readline- ...
- Linux 源码安装apache 与常见错误解决
文档原位置 一.编译安装apache 1.解决依赖关系 httpd-2.4.4需要较新版本的apr和apr-util,因此需要事先对其进行升级. 升级方式有两种,一种是通过源代码编译安装,一种是直接升 ...
- 源码安装Apache,报错:Cannot use an external APR with the bundled APR-util
一般在第一次源码安装是没有问题的,在版本变化情况下在次源码安装可能会遇到此问题: apache2.0.x与apache2.2.x在apr有很大区别,前者为依赖公用apr,后者依赖于自身的apr.一般前 ...
- centos7源码安装mysql5.7.19
centos7源码包安装mysql5.7 5.7.20安装方法和5.7.19的一样. 1.安装前准备 清空环境.安装相应的软件包 1>关闭防火墙和SELinux 2>配置yum源(阿里云, ...
- Centos7源码安装mysql及读写分离,互为主从
Linux服务器 -源码安装mysql 及读写分离,互为主从 一.环境介绍: Linux版本: CentOS 7 64位 mysq版本: mysql-5.6.26 这是我安装时所使用的版本, ...
随机推荐
- D - Super Jumping! Jumping! Jumping!
Nowadays, a kind of chess game called "Super Jumping! Jumping! Jumping!" is very popular i ...
- UnboundLocalError,探讨Python中的绑定
绑定 将python闭包之前,先梳理一下闭包中的绑定操作. 先看看2个相关的错误 NameError 和UnboundLocalError When a name is not found at al ...
- 关于git你日常工作中会用到的一些东西
前言 git是一个版本控制工具, 版本控制主要的好处有三点: 从当前版本回退到任意版本 查看历史版本 对比两个版本差异 git 相关术语 repository 仓库 branch 分支 summary ...
- 根据银行卡号 获取银行名称及银行logo
根据银行卡号码获取银行卡归属地信息接口地址: https://ccdcapi.alipay.com/validateAndCacheCardInfo.json?_input_charset=utf-8 ...
- 为应用程序池“XXX”提供服务的进程在与 Windows Process Activation Service 通信时出现严重错误。该进程 ID 为“XXXX”。数据字段包含错误号。 改进查找流程
原文链接:https://www.cnblogs.com/qidian10/p/6028784.html 为防止原作者删除,留作解决方法备份 ---------------------------- ...
- java/php DES/CBC/PKCS5Padding加密解密算法实现过程
先看java代码 public static String encrypt(String message, String key) throws Exception { Cipher cipher = ...
- 【JavaScript】js02
正则对象. 声明: //var reg = new RegExp('', '');// i,g 修正符. // i,不区分大小写,g 全局匹配. //var reg = /\w/i; 方法: //ex ...
- 【PHP】函数
一. 数学中的函数: a) sin().cos().tan().log() 这些都是数学函数,但是都已经忘了啥意思了!没关系,在php当中的函数和这些函数的概念还是有一定的区别的 二. ...
- 微信小程序中使用template
当我们的项目需要多次使用同一个布局和样式的时候,我们就可以考虑使用template(模块)来减少冗余的代码. 使用方法: 1. 新建一个template文件夹存放通用模板: 2. 在文件夹汇里面新建一 ...
- shell 数组遍历加引号和不加引号的区别?
前言 shell 是一个比较神奇的国度,里面有太多的坑需要填,今天需要填的坑就是,数组遍历在使用时加了引号和不加引号的区别. 案例 解析: 不加引号,数组中元素间的“空格”就会编程换行符 加引号, ...