Could not retrieve mirrorlist http://mirrorlist.centos.org/?release=7&arch=x86_64&repo=os&infra=stock32 error was 14: curl#6 - "Could not resolve host: mirrorlist.centos.org; Unknown error"
|
1
2
3
4
5
6
7
8
9
10
11
12
13
14
15
16
17
18
19
20
21
22
23
24
25
26
27
|
Could not retrieve mirrorlist http://mirrorlist.centos.org/?release=7&arch=x86_64&repo=os&infra=stock32 error was14: curl#6 - "Could not resolve host: mirrorlist.centos.org; Unknown error"One of the configured repositories failed (Unknown),and yum doesn't have enough cached data to continue. At this point the onlysafe thing yum can do is fail. There are a few ways to work "fix" this: 1. Contact the upstream for the repository and get them to fix the problem. 2. Reconfigure the baseurl/etc. for the repository, to point to a working upstream. This is most often useful if you are using a newer distribution release than is supported by the repository (and the packages for the previous distribution release still work). 3. Disable the repository, so yum won't use it by default. Yum will then just ignore the repository until you permanently enable it again or use --enablerepo for temporary usage: yum-config-manager --disable <repoid> 4. Configure the failing repository to be skipped, if it is unavailable. Note that yum will try to contact the repo. when it runs most commands, so will have to try and fail each time (and thus. yum will be be much slower). If it is a very temporary problem though, this is often a nice compromise: yum-config-manager --save --setopt=<repoid>.skip_if_unavailable=true |
googel了一下这个错误,发现报错原因是“本机无法连接网络的网络设置”的原因。
于是参照“How to Setup network on centos 7”这篇博文,配置了下DHPC,最终解决了这个error。
配置CentOS 7的网络,步骤如下:
1.在终端中输入以下命令,查看安装在本机的网卡:

|
1
2
3
4
5
6
|
[xi@localhost ~]$ nmcli d//以下显示是已经配置到网络后的本机网络状况。DEVICE TYPE STATE CONNECTION virbr0 bridge connected virbr0 eno16777736 ethernet connected eno16777736virbr0-nic ethernet disconnected -- lo loopback unmanaged -- |
2.GUI 或 命令模式的网络配置:
GUI模式:
Step #1 » 在终端中输入以下命令,打开网络管理员。接着选择“Edit a connection”后按回车键(使用TAB键进行选择的选项)。
|
1
|
[xi@localhost ~]$ nmtui |

Step #2 » 现在你可以看到所有的网络接口,选择一个(我选择了“eno16777736”),然后点击“ Edit “。

Step 3 » 动态配置 或 静态配置
» 动态配置
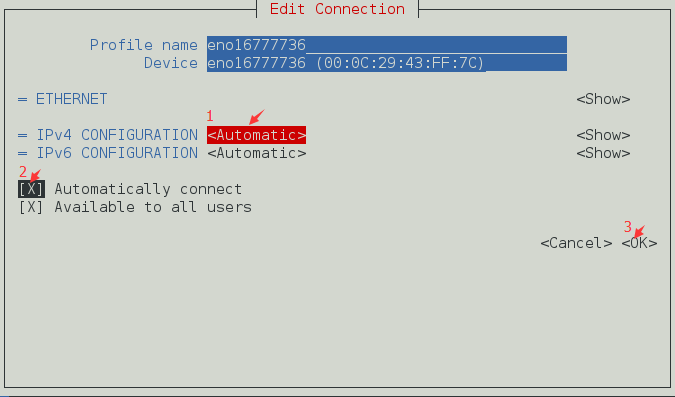
1.在“IPv4 CONFIGURATION”配置选择“<Automatic>”;
2.选择“Automatically connect”复选框;
3.点击OK键,退出网络管理器。最后,通过键入以下命令重新启动网络服务。
|
1
|
[xi@localhost ~]$ systemctl restart network |
现在你的服务器将从DHCP获得IP地址。
» 静态配置
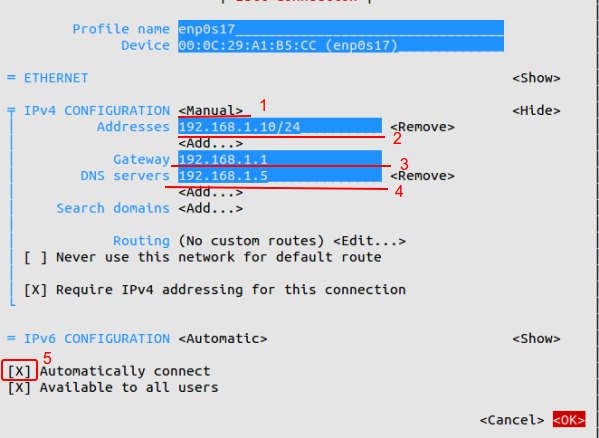
1.在“IPv4 CONFIGURATION”配置选择”Manual”;
2.添加与子网掩码,网关和DNS服务器(参见下图)的IP地址;
3.选择“Automatically connect”复选框;
4.点击OK键,退出网络管理器。现在,通过键入以下命令重新启动网络服务。
|
1
|
[xi@localhost ~]$ systemctl restart network |
现在你的服务器具有静态IP。
命令模式:
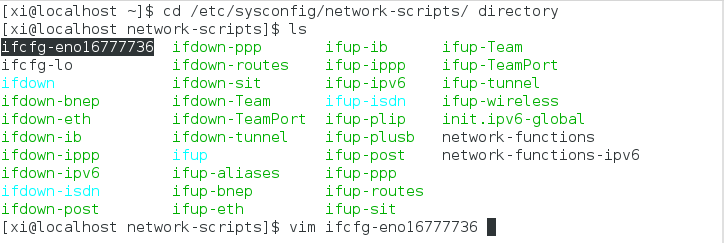
Step #1 » 切换到/etc/sysconfig/network-scripts/目录下,打开“ifcfg-eno16777736”文件:
|
1
|
xi@localhost network-scripts]$ cd /etc/sysconfig/network-scripts/ |
|
1
|
[xi@localhost network-scripts]$ vim ifcfg-eno16777736 |
打开ifcfg-eno16777736文件,展开如下:
|
1
2
3
4
5
6
7
8
9
10
11
12
13
14
15
16
|
1 TYPE=Ethernet2 BOOTPROTO=none3 DEFROUTE=yes4 IPV4_FAILURE_FATAL=no5 IPV6INIT=yes6 IPV6_AUTOCONF=yes7 IPV6_DEFROUTE=yes8 IPV6_FAILURE_FATAL=no9 NAME=enp0s1710 UUID=7f1aff2d-b154-4436-9497-e3a4dedddcef11 ONBOOT=no12 HWADDR=00:0C:29:A1:B5:D613 PEERDNS=yes14 PEERROUTES=yes15 IPV6_PEERDNS=yes16 IPV6_PEERROUTES=yes |
Step #3 » 动态配置 或 静态配置
» 动态配置
依次将第2行和第11行替换为:
BOOTPROTO=dhcp
ONBOOT=yes
然后,通过键入以下命令重新启动网络服务:
|
1
|
[xi@localhost ~]$ systemctl restart network |
连接外网,测试网络是否成功:
|
1
|
xi@localhost ~]$ ping www.baidu.com |
» 静态配置
依次将第2行和第11行替换为:
BOOTPROTO=static
ONBOOT=yes
然后,在文件末尾添加以下4行:
|
1
2
3
4
|
IPADDR=172.27.0.32NETMASK=255.255.255.0GATEWAY=172.27.0.1DNS1=172.27.0.5 |
最后,通过键入以下命令重新启动网络服务:
|
1
|
[xi@localhost ~]$ systemctl restart network |
现在你的服务器具有静态IP。
此外,你可以通过打开文件/ etc / sysconfig / network来修改主机名和DNS。
centos查询本机的外网输入 curl ifconfig.me 命令即可查看:

centos查询上网网关IP,tracepath www.baidu.com

|
1
2
3
4
|
HOSTNAME = server.krizna.comDNS1 = 192.168.1.5DNS2 = 8.8. 8.8SEARCH = krizna.com |
Could not retrieve mirrorlist http://mirrorlist.centos.org/?release=7&arch=x86_64&repo=os&infra=stock32 error was 14: curl#6 - "Could not resolve host: mirrorlist.centos.org; Unknown error"的更多相关文章
- CentOS报错:Could not retrieve mirrorlist http://mirrorlist.centos.org/?release=7&arch=x86_64&repo=os&infra=stock32 error was 14: curl#6 - "Could not resolve host: mirrorlist.centos.org; Unknown error"
今天安装完带图形界面的CentOS 7后,在Terminal中运行yum安装命令时报了以下错误: Could not retrieve mirrorlist http://mirrorlist.cen ...
- yum 安装报错:Could not retrieve mirrorlist http://mirrorlist.centos.org/?release=7&arch=x86_64&repo=os&infra=stock error was 14: curl#6 - "Could not resolve host: mirrorlist.centos.org; Unknown error"
[root@venn09 ~]# yum install -y vim Loaded plugins: fastestmirror Could not retrieve mirrorlist http ...
- Bug Could not retrieve mirrorlist http://mirrorlist.centos.org/?release=7&arch=x86_64&repo=os&infra=stock error was
yum -y install gcc 时候报bug: Could not retrieve mirrorlist http://mirrorlist.centos.org/?release=7& ...
- Could not retrieve mirrorlist http://mirrorlist.centos.org/?release=7&arch=x86_64&repo=os&infra=stoc
今天在使用yum安装文件时,出现了以下问题: root@localhost opt]# yum update Loaded plugins: fastestmirror Could not retri ...
- Linux安装yum install gcc-c++出错:Could not retrieve mirrorlist http://mirrorlist.centos.org/?release=7&arch=x86_64&repo=os&infra=stock error was 14: curl#6 - "Could not resolve host: mirrorlist.centos...
错误如图: 解决办法: 1.修改配置文件 /etc/resolv.conf,该配置文件如下: 2.输入:gedit resolv.conf,修改配置文件内容如下: 3.然后重启: 4.重新进行安装: ...
- 14: curl#6 - "Could not resolve host: mirrorlist.centos.org; 未知的错误"
14: curl#6 - "Could not resolve host: mirrorlist.centos.org; 未知的错误" One of the configured ...
- yum安装软件报错:curl#6 - "Could not resolve host: mirrorlist.centos.org; Temporary failure in name resolut
# yum install -y epel-release Loaded plugins: fastestmirror Repository base is listed more than once ...
- 安装时遇到:正在尝试其它镜像。 http://mirrors.btte.net/centos/7.2.1511/extras/x86_64/repodata/repomd.xml: [Errno 14] curl#6 - "Could not resolve host: mirrors.btte.net; 未知的错误"
我出现这种错误是因为网络链接问题,因为我设置虚拟机网络链接为VmNET8,设置了nat模式,使得我本地机可以访问虚拟机的linux服务器.但是打开虚拟机的浏览器却不能上网了.所以现在我用xshell装 ...
- Could not resolve host: mirrorlist.centos.org Centos 7 Unkown error
安装Centos7(core)以后,网卡默认不会启用.这是一个大坑,直接报错,这是一个过度优化,有几个开发人员/运维人员安装centos7(core)不用ssh去连接服务器的. 报错如下: Loade ...
随机推荐
- WebApiClient百度地图服务接口实践
1. 文章目的 随着WebApiClient的不断完善,越来越多开发者选择WebApiClient替换原生的HttpClient,然而在应用到实际项目中多多少少会遇到一些项目结合上的疑问和困难,本文将 ...
- XSS 绕过技术
XSS Cross-Site Scripting(XSS)是一类出现在 web 应用程序上的安全弱点,攻击者可以通过 XSS 插入一 些代码,使得访问页面的其他用户都可以看到,XSS 通常是可以被看作 ...
- MVC中使用Ninject依赖注入
在.NET MVC中使用Ninject注入,主要分为以下几步: 使用NuGet包添加Ninject引用,我添加的是目前最新版本3.34 在App_Start文件夹下,创建NinjectControll ...
- CentOS 7.4 下 如何部署 AspNetCore 结合 consul
上篇我们讲到consul的概念,以及在WIN下如何使用:http://www.cnblogs.com/szlblog/p/9162557.html 步骤如下: 1.安装虚拟机VM 2.下载安装 Cen ...
- 前端性能核对表Checklist-2018
前端性能核对表Checklist-2018 1. 计划与度量 Get Ready: Planning and Metrics ☐ Establish a performance culture. ☐ ...
- IOC之Unity的使用详解
原文链接:https://www.cnblogs.com/hua66/p/9670639.html Unity作为Microsoft推出IOC容器,其功能是非常丰富的,其中需要注意的地方也不少.以下是 ...
- springMVC报404,没有显示地址
正常报404会显示你的错误地址信息,而针对本问题 如果你使用的是springMVC框架,这就代表你的请求被拦截了
- 如何在Linux服务器和windows系统之间上传与下载文件
Do not let dream just be your dream. 背景:Linux服务器文件上传下载. XShell+Xftp安装包(解压即用)百度网盘链接:https://pan.baidu ...
- git status 显示中文乱码
场景 在使用git命令行查看当前 状态时, git status 显示中文文件乱码: 解决 修改git配置, git config --global core.quotepath false
- 《JavaScript高级程序设计》笔记:DOM(十)
Node类型 nodeType以下是一些重要的nodeType的取值:1: 元素element2: 属性attr3: 文本text8: 注释comments9: 文档document nodeName ...