python+xlsxwriter+PIL自动压图贴图到Excel小工具
一、环境
windows10/mac + python3.6
python第三方库 xlsxwriter、PIL、argparse
二、需求
1、运行每条测试case成功与否都需要把截图放在img文件夹里;
2、把 (平台)_img 文件夹中的图片压缩写到small_img文件夹里;
3、根据图片命名规则,顺序写入所属case number对应行,顺序写入每条case所有截图;
4、根据平台来贴到excel最合适的位置;
5、最重要一点,是给媳妇写的,提升工作效率;
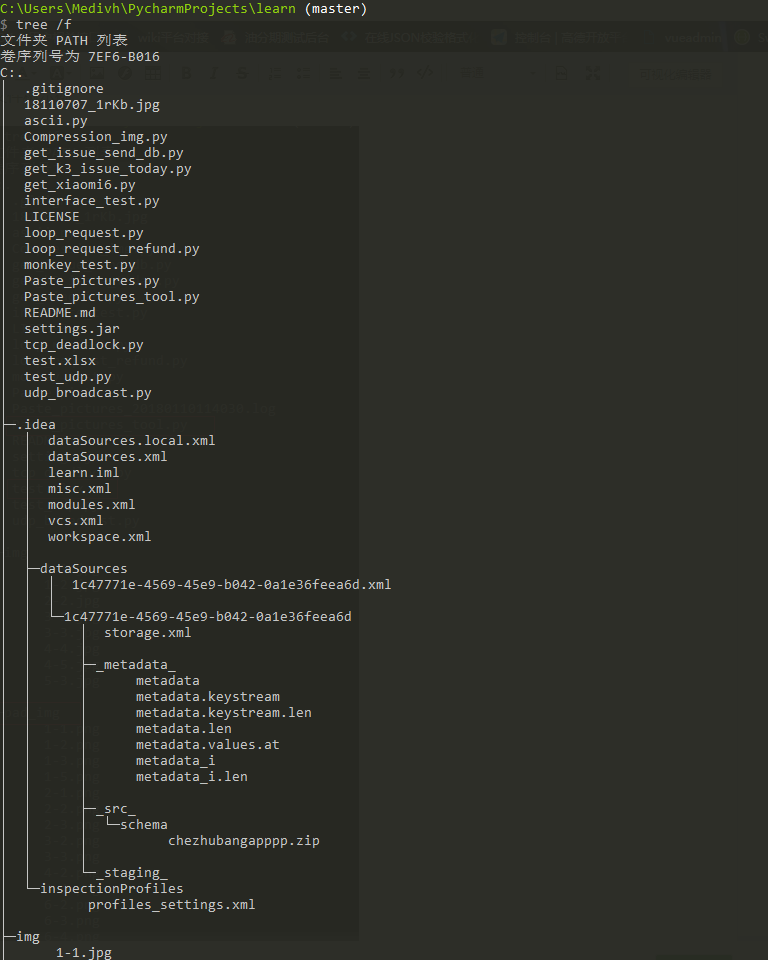
三、文件树示例
三、Paste_pictures.py
#!/usr/bin/env python3

# coding=utf-8

import xlsxwriter

import datetime

import os

import logging

LOGGER = logging.getLogger(__name__)

def write_img_for_xls(file_name="test.xlsx", img_dir_name="img", sheet_name="案例截图",

                      set_img_row=210.75, set_img_column=23.38, x_scale=0.14, y_scale=0.14, ):

    """

    读取同目录img文件夹下的所有图片,格式支持png\jpg\bmp。

    图片必须遵从  1-1.png、1-2.png、2-1.png、2-2.png格式。

    注意:是将图片写入新的excel文件,如果老的excel中有数据,将会替换所有数据。

    file_name: 要写入的xlsx文件名

    img_dir_name: 图片存放的目录,必须与脚本在同一目录下

    set_img_row:设置行高

    set_img_column:设置列宽

    x_scale:图片宽度缩放比例

    y_scale:图片高度缩放比例

    :return: Nothing

    """

    start_time = datetime.datetime.now()

    xls_path = os.path.join(os.getcwd(), file_name)

    if not os.path.isfile(xls_path):

        raise MyException("what?你居然不把{}文件跟脚本放在同一个目录下!".format(file_name))

    img_path = os.path.join(os.getcwd(), img_dir_name)

    if not os.path.isdir(img_path):

        raise MyException("what?你都没有{}文件夹,我咋给你贴图啊~".format(img_dir_name))

    all_img = os.listdir(img_path)

    if not all_img:

        raise MyException("忽悠我呢?{}文件夹下啥都没有~".format(img_dir_name))

    w_book = xlsxwriter.Workbook(xls_path)

    img_sheet = w_book.add_worksheet(name=sheet_name)

    count_num = 0

    try:

        for unit_img in all_img:

            try:

                img_num = unit_img.split("-")

                row = int(img_num[0])

                column = int(img_num[1].split(".")[0])

                suffix = (unit_img.split(".")[1])

                if column == 0:

                    LOGGER.warning("图片名称格式有误直接略过!错误文件名:{},“-”前后数字必须从1开始!".format(unit_img))

                    continue

            except ValueError:

                LOGGER.warning("[-]图片命名规则有误直接略过!错误文件名是:{}".format(unit_img))

                continue

            LOGGER.info(">> 正在贴图到第{}条用例,第{}列...".format(row, column))

            img_sheet.set_column(firstcol=0, lastcol=0, width=8.38)

            img_sheet.write(row - 1, 0, "案例{}".format(row))

            small_img = os.path.join(os.getcwd(), "{}/{}-{}.{}".format(img_dir_name, row, column,

                                                                       suffix))

            img_sheet.set_column(firstcol=column, lastcol=column, width=set_img_column)

            img_sheet.set_row(row=row - 1, height=set_img_row)

            img_config = {

                x_scale: x_scale,

                y_scale: y_scale

            }

            result = img_sheet.insert_image(row - 1, column, small_img, img_config)

            img_sheet.write_url(row - 1, column + 1, url="https://my.oschina.net/medivhxu/blog/1590012")

            if not result:

                LOGGER.info("[+] 写入成功!")

                count_num += 1

            else:

                LOGGER.error("[-] 写入失败!")

    except Exception as e:

        raise MyException("受到不明外力袭击,程序...挂了....\n{}".format(e))

    finally:

        try:

            w_book.close()

        except PermissionError:

            raise MyException("你开着{}文件我让我咋写。。。赶紧关了!".format(file_name))

    LOGGER.info("--------------贴图完成--------------")

    LOGGER.info("程序贴图数量:{},贴图成功数量:{},贴图失败数量:{}".format(len(all_img), count_num, len(all_img) - count_num))

class MyException(Exception):

    pass

write_img_for_xls()

四、run
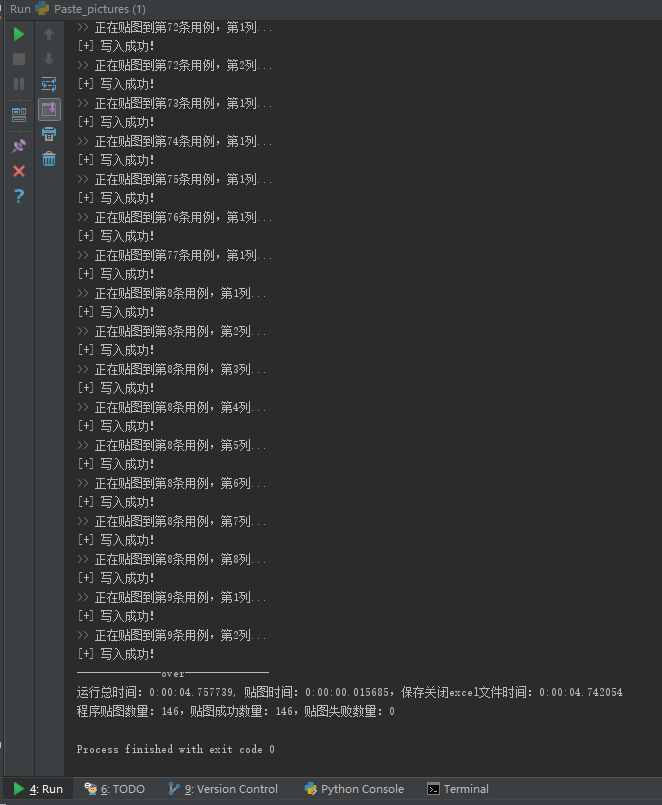
五、result

价值:
手动贴图需要半小时?1小时?贴错了?不,这些我都不要,仅需不到5秒,全部搞定,然后就可以干点想干的事~
性能分析:
其实贴图并不需要4秒+,因为xlsxwriter这个模块是自动创建cell的,但是这不是主要原因,主要原因是因为图片太大了,所以保存时间会随着图片加载到内存而线性增长(图片较大或过多,容易导致脚本直接崩溃),优化方式是选用openpyxl模块和最中要的图片预处理。
六、PIL图片压缩
1、code
#!/usr/bin/env python3

# coding=utf-8

import os

from PIL import Image

def compression_img(read_dir_name="img", save_img_file=True, height_shrink_multiple=2, width_shrink_multiple=2):

    '''

    自动压缩指定文件夹下的所有图片

    :param read_dir_name: 指定读取图片的文件夹名称,必须在当前目录下

    :param save_img_file: 是否保存压缩后的图片

    :param height_shrink_multiple: 设置图片压缩高度的倍数

    :param width_shrink_multiple: 设置图片压缩宽度的倍数

    :return: nothing

    '''

    img_path = os.path.join(os.getcwd(), read_dir_name)

    all_img = os.listdir(img_path)

    for unit_img in all_img:

        try:

            img_num = unit_img.split("-")

            row = int(img_num[0])

            column = int(img_num[1].split(".")[0])

            suffix = (unit_img.split(".")[1])

            if column == 0:

                print("图片名称格式有误直接略过!错误文件名:{},“-”前后数字必须从1开始!".format(unit_img))

                continue

        except ValueError:

            print("[-]图片命名规则有误直接略过!请参考1-1.png格式从新运行或手动解决!")

            print("错误文件名是:{}".format(unit_img))

            continue

        img_fp = os.path.join(img_path, unit_img)

        origin_img = Image.open(img_fp)

        w, h = origin_img.size

        small_img = origin_img.resize((int(w / height_shrink_multiple), int(h / width_shrink_multiple)))

        if save_img_file:

            img_save_fp = os.path.join(os.getcwd(), "small_img")

            if os.path.isdir(os.path.join(os.getcwd(), "small_img")):

                print("warning, 已有small_img文件夹!直接保存到里面了!")

                small_img.save(os.path.join(img_save_fp, ("{}-{}.{}".format(row, column, suffix))))

            else:

                os.mkdir("small_img")

                print("新建文件夹“small_img”,压缩后的图片将存储在该文件夹中。")

                small_img.save(os.path.join(img_save_fp, ("{}-{}.{}".format(row, column, suffix))))

        print(">> 正在处理图像{}-{}.{},原像素高和宽{},压缩后的高和宽{}".format(row, column, suffix,

                                                            (w, h), small_img.size))

        small_img.close()

    print("--------------图片压缩完成--------------")

compression_img()
2、再次运行Paste_pictures.py
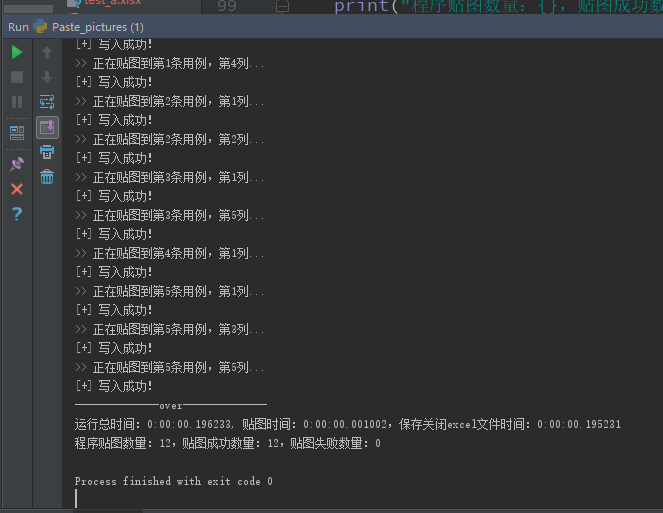
可以明显看出,保存文件的时间有非常显著的提升。
七、模块化
把以上两个功能合并,增加平台类型,根据需求增加了3个平台的图片缩放比例和宽高,增加运行log,增加作为主程序命令行运行。以后如果扩展的话直接调用或者写个类,增加几个返回值就可以了。
#!/usr/bin/env python3

# coding=utf-8

import xlsxwriter

import datetime

import os

import argparse

import logging

from PIL import Image

LOGGER = logging.getLogger(__name__)

PLATFORM = {"phone": {

    "x_scale": 0.29,

    "y_scale": 0.29,

    "width": 23.38,

    "height": 210.75

},

    "pad": {

        'x_scale': 0.2,

        "y_scale": 0.2,

        "width": 58,

        "height": 230

    },

    "oppo": {

        'x_scale': 0.29,

        'y_scale': 0.3,

        "width": 22.17,

        "height": 230

    }

}

def _check_os_dir(read_dir_name, small_dir_name="small", xlsx_file_name="test.xlsx"):

    '''

    检测img文件夹及文件夹中的内容、xlsx文件是否存在

    :param read_dir_name: 要读取图片的文件夹

    :param small_dir_name: 压缩的图片文件夹

    :param xlsx_file_name: excel文件名

    :return:

            all_img:所有图片对象

            xls_path:excel文件路径

            img_path:图片文件路径

    '''

    full_name = read_dir_name + "_img"

    img_path = os.path.join(os.getcwd(), full_name)

    LOGGER.info(img_path)

    assert os.path.isdir(img_path), "what?你都没有{}文件夹,我咋给你贴图啊!!!".format(full_name)

    all_img = os.listdir(img_path)

    assert all_img, "{}文件夹里啥也没有,咋贴!!!".format(full_name)

    xls_path = os.path.join(os.getcwd(), xlsx_file_name)

    assert os.path.isfile(xls_path), "{}文件不存在!!!".format(xlsx_file_name)

    # small_full_name = small_dir_name + datetime.datetime.now().strftime("%Y%m%d%H%M%S")

    if full_name == small_dir_name:

        return all_img, xls_path, img_path

    # os.mkdir("{}".format(small_full_name))

    # LOGGER.warning("新建文件夹{},压缩后的图片将存储在该文件夹中。".format(small_dir_name))

    return all_img, xls_path, img_path

def _compression_img(read_dir_name, small_dir_name="small", height_shrink_multiple=2, width_shrink_multiple=2):

    '''

    自动压缩指定文件夹下的所有图片

    :param read_dir_name: 读取图片文件夹的名称

    :param small_dir_name:如果压缩图片就读取该文件夹下的压缩图片

    :param height_shrink_multiple: 设置图片压缩高度的倍数

    :param width_shrink_multiple: 设置图片压缩宽度的倍数

    :return: small_dir_name: 压缩后的图片文件名

    '''

    full_small_dir_name = small_dir_name + "_img"

    _check_os_dir(read_dir_name=read_dir_name, small_dir_name=full_small_dir_name)

    img_path = os.path.join(os.getcwd(), read_dir_name + "_img")

    all_img = os.listdir(img_path)

    for unit_img in all_img:

        try:

            img_num = unit_img.split("-")

            row = int(img_num[0])

            column = int(img_num[1].split(".")[0])

            suffix = (unit_img.split(".")[1])

            if column == 0:

                LOGGER.warning("图片名称格式有误直接略过!错误文件名:{},“-”前后数字必须从1开始!".format(unit_img))

                continue

        except ValueError:

            LOGGER.warning("[-]图片命名规则有误直接略过!错误文件名是:{}".format(unit_img))

            continue

        img_fp = os.path.join(img_path, unit_img)

        origin_img = Image.open(img_fp)

        w, h = origin_img.size

        small_img = origin_img.resize((int(w / height_shrink_multiple), int(h / width_shrink_multiple)))

        small_img.save(os.path.join(os.getcwd(), "{}/{}-{}.{}".format(full_small_dir_name, row, column, suffix)))

        LOGGER.info(">> 正在处理图像{}-{}.{},原像素高和宽{},压缩后的高和宽{}".format(row, column, suffix, (w, h), small_img.size))

        try:

            small_img.close()

        except Exception as e:

            LOGGER.debug("未知错误\n{}".format(e))

    LOGGER.info("--------------图片压缩完成--------------")

    return small_dir_name

def write_img_for_xls(platform, read_dir_name, sheet_name="案例截图", xlsx_file_name="test.xlsx"):

    """

    读取同目录img文件夹下的所有图片,格式支持png\jpg\bmp。

    图片必须遵从  1-1.png、1-2.png、2-1.png、2-2.png格式。

    注意:是将图片写入新的excel文件,如果老的excel中有数据,将会替换所有数据。

    platform: 平台名称,包括phone、pad,web目前没实现

    read_dir_name: 要读取图片的文件夹名称

    xlsx_file_name: 要写入的xlsx文件名

    sheet_name: 写入excel中sheet的名字

    :return: nothing

    """

    all_img, xls_path, img_path = _check_os_dir(xlsx_file_name=xlsx_file_name, read_dir_name=read_dir_name)

    w_book = xlsxwriter.Workbook(xls_path)

    img_sheet = w_book.add_worksheet(name=sheet_name)

    count_num = 0

    try:

        for unit_img in all_img:

            try:

                img_num = unit_img.split("-")

                row = int(img_num[0])

                column = int(img_num[1].split(".")[0])

                suffix = (unit_img.split(".")[1])

                if column == 0:

                    LOGGER.warning("图片名称格式有误直接略过!错误文件名:{},“-”前后数字必须从1开始!".format(unit_img))

                    continue

            except ValueError:

                LOGGER.warning("[-]图片命名规则有误直接略过!错误文件名是:{}".format(unit_img))

                continue

            LOGGER.info(">> 正在贴图到第{}条用例,第{}列...".format(row, column))

            img_sheet.set_column(firstcol=0, lastcol=0, width=8.38)

            img_sheet.write(row - 1, 0, "案例{}".format(row))

            small_img = os.path.join(os.getcwd(), "{}/{}-{}.{}".format(read_dir_name+"_img", row, column,

                                                                       suffix))

            img_sheet.set_column(firstcol=column, lastcol=column, width=PLATFORM.get(platform).get("width"))

            img_sheet.set_row(row=row - 1, height=PLATFORM.get(platform).get("height"))

            x_ = PLATFORM.get(platform).get("x_scale")

            y_ = PLATFORM.get(platform).get("y_scale")

            img_config = {"x_scale": x_, "y_scale": y_}

            result = img_sheet.insert_image(row - 1, column, small_img, img_config)

            img_sheet.write_url(row - 1, column + 1, url="https://my.oschina.net/medivhxu/blog/1590012")

            if not result:

                LOGGER.info("[+] 写入成功!")

                count_num += 1

            else:

                LOGGER.error("[-] 写入失败!")

    except Exception as e:

        raise MyException("受到不明外力袭击,程序...挂了....\n{}".format(e))

    finally:

        try:

            w_book.close()

        except PermissionError:

            raise MyException("你开着{}文件我让我咋写。。。赶紧关了!".format(xlsx_file_name))

    LOGGER.info("--------------贴图完成--------------")

    LOGGER.info("程序贴图数量:{},贴图成功数量:{},贴图失败数量:{}".format(len(all_img), count_num, len(all_img) - count_num))

class MyException(Exception):

    pass

if __name__ == '__main__':

    parser = argparse.ArgumentParser()

    parser.add_argument("-p", help="必须选择平台phone、pad、oppo")

    group = parser.add_mutually_exclusive_group()

    group.add_argument("-a", action="store_true", help="压缩图片且贴图到excel")

    group.add_argument("-w", action="store_true", help="直接贴图到excel")

    args = parser.parse_args()

    logging.basicConfig(level=logging.DEBUG,

                        format='%(asctime)s %(filename)s[line:%(lineno)d] %(levelname)s %(message)s',

                        datefmt='%a, %d %b %Y %H:%M:%S',

                        filename='Paste_pictures_{}.log'.format(datetime.datetime.now().strftime("%Y%m%d%H%M%S")),

                        filemode='w')

    console = logging.StreamHandler()

    console.setLevel(logging.INFO)

    formatter = logging.Formatter('%(name)-12s: %(levelname)-8s %(message)s')

    console.setFormatter(formatter)

    logging.getLogger('').addHandler(console)

    if args.p not in PLATFORM.keys():

        raise MyException("参数错误,必须在{}中选择".format(PLATFORM.keys()))

    if args.a:

        LOGGER.info(">>> 选择参数-a,即压缩图片,又贴图。")

        r_small_dir_name = _compression_img(read_dir_name=args.p, small_dir_name="small")

        write_img_for_xls(platform=args.p, read_dir_name=r_small_dir_name)

    elif args.w:

        LOGGER.info(">>> 选择参数-w,只贴图。")

        write_img_for_xls(platform=args.p, read_dir_name=args.p)

    else:

        LOGGER.error("参数错误")
windows command和linux/mac terminal下运行效果:
The end~
python+xlsxwriter+PIL自动压图贴图到Excel小工具的更多相关文章
- 一秒钟带你走进P图世界-----(python)PIL库的使用
python-----PIL库的使用 一.什么是PIL库 1.PIL(Python Image Library)库是python语言的第三方库,具有强大的图像处理能力,不仅包含了丰富的像素.色彩操作功 ...
- 我用 Python 撸了一个 plist 图集拆图工具!附上github源码
这些年,我一直在使用 JavaScript .CocosCreator 做开发,只要是他们不能解决的,我都不太愿意去弄,或者说是不太情愿去做.真的是手中有把锤子,看什么都是钉子,越是熟悉一样东西,越容 ...
- 【python】pandas & matplotlib 数据处理 绘制曲面图
Python matplotlib模块,是扩展的MATLAB的一个绘图工具库,它可以绘制各种图形 建议安装 Anaconda后使用 ,集成了很多第三库,基本满足大家的需求,下载地址,对应选择pytho ...
- python初步(附学习思维导图)
python,原意为蟒蛇,至于它的发展史,度娘应该比我讲述的更为专业/偷笑.这里我们要梳理的是整个学习的脉络,当然,今后的随笔也会从基础部分说起,希望能给进门python的小伙伴一些建议. 一.环境的 ...
- Python的进程与线程--思维导图
Python的进程与线程--思维导图
- Python交互图表可视化Bokeh:4. 折线图| 面积图
折线图与面积图 ① 单线图.多线图② 面积图.堆叠面积图 1. 折线图--单线图 import numpy as np import pandas as pd import matplotlib.py ...
- 关于python中PIL的安装
python 的PIL安装是一件很蛋痛的事, 如果你要在python 中使用图型程序那怕只是将个图片从二进制流中存盘(例如使用Scrapy 爬网存图),那么都会使用到 PIL 这库,而这个库是出名的难 ...
- Python+Selenium+PIL+Tesseract真正自动识别验证码进行一键登录
Python 2.7 IDE Pycharm 5.0.3 Selenium:Selenium的介绍及使用,强烈推荐@ Eastmount的博客 PIL : Pillow-3.3.0-cp27-cp27 ...
- 使用Python的PIL模块来进行图片对比
使用Python的PIL模块来进行图片对比 在使用google或者baidu搜图的时候会发现有一个图片颜色选项,感觉非常有意思,有人可能会想这肯定是人为的去划分的,呵呵,有这种可能,但是估计人会累死, ...
随机推荐
- HDU 2563 统计问题(递归,思维题)
统计问题 Time Limit: 3000/1000 MS (Java/Others) Memory Limit: 32768/32768 K (Java/Others) Total Submi ...
- bzoj usaco 金组水题题解(2)
续.....TAT这回不到50题编辑器就崩了.. 这里塞40道吧= = bzoj 1585: [Usaco2009 Mar]Earthquake Damage 2 地震伤害 比较经典的最小割?..然而 ...
- MYSQL数据库增量备份
MySQL数据库增量备份,在这之前修改我们的数据库配置文件/etc/my.cnf开启bin-log日志功能即可.接下来是我参考了下网上的一些方法,自己写的,主要还是要能学到他的一些思路和方法. #fu ...
- 了解 Python 语言中的时间处理
python 语言对于时间的处理继承了 C语言的传统,时间值是以秒为单位的浮点数,记录的是从1970年1月1日零点到现在的秒数,这个秒数可以转换成我们日常可阅读形式的日期和时间:我们下面首先来看一下p ...
- spring如何控制事务
Spring 的事务,可以说是 Spring AOP 的一种实现. AOP面向切面编程,即在不修改源代码的情况下,对原有功能进行扩展,通过代理类来对具体类进行操作. spring是一个容器,通过spr ...
- 微信小程序版2048
最近流行微信"跳一跳"小游戏,我也心血来潮写了一个微信小程序版2048,本篇文章主要分享实现2048的算法以及注意的点,一起来学习吧!(源码地址见文章末尾) 算法 1.生成4* ...
- 《并行程序设计导论》——MPI(Microsoft MPI)(6):并行排序算法
=================================版权声明================================= 版权声明:原创文章 禁止转载 请通过右侧公告中的“联系邮 ...
- h5开发安卓软键盘遮挡解决方案
//处理input focus时被键盘遮挡问题 inputFocus:function(){ if(/Android [4-6]/.test(navigator.appVersion)) { wind ...
- mysql 两个时间段的差,可以是秒,天,星期,月份,年...
SELECT TIMESTAMPDIFF(SECOND, now(), "2012-11-11 00:00:00") 语法为:TIMESTAMPDIFF(unit,datetime ...
- ASP.NET Core 一步步搭建个人网站(6)_单页模式和优化
前言 HI,有段时间没有更新了,主要因为第一年前事情比较多,有些事得忙着张罗下:第二呢,对个人网站进行了一次大范围的优化,主要是申请的云服务器资源有限,1m的网络带宽,带上图片展示的话,打开网站的平均 ...