记录一次widora sdk编译ipk 实战编译redis
因为业务需求,需要用到redis存储一点简单的数据,因为redis有良好的哈希机制,可以完美实现我的某些需求,但openwrt官方提供memcached的ipk并没有提供redis,没办法,只能自己编译了,编译的redis版本3.2.1
1.下载redis:http://download.redis.io/releases/redis-3.2.1.tar.gz
2.在openwrt-widora的package目录下创建redis目录,把解压出来的redis目录mv到此目录下,改名为src,在平级目录(openwrt-widora的package下刚刚创建的redis目录)下创建Makefile
内容如下:
include $(TOPDIR)/rules.mk

# Name and release number of this package

PKG_NAME:=redis

PKG_RELEASE:=

PKG_BUILD_DIR := $(BUILD_DIR)/$(PKG_NAME)

PKG_KCONFIG:=RALINK_MT7620 RALINK_MT7628

include $(INCLUDE_DIR)/package.mk

include $(INCLUDE_DIR)/kernel.mk

define Package/redis

        SECTION:=Diy pack

        CATEGORY:=Diy pack

        TITLE:=redis

        DEPENDS:= +libpthread

endef

# Uncomment portion below for Kamikaze and delete DESCRIPTION variable above

define Package/redis/description

        redis for server

endef

# Specify what needs to be done to prepare for building the package.

# In our case, we need to copy the source files to the build directory.

# This is NOT the default.  The default uses the PKG_SOURCE_URL and the

# PKG_SOURCE which is not defined here to download the source from the web.

# In order to just build a simple program that we have just written, it is

# much easier to do it this way.

define Build/Prepare

        mkdir -p $(PKG_BUILD_DIR)

        $(CP) ./src/* $(PKG_BUILD_DIR)/

endef

# We do not need to define Build/Configure or Build/Compile directives

# The defaults are appropriate for compiling a simple program such as this one

        $(foreach c, $(PKG_KCONFIG),$(if $(CONFIG_$c),-DCONFIG_$(c)=$(CONFIG_$c)))

define Build/Compile

        $(MAKE) MALLOC=libc -C $(PKG_BUILD_DIR) \

        $(TARGET_CONFIGURE_OPTS) CFLAGS="$(TARGET_CFLAGS)  -I$(LINUX_DIR)/include"

endef

# Specify where and how to install the program. Since we only have one file,

# the helloworld executable, install it by copying it to the /bin directory on

# the router. The $(1) variable represents the root directory on the router running

# OpenWrt. The $(INSTALL_DIR) variable contains a command to prepare the install

# directory if it does not already exist.  Likewise $(INSTALL_BIN) contains the

# command to copy the binary file from its current location (in our case the build

# directory) to the install directory.

#$(INSTALL_BIN) $(PKG_BUILD_DIR)/src/redis-server $(1)/bin/

define Package/redis/install

        $(INSTALL_DIR) $()/bin

        $(INSTALL_BIN) $(PKG_BUILD_DIR)/src/redis-server $()/bin/(如果是需要客户端则为$(INSTALL_BIN) $(PKG_BUILD_DIR)/src/redis-cli $()/bin/)

endef

# This line executes the necessary commands to compile our program.

# The above define directives specify all the information needed, but this

# line calls BuildPackage which in turn actually uses this information to

# build a package.

$(eval $(call BuildPackage,redis))
-------------------****************************** Makefile end *******************************************
修改src里的src下的config.h文件(也就是redis目录下的config.h文件)
vim src/src/config.h
把#define HAVE_BACKTRACE 1 注掉 ,如下图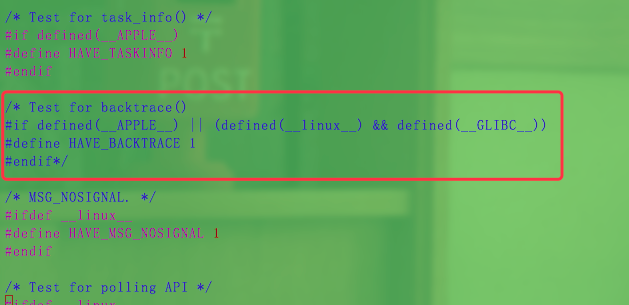
然后回到widora 的sdk目录下,make menuconfig,找到Diy pack进入,选择redis(如果是ipk则标注为M,如果编译进固件则是*)
然后正常make -j4 如果一切顺利的话,在sdk的bin/ramips/packages/base/中可以找到前缀为redis的ipk文件
将对应ipk下载下来上传到neo或bit3、bit4中,opkg install redis_xxx.ipk即可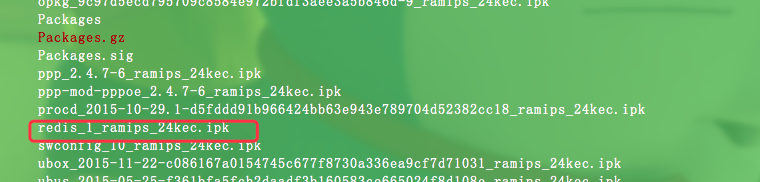
创建redis.conf文件,内容如下
bind 127.0.0.1

protected-mode yes

port

tcp-backlog

timeout

tcp-keepalive

daemonize yes

supervised no

pidfile /tmp/redis_6379.pid

loglevel notice

logfile ""

databases

save

save

save

stop-writes-on-bgsave-error yes

rdbcompression yes

rdbchecksum yes

dbfilename dump.rdb

dir ./

slave-serve-stale-data yes

slave-read-only yes

repl-diskless-sync no

repl-diskless-sync-delay

repl-disable-tcp-nodelay no

slave-priority

appendonly no

appendfilename "appendonly.aof"

appendfsync everysec

no-appendfsync-on-rewrite no

auto-aof-rewrite-percentage

auto-aof-rewrite-min-size 64mb

aof-load-truncated yes

lua-time-limit

slowlog-log-slower-than

slowlog-max-len

latency-monitor-threshold

notify-keyspace-events ""

hash-max-ziplist-entries

hash-max-ziplist-value

list-max-ziplist-size -

list-compress-depth

set-max-intset-entries

zset-max-ziplist-entries

zset-max-ziplist-value

hll-sparse-max-bytes

activerehashing yes

client-output-buffer-limit normal

client-output-buffer-limit slave 256mb 64mb

client-output-buffer-limit pubsub 32mb 8mb

hz

aof-rewrite-incremental-fsync yes
然后 redis-server 您的路径/redis.conf 启动redis
运行效果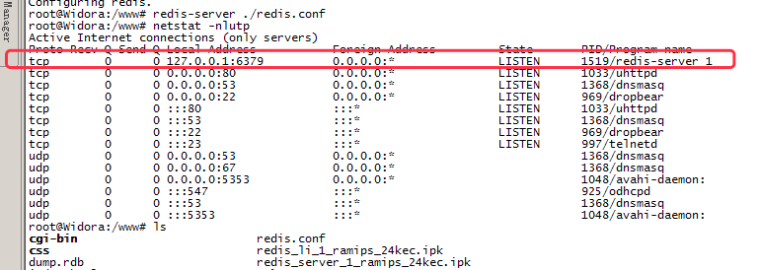
客户端(客户端编译需要的包为redis-cli,Makefile要对应修改一下,上边我给出的Makefile有注释这部分)实测连接: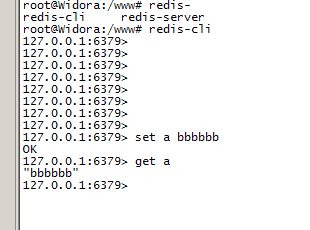
ok,完工
记录一次widora sdk编译ipk 实战编译redis的更多相关文章
- jenkins+gitlab自动化编译部署方案探索及服务端编译webpack实战
一. 背景 之前我们的开发流程为在本地进行webpack打包编译,然后svn提交源代码和编译后的代码.同时每次提交前也会从svn更新源代码和编译后的代码.这样做有几个缺点: 1. svn 更新和提交编 ...
- 编译原理实战——使用Lex/Flex进行编写一个有一定词汇量的词法分析器
编译原理实战--使用Lex/Flex进行编写一个有一定词汇量的词法分析器 by steve yu 2019.9.30 参考文档:1.https://blog.csdn.net/mist14/artic ...
- net core 实战之 redis 负载均衡和"高可用"实现
net core 实战之 redis 负载均衡和"高可用"实现 1.概述 分布式系统缓存已经变得不可或缺,本文主要阐述如何实现redis主从复制集群的负载均衡,以及 redis的& ...
- ilasm.exe与ildasm.exe的使用(编译与反编译)
ilasm.exe与ildasm.exe的使用(编译与反编译) 首先打开cmd命令.cd 到 C:\Program Files\Microsoft Visual Studio 8\SDK\v2.0 ...
- APK反编译、重编译、签名、查看源码
1.反编译与重编译 工具:apktool 下载地址:https://ibotpeaches.github.io/Apktool/ 环境:Java (JRE 1.7) 安装步骤:参考官网(也可以不安装, ...
- 安卓apk的编译与反编译
原文:https://blog.csdn.net/baidu_33870664/article/details/80186945 android基于java的,而java反编译工具很强悍,所以对正常a ...
- .Net Core Razor 预编译,动态编译,混合编译
预编译 预编译是ASP .Net Core的默认方式.在发布时,默认会将系统中的所有Razor视图进行预编译.编译好的视图DLL统一命名为 xxx.PrecompiledViews.dll 或者 xx ...
- 20190418 CentOS7实用技能综合:系统安装 + WinScp客户端连接 + 防火墙端口号iptables + Nginx编译安装 + MySQL编译安装 + Redis编译安装 + MongoDB编译安装 + ActiveMQ/RocketMQ/RabbitMQ编译安装 + ...各类常用生产环境软件的编译安装
系统安装 + WinScp客户端连接 + 防火墙端口号iptables + Nginx编译安装 + MySQL编译安装 + Redis编译安装 + MongoDB编译安装 + ActiveMQ/Roc ...
- 如何在 MSBuild Target(Exec)中报告编译错误和编译警告
编译错误和编译警告 MSBuild 的 Exec 自带有错误和警告的标准格式,按照此格式输出,将被识别为编译错误和编译警告. 而格式只是简简单单的 error: 开头或者 warning: 开头.冒号 ...
随机推荐
- pythoncharm 中解决启动server时出现 “django.core.exceptions.ImproperlyConfigured: Requested setting DEBUG, but settings are not configured”的错误
背景介绍 最近,尝试着用pythoncharm 这个All-star IDE来搞一搞Django,于是乎,下载专业版,PJ等等一系列操作之后,终于得偿所愿.可以开工了. 错误 在园子里找了一篇初学者的 ...
- Centos7安装openvpn及客户端配置
1.openvpn介绍 VPN直译就是虚拟专用通道,是提供给企业之间或者个人与公司之间安全数据传输的隧道,使用OpenSSL加密库中的SSLv3/TLSv1协议函数库. 目前OpenVPN能在Sola ...
- js实现图片(高度不确定)懒加载
最近一直在弄广告页,由于广告页几乎都是图片拼凑起来的,为了减少服务器压力和带宽,采用图片懒加载方式,但是我们的图片高度又不确定,所以我在网上下载了echo.js自己改了一下. 大体思路是:让首页先加载 ...
- JavaScript 原型中的哲学思想
学习JavaScript过程中,原型问题一直让我疑惑许久,那时候捧着那本著名的红皮书,看到有关原型的讲解时,总是心存疑虑.当在JavaScript世界中走过不少旅程之后,再次萌发起研究这部分知识的欲望 ...
- istio入门(04)istio的helloworld-部署构建
参考链接: https://zhuanlan.zhihu.com/p/27512075 安装Istio目前仅支持Kubernetes,在部署Istio之前需要先部署好Kubernetes集群并配置好k ...
- JVM 掌握要点
重读JVM jvm系列:jvm知识点总览 1. 认识Java虚拟机 默认Hotspot实现 2. 类加载机制 知道双亲委派模型 编译为class javac → 装载 class ClassLoade ...
- this对象指向
this表示函数运行时,自动生成的一个内部对象,只能在函数内部运行 function test(){ this.x = 1; } 随着使用场景的变化,this的值会发生变化 原则:this指的值调用函 ...
- 你真的会websocket吗
Websocket WebSocket协议是基于TCP的一种新的网络协议.它实现了浏览器与服务器全双工(full-duplex)通信——允许服务器主动发送信息给客户端. WebSocket通信协议于2 ...
- 用PHP如何实现这种乘法口诀表?
用PHP如何实现这种乘法口诀表? 1x1=1 ,1x2=2 ,1x3=3 ,.....,1x9=9 2x2=4 ,2x3=6 ,......,2x9=18 ........ ...... 8x8=64 ...
- JDK安装、变量、变量的分类
Lesson One 2018-04-17 19:50:35 JAVA语言特点: 编译型.强类型语言. 纯面向对象的语言,所有的代码都必须包含在class中的方法中 配置JAVA环境变量 1.安装J ...