
android 基本布局(RelativeLayout、TableLayout等)使用方法及各种属性
博客逐步迁移至 极客兔兔的小站
本文介绍 Android 界面开发中最基本的四种布局LinearLayout、RelativeLayout、FrameLayout、TableLayout 的使用方法及这四种布局中常用的属性。
- LinearLayout
线性布局,布局中空间呈线性排列- RelativeLayout
相对布局,通过相对定位的方式,控制控件位置- FrameLayout
帧布局,最简单的布局,所有控件放置左上角- TableLayout
表格布局,以行列方式控制控件位置
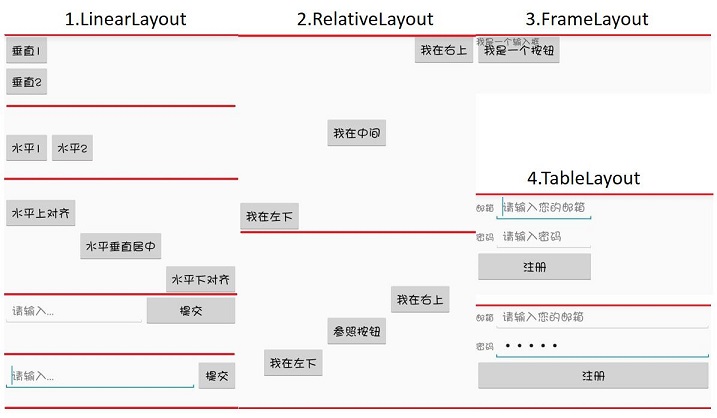
1.LinearLayout
<LinearLayout xmlns:android="http://schemas.android.com/apk/res/android"

    android:layout_width="match_parent"

    android:layout_height="match_parent"

    android:orientation="vertical">

    <LinearLayout xmlns:android="http://schemas.android.com/apk/res/android"

        android:layout_width="match_parent"

        android:layout_height="150dp"

        android:orientation="vertical">

        <Button

            android:layout_width="wrap_content"

            android:layout_height="wrap_content"

            android:text="垂直1" />

        <Button

            android:layout_width="wrap_content"

            android:layout_height="wrap_content"

            android:text="垂直2" />

    </LinearLayout>

    <LinearLayout xmlns:android="http://schemas.android.com/apk/res/android"

        android:layout_width="match_parent"

        android:layout_height="100dp"

        android:orientation="horizontal">

        <Button

            android:layout_width="wrap_content"

            android:layout_height="wrap_content"

            android:text="水平1" />

        <Button

            android:layout_width="wrap_content"

            android:layout_height="wrap_content"

            android:text="水平2" />

    </LinearLayout>

    <LinearLayout xmlns:android="http://schemas.android.com/apk/res/android"

        android:layout_width="match_parent"

        android:layout_height="150dp"

        android:orientation="horizontal">

        <Button

            android:layout_width="wrap_content"

            android:layout_height="wrap_content"

            android:layout_gravity="top"

            android:text="水平上对齐" />

        <Button

            android:layout_width="wrap_content"

            android:layout_height="wrap_content"

            android:layout_gravity="center_vertical"

            android:text="水平垂直居中" />

        <Button

            android:layout_width="wrap_content"

            android:layout_height="wrap_content"

            android:layout_gravity="bottom"

            android:text="水平下对齐" />

    </LinearLayout>

    <LinearLayout xmlns:android="http://schemas.android.com/apk/res/android"

        android:layout_width="match_parent"

        android:layout_height="100dp"

        android:orientation="horizontal">

        <EditText

            android:layout_width="0dp"

            android:layout_height="wrap_content"

            android:layout_weight="3"

            android:hint="请输入..."/>

        <Button

            android:layout_width="0dp"

            android:layout_height="wrap_content"

            android:layout_weight="2"

            android:text="提交" />

    </LinearLayout>

    <LinearLayout xmlns:android="http://schemas.android.com/apk/res/android"

        android:layout_width="match_parent"

        android:layout_height="100dp"

        android:orientation="horizontal">

        <EditText

            android:layout_width="0dp"

            android:layout_height="wrap_content"

            android:layout_weight="1"

            android:hint="请输入..."/>

        <Button

            android:layout_width="wrap_content"

            android:layout_height="wrap_content"

            android:text="提交" />

    </LinearLayout>

</LinearLayout>
- orientation:horizontal(水平)/vertical(垂直),表示线性排列的方向。
- layout_width/layout_height:元素的宽度与高度
- layout_gravity:top/bottom/center/left/right/etc,表示当前元素相对父元素的对齐方式,多种对齐方式用“|”隔开,右上对齐:
top|right。- layout_weight:占据空间的比例,例如元素A和B,A设置为1,B设置为3, 元素A、B分别占空间的1/4、3/4,此时元素宽度不由layout_width决定,设置为
0dp是比较规范的写法。- layout_weight 若元素A设置为1,元素B不设置,将layout_width设置为具体的值或wrap_content,那么元素B的宽度由layout_width决定,元素A将占满屏幕剩下的空间。
2.RelativeLayout
<LinearLayout ...>

    <RelativeLayout xmlns:android="http://schemas.android.com/apk/res/android"

        android:layout_width="match_parent"

        android:layout_height="300dp">

        <Button

            android:layout_width="wrap_content"

            android:layout_height="wrap_content"

            android:layout_alignParentLeft="true"

            android:layout_alignParentBottom="true"

            android:text="我在左下"/>

        <Button

            android:layout_width="wrap_content"

            android:layout_height="wrap_content"

            android:layout_centerInParent="true"

            android:text="我在中间"/>

        <Button

            android:layout_width="wrap_content"

            android:layout_height="wrap_content"

            android:layout_alignParentRight="true"

            android:layout_alignParentTop="true"

            android:text="我在右上"/>

    </RelativeLayout>

    <RelativeLayout xmlns:android="http://schemas.android.com/apk/res/android"

        android:layout_width="match_parent"

        android:layout_height="300dp">

        <Button

            android:id="@+id/button_2"

            android:layout_width="wrap_content"

            android:layout_height="wrap_content"

            android:layout_centerInParent="true"

            android:text="参照按钮"/>

        <Button

            android:layout_width="wrap_content"

            android:layout_height="wrap_content"

            android:layout_above="@id/button_2"

            android:layout_toRightOf="@id/button_2"

            android:text="我在右上"/>

        <Button

            android:layout_width="wrap_content"

            android:layout_height="wrap_content"

            android:layout_below="@id/button_2"

            android:layout_toLeftOf="@id/button_2"

            android:text="我在左下"/>

    </RelativeLayout>

</LinearLayout>
以下属性值为true/false
- layout_centerHorizontal/layout_centerVertical: 水平居中、垂直居中
- layout_centerInparent: 相对父元素垂直&水平居中
- layout_alignParentBottom: 元素下边界和父元素下边界对齐
- layout_alignParentLeft: 左边界对齐
- layout_alignParentRight: 右边界对齐
- layout_alignParentTop: 上边界对齐
以下属性值为控件id
- layout_above/layout_below: 在某元素的上方/下方
- layout_toLeftOf/layout_toRightOf: 在某元素的左方/右方
- layout_alignTop/layout_alignBottom: 元素上(下)边界与某元素上(下)边界对齐
- layout_alignLeft/layout_alignRight: 左(右)边界对齐
3.FrameLayout
所有元素都放置在布局的左上角
<FrameLayout xmlns:android="http://schemas.android.com/apk/res/android"

    android:layout_width="match_parent"

    android:layout_height="match_parent">

    <Button

        android:layout_width="wrap_content"

        android:layout_height="wrap_content"

        android:text="我是一个按钮"/>

    <TextView

        android:layout_width="wrap_content"

        android:layout_height="wrap_content"

        android:text="我是一个输入框"/>

</FrameLayout>
4.TableLayout
<TableLayout xmlns:android="http://schemas.android.com/apk/res/android"

    android:layout_width="match_parent"

    android:layout_height="match_parent">

    <TableRow>

        <TextView

            android:layout_height="wrap_content"

            android:text="邮箱"/>

        <EditText

            android:layout_height="wrap_content"

            android:inputType="textEmailAddress"

            android:hint="请输入您的邮箱" />

    </TableRow>

    <TableRow>

        <TextView

            android:layout_height="wrap_content"

            android:text="密码"/>

        <EditText

            android:layout_height="wrap_content"

            android:inputType="textPassword"

            android:hint="请输入密码" />

    </TableRow>

    <TableRow>

        <Button

            android:layout_height="wrap_content"

            android:layout_span="2"

            android:text="注册" />

    </TableRow>

</TableLayout>
<TableLayout xmlns:android="http://schemas.android.com/apk/res/android"

    android:layout_width="match_parent"

    android:layout_height="match_parent"

    android:stretchColumns="1">

    ...

</TableLayout>
- TableRow: 代表表格布局的一行,行内一个元素代表一列。
- layout_span: 合并单元格,设置为2,代表该元素占据2列空间。
- stretchColumns: TableRow中无法指定空间宽度,那么需要用到该属性,设置为1,表示拉伸第2列(0为第1列)与屏幕一样宽,效果如TableLayout的第二张图。
5.自定义布局
Android中,布局下可以放置控件,也可以放置子布局。如果子布局内容较为独立且经常使用,例如标题栏,或者布局比较复杂,这时候可以考虑使用自定义布局的形式导入。方法很简单。
- 新建一个布局文件,例如
example.xml - 在父布局中引入:
<LinearLayout xmlns:android="http://schemas.android.com/apk/res/android"

    android:orientation="vertical"

    android:layout_width="match_parent"

    android:layout_height="match_parent">

    <include layout="@layout/example"/>

</LinearLayout>
android 基本布局(RelativeLayout、TableLayout等)使用方法及各种属性的更多相关文章
- Android相对布局(RelativeLayout)
Android相对布局(RelativeLayout) 备注:这里的视图和元素是等同的概念. RelativeLayout是一个允许子视图相对于其他兄弟视图或是父视图显示的视图组(通过ID指定).每个 ...
- Android UI布局之TableLayout
从字面上了解TableLayout是一种表格式的布局.这样的布局会把包括的元素以行和列的形式进行排列.表格的列数为每一行的最大列数.当然表格里边的单元格是能够为空的. 实例:LayoutDemo 执行 ...
- Android之布局RelativeLayout
线性布局的weight属性在等比例分配时比较方便,但是对复杂的界面,嵌套多层LinearLayout布局会导致渲染变慢,占用更多系统资源:而使用RelativeLayout的话,可能仅仅需要一层就可以 ...
- android的布局-----RelativeLayout(相对布局)
学习导图 注:父容器定位的属性值只能是Boolean ,兄弟组件定位的属性值只能是ID 典型案例(梅花) <?xml version="1.0" encoding=" ...
- Android 五大布局(LinearLayout、FrameLayout、AbsoulteLayout、RelativeLayout、TableLayout )
前言 欢迎大家我分享和推荐好用的代码段~~ 声明 欢迎转载,但请保留文章原始出处: CSDN:http://www.csdn.net ...
- [转]浅谈Android五大布局(二)——RelativeLayout和TableLayout
在浅谈Android五大布局(一)中已经描述了LinearLayout(线性布局).FrameLayout(单帧布局)和AbsoulteLayout(绝对布局)三种布局结构,剩下的两种布局Relati ...
- 【深入篇】Android常用布局方式简介
LinearLayout 线性布局是程序中最常见的布局方式.一般分为水平线性布局和竖直线性布局,通过android.orientation属性可以设置线性布局的方向. 在布局中操作颜色时,要用的是十六 ...
- 动态布局--动态修改RelativeLayout宽高的方法
本文实例讲述了Android编程动态修改RelativeLayout宽高的方法.分享给大家供大家参考,具体如下: 我们经常会动态修改RelativeLayout的宽高,这样的代码,比较简单,就是修改R ...
- Android 表格布局<TableLayout>
表格布局即,tableLayout,表格布局通过行.列的形式来管理UI组件,TablelLayout并不需要明确地声明包含多少行.多少列,而是通过TableRow,以及其他组件来控制表格的行数和列数, ...
随机推荐
- DataTable 除去列中重复值
DataTable dtPCI = dtblSourceData.DefaultView.ToTable(true, new string[] { "Server Cell PCI" ...
- jquery更改加载图片大小
<script type="text/javascript"> $("img").css("width","80%&q ...
- c++错误代码1
今天敲c++,出现一个错误,这个题目错误代码如下: 并没有提示有错误而终止. 运行结果却错了: 很明显,错误的地方是变量r没有初始化. 这让我知道了,这种情况下的某些变量未经初始化而使用编译器是不会报 ...
- 用div和css样式控制页面布局
<!DOCTYPE html> <html xmlns="http://www.w3.org/1999/xhtml"> <head> <m ...
- jQuery超酷下拉插件6种效果演示
原始的下拉框很丑啦, 给大家一款jQuery超酷下拉插件6种效果 效果预览 下载地址 实例代码 <div class="container"> <section ...
- 使用ruby搭建简易的http服务和sass环境
使用ruby搭建简易的http服务和sass环境 由于在通常的前端开发情况下,我们会有可能需要一个http服务,当然你可以选择自己写一个node的http服务,也比较简单,比如下面的node代码: v ...
- JavaScript学习笔记-实例详解-类(二)
实例详解-类(二) //===给Object.prototype添加只读\不可枚举\不可配置的属性objectId(function(){ Object.defineProperty(Object ...
- JavaScript学习笔记-数组
数组 数组中的每个元素的位置是索引,索引是基于32位的由0开始的数值,最大索引为(2的32次方-2),最大长度为(2的32次方-3) 数组是无类型的:元素可为任意类型:动态的:可根据需要自动增长.缩减 ...
- 删除oracle表报ORA-24005错误
请先执行:alter session set events'10851 trace name context forever,level 1'; 然后再删除表.
- DevExpress应用案例--语音识别器Dual Writer
Dual Writer是 一个以语音识别为特色的文档处理器,无需安装其他软件,只需要插入你的麦克风就可以开始录入口述文字.它不仅支持MS Word的DOCX格式,还支持 RTF.ODT.TXT等常见文 ...