Nacos深入浅出(四)
private void executeAsyncInvoke() {

            while (!queue.isEmpty()) {

                NotifySingleTask task = queue.poll();

                String targetIp = task.getTargetIP();

                if (serverListService.getServerList().contains(

                    targetIp)) {

                    // 启动健康检查且有不监控的ip则直接把放到通知队列,否则通知

                    if (serverListService.isHealthCheck()

                        && ServerListService.getServerListUnhealth().contains(targetIp)) {

                        // target ip 不健康,则放入通知列表中

                        ConfigTraceService.logNotifyEvent(task.getDataId(), task.getGroup(), task.getTenant(), null,

                            task.getLastModified(),

                            LOCAL_IP, ConfigTraceService.NOTIFY_EVENT_UNHEALTH, , task.target);

                        // get delay time and set fail count to the task

                        int delay = getDelayTime(task);

                        Queue<NotifySingleTask> queue = new LinkedList<NotifySingleTask>();

                        queue.add(task);

                        AsyncTask asyncTask = new AsyncTask(httpclient, queue);

                        ((ScheduledThreadPoolExecutor)EXCUTOR).schedule(asyncTask, delay, TimeUnit.MILLISECONDS);

                    } else {

                        HttpGet request = new HttpGet(task.url);

                        request.setHeader(NotifyService.NOTIFY_HEADER_LAST_MODIFIED,

                            String.valueOf(task.getLastModified()));

                        request.setHeader(NotifyService.NOTIFY_HEADER_OP_HANDLE_IP, LOCAL_IP);

                        if (task.isBeta) {

                            request.setHeader("isBeta", "true");

                        }

                        httpclient.execute(request, new AyscNotifyCallBack(httpclient, task));

                    }

                }

            }

        }
request中的内容debug出来
http://10.129.13.96:8848/nacos/v1/cs/communication/dataChange?dataId=springboot2-nacos-config&group=DEFAULT_GROUP
这里又发了一个请求出去,跳转到/communication/dataChange这个里面去,继续跟进,
这个请求转发到
CommunicationController.java中来了
/**

     * 通知配置信息改变

     */

    @RequestMapping(value = "/dataChange", method = RequestMethod.GET)

    @ResponseBody

    public Boolean notifyConfigInfo(HttpServletRequest request, HttpServletResponse response,

                                    @RequestParam("dataId") String dataId, @RequestParam("group") String group,

                                    @RequestParam(value = "tenant", required = false, defaultValue = StringUtils.EMPTY)

                                        String tenant,

                                    @RequestParam(value = "tag", required = false) String tag) {

        dataId = dataId.trim();

        group = group.trim();

        String lastModified = request.getHeader(NotifyService.NOTIFY_HEADER_LAST_MODIFIED);

        long lastModifiedTs = StringUtils.isEmpty(lastModified) ? -1 : Long.parseLong(lastModified);

        String handleIp = request.getHeader(NotifyService.NOTIFY_HEADER_OP_HANDLE_IP);

        String isBetaStr = request.getHeader("isBeta");

        if (StringUtils.isNotBlank(isBetaStr) && trueStr.equals(isBetaStr)) {

            dumpService.dump(dataId, group, tenant, lastModifiedTs, handleIp, true);

        } else {

            dumpService.dump(dataId, group, tenant, tag, lastModifiedTs, handleIp);

        }

        return true;

    }
TaskManager.java
/**

     * 将任务加入到任务Map中

     *

     * @param type

     * @param task

     */

    public void addTask(String type, AbstractTask task) {

        this.lock.lock();

        try {

            AbstractTask oldTask = tasks.put(type, task);

            MetricsMonitor.getDumpTaskMonitor().set(tasks.size());

            if (null != oldTask) {

                task.merge(oldTask);

            }

        } finally {

            this.lock.unlock();

        }

    }
task具体内容如下
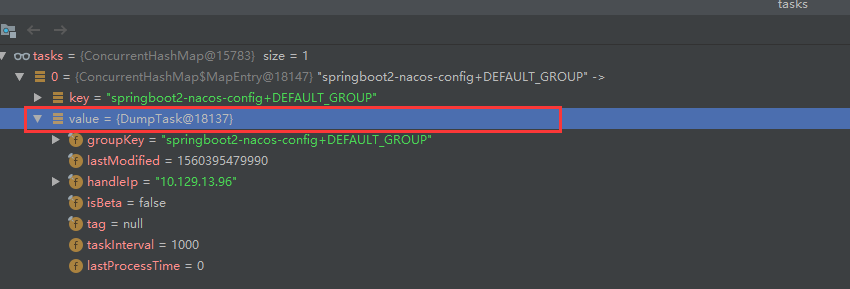
这目前为止,Nacos的整个思路就是把每一个需要通知的操作,封装成一个task,直接把这个task扔到一个队列里面去,然后这个队列在不断的循环去poll,
只要队列里面有东西,就去执行这个task对应的processor;
TaskManager.java
这个类就是我们最终的处理类,真正去做通知更新的管理类,上代码,这里就不贴整个类了,局部展示,
public final class TaskManager implements TaskManagerMBean {

    class ProcessRunnable implements Runnable {

        public void run() {

            while (!TaskManager.this.closed.get()) {

                try {

                    Thread.sleep(100);

                    TaskManager.this.process();

                } catch (Throwable e) {

                }

            }

        }

    }
这里面起了一个线程,只要没有关闭,就死循环去执行process;
 protected void process() {

        for (Map.Entry<String, AbstractTask> entry : this.tasks.entrySet()) {

            AbstractTask task = null;

            this.lock.lock();

            try {

                // 获取任务

                task = entry.getValue();

                if (null != task) {

                    if (!task.shouldProcess()) {

                        // 任务当前不需要被执行,直接跳过

                        continue;

                    }

                    // 先将任务从任务Map中删除

                    this.tasks.remove(entry.getKey());

                    MetricsMonitor.getDumpTaskMonitor().set(tasks.size());

                }

            } finally {

                this.lock.unlock();

            }

            if (null != task) {

                // 获取任务处理器

                TaskProcessor processor = this.taskProcessors.get(entry.getKey());

                if (null == processor) {

                    // 如果没有根据任务类型设置的处理器,使用默认处理器

                    processor = this.getDefaultTaskProcessor();

                }

                if (null != processor) {

                    boolean result = false;

                    try {

                        // 处理任务

                        result = processor.process(entry.getKey(), task);

                    } catch (Throwable t) {

                        log.error("task_fail", "处理task失败", t);

                    }

                    if (!result) {

                        // 任务处理失败,设置最后处理时间

                        task.setLastProcessTime(System.currentTimeMillis());

                        // 将任务重新加入到任务Map中

                        this.addTask(entry.getKey(), task);

                    }

                }

            }

        }
重点!!!!!!!!!!!!!!!!!!!!!!!!!!!!!!!!!!!!!!!
class DumpProcessor implements TaskProcessor {

    DumpProcessor(DumpService dumpService) {

        this.dumpService = dumpService;

    }

    @Override

    public boolean process(String taskType, AbstractTask task) {

        DumpTask dumpTask = (DumpTask)task;

        String[] pair = GroupKey2.parseKey(dumpTask.groupKey);

        String dataId = pair[0];

        String group = pair[1];

        String tenant = pair[2];

        long lastModified = dumpTask.lastModified;

        String handleIp = dumpTask.handleIp;

        boolean isBeta = dumpTask.isBeta;

        String tag = dumpTask.tag;

        if (isBeta) {

            // beta发布,则dump数据,更新beta缓存

            ConfigInfo4Beta cf = dumpService.persistService.findConfigInfo4Beta(dataId, group, tenant);

            boolean result;

            if (null != cf) {

                result = ConfigService.dumpBeta(dataId, group, tenant, cf.getContent(), lastModified, cf.getBetaIps());

                if (result) {

                    ConfigTraceService.logDumpEvent(dataId, group, tenant, null, lastModified, handleIp,

                        ConfigTraceService.DUMP_EVENT_OK, System.currentTimeMillis() - lastModified,

                        cf.getContent().length());

                }

            } else {

                result = ConfigService.removeBeta(dataId, group, tenant);

                if (result) {

                    ConfigTraceService.logDumpEvent(dataId, group, tenant, null, lastModified, handleIp,

                        ConfigTraceService.DUMP_EVENT_REMOVE_OK, System.currentTimeMillis() - lastModified, 0);

                }

            }

            return result;

        } else {

            if (StringUtils.isBlank(tag)) {

                ConfigInfo cf = dumpService.persistService.findConfigInfo(dataId, group, tenant);

                if (dataId.equals(AggrWhitelist.AGGRIDS_METADATA)) {

                    if (null != cf) {

                        AggrWhitelist.load(cf.getContent());

                    } else {

                        AggrWhitelist.load(null);

                    }

                }

                if (dataId.equals(ClientIpWhiteList.CLIENT_IP_WHITELIST_METADATA)) {

                    if (null != cf) {

                        ClientIpWhiteList.load(cf.getContent());

                    } else {

                        ClientIpWhiteList.load(null);

                    }

                }

                if (dataId.equals(SwitchService.SWITCH_META_DATAID)) {

                    if (null != cf) {

                        SwitchService.load(cf.getContent());

                    } else {

                        SwitchService.load(null);

                    }

                }

                boolean result;

                if (null != cf) {

                    result = ConfigService.dump(dataId, group, tenant, cf.getContent(), lastModified);

                    if (result) {

                        ConfigTraceService.logDumpEvent(dataId, group, tenant, null, lastModified, handleIp,

                            ConfigTraceService.DUMP_EVENT_OK, System.currentTimeMillis() - lastModified,

                            cf.getContent().length());

                    }

                } else {

                    result = ConfigService.remove(dataId, group, tenant);

                    if (result) {

                        ConfigTraceService.logDumpEvent(dataId, group, tenant, null, lastModified, handleIp,

                            ConfigTraceService.DUMP_EVENT_REMOVE_OK, System.currentTimeMillis() - lastModified, 0);

                    }

                }

                return result;

            } else {

                ConfigInfo4Tag cf = dumpService.persistService.findConfigInfo4Tag(dataId, group, tenant, tag);

                //

                boolean result;

                if (null != cf) {

                    result = ConfigService.dumpTag(dataId, group, tenant, tag, cf.getContent(), lastModified);

                    if (result) {

                        ConfigTraceService.logDumpEvent(dataId, group, tenant, null, lastModified, handleIp,

                            ConfigTraceService.DUMP_EVENT_OK, System.currentTimeMillis() - lastModified,

                            cf.getContent().length());

                    }

                } else {

                    result = ConfigService.removeTag(dataId, group, tenant, tag);

                    if (result) {

                        ConfigTraceService.logDumpEvent(dataId, group, tenant, null, lastModified, handleIp,

                            ConfigTraceService.DUMP_EVENT_REMOVE_OK, System.currentTimeMillis() - lastModified, 0);

                    }

                }

                return result;

            }

        }

    }

    final DumpService dumpService;

}
篇幅有点长,放到下一篇,go!!
Nacos深入浅出(四)的更多相关文章
- VC++动态链接库(DLL)编程深入浅出(四)
这是<VC++动态链接库(DLL)编程深入浅出>的第四部分,阅读本文前,请先阅读前三部分:(一).(二).(三). MFC扩展DLL的内涵为MFC的扩展,用户使用MFC扩展DLL就像使用M ...
- Nacos深入浅出(五)
四中标色的代码 result = ConfigService.dump(dataId, group, tenant, cf.getContent(), lastModified); 我们看下这个方法 ...
- Spring Cloud Alibaba 教程 | Nacos(四)
Nacos环境隔离 Nacos管理台有一个单独的菜单"命名空间",里面默认存在一个名为"public"的默认命名空间,我们在使用Nacos时不管是作为注册中心还 ...
- Nacos深入浅出(十)
基本上到第9篇,整个请求的一套就结束了,感觉这里跳跳绕绕很多东西,下面我们来做个总结:从Nacos配置平台修改,到Client请求更新,事件触发去取值返回给客户端,整个过程感觉只分析到了4.5层的深度 ...
- Nacos深入浅出(九)
然而Nacos的发布操作并不是上面我们想的那样通过代理去实现,通过下面的代码我们分析下: public class NacosConfigurationPropertiesBindingPostPro ...
- Nacos深入浅出(八)
Nacos-spring-context.java 感觉这个后台要比之前的Nacos复杂多了,涉及到很多基础的概念,慢慢看,这个后面慢慢更新解析过程 看到他的目录结构一个是基于注解,一个是XML的解析 ...
- Nacos深入浅出(七)
大家可以把这个也下载下来,结合之前的Nacos一起来看下,感觉前面几篇看了好像冰山一角的感觉 学无止境! https://github.com/nacos-group/nacos-spring-pro ...
- Nacos深入浅出(六)
其实我们发现在我们本地新生成了文件,这个文件就是nacos; 这个文件怎么那么眼熟,不就是我们的controller中的注解里面的参数value么: @Controller @NacosPropert ...
- Nacos深入浅出(二)
如果你的服务已经能正常跑起来,个人建议可以先感受下nacos的魅力,也就是怎么使用吧 直接上代码 @Controller @NacosPropertySource(dataId = "spr ...
随机推荐
- loader与plugin,module与chunk,compiler与compilation
loader将各类型的文件转为webpack能处理的有效模块(module) 插件处理范围更广的任务,例如打包优化.压缩等 module程序的离散功能块,一个文件对应一个module chunk若干m ...
- 自定义编辑框VC,可加载更改字体,添加背景图片,显示输入提示信息
搞了一天终于弄了个完整的编辑框控件出来了, 哎,,,搞界面开发还是有点复杂的. #pragma once #include "AdvEdit.h" // CBkgEditBox c ...
- JAVA- 清除数组重复元素
清除数组重复元素并打印新数组. import java.util.*; public class Repeat { public static void main(String[] args) { / ...
- nodejs && apidoc
1. 安装nodejs http://www.nodejs.org 源码编译 configure —prefix=/usr/local/nodejs make ...
- listen 78
Struggling Young Readers Like Kindles Kindles, Nooks and other e-readers catch flack for threatening ...
- listen 66
Frog Species Found in Big Apple Scientists discover new species all the time—on the order of 15,000 ...
- mvc 让伪静态变得简单
IIS 部署后访问*.* config 配置: <modules runAllManagedModulesForAllRequests="true"> < ...
- plsql developer点滴
PLSql中查看编译错误的具体内容: 1. 打开Command Windows show errors procedure procedure_name
- Spring boot 学习 九
一:经过试验发现,如果使用如下的Controller(@RequestBody), 前台POST的请求body只能是JSON,如果是form-data, X-www-form-urlencoded 或 ...
- nodejs的mysql模块学习(二)连接数据库
nodejs连接mysql的方式有两种 官方建议的第一种是 let mysql = require('mysql'); let connection = mysql.createConnection( ...