[nRF51822] 8、基础实验代码解析大全 · 实验11 - PPI
前一篇分析了前十个基础实验的代码,从这里开始分析后十个~
一、PPI原理:
PPI(Programmable Peripheral Interconnect),中文翻译为可编程外设互连。
在nRF51822 内部设置了PPI 方式,可以通过任务和事件让不同外设之间进行互连,而不需要CPU 进行参与。
PPI 通过通道让任务和事件连接在一起。PPI 通道由两个端点组成:
- 任务端点:Task End-Point (TEP)。
- 事件端点:Event End-Point (EEP)。
所谓的互联就是将任务端点写入需要连接的任务寄存器地址,事件端点写入需要连接事件寄存器地址,之后,使能该PPI 通道,即实现了任务和事件的互联。
可以通过如下两种方式使能和关闭PPI 通道:
- 1) 通过独立设置CHEN,CHENSET 和CHENCLR 寄存器。
- 2) 通过PPI 通道组的使能和关闭任务。使用这种方式,在触发任务之前,需要先配置好哪些PPI 通道属于哪个组。
二、运行逻辑:
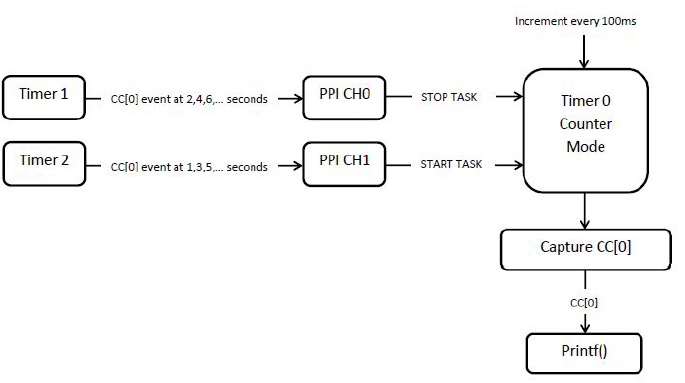
实验中,用到了3 个定时器:Timer 0、Timer 1 和Timer 2。
1) Timer 0 配置为计数器,在主循环中每100ms 被触发一次,并通过串口打印出计数值。
2) Timer 1 每个偶数秒(2、4、6、8……)产生一次比较匹配事件,该事件通过PPI通道0 和Timer 0 的STOP Task 互联,互联后通过该事件触发Timer 0 的STOP Task。
3) Timer 2 每个奇数秒(1、3、5、7……)产生一次比较匹配事件,该事件通过PPI通道1 和Timer 0 的START Task 互联,互联后通过该事件触发Timer 0 的START Task。
实验原理框图如图1 所示:
三、核心代码分析
系统运行后,在循环中Timer 0 计数器的计数值每100ms 增加一次,在偶数秒时,Timer2 产生比较匹配事件,通过PPI 触发Timer 0 的STOP Task,Timer 0 停止计数。此时,尽管主循环中每隔100ms 触发一次Timer 0 计数,但是由于Timer 0 已经停止,所以,计数值不会增加。每个奇数秒,Timer2 产生比较匹配事件,通过PPI 触发Timer 0 的START Task,Timer 0 恢复计数。
main函数部分:
 int main(void)

 {

     timer0_init(); // Timer used to blink the LEDs.

     timer1_init(); // Timer to generate events on even number of seconds.

     timer2_init(); // Timer to generate events on odd number of seconds.

     ppi_init();    // PPI to redirect the event to timer start/stop tasks.

       串口初始化(略)

     // Enabling constant latency as indicated by PAN 11 "HFCLK: Base current with HFCLK

     // running is too high" found at Product Anomaly document found at

     // https://www.nordicsemi.com/eng/Products/Bluetooth-R-low-energy/nRF51822/#Downloads

     //

     // @note This example does not go to low power mode therefore constant latency is not needed.

     //       However this setting will ensure correct behaviour when routing TIMER events through

     //       PPI (shown in this example) and low power mode simultaneously.

     NRF_POWER->TASKS_CONSTLAT = ;

     // Start clock.

     nrf_drv_timer_enable(&timer0);

     nrf_drv_timer_enable(&timer1);

     nrf_drv_timer_enable(&timer2);

     // Loop and increment the timer count value and capture value into LEDs. @note counter is only incremented between TASK_START and TASK_STOP.

     while (true)

     {

         printf("Current cout: %d\r\n", (int)nrf_drv_timer_capture(&timer0,NRF_TIMER_CC_CHANNEL0));

         /* increment the counter */

         nrf_drv_timer_increment(&timer0);

         nrf_delay_ms();

     }

 }
定时器初始化部分:
 // Timer even handler. Not used since timer is used only for PPI.

 void timer_event_handler(nrf_timer_event_t event_type, void * p_context){}

 /** @brief Function for Timer 0 initialization, which will be started and stopped by timer1 and timer2 using PPI.

 */

 static void timer0_init(void)

 {

     ret_code_t err_code = nrf_drv_timer_init(&timer0, NULL, timer_event_handler);

     APP_ERROR_CHECK(err_code);

 }

 /** @brief Function for Timer 1 initialization.

  *  @details Initializes Timer 1 peripheral, creates event and interrupt every 2 seconds,

  *           by configuring CC[0] to timer overflow value, we create events at even number of seconds

  *           for example, events are created at 2,4,6 ... seconds. This event can be used to stop Timer 0

  *           with Timer1->Event_Compare[0] triggering Timer 0 TASK_STOP through PPI.

 */

 static void timer1_init(void)

 {

     // Configure Timer 1 to overflow every 2 seconds. Check TIMER1 configuration for details

     // The overflow occurs every 0xFFFF/(SysClk/2^PRESCALER).

     // = 65535/31250 = 2.097 sec

     ret_code_t err_code = nrf_drv_timer_init(&timer1, NULL, timer_event_handler);

     APP_ERROR_CHECK(err_code);

     nrf_drv_timer_extended_compare(&timer1, NRF_TIMER_CC_CHANNEL0, 0xFFFFUL, NRF_TIMER_SHORT_COMPARE0_CLEAR_MASK, false);//比较模式,Timer 1 每个偶数秒(2、4、6、8……)产生一次比较匹配事件,该事件通过PPI通道0 和Timer 0 的STOP Task 互联,互联后通过该事件触发Timer 0 的STOP Task。

 }

 /** @brief Function for Timer 2 initialization.

  *  @details Initializes Timer 2 peripheral, creates event and interrupt every 2 seconds

  *           by configuring CC[0] to half of timer overflow value. Events are created at odd number of seconds.

  *           For example, events are created at 1,3,5,... seconds. This event can be used to start Timer 0

  *           with Timer2->Event_Compare[0] triggering Timer 0 TASK_START through PPI.

 */

 static void timer2_init(void)

 {

     // Generate interrupt/event when half of time before the timer overflows has past, that is at 1,3,5,7... seconds from start.

     // Check TIMER1 configuration for details

     // now the overflow occurs every 0xFFFF/(SysClk/2^PRESCALER)

     // = 65535/31250 = 2.097 sec */

     ret_code_t err_code = nrf_drv_timer_init(&timer2, NULL, timer_event_handler);

     APP_ERROR_CHECK(err_code);

     nrf_drv_timer_extended_compare(&timer2, NRF_TIMER_CC_CHANNEL0, 0x7FFFUL, NRF_TIMER_SHORT_COMPARE0_CLEAR_MASK, false);//Timer 2 每个奇数秒(1、3、5、7……)产生一次比较匹配事件,该事件通过PPI通道1 和Timer 0 的START Task 互联,互联后通过该事件触发Timer 0 的START Task。

 }
PPI连接事件部分:
 /** @brief Function for initializing the PPI peripheral.

 */

 static void ppi_init(void)

 {

     uint32_t err_code = NRF_SUCCESS;

     err_code = nrf_drv_ppi_init();

     APP_ERROR_CHECK(err_code);

     // Configure 1st available PPI channel to stop TIMER0 counter on TIMER1 COMPARE[0] match, which is every even number of seconds.

     err_code = nrf_drv_ppi_channel_alloc(&ppi_channel1);

     APP_ERROR_CHECK(err_code);

13     err_code = nrf_drv_ppi_channel_assign(ppi_channel1,//PPI连接事件

14                                           nrf_drv_timer_event_address_get(&timer1, NRF_TIMER_EVENT_COMPARE0),

15                                           nrf_drv_timer_task_address_get(&timer0, NRF_TIMER_TASK_STOP));

     APP_ERROR_CHECK(err_code);

     // Configure 2nd available PPI channel to start timer0 counter at TIMER2 COMPARE[0] match, which is every odd number of seconds.

     err_code = nrf_drv_ppi_channel_alloc(&ppi_channel2);

     APP_ERROR_CHECK(err_code);

21     err_code = nrf_drv_ppi_channel_assign(ppi_channel2,

22                                           nrf_drv_timer_event_address_get(&timer2, NRF_TIMER_EVENT_COMPARE0),

23                                           nrf_drv_timer_task_address_get(&timer0, NRF_TIMER_TASK_START));

     APP_ERROR_CHECK(err_code);

     // Enable both configured PPI channels

     err_code = nrf_drv_ppi_channel_enable(ppi_channel1);

     APP_ERROR_CHECK(err_code);

     err_code = nrf_drv_ppi_channel_enable(ppi_channel2);

     APP_ERROR_CHECK(err_code);

 }
@beautifulzzzz - 物联网&普适计算实践者
e-mail:beautifulzzzz@qq.com
i-blog:blog.beautifulzzzz.com
[nRF51822] 8、基础实验代码解析大全 · 实验11 - PPI的更多相关文章
- [nRF51822] 12、基础实验代码解析大全 · 实验19 - PWM
一.PWM概述: PWM(Pulse Width Modulation):脉冲宽度调制技术,通过对一系列脉冲的宽度进行调制,来等效地获得所需要波形. PWM 的几个基本概念: 1) 占空比:占空比是指 ...
- [nRF51822] 11、基础实验代码解析大全 · 实验16 - 内部FLASH读写
一.实验内容: 通过串口发送单个字符到NRF51822,NRF51822 接收到字符后将其写入到FLASH 的最后一页,之后将其读出并通过串口打印出数据. 二.nRF51822芯片内部flash知识 ...
- [nRF51822] 10、基础实验代码解析大全 · 实验15 - RTC
一.实验内容: 配置NRF51822 的RTC0 的TICK 频率为8Hz,COMPARE0 匹配事件触发周期为3 秒,并使能了TICK 和COMPARE0 中断. TICK 中断中驱动指示灯D1 翻 ...
- [nRF51822] 9、基础实验代码解析大全 · 实验12 - ADC
一.本实验ADC 配置 分辨率:10 位. 输入通道:5,即使用输入通道AIN5 检测电位器的电压. ADC 基准电压:1.2V. 二.NRF51822 ADC 管脚分布 NRF51822 的ADC ...
- [nRF51822] 7、基础实验代码解析大全(前十)
实验01 - GPIO输出控制LED 引脚输出配置:nrf_gpio_cfg_output(LED_1); 引脚输出置高:nrf_gpio_pin_set(LED_1); 引脚电平转换:nrf_gpi ...
- 基础Gan代码解析
initializer总结: #f.constant_initializer(value) 将变量初始化为给定的常量,初始化一切所提供的值. #tf.random_normal_initializer ...
- MYSQL常见出错mysql_errno()代码解析
如题,今天遇到怎么一个问题, 在理论上代码是不会有问题的,但是还是报了如上的错误,把sql打印出來放到DB中却可以正常执行.真是郁闷,在百度里面 渡 了很久没有相关的解释,到时找到几个没有人回复的 & ...
- 【原创】大数据基础之Spark(5)Shuffle实现原理及代码解析
一 简介 Shuffle,简而言之,就是对数据进行重新分区,其中会涉及大量的网络io和磁盘io,为什么需要shuffle,以词频统计reduceByKey过程为例, serverA:partition ...
- 【原创】大数据基础之Spark(4)RDD原理及代码解析
一 简介 spark核心是RDD,官方文档地址:https://spark.apache.org/docs/latest/rdd-programming-guide.html#resilient-di ...
随机推荐
- F#之旅6 - 简单AV推荐系统
上回说到用F#来写爬虫,这只是F#学习第一阶段的第一步.最开始,就对第一阶段做了这样的安排: 1.爬虫爬取AV数据 2.数据处理和挖掘 3.数据可视化(使用ECharts) 4.推荐系统 第一步很快就 ...
- FFmpeg纯净版解码 av_parser_parse2
主要是通过av_parser_parse2拿到AVPaket数据,跟av_read_frame类似. 输入必须是只包含视频编码数据“裸流”(例如H.264.HEVC码流文件),而不能是包含封装格式的媒 ...
- Linq的分页
真有趣. C#里面的List对象.set对象,都可以直接使用Linq(这是因为,它们都实现了接口IEnumable?),比如说:Where().OrderBy()什么的.假如有点SQL基础的人,一看这 ...
- HDU-SupportOrNot训练实录
菜鸡队训练实录. 现场赛记录: 2016:[名称:奖项/排名] ZJPSC:Gold/1 CCPC中南邀请赛:Gold/1 ICPC Dalian:Gold/24 ICPC Beijing:Gold/ ...
- 前馈网络求导概论(一)·Softmax篇
Softmax是啥? Hopfield网络的能量观点 1982年的Hopfiled网络首次将统计物理学的能量观点引入到神经网络中, 将神经网络的全局最小值求解,近似认为是求解热力学系统的能量最低点(最 ...
- hdu3068马拉车
其实马拉车还真是最好理解的算法(感觉初中的时候好像讲过类似的,但是当时就没有认真听) 没想到一个简单的优化能变成O(n),感觉碉堡 不说了,马拉车裸题,我在写的时候只保留了id,没保留mx,希望能形成 ...
- bug: 在缓存行高时,总是记录错误.
一,现象: 1.在 cell 中添加了一个 label, 并对 label 设置了 attributeText, 结果滑动的过程中,cell 的高度总是不对,多次出现下一个 cell 覆盖上一个 ce ...
- Ubuntu14.10搭建C++开发环境
方法一:1、安装Eclipsesudo apt-get install eclipse2、安装Eclipse CDTsudo apt-get install eclipse-cdt3、安装Autoto ...
- 使用 SWFObject.js 插入Flash
今天学习了一下使用 SWFObject.js 这个js插入flash. 下载地址:http://code.google.com/p/swfobject/ 这个js的好处 1.IE中没有讨厌的虚框问题了 ...
- jsp页面 如何通过el表达式获取request属性值
1. 我在一个超连接后加个参数如: http://localhost:8080/test/testjstl.jsp?pid=001 此时在jsp页面中,获取jsp传过来的pid的参数值 ...