Nginx 做JavaWeb负载均衡
随着用户量的增大,单台服务器已经满足不了用户的需求。
准备工作:安装 gcc、pcre-devel、zlib、OpenSSL 一下是在线 离线请戳这里
gcc 安装
安装 nginx 需要先将官网下载的源码进行编译,编译依赖 gcc 环境,如果没有 gcc 环境,则需要安装:
yum install gcc-c++
PCRE pcre-devel 安装
PCRE(Perl Compatible Regular Expressions) 是一个Perl库,包括 perl 兼容的正则表达式库。nginx 的 http 模块使用 pcre 来解析正则表达式,所以需要在 linux 上安装 pcre 库,pcre-devel 是使用 pcre 开发的一个二次开发库。nginx也需要此库。命令:
yum install -y pcre pcre-devel
zlib
zlib 库提供了很多种压缩和解压缩的方式, nginx 使用 zlib 对 http 包的内容进行 gzip ,所以需要在 Centos 上安装 zlib 库。
yum install -y zlib zlib-devel
OpenSSL
OpenSSL 是一个强大的安全套接字层密码库,囊括主要的密码算法、常用的密钥和证书封装管理功能及 SSL 协议,并提供丰富的应用程序供测试或其它目的使用。
nginx 不仅支持 http 协议,还支持 https(即在ssl协议上传输http),所以需要在 Centos 安装 OpenSSL 库。
yum install -y openssl openssl-devel
Nginx 下载地址
1、解压 nginx-1.8.1.tar.gz
tar -zxvf nginx-1.8.1.tar.gz

cd nginx-1.8.1
2、编译、安装nginx
./configure

make

make install
3、启动 nginx
[root@localhost nginx-1.8.1]# whereis nginx

 nginx: /usr/local/nginx

[root@localhost nginx-1.8.1]# cd /usr/local/nginx/

[root@localhost nginx]# ./sbin/nginx     #启动
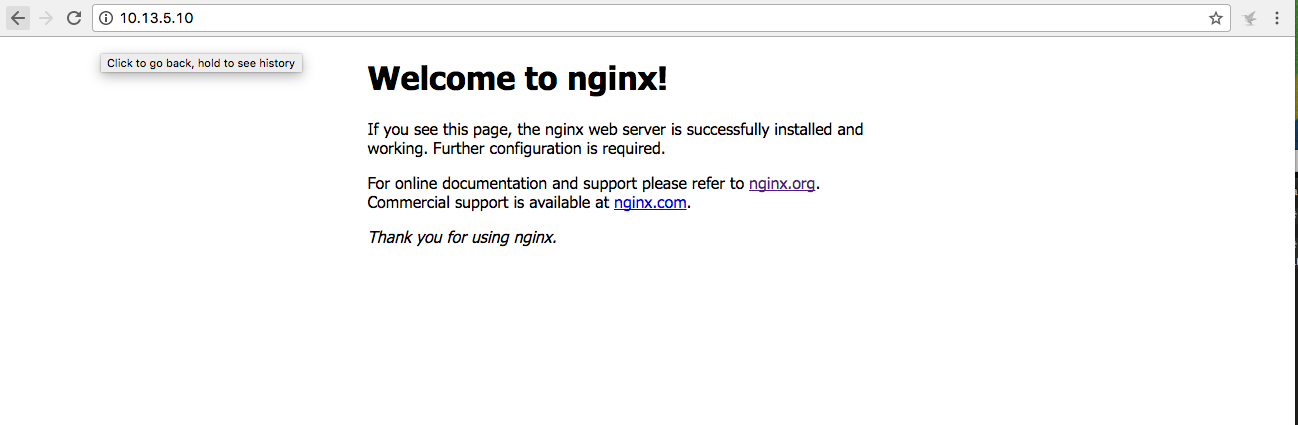
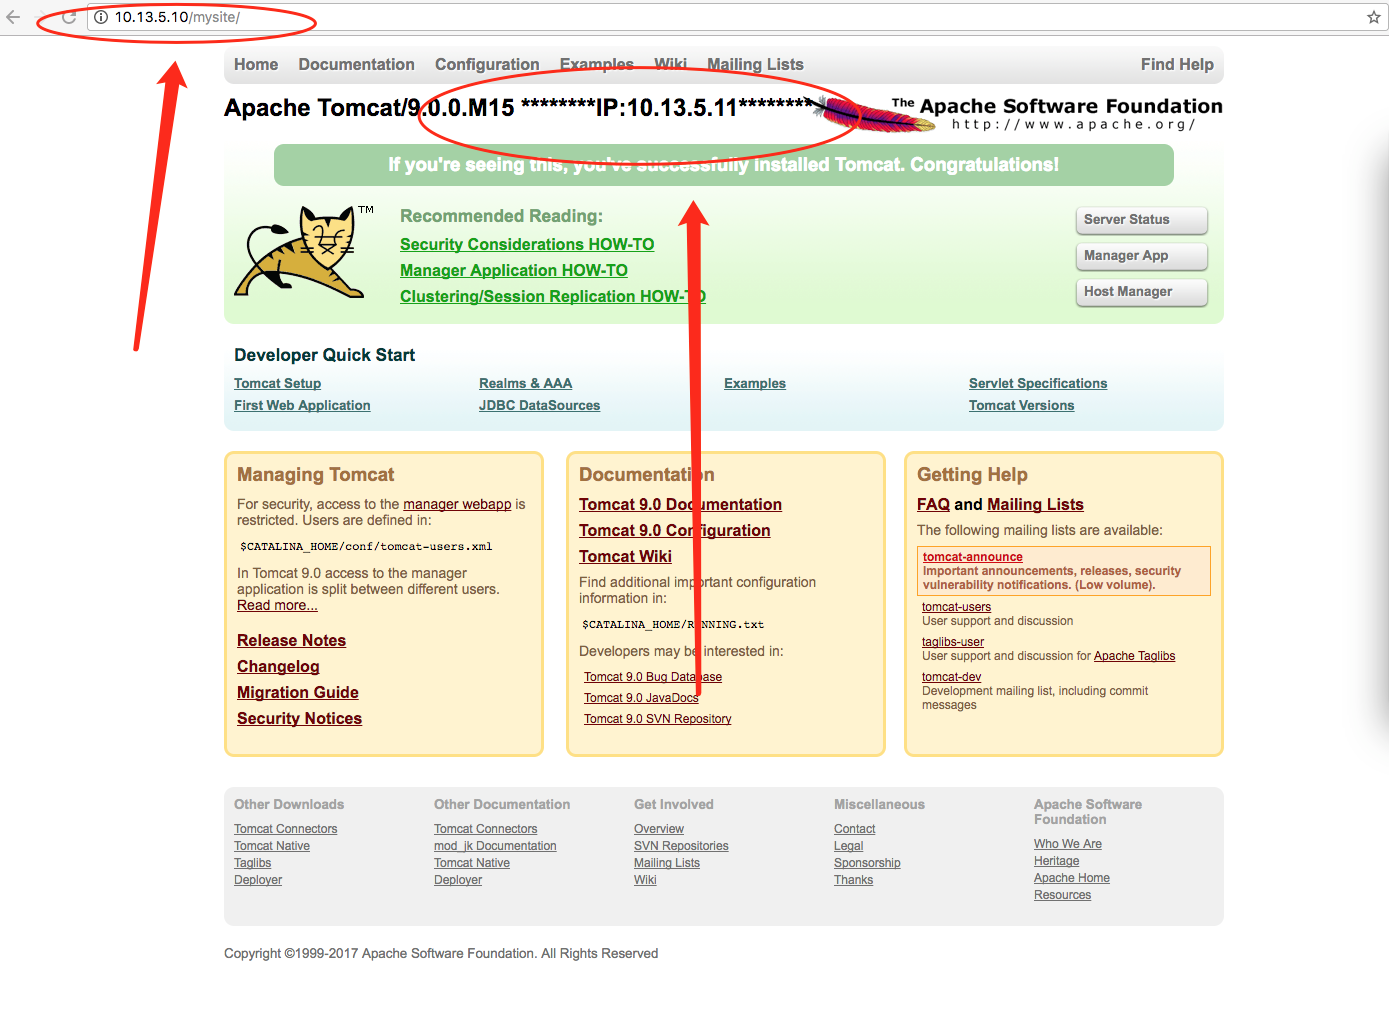
4、可以去访问ip nginx 端口默认是80 看到一下界面就代表成功了一半 PS:如果访问不到,可以试着把防火墙关掉。建议是 开启80 端口
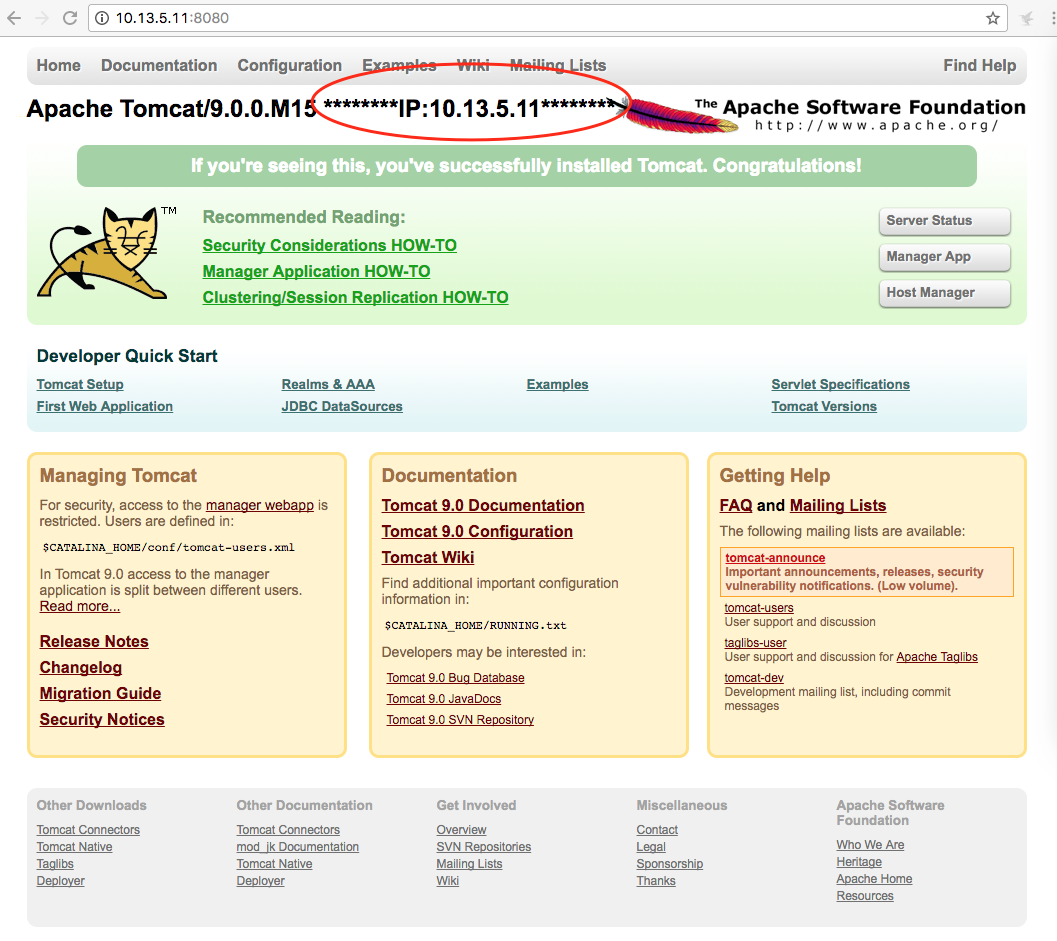
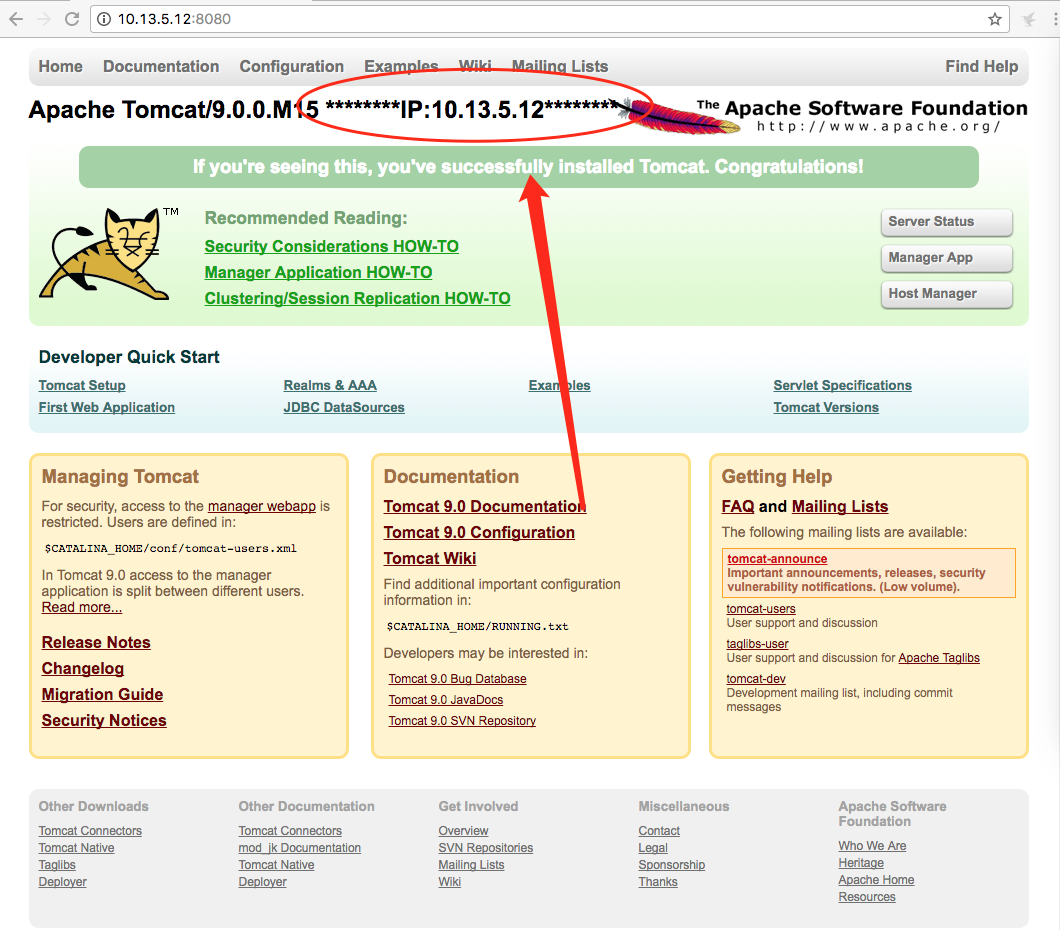
5、准备两个tomcat 当然 你可以在同一台服务器上,然后改成不痛端口。我这边是在两台服务器上。一台IP:10.13.5.11 另一台IP:10.13.5.12。为了方便区别是两个不同的tomcat 我把index.jsp 修改成以下:
第一台IP:10.13.5.11
第二台IP:10.13.5.12
6、配置 nginx configure
[root@localhost nginx]# cd /usr/local/nginx/conf/
a、配置后端服务器组
    upstream testsite.com{

    server 10.13.5.11:8080 weight=1;

    server 10.13.5.12:8080 weight=2;

  }
b、使用服务器组 注意!!!!! 如果 location / { proxy_pass http://testsite.com; } proxy_pass http://testsite.com 末尾可以不用加 / ,但是 location /other_string/ { proxy_pass http://testsite.com/; } proxy_pass http://testsite.com 之后一定要加 /
       location /mysite/ {

        	proxy_pass http://testsite.com/;

	     proxy_redirect default;

  }
c、最后的所有代码
#user  nobody;

worker_processes  1;

#error_log  logs/error.log;

#error_log  logs/error.log  notice;

#error_log  logs/error.log  info;

#pid        logs/nginx.pid;

events {

    worker_connections  1024;

}

http {

    include       mime.types;

    default_type  application/octet-stream;

    #log_format  main  '$remote_addr - $remote_user [$time_local] "$request" '

    #                  '$status $body_bytes_sent "$http_referer" '

    #                  '"$http_user_agent" "$http_x_forwarded_for"';

    #access_log  logs/access.log  main;

    sendfile        on;

    #tcp_nopush     on;

    #keepalive_timeout  0;

    keepalive_timeout  65;

    #gzip  on;

    upstream testsite.com{

	server 10.13.5.11:8080 weight=1;

	server 10.13.5.12:8080 weight=2;

    }

    server {

        listen       80;

        server_name  localhost;

        #charset koi8-r;

        #access_log  logs/host.access.log  main;

        location / {

            root   html;

            index  index.html index.htm;

        }

	location /mysite/ {

        	proxy_pass http://testsite.com/;

		proxy_redirect default;

	}

        #error_page  404              /404.html;

        # redirect server error pages to the static page /50x.html

        #

        error_page   500 502 503 504  /50x.html;

        location = /50x.html {

            root   html;

        }

        # proxy the PHP scripts to Apache listening on 127.0.0.1:80

        #

        #location ~ \.php$ {

        #    proxy_pass   http://127.0.0.1;

        #}

        # pass the PHP scripts to FastCGI server listening on 127.0.0.1:9000

        #

        #location ~ \.php$ {

        #    root           html;

        #    fastcgi_pass   127.0.0.1:9000;

        #    fastcgi_index  index.php;

        #    fastcgi_param  SCRIPT_FILENAME  /scripts$fastcgi_script_name;

        #    include        fastcgi_params;

        #}

        # deny access to .htaccess files, if Apache's document root

        # concurs with nginx's one

        #

        #location ~ /\.ht {

        #    deny  all;

        #}

    }

    # another virtual host using mix of IP-, name-, and port-based configuration

    #

    #server {

    #    listen       8000;

    #    listen       somename:8080;

    #    server_name  somename  alias  another.alias;

    #    location / {

    #        root   html;

    #        index  index.html index.htm;

    #    }

    #}

    # HTTPS server

    #

    #server {

    #    listen       443 ssl;

    #    server_name  localhost;

    #    ssl_certificate      cert.pem;

    #    ssl_certificate_key  cert.key;

    #    ssl_session_cache    shared:SSL:1m;

    #    ssl_session_timeout  5m;

    #    ssl_ciphers  HIGH:!aNULL:!MD5;

    #    ssl_prefer_server_ciphers  on;

    #    location / {

    #        root   html;

    #        index  index.html index.htm;

    #    }

    #}

}
7、重启nginx
[root@localhost conf]# ./sbin/nginx -s reload
8、成功
第一张访问 IP:10.13.5.12 的服务器
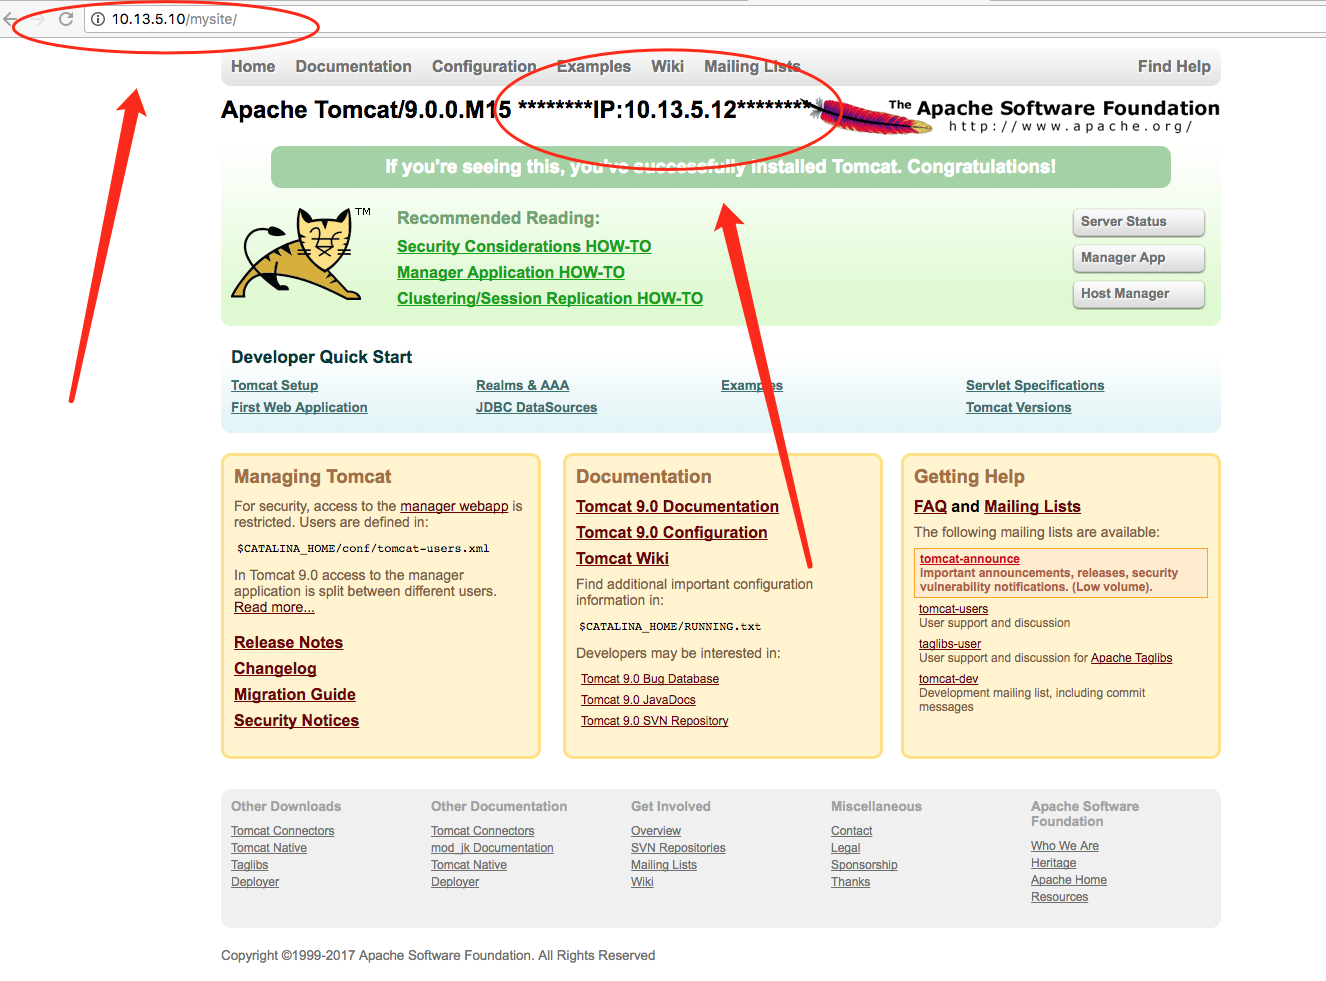
第二张是访问IP:10.13.5.11 的服务器
Nginx 做JavaWeb负载均衡的更多相关文章
- windows下利用nginx 做IIS负载均衡
如果网站流量变大,就想加服务器分担压力,当然就要用到负载均衡,在windows 2003有自带的网络负载均衡,但配置还是挺麻烦的虽然有轮训和iphash的效果,但效果不算好. nginx小巧,下载不到 ...
- 利用nginx做tcp负载均衡
当前nginx-13.1已经支持tcp,ucp,unix域套接字三种负载均衡模式(http肯定支持,这个不用说).最近有需求需要对后端服务做负载均衡,因此考虑使用nginx来做. 1. 下载nginx ...
- nginx做反向负载均衡,后端服务器获取真实客户端ip(转)
首先,在前端nginx上需要做如下配置: location / proxy_set_hearder host $host; proxy_set_header X-forw ...
- nginx做反向负载均衡,后端服务器获取真实客户端ip
首先,在前端nginx上需要做如下配置: location / proxy_set_header host $host; proxy_set_header X-fo ...
- Nginx 简单的负载均衡配置演示样例
近期在做开放查询应用的时候,因为数据两天特别多,两千多万条呢,用户訪问需求也比較大,所以就用nginx做了 负载均衡,以下是改动之后的相关内容. http://www.cnblogs.com/xiao ...
- Nginx 简单的负载均衡配置示例(转载)
原文地址:Nginx 简单的负载均衡配置示例(转载) 作者:水中游于 www.s135.com 和 blog.s135.com 域名均指向 Nginx 所在的服务器IP. 用户访问http://www ...
- 观nginx与lvs负载均衡的较量
在技术工作者中,常用到的就是lvs负载均衡和Nginx负载均衡了.这两者也是比较普及的.那么,根据不同的需求,两者存在着不同的优势.具体选择哪一个,还要看您的要求了.那么我们在此为大家分享一篇文章,对 ...
- Nginx+Tomcat+Memcached负载均衡集群服务搭建
操作系统:CentOS6.5 本文档主要讲解,如何在CentOS6.5下搭建Nginx+Tomcat+Memcached负载均衡集群服务器,Nginx负责负载均衡,Tomcat负责实际服务,Memc ...
- nginx 健康检查和负载均衡机制分析
nginx 是优秀的反向代理服务器,这里主要讲它的健康检查和负载均衡机制,以及这种机制带来的问题.所谓健康检查,就是当后端出现问题(具体什么叫出现问题,依赖 于具体实现,各个实现定义不一样),不再往这 ...
随机推荐
- SSRS Reporting Service安装与部署
安装与部署SSRS步骤 什么是SSRS SQL Server Reporting Serivces(SSRS) 是一种强大的报表设计开发工具或者说是服务,它提供了一系列本地工具和服务,用于创建.部署和 ...
- git config命令详解
Git有一个工具被称为git config,它允许你获得和设置配置变量:这些变量可以控制Git的外观和操作的各个方面. 一. 配置文件的存储位置 这些变量可以被存储在三个不同的位置: 1./etc/ ...
- struts笔记1
框架:所谓框架,就是把一些繁琐的重复性代码封装起来,使程序员在编码中把更多的精力放到业务需求的分析和理解上面 SHH:strust spring hibernate; SSM:springmvc sp ...
- try except 异常捕获的方法、断言的使用
except as e中的'e'的作用总结 - 2puT - CSDN博客 Python使用try except处理程序异常的三种常用方法分析 Python3和Python2 异常处理except的不 ...
- web开发工具flask中文英文书籍-持续更新
web开发工具flask中文英文书籍-持续更新 python测试开发_AI命理关注 0.9222018.11.10 07:48:43字数 625阅读 885 python测试开发项目实战-目录 pyt ...
- ubuntu下使用eclipse调试jni无法获取环境变量,本地库(java.library.path,LD_LIBRARY_PATH)等问题的解决。
首先要把本地库全部配置到LD_LIBRARY_PATH中. 然后一定要采用命令行方式启动eclipse(也可以写一个启动shell,通过桌面启动器打开这个shell),这样环境变量才会有效. 打开终端 ...
- javascript 之 call,apply原理
一.call原理 1.使用JQuery的call功能 var add(c,d){ return this.a+this.b+c+d } var obj={a:1,b:2} add.Call(obj,3 ...
- Vuex 刷新后数据丢失问题 Typescript
问题描述:Vuex保存的数据在页面刷新后会全部丢失清除 问题解决方案:使用sessionstorage进行保存,在页面刷新时保存至sessionStorage,页面在加载时再进行填充 (另有vue ...
- Scrapy 安装与使用
Scrapy的安装: 当前环境win10,python_3.6.4,64bit.在命令提示符窗口运行pip install Scrapy,出现以下结果: building 'twisted.test. ...
- H5 新增标签canvas 画布
canvas是写在body中的标签,设置宽高后,通过JS来往其中绘制想要的内容, canvas可以理解为一个画板,而JS就是你的画笔. 1.获取到画布 var canvas = document.ge ...