yum搭建LAMP环境
LAMP=Linux+Apache(httpd)+Mysql(mariadb)+PHP
Apache HTTP 服务器 2.4 文档:http://httpd.apache.org/docs/2.4/
(1).实验环境
LAMP服务器:youxi1 192.168.5.101
测试主机:youxi2(CentOS7) 192.168.5.102
Windows 192.168.5.1
(2).安装与说明
CentOS6使用如下命令:
yum -y install httpd mysql mysql-server php php-mysql
CentOS7使用如下命令:
[root@youxi1 ~]# yum -y install httpd mariadb mariadb-server php php-mysql
httpd说明:httpd是Apache服务的主程序包,服务器端必须安装。httpd-devel是Apache开发程序包。httpd-manual是Apache手册文档,包含HTML格式的Apache计划的Apache User's Guide说明指南。httpd-tools是Apache相关工具包。
(3).开启服务进行测试
测试httpd和mariadb是否能正常启动,并设置开机自启
[root@youxi1 ~]# systemctl start httpd.service

[root@youxi1 ~]# systemctl enable httpd.service

Created symlink from /etc/systemd/system/multi-user.target.wants/httpd.service to /usr/lib/systemd/system/httpd.service.

[root@youxi1 ~]# systemctl start mariadb.service

[root@youxi1 ~]# systemctl enable mariadb.service

Created symlink from /etc/systemd/system/multi-user.target.wants/mariadb.service to /usr/lib/systemd/system/mariadb.service.
编写php测试文件
[root@youxi1 ~]# vim /var/www/html/index.php

<?php

        phpinfo();

?>
重启httpd
[root@youxi1 ~]# systemctl restart httpd.service
如果防火墙是打开的,还需将端口号加入防火墙中
[root@youxi1 ~]# firewall-cmd --permanent --zone=public --add-port=80/tcp

success

[root@youxi1 ~]# firewall-cmd --reload

success
之后Windows就可以在浏览器中查看了,结果如下: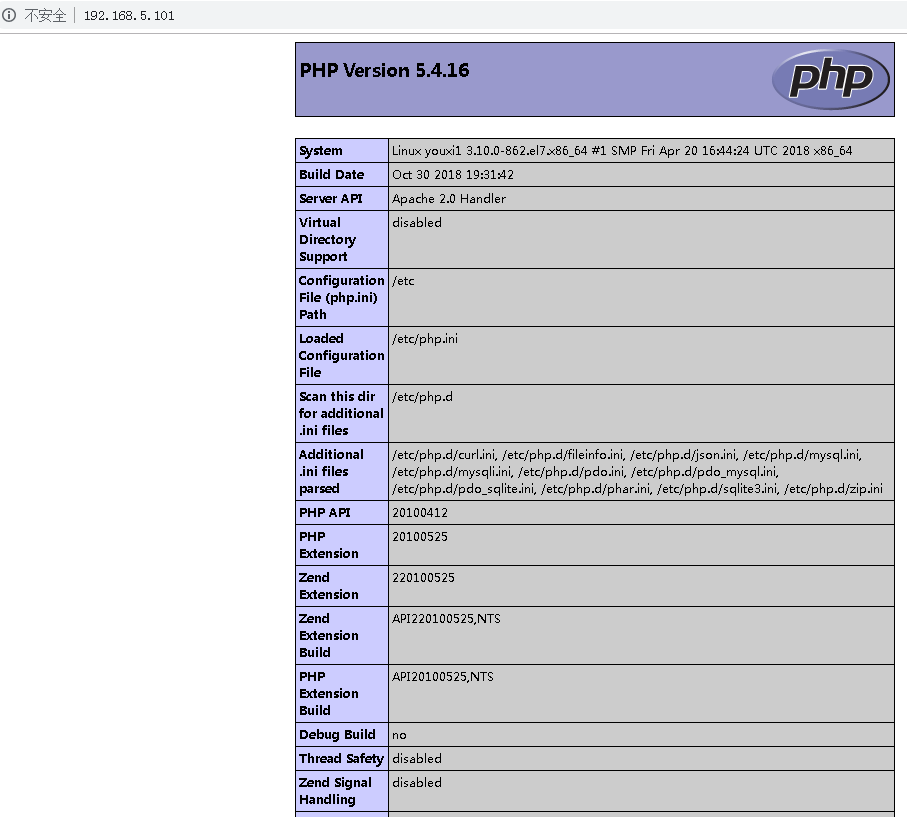
当然也可以使用Linux的elinks(需要安装),当然elinks只能简单查看
[root@youxi1 ~]# yum -y install elinks

(4).httpd主配置文件常用参数说明(2.4版本)
yum安装的httpd主要配置文件是/etc/httpd/conf/httpd.conf。其中比较常用的参数如下:
ServerRoot "/etc/httpd"  //httpd服务的根目录

Timeout 60  //超时时间,默认60秒。默认配置文件中没有,需手动添加

Listen 80  //监听的IP和端口,完整格式为[IP]:[port],IP省略则监听所有本地IP

Include conf.modules.d/*.conf  //conf.modules.d目录下的所有.conf文件都生效,该相对路径以httpd服务的根目录为参照

User apache  //以什么用户运行

Group apache  //以什么组运行

ServerAdmin root@localhost  //设置管理员email地址

#ServerName www.example.com:80  //服务区用于标识自身的主机名和端口号

DocumentRoot "/var/www/html"  //默认的主目录,至少存在一个目录设置相同的<Directory "[dir]">,否则将使用默认参数

<Directory "/var/www/html">  //一旦与DocumentRoot设置的目录相同,将使用内部设置的参数

Options Indexes FollowSymLinks  //当目录没有默认首页时,允许浏览目录结构。为了安全建议禁止浏览目录结构

AllowOverride None  //设置为None则忽略.htaccess

Require all granted  //支持所有访问,Require all denied表示拒绝所有访问

</Directory>

<IfModule dir_module>

DirectoryIndex index.html  //设置目录默认首页,我没改index.php也运行起来了,估计默认index都被扫描了

</IfModule>

LogLevel warn  //日志等级

AddDefaultCharset UTF-8  //支持的编码

IncludeOptional conf.d/*.conf  //conf.d目录下的所有.conf文件也属于有效配置文件,该相对路径以httpd服务的根目录为参照
与Require all granted相关的授权容器详细查看:http://httpd.apache.org/docs/2.4/mod/mod_authz_core.html#require
Require all granted 	//允许所有

Require all denied 	//拒绝所有

Require method http-method [http-method] ... 	//只允许特定的HTTP方法

Require user userid [ userid ] ... 	//只允许特定用户

Require group group-name [group-name] ... 	//只允许特定用户组

Require valid-user 	//只允许有效用户
另特别说明:
<RequireALL>

    Require ip 192.168.5.1  //只允许指定ip访问,空格分隔

    Require not ip 192.168.5.1  //不允许指定ip访问,空格分隔

</RequireALL>
有Require ip可以没有Require not ip。但有Require not ip就必须有Require ip,否则httpd服务报错。
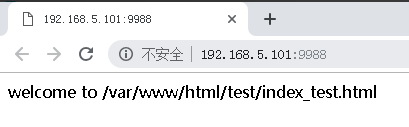
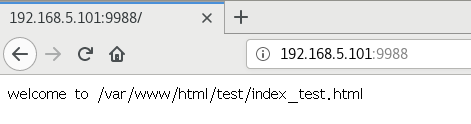
(5).修改配置文件第一次尝试
目标:设置超时时间为60s,监听端口9988,邮箱改一下。默认主目录修改为/var/www/html/test,默认首页为index_test.html。
修改配置文件/etc/httpd/conf/httpd.conf的以下参数:
timeout 60    //添加

Listen 9988    //修改

ServerAdmin youxi@163.com    //修改,我这里随便写了

ServerName 192.168.5.101:9988    //可以添加,可以去除注释后修改

DocumentRoot "/var/www/html/test"    //修改

<Directory "/var/www/html/test">    //可以修改,可以新建

    Options Indexes FollowSymLinks  //如果没有默认首页,可以访问目录结构

    AllowOverride None

    Require all granted  //允许所有人访问

</Directory>

<IfModule dir_module>

    DirectoryIndex index_test.html    //修改

</IfModule>
接着取消默认的welcome页面,注释掉/etc/httpd/conf.d/welcome.conf配置文件的所有内容。
然后创建/var/www/html/test目录和目录下的首页index_test.html
[root@youxi1 ~]# mkdir -p /var/www/html/test

[root@youxi1 ~]# vim /var/www/html/test/index_test.html

welcome to /var/www/html/test/index_test.html
重新启动httpd服务
[root@youxi1 ~]# systemctl restart httpd.service
修改防火墙端口设置
[root@youxi1 ~]# firewall-cmd --permanent --zone=public --remove-port=80/tcp

success

[root@youxi1 ~]# firewall-cmd --permanent --zone=public --add-port=9988/tcp

success

[root@youxi1 ~]# firewall-cmd --reload

success

[root@youxi1 ~]# firewall-cmd --zone=public --list-ports

9988/tcp
最后查看了


(6).修改配置文件第二次尝试
目标:限制访问IP,不允许Windows访问
修改配置文件/etc/httpd/conf/httpd.conf的以下参数:
<Directory "/var/www/html/test">    //可以修改,可以新建

    Options Indexes FollowSymLinks  //如果没有默认首页,可以访问目录结构

    AllowOverride None

#    Require all granted  //注释掉

    <RequireALL>  //添加

        Require ip 192.168.5.1 192.168.5.131  //只允许指定的IP访问

        Require not ip 192.168.5.102  //不允许指定的IP访问

    </RequireALL>

</Directory>
重启httpd服务
[root@youxi1 ~]# systemctl restart httpd.service
Windows(192.168.5.1)浏览器查看
youxi2(192.168.5.102)使用elinks查看

又加了一台CentOS7(192.168.5.131),桌面系统
(7).修改配置文件第三次尝试
目标:引用主目录外的目录
修改配置文件/etc/httpd/conf/httpd.conf的以下参数:
Alias /test2/ "/test2/"  //添加别名

<Directory "/test2/">  //添加别名的参数

    Options Indexes FollowSymLinks

    AllowOverride None

    Require all granted

</Directory>
注意:<Directory "[dir]"></Directory>间的参数互不影响。
创建/test2/目录和测试文件与目录
[root@youxi1 ~]# mkdir /test2

[root@youxi1 ~]# touch /test2/File{1..5}

[root@youxi1 ~]# mkdir /test2/Dir{1..5}

[root@youxi1 ~]# ls /test2/

Dir1  Dir2  Dir3  Dir4  Dir5  File1  File2  File3  File4  File5
接着重启httpd服务
[root@youxi1 ~]# systemctl restart httpd.service
Windows(192.168.5.1)浏览器访问
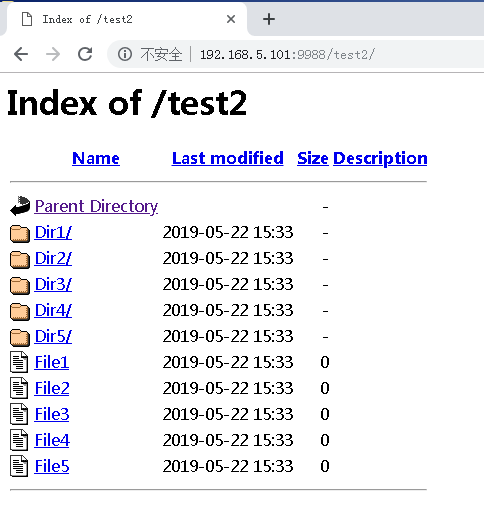
youxi2(192.168.5.102)使用elinks访问

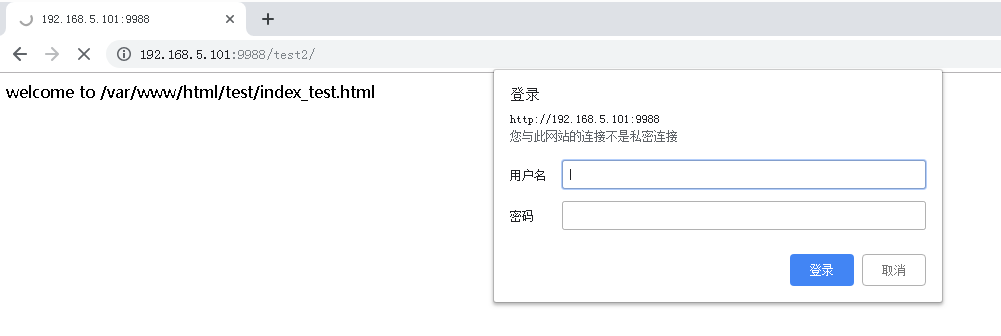
(8).修改配置文件第四次尝试
目标:禁止查看目录结构,并使用用户登录
修改配置文件/etc/httpd/conf/httpd.conf的以下参数:
Alias /test2/ "/test2/"

<Directory "/test2/">

#    Options Indexes FollowSymLinks  //注释掉,禁止查看目录结构

    AllowOverride None

#    Require all granted  //注释掉

    authtype basic  //指定认证类型为basic

    authname "my web site"  //认证信息

    authuserfile /etc/httpd/conf/user.passwd  //指定包含用户名和密码的文件

    require valid-user  //只允许有效用户登录

</Directory>
生成存放文件和密码的文件
[root@youxi1 ~]# htpasswd -cm /etc/httpd/conf/user.passwd youxi1

New password:

Re-type new password:

Adding password for user youxi1

[root@youxi1 ~]# htpasswd -m /etc/httpd/conf/user.passwd youxi2

New password:

Re-type new password:

Adding password for user youxi2

[root@youxi1 ~]# cat /etc/httpd/conf/user.passwd

youxi1:$apr1$7AIP0HXy$6wudl4S6Rybz7.T3S8BBv.

youxi2:$apr1$JHX3ZGwB$e5AmRlHr3DN3TUejBOsZ8/
注意:htpasswd命令-c选项是创建一个新的文件,所以除第一次使用外都不能使用,否则会覆盖文件内容。-m选项是使用MD5加密方法。
重启httpd服务
[root@youxi1 ~]# systemctl restart httpd.service
Windows(192.168.5.1)浏览器登录
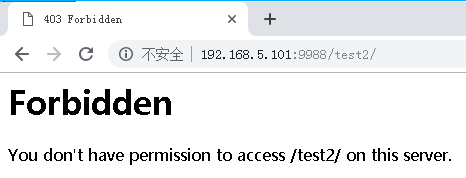
登录后(没有默认页面,也不能查看目录结构)
yum搭建LAMP环境的更多相关文章
- 利用yum搭建lamp环境并进一步创建博客
用yum搭建lamp环境 第一.安装apache yum -y install httpd 第二.安装mariadb Yum -y mariadb mariadb-server 第三.安装php Yu ...
- CentOS 6.6 yum 搭建LAMP环境
CentOS 查看操作系统版本 [root@oa ~]# cat /etc/redhat-releaseCentOS release 6.6 (Final) 参考linux centos yum安装L ...
- yum搭建 Lamp环境
yum搭建Lamp yum install -y httpd yum install -y nano rpm 安装 Php7 相应的 yum源 rpm -Uvh https://dl.fedorapr ...
- centos7用yum搭建LAMP环境
用yum快速搭建LAMP平台 实验环境: [root@nmserver- html]# cat /etc/redhat-release CentOS release (AltArch) [root@n ...
- centos7 yum搭建lamp环境
=============================================== 2018/1/14_第1次修改 ccb_warlock == ...
- CentOS下搭建LAMP环境详解
前言:在这里将介绍如何在CentOS下搭建LAMP环境(全部使用源码编译安装),用于web服务器开发. •LAMP: Linux + Apache + PHP + Mysql. •系统: CentOS ...
- Centos6.4版本下搭建LAMP环境
Centos6.4版本下搭建LAMP环境 配置yum mkdir/mnt/cdrom mount/dev/cdrom /mnt/cdrom 装载光盘 vi /etc/yum.repos.d/Cent ...
- Centos7+Apache2.4+php5.6+mysql5.5搭建Lamp环境——为了wordPress
最近想搭建个人博客玩玩,挑来挑去发现口碑不错的博客程序是wordpress,简称wp.虽然是学java路线的程序员,但因入行时间太短,至今没有发现较为称手开源的博客程序,如果各位大神有好的推荐,也希望 ...
- Linux手动搭建LAMP环境
当你看到标题里的“手动搭建”,你是不是会想,难不成还有“自动搭建”?当然......不是,这里的“手动搭建”是指按部就班的搭建Apache.MySQL.PHP环境,是相对于集成软件包而言的.所以你是不 ...
随机推荐
- keepalived+lvs+usp安装实施文档
操作系统平台:RedHat6.4 x86_64 软件:LVS+keepalived LVS+Keepalived 介绍 LVS LVS是Linux Virtual Server的简写,意即Linux ...
- zencart批量更新后台邮箱地址sql
zencart批量更新后台邮箱地址sql UPDATE `configuration` SET `configuration_value` = '新邮箱地址' WHERE `configuration ...
- java之rpc/orm
Netty线程模型 其中ChannelPiepline的设计模型采用的是Handler组成的责任链模型 blocking I/O 阻塞nonblocking I/O 非阻塞I/O multiplexi ...
- Cairo
Cairo 英[ˈkaɪrəʊ] 美[ˈkaɪroʊ] n. 开罗(埃及首都); [例句]From Cairo came expressions of regret at the attac
- MySQL常见水平分表技术方案
根据经验,Mysql表数据一般达到百万级别,查询效率会很低,容易造成表锁,甚至堆积很多连接,直接挂掉:水平分表能够很大程度较少这些压力. 1.按时间分表 这种分表方式有一定的局限性,当数据有较强的实效 ...
- redis cluster 安装配置
实验环境: 三主三从,从负责备份. 192.168.2.201 6381 192.168.2.201 6382 192.168.2.202 6381 192.168.2.202 6382 192.16 ...
- 怎么在vscode里搜索函数
怎么在vscode里搜索函数?在vsCode编辑器中如何跨文件查找函数的定义? 问题: 比如: 在 a.js中使用 var res = window.unique(arr); 在未知的js文件定义了u ...
- nginx location if 的匹配规则
cation匹配命令 ~ #波浪线表示执行一个正则匹配,区分大小写~* #表示执行一个正则匹配,不区分大小写^~ #^~表示普通字符匹配,不是正则匹配.如果该选项匹配,只匹配该选 ...
- 28、[源码]-AOP原理-@EnableAspectJAutoProxy
28.[源码]-AOP原理-@EnableAspectJAutoProxy
- 15-Node.js学习笔记-Express的安装及检验
最新的node已经把一些命令工具单独的分出来了,所以我们应该先下安装他的打包函数,再安装express,在进行检验就安装成功了 如需require还需在文件夹内单独安装 sudo npm instal ...