Hadoop-(Flume)
Hadoop-(Flume)
1. Flume 介绍
1.1. 概述
- Flume是一个分布式、可靠、和高可用的海量日志采集、聚合和传输的系统。
- Flume可以采集文件,socket数据包、文件、文件夹、kafka等各种形式源数据,又可以将采集到的数据(下沉sink)输出到HDFS、hbase、hive、kafka等众多外部存储系统中
- 一般的采集需求,通过对flume的简单配置即可实现
- Flume针对特殊场景也具备良好的自定义扩展能力,
因此,flume可以适用于大部分的日常数据采集场景
1.2. 运行机制
Flume分布式系统中最核心的角色是agent,flume采集系统就是由一个个agent所连接起来形成
每一个agent相当于一个数据传递员,内部有三个组件:
Source:采集组件,用于跟数据源对接,以获取数据
Sink:下沉组件,用于往下一级agent传递数据或者往最终存储系统传递数据
Channel:传输通道组件,用于从source将数据传递到sink
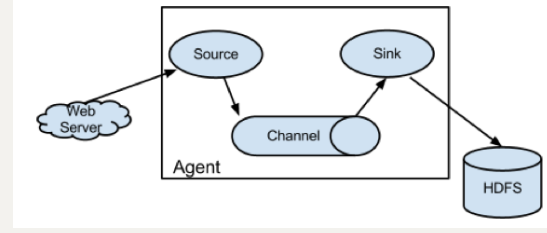
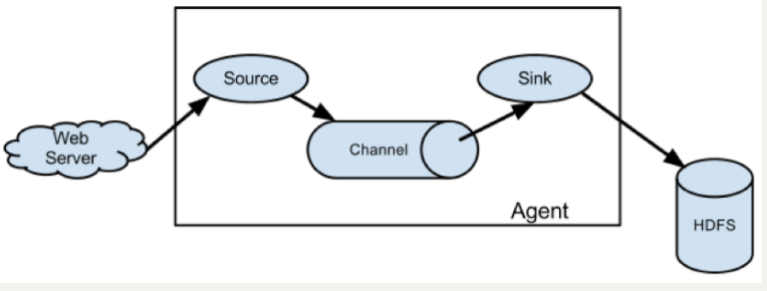
1.3. Flume 结构图
简单结构
单个 Agent 采集数据
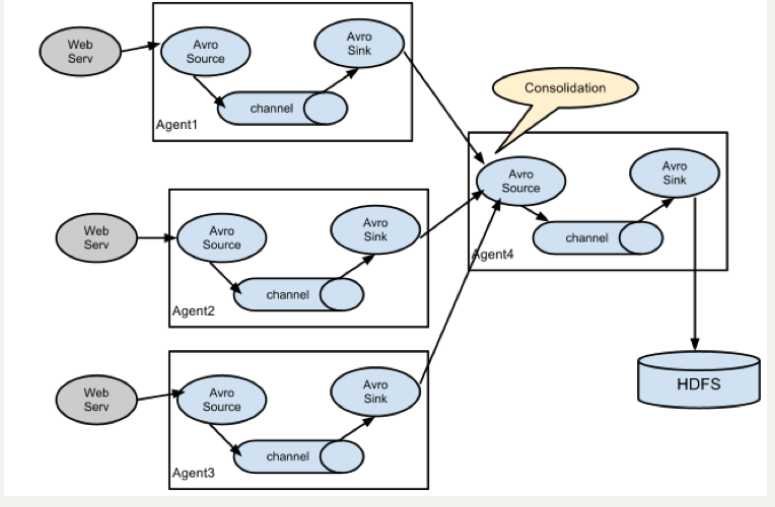
复杂结构
多级 Agent 之间串联

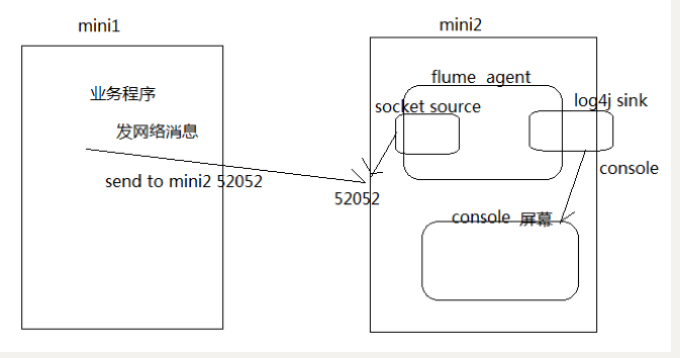
2. Flume 实战案例
案例:使用网络telent命令向一台机器发送一些网络数据,然后通过flume采集网络端口数据
2.1. Flume 的安装部署
Step 1: 下载解压修改配置文件
下载地址:
http://archive.apache.org/dist/flume/1.8.0/apache-flume-1.8.0-bin.tar.gz
Flume的安装非常简单,只需要解压即可,当然,前提是已有hadoop环境
上传安装包到数据源所在节点上
这里我们采用在第三台机器来进行安装
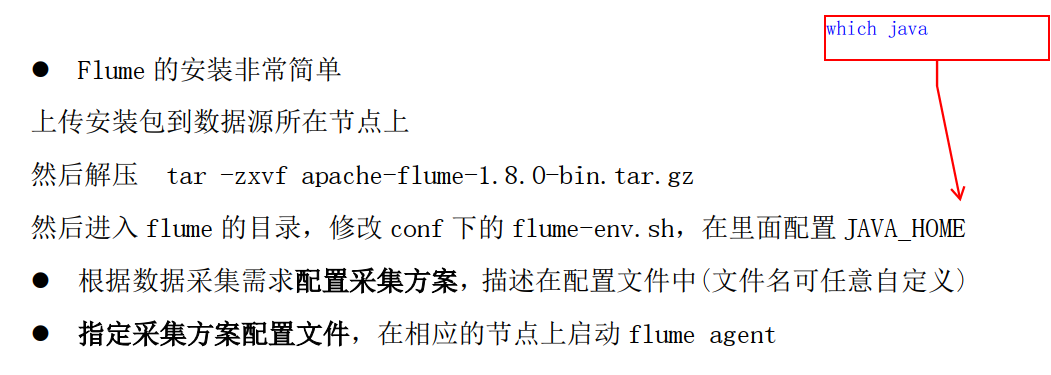
cd /export/softwares/tar -zxvf apache-flume-1.8.-bin.tar.gz -C ../servers/cd /export/servers/apache-flume-1.8.-bin/confcp flume-env.sh.template flume-env.shvim flume-env.shexport JAVA_HOME=/export/servers/jdk1.8.0_141
Step 2: 开发配置文件
根据数据采集的需求配置采集方案,描述在配置文件中(文件名可任意自定义)
配置我们的网络收集的配置文件
在flume的conf目录下新建一个配置文件(采集方案)
vim /export/servers/apache-flume-1.8.-bin/conf/netcat-logger.conf
# 定义这个agent中各组件的名字a1.sources = r1a1.sinks = k1a1.channels = c1# 描述和配置source组件:r1a1.sources.r1.type = netcata1.sources.r1.bind = 192.168.174.a1.sources.r1.port =# 描述和配置sink组件:k1a1.sinks.k1.type = logger# 描述和配置channel组件,此处使用是内存缓存的方式a1.channels.c1.type = memorya1.channels.c1.capacity =a1.channels.c1.transactionCapacity =# 描述和配置source channel sink之间的连接关系a1.sources.r1.channels = c1a1.sinks.k1.channel = c1

Step 3: 启动配置文件
指定采集方案配置文件,在相应的节点上启动flume agent
先用一个最简单的例子来测试一下程序环境是否正常
启动agent去采集数据
bin/flume-ng agent -c conf -f conf/netcat-logger.conf -n a1 -Dflume.root.logger=INFO,console
-c conf指定flume自身的配置文件所在目录-f conf/netcat-logger.con指定我们所描述的采集方案-n a1指定我们这个agent的名字
Step 4: 安装 Telnet 准备测试
在node02机器上面安装telnet客户端,用于模拟数据的发送
yum -y install telnettelnet node03 # 使用telnet模拟数据发送
2.2. 采集案例
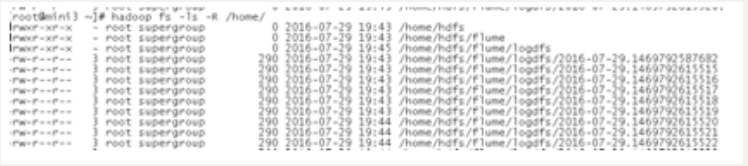
2.2.3. 采集目录到 HDFS
需求
某服务器的某特定目录下,会不断产生新的文件,每当有新文件出现,就需要把文件采集到HDFS中去
思路
根据需求,首先定义以下3大要素
- 数据源组件,即source ——监控文件目录 : spooldir
- 监视一个目录,只要目录中出现新文件,就会采集文件中的内容
- 采集完成的文件,会被agent自动添加一个后缀:COMPLETED
- 所监视的目录中不允许重复出现相同文件名的文件,否则报错\罢工
- 下沉组件,即sink——HDFS文件系统 : hdfs sink
- 通道组件,即channel——可用file channel 也可以用内存channel
Step 1: Flume 配置文件
cd /export/servers/apache-flume-1.8.-bin/confmkdir -p /export/servers/dirfilevim spooldir.conf
# Name the components on this agenta1.sources = r1a1.sinks = k1a1.channels = c1# Describe/configure the source##注意:不能往监控目中重复丢同名文件a1.sources.r1.type = spooldira1.sources.r1.spoolDir = /export/servers/dirfilea1.sources.r1.fileHeader = true# Describe the sinka1.sinks.k1.type = hdfsa1.sinks.k1.channel = c1a1.sinks.k1.hdfs.path = hdfs://node01:8020/spooldir/files/%y-%m-%d/%H%M/a1.sinks.k1.hdfs.filePrefix = events-#控制文件夹以多少时间滚动 10分钟a1.sinks.k1.hdfs.round = truea1.sinks.k1.hdfs.roundValue =a1.sinks.k1.hdfs.roundUnit = minute#roll控制写入hdfs文件,以何种方式滚动#时间间隔a1.sinks.k1.hdfs.rollInterval =#文件大小a1.sinks.k1.hdfs.rollSize =#even数量a1.sinks.k1.hdfs.rollCount =a1.sinks.k1.hdfs.batchSize =#不想滚动,设置0a1.sinks.k1.hdfs.useLocalTimeStamp = true#生成的文件类型,默认是Sequencefile,可用DataStream,则为普通文本a1.sinks.k1.hdfs.fileType = DataStream# Use a channel which buffers events in memorya1.channels.c1.type = memory#胶囊容量a1.channels.c1.capacity =#一次向sink运输多少个eventa1.channels.c1.transactionCapacity =# Bind the source and sink to the channela1.sources.r1.channels = c1a1.sinks.k1.channel = c1
Channel参数解释
capacity:默认该通道中最大的可以存储的event数量
trasactionCapacity:每次最大可以从source中拿到或者送到sink中的event数量
keep-alive:event添加到通道中或者移出的允许时间
Step 2: 启动 Flume
bin/flume-ng agent -c ./conf -f ./conf/spooldir.conf -n a1 -Dflume.root.logger=INFO,console#命令的精简版
Step 3: 上传文件到指定目录
将不同的文件放到下面目录里面去,注意文件不能重名
cd /export/servers/dirfile
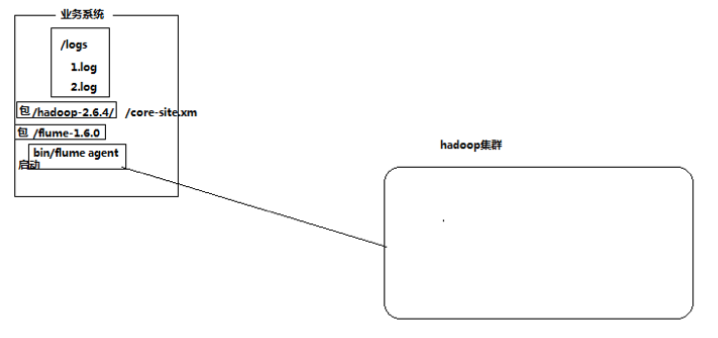
2.2.4. 采集文件到 HDFS
需求
比如业务系统使用log4j生成的日志,日志内容不断增加,需要把追加到日志文件中的数据实时采集到hdfs
分析
根据需求,首先定义以下3大要素
- 采集源,即source——监控文件内容更新 : exec ‘tail -F file’
- 下沉目标,即sink——HDFS文件系统 : hdfs sink
- Source和sink之间的传递通道——channel,可用file channel 也可以用 内存channel
Step 1: 定义 Flume 配置文件
cd /export/servers/apache-flume-1.8.-bin/confvim tail-file.conf
# Name the components on this agenta1.sources = r1a1.sinks = k1a1.channels = c1# Describe/configure the sourcea1.sources.r1.type = execa1.sources.r1.command = tail -F /root/logs/test.loga1.sources.r1.channels = c1# Describe the sinka1.sinks.k1.type = hdfsa1.sinks.k1.channel = c1a1.sinks.k1.hdfs.path = /flume/tailout/%y-%m-%d/%H-%M/a1.sinks.k1.hdfs.filePrefix = events-a1.sinks.k1.hdfs.round = truea1.sinks.k1.hdfs.roundValue =a1.sinks.k1.hdfs.roundUnit = minutea1.sinks.k1.hdfs.rollInterval =a1.sinks.k1.hdfs.rollSize =a1.sinks.k1.hdfs.rollCount =a1.sinks.k1.hdfs.batchSize =a1.sinks.k1.hdfs.useLocalTimeStamp = true#生成的文件类型,默认是Sequencefile,可用DataStream,则为普通文本a1.sinks.k1.hdfs.fileType = DataStream# Use a channel which buffers events in memorya1.channels.c1.type = memorya1.channels.c1.capacity =a1.channels.c1.transactionCapacity =# Bind the source and sink to the channela1.sources.r1.channels = c1a1.sinks.k1.channel = c1
Step 2: 启动 Flume
cd /export/servers/apache-flume-1.8.-binbin/flume-ng agent -c conf -f conf/tail-file.conf -n agent1 -Dflume.root.logger=INFO,console
Step 3: 开发 Shell 脚本定时追加文件内容
mkdir -p /export/servers/shells/cd /export/servers/shells/vim tail-file.sh
#!/bin/bashwhile truedodate >> /export/servers/taillogs/access_log;sleep 0.5;done
Step 4: 启动脚本
# 创建文件夹mkdir -p /export/servers/taillogs# 启动脚本sh /export/servers/shells/tail-file.sh
2.2.5. Agent 级联
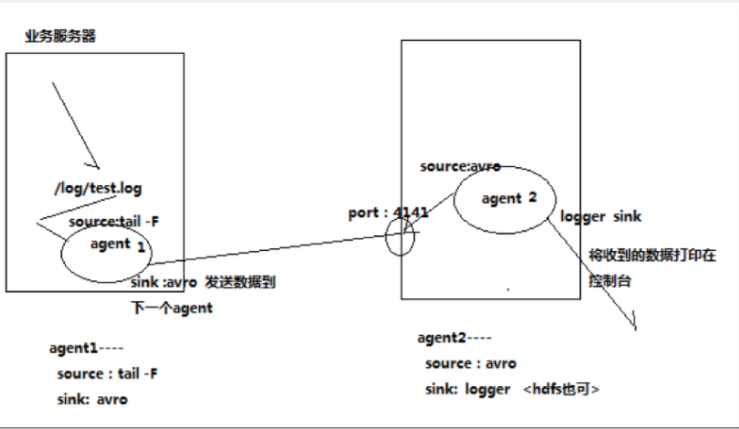
分析
第一个agent负责收集文件当中的数据,通过网络发送到第二个agent当中去
第二个agent负责接收第一个agent发送的数据,并将数据保存到hdfs上面去
Step 1: Node02 安装 Flume
将node03机器上面解压后的flume文件夹拷贝到node02机器上面去
cd /export/serversscp -r apache-flume-1.8.-bin/ node02:$PWD
Step 2: Node02 配置 Flume
在node02机器配置我们的flume
cd /export/servers/ apache-flume-1.8.-bin/confvim tail-avro-avro-logger.conf
################### Name the components on this agenta1.sources = r1a1.sinks = k1a1.channels = c1# Describe/configure the sourcea1.sources.r1.type = execa1.sources.r1.command = tail -F /export/servers/taillogs/access_loga1.sources.r1.channels = c1# Describe the sink##sink端的avro是一个数据发送者a1.sinks = k1a1.sinks.k1.type = avroa1.sinks.k1.channel = c1a1.sinks.k1.hostname = node03a1.sinks.k1.port =a1.sinks.k1.batch-size =# Use a channel which buffers events in memorya1.channels.c1.type = memorya1.channels.c1.capacity =a1.channels.c1.transactionCapacity =# Bind the source and sink to the channela1.sources.r1.channels = c1a1.sinks.k1.channel = c1
Step 3: 开发脚本向文件中写入数据
直接将node03下面的脚本和数据拷贝到node02即可,node03机器上执行以下命令
cd /export/serversscp -r shells/ taillogs/ node02:$PWD
Step 4: Node03 Flume 配置文件
在node03机器上开发flume的配置文件
cd /export/servers/apache-flume-1.8.-bin/confvim avro-hdfs.conf
# Name the components on this agenta1.sources = r1a1.sinks = k1a1.channels = c1# Describe/configure the source##source中的avro组件是一个接收者服务a1.sources.r1.type = avroa1.sources.r1.channels = c1a1.sources.r1.bind = node03a1.sources.r1.port =# Describe the sinka1.sinks.k1.type = hdfsa1.sinks.k1.hdfs.path = hdfs://node01:8020/av/%y-%m-%d/%H%M/a1.sinks.k1.hdfs.filePrefix = events-a1.sinks.k1.hdfs.round = truea1.sinks.k1.hdfs.roundValue =a1.sinks.k1.hdfs.roundUnit = minutea1.sinks.k1.hdfs.rollInterval =a1.sinks.k1.hdfs.rollSize =a1.sinks.k1.hdfs.rollCount =a1.sinks.k1.hdfs.batchSize =a1.sinks.k1.hdfs.useLocalTimeStamp = true#生成的文件类型,默认是Sequencefile,可用DataStream,则为普通文本a1.sinks.k1.hdfs.fileType = DataStream# Use a channel which buffers events in memorya1.channels.c1.type = memorya1.channels.c1.capacity =a1.channels.c1.transactionCapacity =# Bind the source and sink to the channela1.sources.r1.channels = c1a1.sinks.k1.channel = c1
Step 5: 顺序启动
node03机器启动flume进程
cd /export/servers/apache-flume-1.8.-binbin/flume-ng agent -c conf -f conf/avro-hdfs.conf -n a1 -Dflume.root.logger=INFO,console
node02机器启动flume进程
cd /export/servers/apache-flume-1.8.-bin/bin/flume-ng agent -c conf -f conf/tail-avro-avro-logger.conf -n a1 -Dflume.root.logger=INFO,console
node02机器启shell脚本生成文件
cd /export/servers/shellssh tail-file.sh
3. flume的高可用方案-failover
在完成单点的Flume NG搭建后,下面我们搭建一个高可用的Flume NG集群,架构图如下所示:
3.1. 角色分配
Flume的Agent和Collector分布如下表所示:
| 名称 | HOST | 角色 |
|---|---|---|
| Agent1 | node01 | Web Server |
| Collector1 | node02 | AgentMstr1 |
| Collector2 | node03 | AgentMstr2 |
图中所示,Agent1数据分别流入到Collector1和Collector2,Flume NG本身提供了Failover机制,可以自动切换和恢复。在上图中,有3个产生日志服务器分布在不同的机房,要把所有的日志都收集到一个集群中存储。下 面我们开发配置Flume NG集群
3.2. Node01 安装和配置
将node03机器上面的flume安装包以及文件生产的两个目录拷贝到node01机器上面去
node03机器执行以下命令
cd /export/serversscp -r apache-flume-1.8.-bin/ node01:$PWDscp -r shells/ taillogs/ node01:$PWD
node01机器配置agent的配置文件
cd /export/servers/apache-flume-1.8.-bin/confvim agent.conf
#agent1 nameagent1.channels = c1agent1.sources = r1agent1.sinks = k1 k2###set gruopagent1.sinkgroups = g1#agent1.sources.r1.channels = c1agent1.sources.r1.type = execagent1.sources.r1.command = tail -F /export/servers/taillogs/access_log###set channelagent1.channels.c1.type = memoryagent1.channels.c1.capacity =agent1.channels.c1.transactionCapacity =### set sink1agent1.sinks.k1.channel = c1agent1.sinks.k1.type = avroagent1.sinks.k1.hostname = node02agent1.sinks.k1.port =### set sink2agent1.sinks.k2.channel = c1agent1.sinks.k2.type = avroagent1.sinks.k2.hostname = node03agent1.sinks.k2.port =###set sink groupagent1.sinkgroups.g1.sinks = k1 k2###set failoveragent1.sinkgroups.g1.processor.type = failoveragent1.sinkgroups.g1.processor.priority.k1 =agent1.sinkgroups.g1.processor.priority.k2 =agent1.sinkgroups.g1.processor.maxpenalty =
#agent1 nameagent1.channels = c1agent1.sources = r1agent1.sinks = k1 k2#set gruopagent1.sinkgroups = g1#set channelagent1.channels.c1.type = memoryagent1.channels.c1.capacity =agent1.channels.c1.transactionCapacity =agent1.sources.r1.channels = c1agent1.sources.r1.type = execagent1.sources.r1.command = tail -F /root/logs/456.log# set sink1agent1.sinks.k1.channel = c1agent1.sinks.k1.type = avroagent1.sinks.k1.hostname = node02agent1.sinks.k1.port =# set sink2agent1.sinks.k2.channel = c1agent1.sinks.k2.type = avroagent1.sinks.k2.hostname = node03agent1.sinks.k2.port =#set sink groupagent1.sinkgroups.g1.sinks = k1 k2#set failoveragent1.sinkgroups.g1.processor.type = failoveragent1.sinkgroups.g1.processor.priority.k1 =agent1.sinkgroups.g1.processor.priority.k2 =agent1.sinkgroups.g1.processor.maxpenalty =
3.3. Node02 与 Node03 配置 FlumeCollection
node02机器修改配置文件
cd /export/servers/apache-flume-1.8.-bin/confvim collector.conf
#set Agent namea1.sources = r1a1.channels = c1a1.sinks = k1###set channela1.channels.c1.type = memorya1.channels.c1.capacity =a1.channels.c1.transactionCapacity =### other node,nna to nnsa1.sources.r1.type = avroa1.sources.r1.bind = node02a1.sources.r1.port =a1.sources.r1.channels = c1###set sink to hdfsa1.sinks.k1.type=hdfsa1.sinks.k1.hdfs.path= hdfs://node01:8020/flume/failover/a1.sinks.k1.hdfs.fileType=DataStreama1.sinks.k1.hdfs.writeFormat=TEXTa1.sinks.k1.hdfs.rollInterval=a1.sinks.k1.channel=c1a1.sinks.k1.hdfs.filePrefix=%Y-%m-%d#
# Name the components on this agenta1.sources = r1a1.sinks = k1a1.channels = c1# Describe/configure the sourcea1.sources.r1.type = avroa1.sources.r1.channels = c1a1.sources.r1.bind = node02a1.sources.r1.port =# Describe the sinka1.sinks.k1.type = logger# Use a channel which buffers events in memorya1.channels.c1.type = memorya1.channels.c1.capacity =a1.channels.c1.transactionCapacity =# Bind the source and sink to the channela1.sources.r1.channels = c1a1.sinks.k1.channel = c1
node03机器修改配置文件
cd /export/servers/apache-flume-1.8.-bin/confvim collector.conf
#set Agent namea1.sources = r1a1.channels = c1a1.sinks = k1###set channela1.channels.c1.type = memorya1.channels.c1.capacity =a1.channels.c1.transactionCapacity =### other node,nna to nnsa1.sources.r1.type = avroa1.sources.r1.bind = node03a1.sources.r1.port =a1.sources.r1.channels = c1###set sink to hdfsa1.sinks.k1.type=hdfsa1.sinks.k1.hdfs.path= hdfs://node01:8020/flume/failover/a1.sinks.k1.hdfs.fileType=DataStreama1.sinks.k1.hdfs.writeFormat=TEXTa1.sinks.k1.hdfs.rollInterval=a1.sinks.k1.channel=c1a1.sinks.k1.hdfs.filePrefix=%Y-%m-%d
# Name the components on this agenta1.sources = r1a1.sinks = k1a1.channels = c1# Describe/configure the sourcea1.sources.r1.type = avroa1.sources.r1.channels = c1a1.sources.r1.bind = node03a1.sources.r1.port =# Describe the sinka1.sinks.k1.type = logger# Use a channel which buffers events in memorya1.channels.c1.type = memorya1.channels.c1.capacity =a1.channels.c1.transactionCapacity =# Bind the source and sink to the channela1.sources.r1.channels = c1a1.sinks.k1.channel = c1
3.4. 顺序启动
node03机器上面启动flume
cd /export/servers/apache-flume-1.8.-binbin/flume-ng agent -n a1 -c conf -f conf/collector.conf -Dflume.root.logger=DEBUG,console
node02机器上面启动flume
cd /export/servers/apache-flume-1.8.-binbin/flume-ng agent -n a1 -c conf -f conf/collector.conf -Dflume.root.logger=DEBUG,console
node01机器上面启动flume
cd /export/servers/apache-flume-1.8.-binbin/flume-ng agent -n agent1 -c conf -f conf/agent.conf -Dflume.root.logger=DEBUG,console
node01机器启动文件产生脚本
cd /export/servers/shellssh tail-file.sh
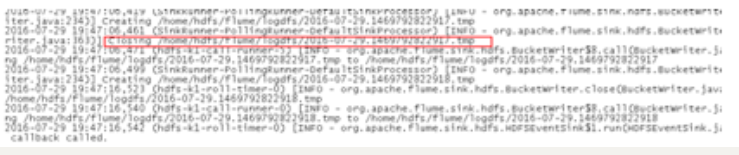
3.5. Failover 测试
下面我们来测试下Flume NG集群的高可用(故障转移)。场景如下:我们在Agent1节点上传文件,由于我们配置Collector1的权重比Collector2大,所以 Collector1优先采集并上传到存储系统。然后我们kill掉Collector1,此时有Collector2负责日志的采集上传工作,之后,我 们手动恢复Collector1节点的Flume服务,再次在Agent1上次文件,发现Collector1恢复优先级别的采集工作。具体截图如下所 示:
Collector1优先上传
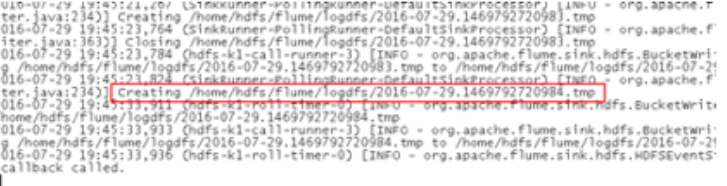
HDFS集群中上传的log内容预览
Collector1宕机,Collector2获取优先上传权限
重启Collector1服务,Collector1重新获得优先上传的权限
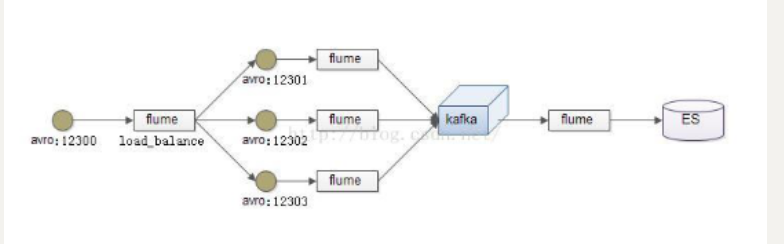
4. flume 的负载均衡
负载均衡是用于解决一台机器(一个进程)无法解决所有请求而产生的一种算法。Load balancing Sink Processor 能够实现 load balance 功能,如下图Agent1 是一个路由节点,负责将 Channel 暂存的 Event 均衡到对应的多个 Sink组件上,而每个 Sink 组件分别连接到一个独立的 Agent 上,示例配置,如下所示:
在此处我们通过三台机器来进行模拟flume的负载均衡
三台机器规划如下:
node01:采集数据,发送到node02和node03机器上去
node02:接收node01的部分数据
node03:接收node01的部分数据
第一步:开发node01服务器的flume配置
node01服务器配置:
cd /export/servers/apache-flume-1.8.-bin/confvim load_banlancer_client.conf
#agent namea1.channels = c1a1.sources = r1a1.sinks = k1 k2#set gruopa1.sinkgroups = g1#set channela1.channels.c1.type = memorya1.channels.c1.capacity =a1.channels.c1.transactionCapacity =a1.sources.r1.channels = c1a1.sources.r1.type = execa1.sources.r1.command = tail -F /export/servers/taillogs/access_log# set sink1a1.sinks.k1.channel = c1a1.sinks.k1.type = avro#对接端口a1.sinks.k1.hostname = node02a1.sinks.k1.port =# set sink2a1.sinks.k2.channel = c1a1.sinks.k2.type = avro#对接端口a1.sinks.k2.hostname = node03a1.sinks.k2.port =#set sink groupa1.sinkgroups.g1.sinks = k1 k2#set failover#负载均衡a1.sinkgroups.g1.processor.type = load_balancea1.sinkgroups.g1.processor.backoff = true#轮训a1.sinkgroups.g1.processor.selector = round_robina1.sinkgroups.g1.processor.selector.maxTimeOut=
第二步:开发node02服务器的flume配置
cd /export/servers/apache-flume-1.8.-bin/confvim load_banlancer_server.conf
# Name the components on this agenta1.sources = r1a1.sinks = k1a1.channels = c1# Describe/configure the sourcea1.sources.r1.type = avroa1.sources.r1.channels = c1a1.sources.r1.bind = node02a1.sources.r1.port =# Describe the sinka1.sinks.k1.type = logger# Use a channel which buffers events in memorya1.channels.c1.type = memorya1.channels.c1.capacity =a1.channels.c1.transactionCapacity =# Bind the source and sink to the channela1.sources.r1.channels = c1a1.sinks.k1.channel = c1
第三步:开发node03服务器flume配置
node03服务器配置
cd /export/servers/apache-flume-1.8.-bin/confvim load_banlancer_server.conf
# Name the components on this agenta1.sources = r1a1.sinks = k1a1.channels = c1# Describe/configure the sourcea1.sources.r1.type = avroa1.sources.r1.channels = c1a1.sources.r1.bind = node03a1.sources.r1.port =# Describe the sinka1.sinks.k1.type = logger# Use a channel which buffers events in memorya1.channels.c1.type = memorya1.channels.c1.capacity =a1.channels.c1.transactionCapacity =# Bind the source and sink to the channela1.sources.r1.channels = c1a1.sinks.k1.channel = c1
第四步:准备启动flume服务
启动node03的flume服务
cd /export/servers/apache-flume-1.8.-binbin/flume-ng agent -n a1 -c conf -f conf/load_banlancer_server.conf -Dflume.root.logger=DEBUG,console
启动node02的flume服务
cd /export/servers/apache-flume-1.8.-binbin/flume-ng agent -n a1 -c conf -f conf/load_banlancer_server.conf -Dflume.root.logger=DEBUG,console
启动node01的flume服务
cd /export/servers/apache-flume-1.8.-binbin/flume-ng agent -n a1 -c conf -f conf/load_banlancer_client.conf -Dflume.root.logger=DEBUG,console
第五步:node01服务器运行脚本产生数据
cd  /export/servers/shells
sh tail-file.sh
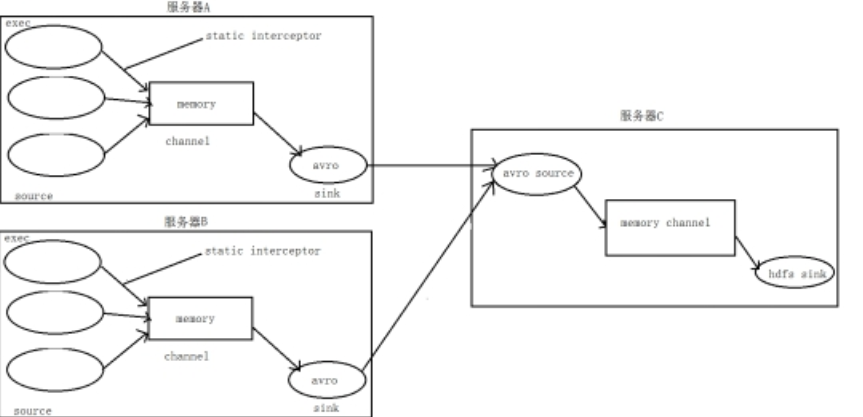
5. Flume 案例-静态拦截器
1. 案例场景
A、B两台日志服务机器实时生产日志主要类型为access.log、nginx.log、web.log
现在要求:
把A、B 机器中的access.log、nginx.log、web.log 采集汇总到C机器上然后统一收集到hdfs中。
但是在hdfs中要求的目录为:
/source/logs/access//**/source/logs/nginx/20180101/**/source/logs/web/20180101/**
2. 场景分析
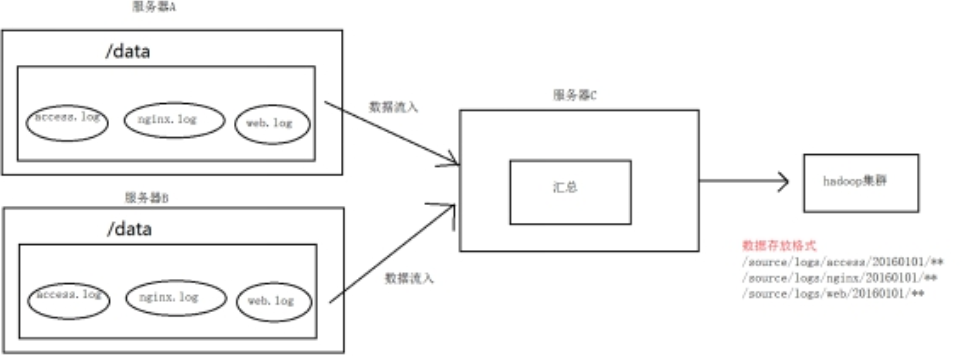
图一
3. 数据流程处理分析
4、实现
服务器A对应的IP为 192.168.174.100
服务器B对应的IP为 192.168.174.110
服务器C对应的IP为 node03
采集端配置文件开发
node01与node02服务器开发flume的配置文件
cd /export/servers/apache-flume-1.8.-bin/confvim exec_source_avro_sink.conf
# Name the components on this agenta1.sources = r1 r2 r3a1.sinks = k1a1.channels = c1# Describe/configure the sourcea1.sources.r1.type = execa1.sources.r1.command = tail -F /export/servers/taillogs/access.loga1.sources.r1.interceptors = i1a1.sources.r1.interceptors.i1.type = static## static拦截器的功能就是往采集到的数据的header中插入自己定## 义的key-value对a1.sources.r1.interceptors.i1.key = typea1.sources.r1.interceptors.i1.value = accessa1.sources.r2.type = execa1.sources.r2.command = tail -F /export/servers/taillogs/nginx.loga1.sources.r2.interceptors = i2a1.sources.r2.interceptors.i2.type = statica1.sources.r2.interceptors.i2.key = typea1.sources.r2.interceptors.i2.value = nginxa1.sources.r3.type = execa1.sources.r3.command = tail -F /export/servers/taillogs/web.loga1.sources.r3.interceptors = i3a1.sources.r3.interceptors.i3.type = statica1.sources.r3.interceptors.i3.key = typea1.sources.r3.interceptors.i3.value = web# Describe the sinka1.sinks.k1.type = avroa1.sinks.k1.hostname = node03a1.sinks.k1.port =# Use a channel which buffers events in memorya1.channels.c1.type = memorya1.channels.c1.capacity =a1.channels.c1.transactionCapacity =# Bind the source and sink to the channela1.sources.r1.channels = c1a1.sources.r2.channels = c1a1.sources.r3.channels = c1a1.sinks.k1.channel = c1
服务端配置文件开发
在node03上面开发flume配置文件
cd /export/servers/apache-flume-1.8.-bin/confvim avro_source_hdfs_sink.conf
a1.sources = r1a1.sinks = k1a1.channels = c1#定义sourcea1.sources.r1.type = avroa1.sources.r1.bind = node03a1.sources.r1.port =#添加时间拦截器a1.sources.r1.interceptors = i1a1.sources.r1.interceptors.i1.type = org.apache.flume.interceptor.TimestampInterceptor$Builder#定义channelsa1.channels.c1.type = memorya1.channels.c1.capacity =a1.channels.c1.transactionCapacity =#定义sinka1.sinks.k1.type = hdfsa1.sinks.k1.hdfs.path=hdfs://node01:8020/source/logs/%{type}/%Y%m%da1.sinks.k1.hdfs.filePrefix =eventsa1.sinks.k1.hdfs.fileType = DataStreama1.sinks.k1.hdfs.writeFormat = Text#时间类型a1.sinks.k1.hdfs.useLocalTimeStamp = true#生成的文件不按条数生成a1.sinks.k1.hdfs.rollCount =#生成的文件按时间生成a1.sinks.k1.hdfs.rollInterval =#生成的文件按大小生成a1.sinks.k1.hdfs.rollSize =#批量写入hdfs的个数a1.sinks.k1.hdfs.batchSize =#flume操作hdfs的线程数(包括新建,写入等)a1.sinks.k1.hdfs.threadsPoolSize=#操作hdfs超时时间a1.sinks.k1.hdfs.callTimeout=#组装source、channel、sinka1.sources.r1.channels = c1a1.sinks.k1.channel = c1
采集端文件生成脚本
在node01与node02上面开发shell脚本,模拟数据生成
cd /export/servers/shellsvim server.sh
#!/bin/bashwhile truedodate >> /export/servers/taillogs/access.log;date >> /export/servers/taillogs/web.log;date >> /export/servers/taillogs/nginx.log;sleep 0.5;done
顺序启动服务
node03启动flume实现数据收集
cd /export/servers/apache-flume-1.8.-binbin/flume-ng agent -c conf -f conf/avro_source_hdfs_sink.conf -name a1 -Dflume.root.logger=DEBUG,console
node01与node02启动flume实现数据监控
cd /export/servers/apache-flume-1.8.-binbin/flume-ng agent -c conf -f conf/exec_source_avro_sink.conf -name a1 -Dflume.root.logger=DEBUG,console
node01与node02启动生成文件脚本
cd /export/servers/shellssh server.sh
5、项目实现截图


6. Flume 案例二
案例需求:
在数据采集之后,通过flume的拦截器,实现不需要的数据过滤掉,并将指定的第一个字段进行加密,加密之后再往hdfs上面保存
原始数据与处理之后的数据对比

图一 原始文件内容

图二 HDFS上产生收集到的处理数
实现步骤
第一步:创建maven java工程,导入jar包
<?xml version="1.0" encoding="UTF-8"?><project xmlns="http://maven.apache.org/POM/4.0.0"xmlns:xsi="http://www.w3.org/2001/XMLSchema-instance"xsi:schemaLocation="http://maven.apache.org/POM/4.0.0 http://maven.apache.org/xsd/maven-4.0.0.xsd"><modelVersion>4.0.0</modelVersion><groupId>cn.le.cloud</groupId><artifactId>example-flume-intercepter</artifactId><version>1.0-SNAPSHOT</version><dependencies><dependency><groupId>org.apache.flume</groupId><artifactId>flume-ng-sdk</artifactId><version>1.8.0</version></dependency><dependency><groupId>org.apache.flume</groupId><artifactId>flume-ng-core</artifactId><version>1.8.0</version></dependency></dependencies><build><plugins><plugin><groupId>org.apache.maven.plugins</groupId><artifactId>maven-compiler-plugin</artifactId><version>3.0</version><configuration><source>1.8</source><target>1.8</target><encoding>UTF-8</encoding><!-- <verbal>true</verbal>--></configuration></plugin><plugin><groupId>org.apache.maven.plugins</groupId><artifactId>maven-shade-plugin</artifactId><version>3.1.1</version><executions><execution><phase>package</phase><goals><goal>shade</goal></goals><configuration><filters><filter><artifact>*:*</artifact><excludes><exclude>META-INF/*.SF</exclude><exclude>META-INF/*.DSA</exclude><exclude>META-INF/*.RSA</exclude></excludes></filter></filters><transformers><transformer implementation="org.apache.maven.plugins.shade.resource.ManifestResourceTransformer"><mainClass></mainClass></transformer></transformers></configuration></execution></executions></plugin></plugins></build></project>
第二步:自定义flume的拦截器
package cn.le.iterceptor;import com.google.common.base.Charsets;import org.apache.flume.Context;import org.apache.flume.Event;import org.apache.flume.interceptor.Interceptor;import java.security.MessageDigest;import java.security.NoSuchAlgorithmException;import java.util.ArrayList;import java.util.List;import java.util.regex.Matcher;import java.util.regex.Pattern;import static cn.le.iterceptor.CustomParameterInterceptor.Constants.*;public class CustomParameterInterceptor implements Interceptor {/** The field_separator.指明每一行字段的分隔符 */private final String fields_separator;/** The indexs.通过分隔符分割后,指明需要那列的字段 下标*/private final String indexs;/** The indexs_separator. 多个下标的分隔符*/private final String indexs_separator;/**** @param indexs* @param indexs_separator*/public CustomParameterInterceptor( String fields_separator,String indexs, String indexs_separator,String encrypted_field_index) {String f = fields_separator.trim();String i = indexs_separator.trim();this.indexs = indexs;this.encrypted_field_index=encrypted_field_index.trim();if (!f.equals("")) {f = UnicodeToString(f);}this.fields_separator =f;if (!i.equals("")) {i = UnicodeToString(i);}this.indexs_separator = i;}/*** \t 制表符 ('\u0009') \n 新行(换行)符 (' ') \r 回车符 (' ') \f 换页符 ('\u000C') \a 报警* (bell) 符 ('\u0007') \e 转义符 ('\u001B') \cx 空格(\u0020)对应于 x 的控制符** @param str* @return* @data:2015-6-30*//** The encrypted_field_index. 需要加密的字段下标*/private final String encrypted_field_index;public static String UnicodeToString(String str) {Pattern pattern = Pattern.compile("(\\\\u(\\p{XDigit}{4}))");Matcher matcher = pattern.matcher(str);char ch;while (matcher.find()) {ch = (char) Integer.parseInt(matcher.group(), );str = str.replace(matcher.group(), ch + "");}return str;}/** @see org.apache.flume.interceptor.Interceptor#intercept(org.apache.flume.Event)* 单个event拦截逻辑*/public Event intercept(Event event) {if (event == null) {return null;}try {String line = new String(event.getBody(), Charsets.UTF_8);String[] fields_spilts = line.split(fields_separator);String[] indexs_split = indexs.split(indexs_separator);String newLine="";for (int i = ; i < indexs_split.length; i++) {int parseInt = Integer.parseInt(indexs_split[i]);//对加密字段进行加密if(!"".equals(encrypted_field_index)&&encrypted_field_index.equals(indexs_split[i])){newLine+=StringUtils.GetMD5Code(fields_spilts[parseInt]);}else{newLine+=fields_spilts[parseInt];}if(i!=indexs_split.length-){newLine+=fields_separator;}}event.setBody(newLine.getBytes(Charsets.UTF_8));return event;} catch (Exception e) {return event;}}/** @see org.apache.flume.interceptor.Interceptor#intercept(java.util.List)* 批量event拦截逻辑*/public List<Event> intercept(List<Event> events) {List<Event> out = new ArrayList<Event>();for (Event event : events) {Event outEvent = intercept(event);if (outEvent != null) {out.add(outEvent);}}return out;}/** @see org.apache.flume.interceptor.Interceptor#initialize()*/public void initialize() {// TODO Auto-generated method stub}/** @see org.apache.flume.interceptor.Interceptor#close()*/public void close() {// TODO Auto-generated method stub}/*** 相当于自定义Interceptor的工厂类* 在flume采集配置文件中通过制定该Builder来创建Interceptor对象* 可以在Builder中获取、解析flume采集配置文件中的拦截器Interceptor的自定义参数:* 字段分隔符,字段下标,下标分隔符、加密字段下标 ...等* @author**/public static class Builder implements Interceptor.Builder {/** The fields_separator.指明每一行字段的分隔符 */private String fields_separator;/** The indexs.通过分隔符分割后,指明需要那列的字段 下标*/private String indexs;/** The indexs_separator. 多个下标下标的分隔符*/private String indexs_separator;/** The encrypted_field. 需要加密的字段下标*/private String encrypted_field_index;/** @see org.apache.flume.conf.Configurable#configure(org.apache.flume.Context)*/public void configure(Context context) {fields_separator = context.getString(FIELD_SEPARATOR, DEFAULT_FIELD_SEPARATOR);indexs = context.getString(INDEXS, DEFAULT_INDEXS);indexs_separator = context.getString(INDEXS_SEPARATOR, DEFAULT_INDEXS_SEPARATOR);encrypted_field_index= context.getString(ENCRYPTED_FIELD_INDEX, DEFAULT_ENCRYPTED_FIELD_INDEX);}/** @see org.apache.flume.interceptor.Interceptor.Builder#build()*/public Interceptor build() {return new CustomParameterInterceptor(fields_separator, indexs, indexs_separator,encrypted_field_index);}}/*** 常量**/public static class Constants {/** The Constant FIELD_SEPARATOR. */public static final String FIELD_SEPARATOR = "fields_separator";/** The Constant DEFAULT_FIELD_SEPARATOR. */public static final String DEFAULT_FIELD_SEPARATOR =" ";/** The Constant INDEXS. */public static final String INDEXS = "indexs";/** The Constant DEFAULT_INDEXS. */public static final String DEFAULT_INDEXS = "0";/** The Constant INDEXS_SEPARATOR. */public static final String INDEXS_SEPARATOR = "indexs_separator";/** The Constant DEFAULT_INDEXS_SEPARATOR. */public static final String DEFAULT_INDEXS_SEPARATOR = ",";/** The Constant ENCRYPTED_FIELD_INDEX. */public static final String ENCRYPTED_FIELD_INDEX = "encrypted_field_index";/** The Constant DEFAUL_TENCRYPTED_FIELD_INDEX. */public static final String DEFAULT_ENCRYPTED_FIELD_INDEX = "";/** The Constant PROCESSTIME. */public static final String PROCESSTIME = "processTime";/** The Constant PROCESSTIME. */public static final String DEFAULT_PROCESSTIME = "a";}/*** 工具类:字符串md5加密*/public static class StringUtils {// 全局数组private final static String[] strDigits = { "0", "1", "2", "3", "4", "5","6", "7", "8", "9", "a", "b", "c", "d", "e", "f" };// 返回形式为数字跟字符串private static String byteToArrayString(byte bByte) {int iRet = bByte;// System.out.println("iRet="+iRet);if (iRet < ) {iRet += ;}int iD1 = iRet / ;int iD2 = iRet % ;return strDigits[iD1] + strDigits[iD2];}// 返回形式只为数字private static String byteToNum(byte bByte) {int iRet = bByte;System.out.println("iRet1=" + iRet);if (iRet < ) {iRet += ;}return String.valueOf(iRet);}// 转换字节数组为16进制字串private static String byteToString(byte[] bByte) {StringBuffer sBuffer = new StringBuffer();for (int i = ; i < bByte.length; i++) {sBuffer.append(byteToArrayString(bByte[i]));}return sBuffer.toString();}public static String GetMD5Code(String strObj) {String resultString = null;try {resultString = new String(strObj);MessageDigest md = MessageDigest.getInstance("MD5");// md.digest() 该函数返回值为存放哈希值结果的byte数组resultString = byteToString(md.digest(strObj.getBytes()));} catch (NoSuchAlgorithmException ex) {ex.printStackTrace();}return resultString;}}}
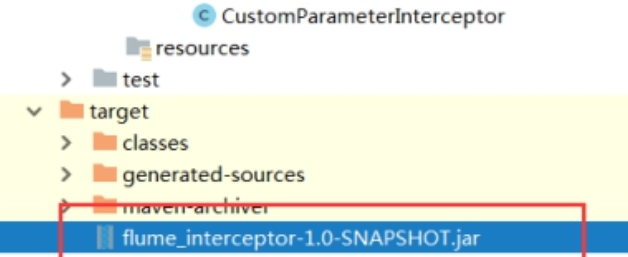
第三步:打包上传服务器
将我们的拦截器打成jar包放到flume的lib目录下
第四步:开发flume的配置文件
第三台机器开发flume的配置文件
cd /export/servers/apache-flume-1.8.-bin/confvim spool-interceptor-hdfs.conf
a1.channels = c1a1.sources = r1a1.sinks = s1#channela1.channels.c1.type = memorya1.channels.c1.capacity=a1.channels.c1.transactionCapacity=#sourcea1.sources.r1.channels = c1a1.sources.r1.type = spooldira1.sources.r1.spoolDir = /export/servers/intercepta1.sources.r1.batchSize=a1.sources.r1.inputCharset = UTF-a1.sources.r1.interceptors =i1 i2a1.sources.r1.interceptors.i1.type =cn.le.iterceptor.CustomParameterInterceptor$Buildera1.sources.r1.interceptors.i1.fields_separator=\\u0009a1.sources.r1.interceptors.i1.indexs =,,,,a1.sources.r1.interceptors.i1.indexs_separator =\\u002ca1.sources.r1.interceptors.i1.encrypted_field_index =a1.sources.r1.interceptors.i2.type = org.apache.flume.interceptor.TimestampInterceptor$Builder#sinka1.sinks.s1.channel = c1a1.sinks.s1.type = hdfsa1.sinks.s1.hdfs.path =hdfs://node01:8020/flume/intercept/%Y%m%da1.sinks.s1.hdfs.filePrefix = eventa1.sinks.s1.hdfs.fileSuffix = .loga1.sinks.s1.hdfs.rollSize =a1.sinks.s1.hdfs.rollInterval =a1.sinks.s1.hdfs.rollCount =a1.sinks.s1.hdfs.batchSize =a1.sinks.s1.hdfs.round = truea1.sinks.s1.hdfs.roundUnit = minutea1.sinks.s1.hdfs.threadsPoolSize =a1.sinks.s1.hdfs.useLocalTimeStamp = truea1.sinks.s1.hdfs.minBlockReplicas =a1.sinks.s1.hdfs.fileType =DataStreama1.sinks.s1.hdfs.writeFormat = Texta1.sinks.s1.hdfs.callTimeout =a1.sinks.s1.hdfs.idleTimeout =
第五步:上传测试数据
上传我们的测试数据到/export/servers/intercept 这个目录下面去,如果目录不存在则创建
mkdir -p /export/servers/intercept
测试数据如下
136012493011360124930213601249303136012493041360124930513601249306136012493071360124930813601249309136012493101360124931113601249312
第六步:启动flume
cd /export/servers/apache-flume-1.8.-binbin/flume-ng agent -c conf -f conf/spool-interceptor-hdfs.conf -name a1 -Dflume.root.logger=DEBUG,console

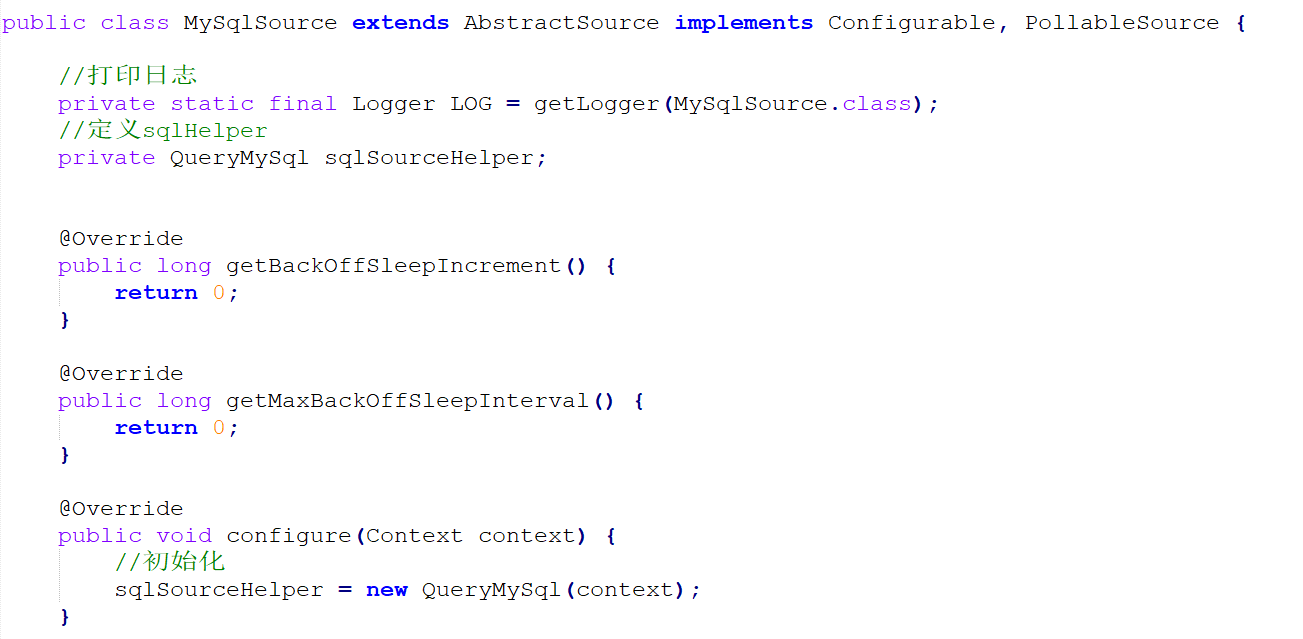
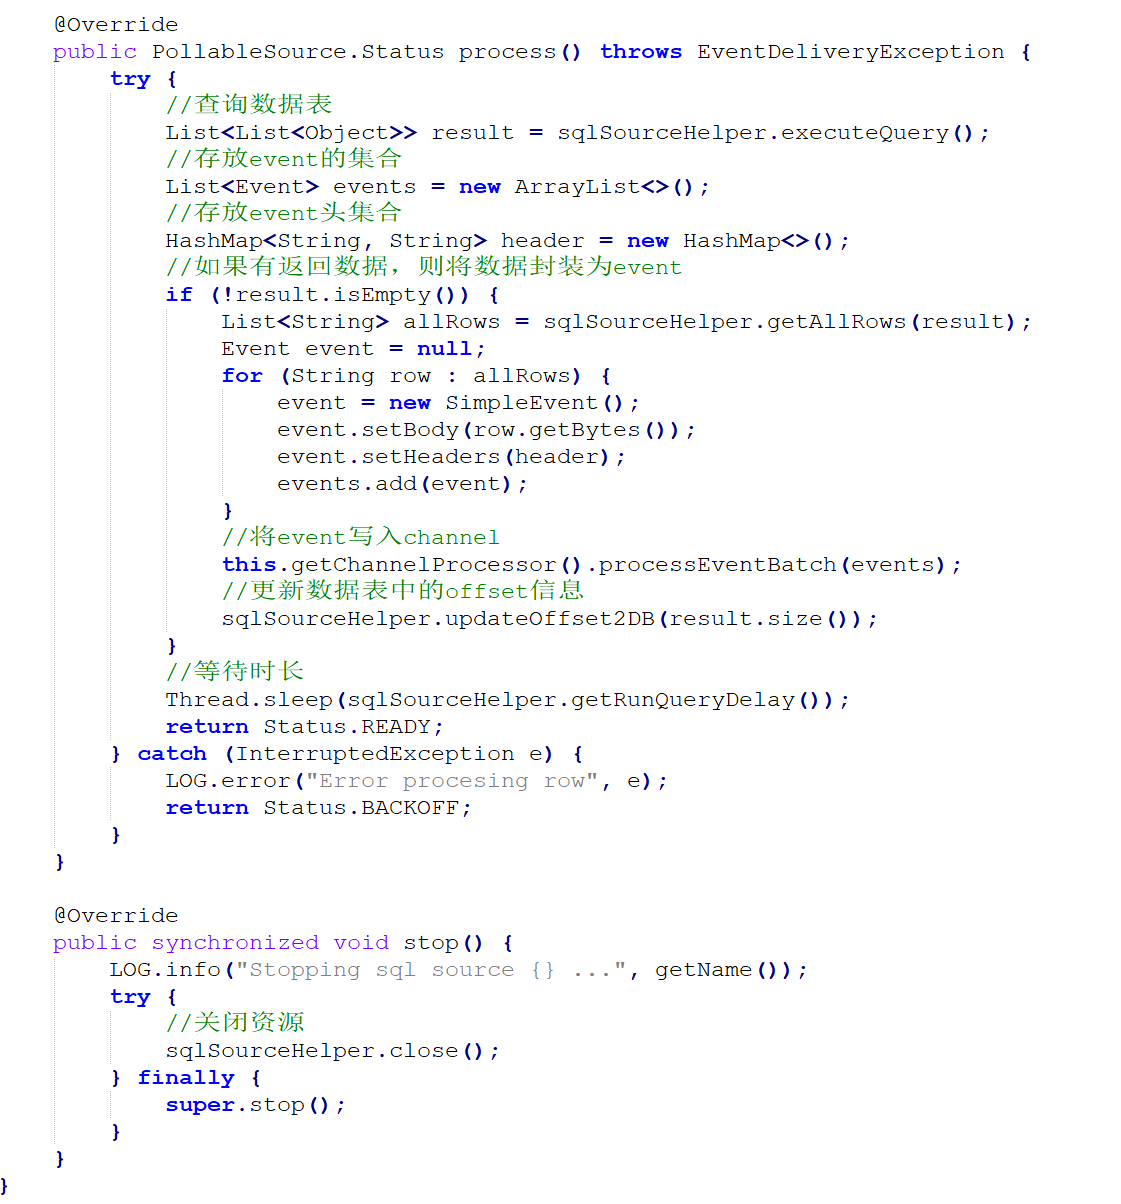
package cn.le.flumesource;import org.apache.flume.Context;import org.apache.flume.Event;import org.apache.flume.EventDeliveryException;import org.apache.flume.PollableSource;import org.apache.flume.conf.Configurable;import org.apache.flume.event.SimpleEvent;import org.apache.flume.source.AbstractSource;import org.slf4j.Logger;import java.util.ArrayList;import java.util.HashMap;import java.util.List;import static org.slf4j.LoggerFactory.*;public class MySqlSource extends AbstractSource implements Configurable, PollableSource {//打印日志private static final Logger LOG = getLogger(MySqlSource.class);//定义sqlHelperprivate QueryMySql sqlSourceHelper;@Overridepublic long getBackOffSleepIncrement() {return ;}@Overridepublic long getMaxBackOffSleepInterval() {return ;}@Overridepublic void configure(Context context) {//初始化sqlSourceHelper = new QueryMySql(context);}@Overridepublic PollableSource.Status process() throws EventDeliveryException {try {//查询数据表List<List<Object>> result = sqlSourceHelper.executeQuery();//存放event的集合List<Event> events = new ArrayList<>();//存放event头集合HashMap<String, String> header = new HashMap<>();//如果有返回数据,则将数据封装为eventif (!result.isEmpty()) {List<String> allRows = sqlSourceHelper.getAllRows(result);Event event = null;for (String row : allRows) {event = new SimpleEvent();event.setBody(row.getBytes());event.setHeaders(header);events.add(event);}//将event写入channelthis.getChannelProcessor().processEventBatch(events);//更新数据表中的offset信息sqlSourceHelper.updateOffset2DB(result.size());}//等待时长Thread.sleep(sqlSourceHelper.getRunQueryDelay());return Status.READY;} catch (InterruptedException e) {LOG.error("Error procesing row", e);return Status.BACKOFF;}}@Overridepublic synchronized void stop() {LOG.info("Stopping sql source {} ...", getName());try {//关闭资源sqlSourceHelper.close();} finally {super.stop();}}}
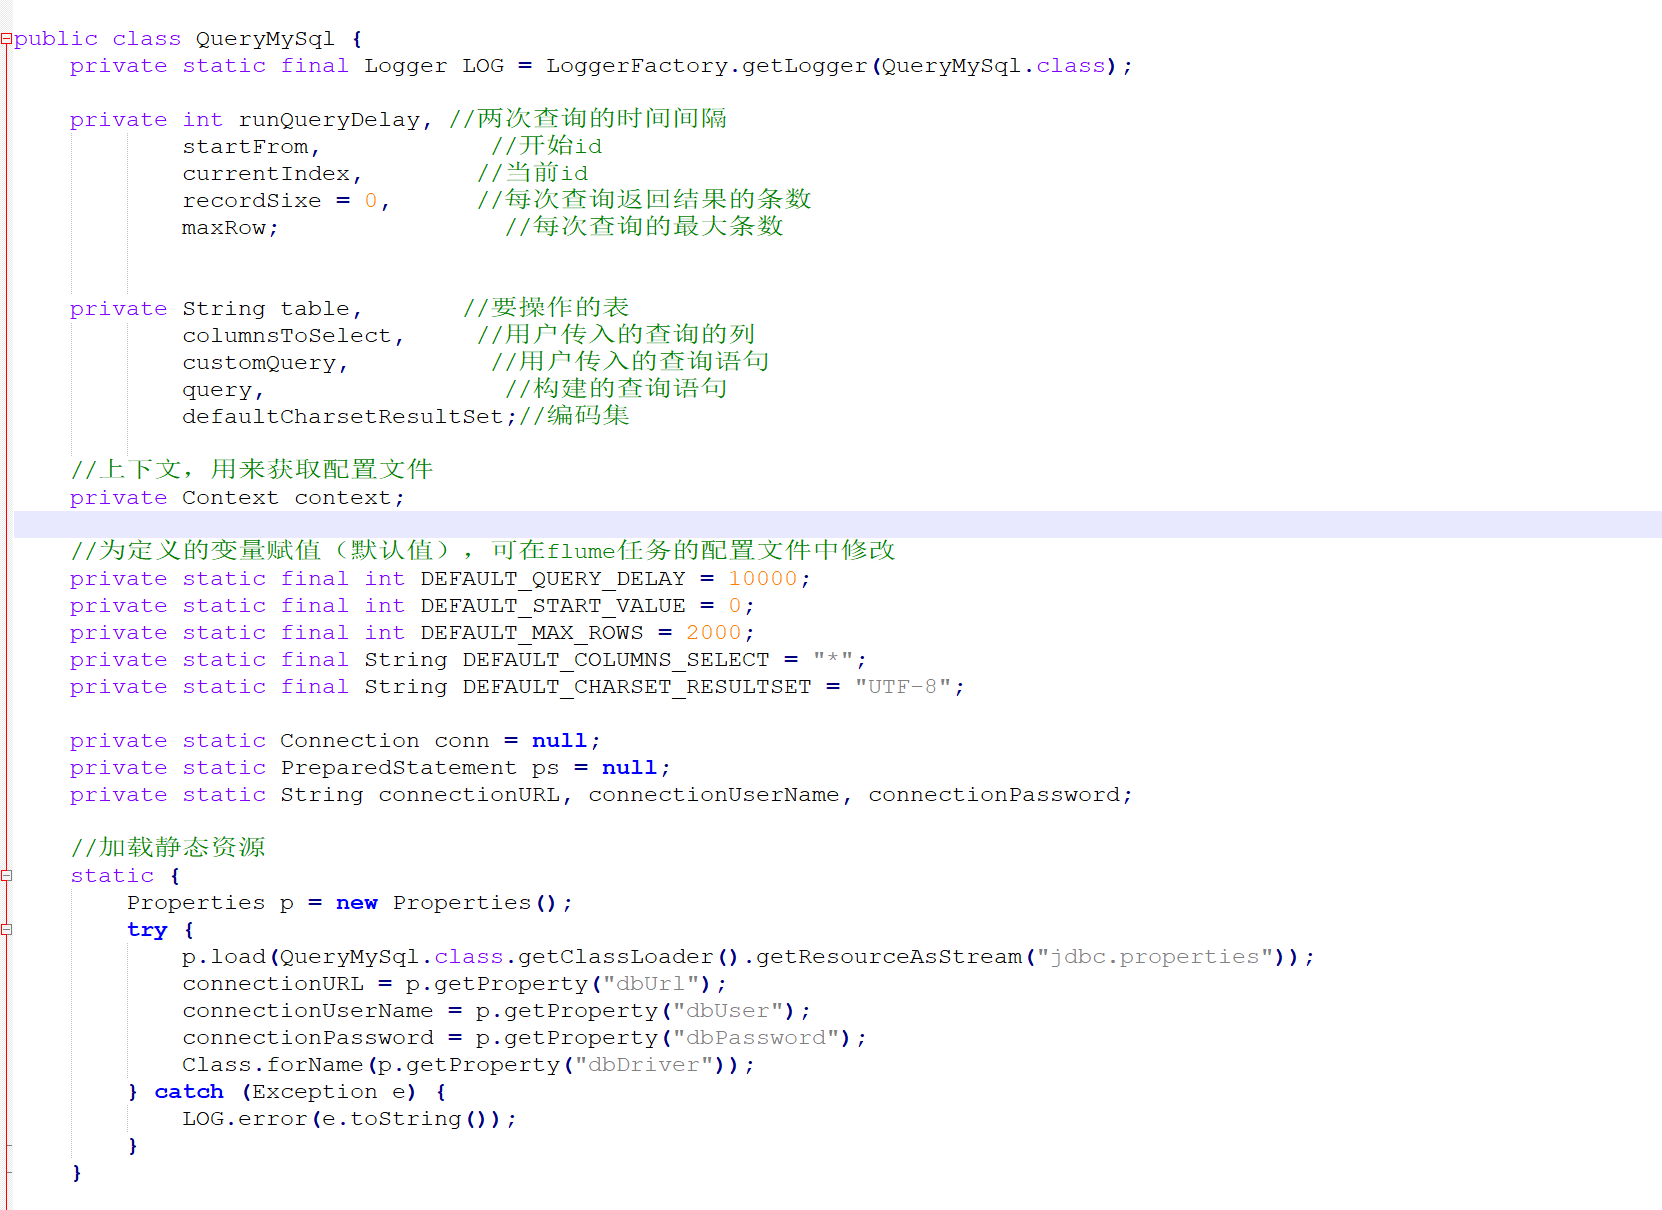
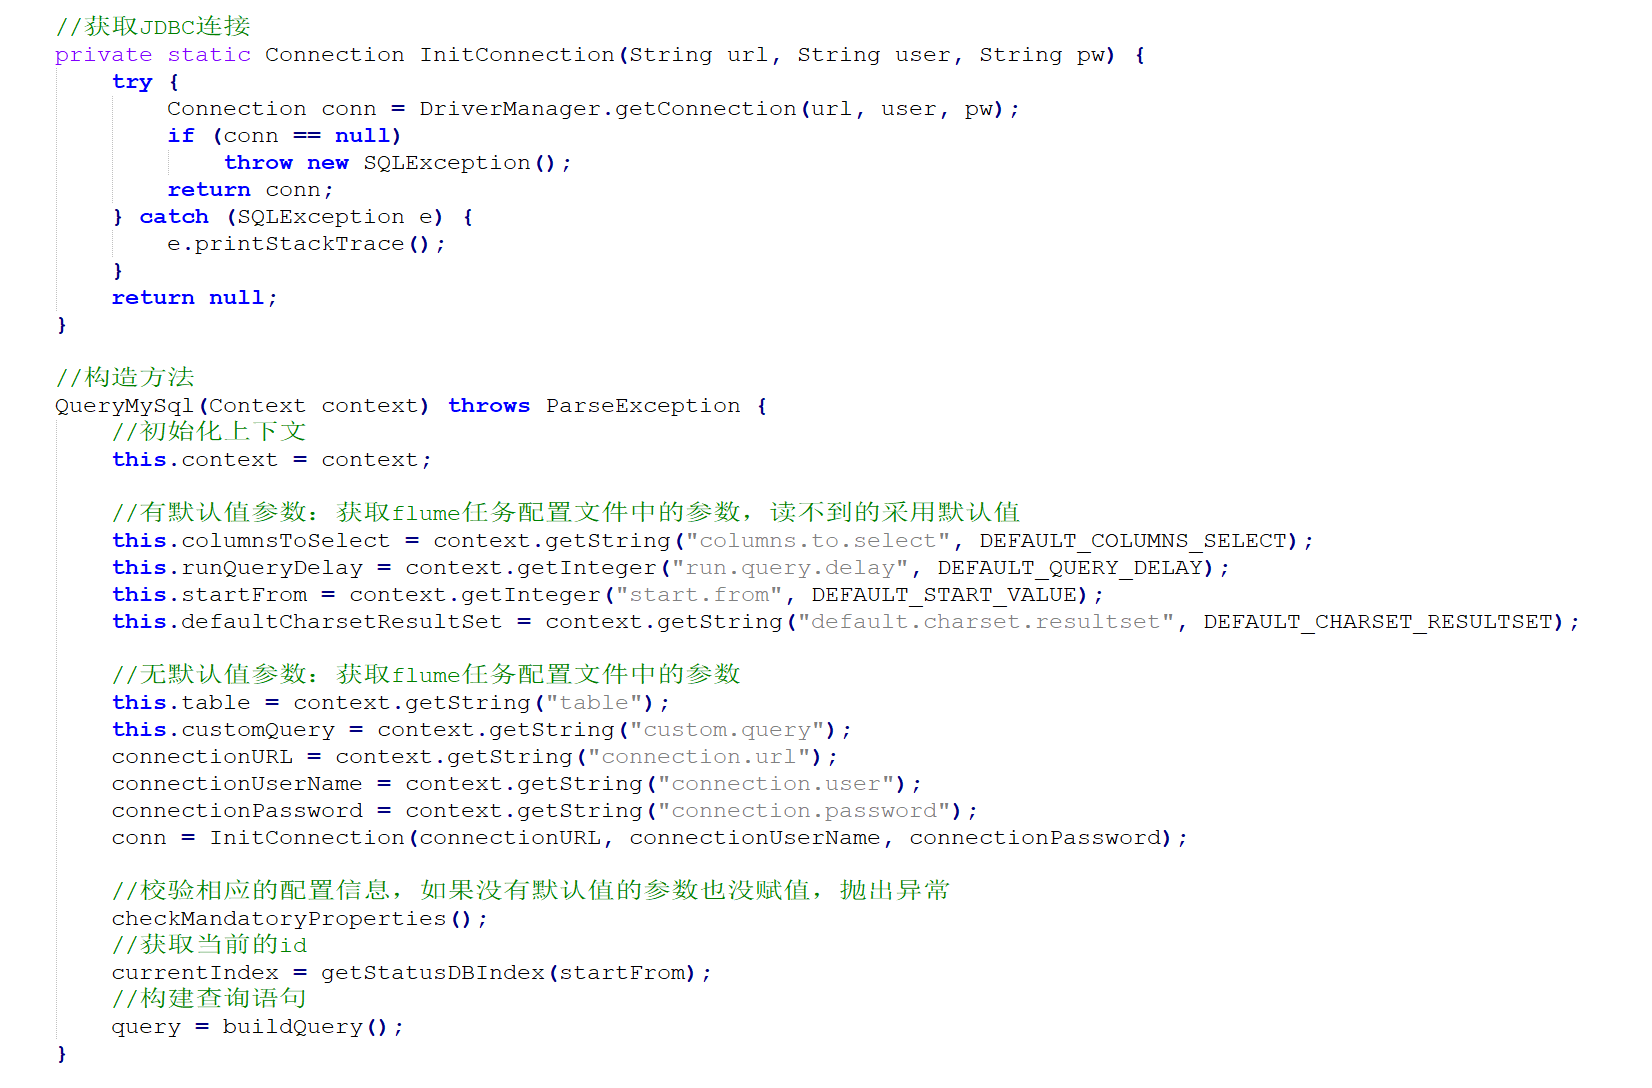
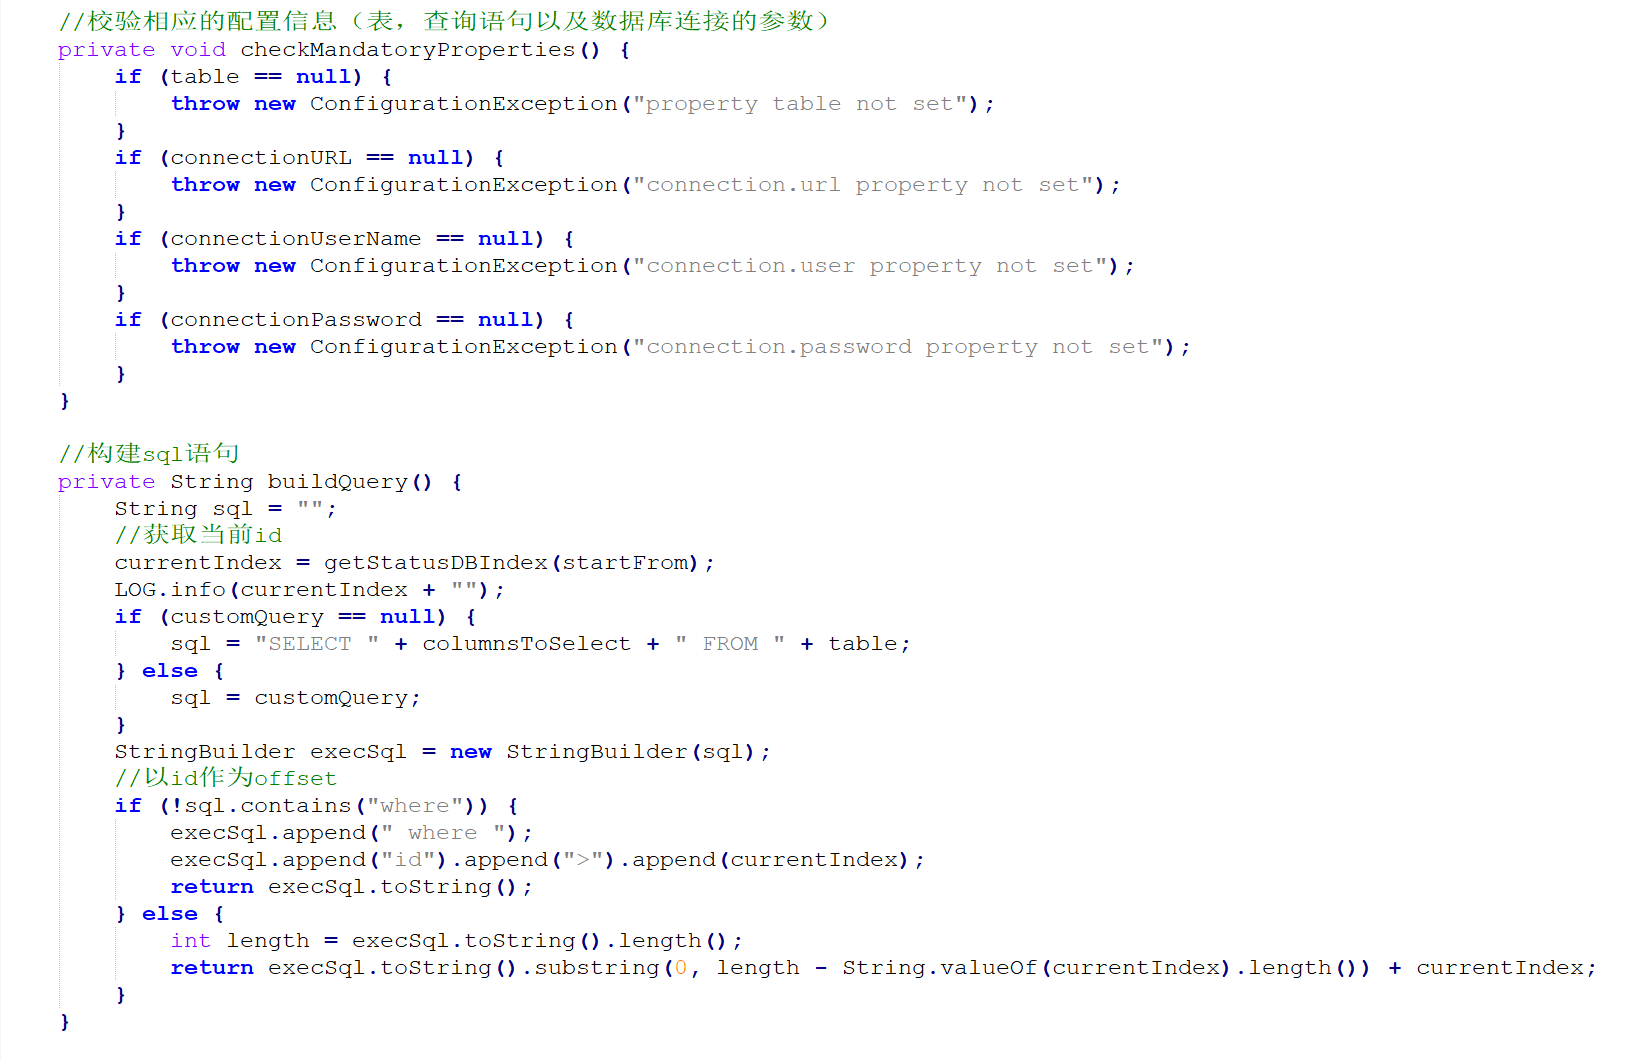
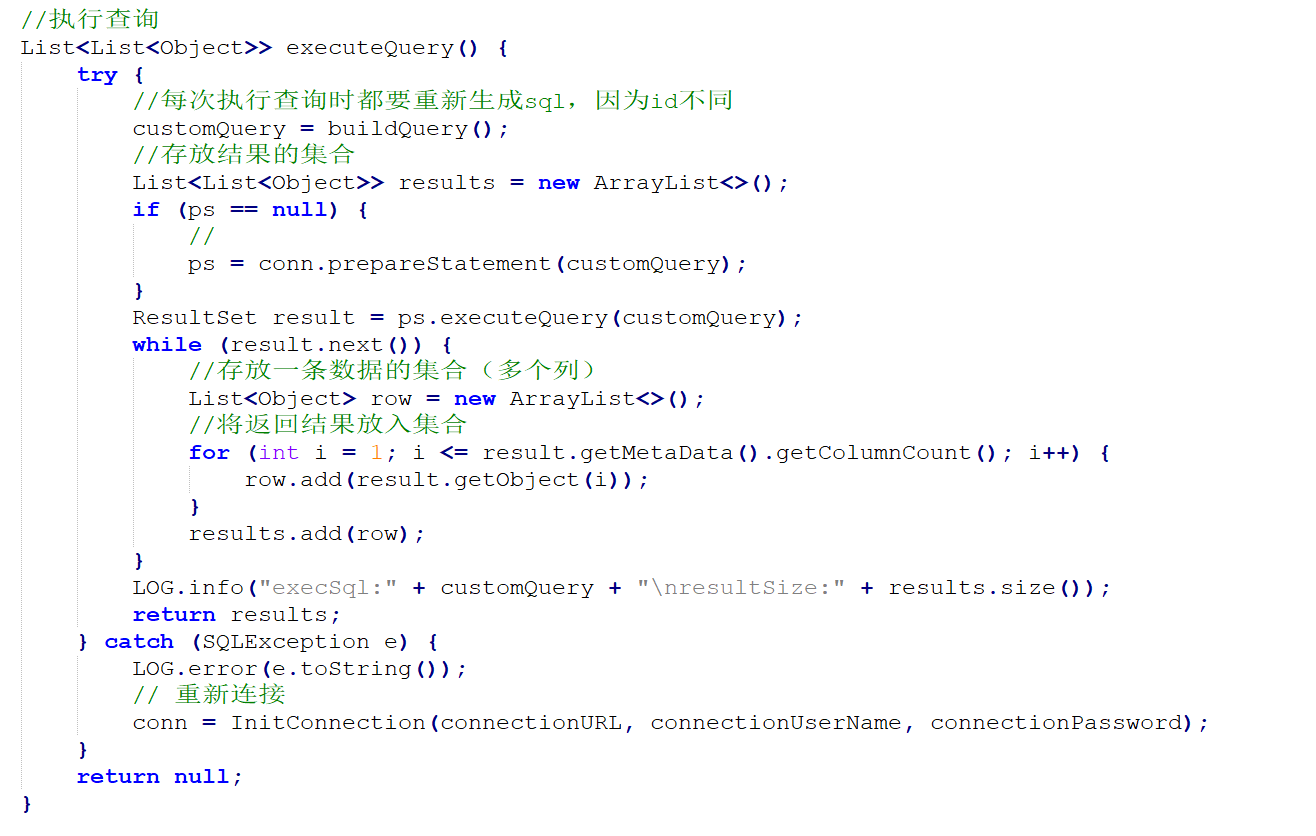
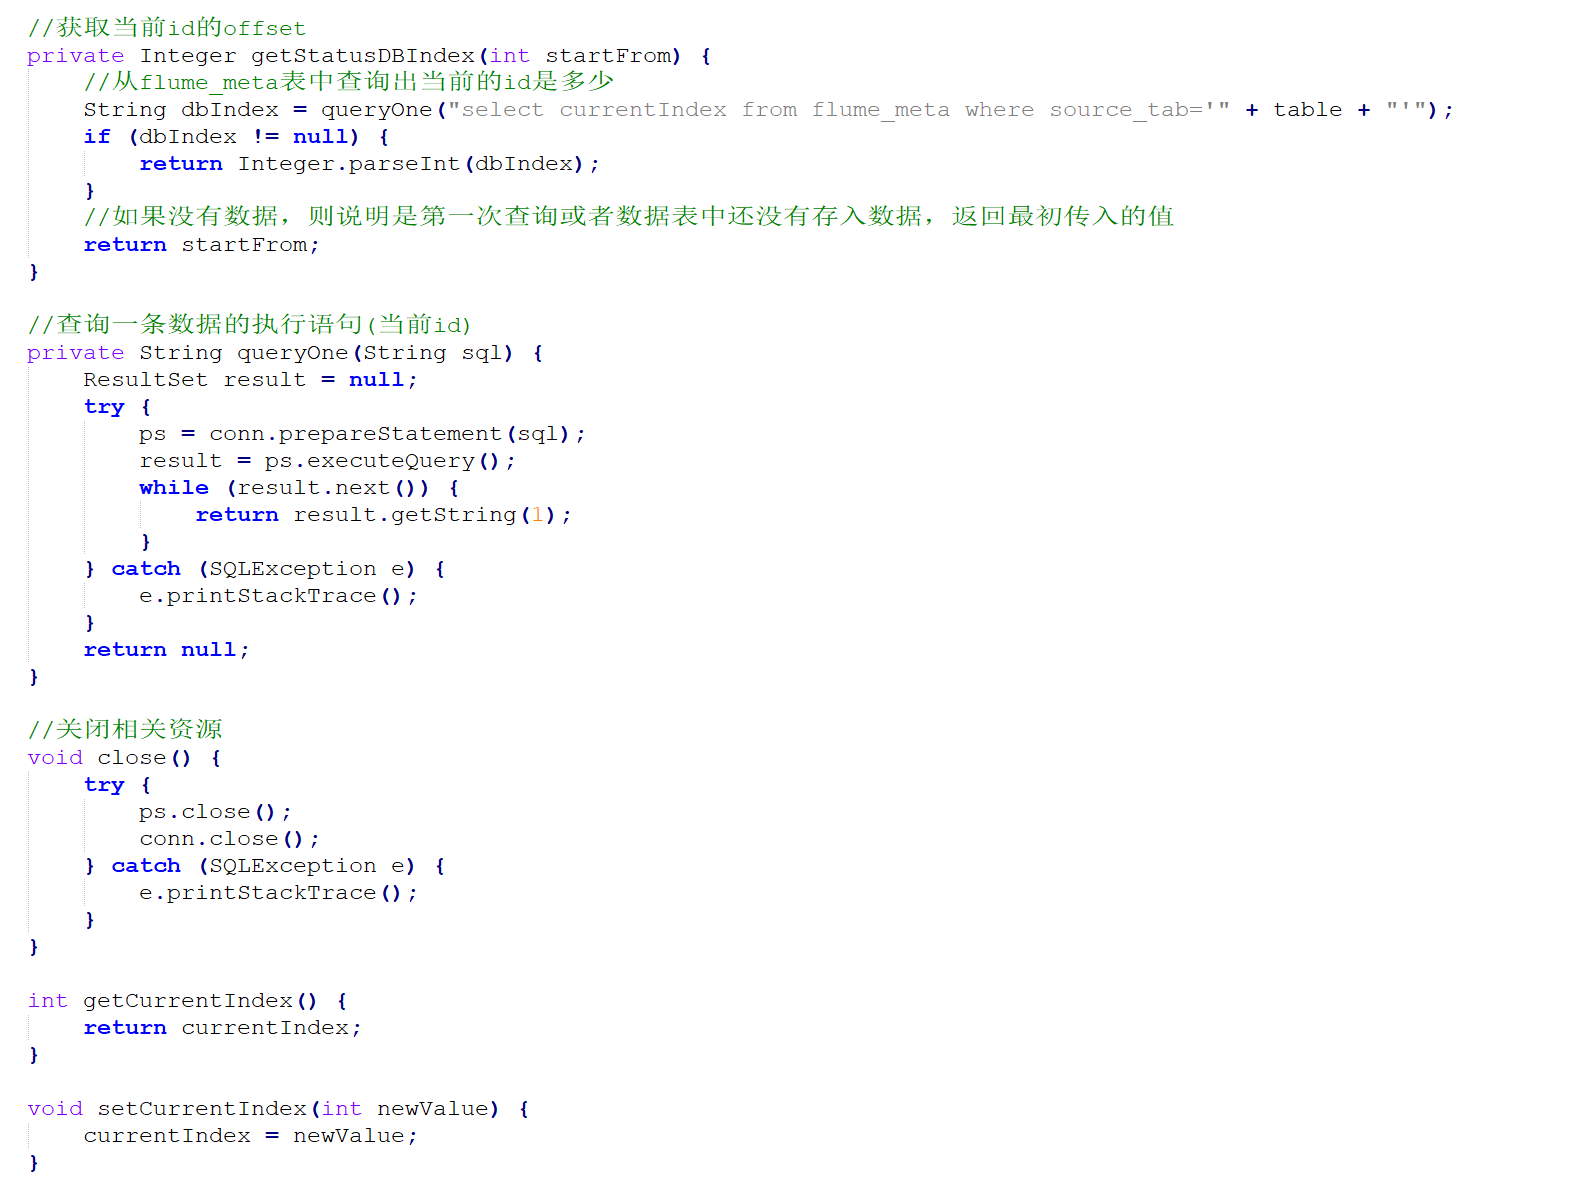
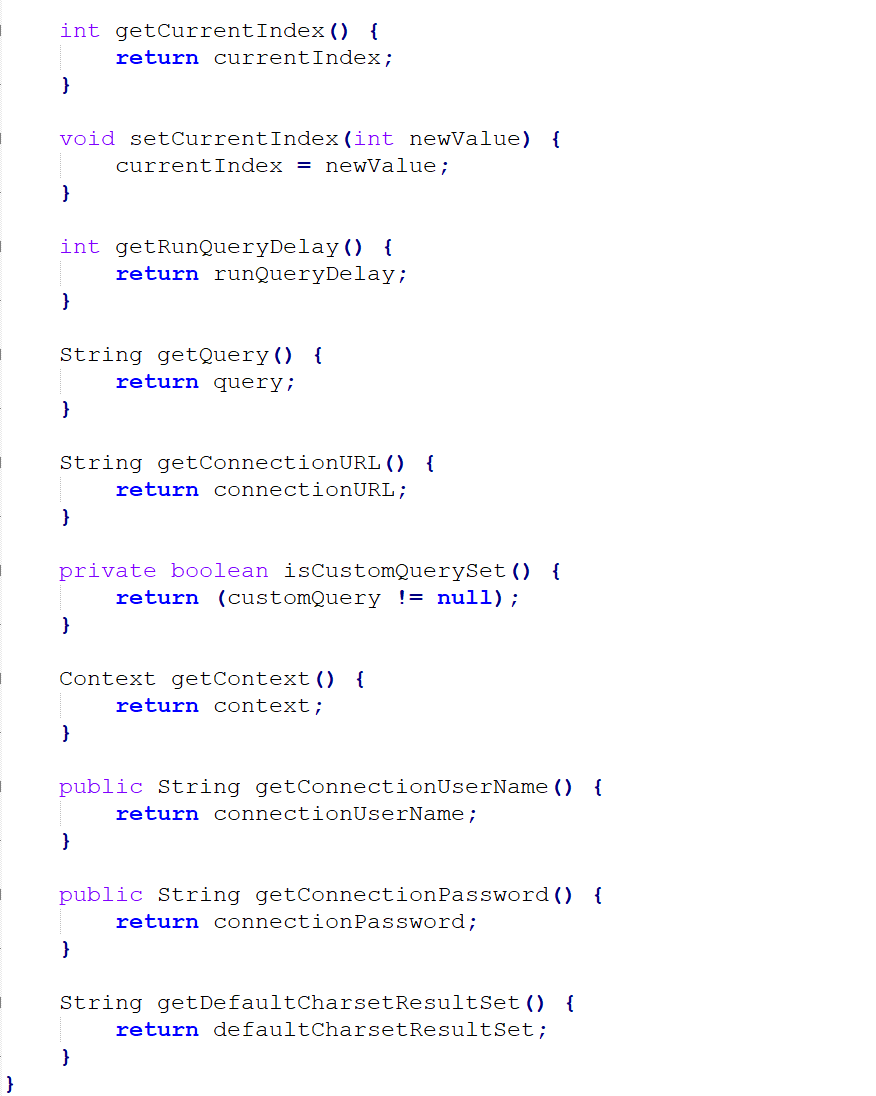
package cn.le.flumesource;import org.apache.flume.Context;import org.apache.flume.conf.ConfigurationException;import org.apache.http.ParseException;import org.slf4j.Logger;import org.slf4j.LoggerFactory;import java.sql.*;import java.util.ArrayList;import java.util.List;import java.util.Properties;public class QueryMySql {private static final Logger LOG = LoggerFactory.getLogger(QueryMySql.class);private int runQueryDelay, //两次查询的时间间隔startFrom, //开始idcurrentIndex, //当前idrecordSixe = , //每次查询返回结果的条数maxRow; //每次查询的最大条数private String table, //要操作的表columnsToSelect, //用户传入的查询的列customQuery, //用户传入的查询语句query, //构建的查询语句defaultCharsetResultSet;//编码集//上下文,用来获取配置文件private Context context;//为定义的变量赋值(默认值),可在flume任务的配置文件中修改private static final int DEFAULT_QUERY_DELAY = ;private static final int DEFAULT_START_VALUE = ;private static final int DEFAULT_MAX_ROWS = ;private static final String DEFAULT_COLUMNS_SELECT = "*";private static final String DEFAULT_CHARSET_RESULTSET = "UTF-8";private static Connection conn = null;private static PreparedStatement ps = null;private static String connectionURL, connectionUserName, connectionPassword;//加载静态资源static {Properties p = new Properties();try {p.load(QueryMySql.class.getClassLoader().getResourceAsStream("jdbc.properties"));connectionURL = p.getProperty("dbUrl");connectionUserName = p.getProperty("dbUser");connectionPassword = p.getProperty("dbPassword");Class.forName(p.getProperty("dbDriver"));} catch (Exception e) {LOG.error(e.toString());}}//获取JDBC连接private static Connection InitConnection(String url, String user, String pw) {try {Connection conn = DriverManager.getConnection(url, user, pw);if (conn == null)throw new SQLException();return conn;} catch (SQLException e) {e.printStackTrace();}return null;}//构造方法QueryMySql(Context context) throws ParseException {//初始化上下文this.context = context;//有默认值参数:获取flume任务配置文件中的参数,读不到的采用默认值this.columnsToSelect = context.getString("columns.to.select", DEFAULT_COLUMNS_SELECT);this.runQueryDelay = context.getInteger("run.query.delay", DEFAULT_QUERY_DELAY);this.startFrom = context.getInteger("start.from", DEFAULT_START_VALUE);this.defaultCharsetResultSet = context.getString("default.charset.resultset", DEFAULT_CHARSET_RESULTSET);//无默认值参数:获取flume任务配置文件中的参数this.table = context.getString("table");this.customQuery = context.getString("custom.query");connectionURL = context.getString("connection.url");connectionUserName = context.getString("connection.user");connectionPassword = context.getString("connection.password");conn = InitConnection(connectionURL, connectionUserName, connectionPassword);//校验相应的配置信息,如果没有默认值的参数也没赋值,抛出异常checkMandatoryProperties();//获取当前的idcurrentIndex = getStatusDBIndex(startFrom);//构建查询语句query = buildQuery();}//校验相应的配置信息(表,查询语句以及数据库连接的参数)private void checkMandatoryProperties() {if (table == null) {throw new ConfigurationException("property table not set");}if (connectionURL == null) {throw new ConfigurationException("connection.url property not set");}if (connectionUserName == null) {throw new ConfigurationException("connection.user property not set");}if (connectionPassword == null) {throw new ConfigurationException("connection.password property not set");}}//构建sql语句private String buildQuery() {String sql = "";//获取当前idcurrentIndex = getStatusDBIndex(startFrom);LOG.info(currentIndex + "");if (customQuery == null) {sql = "SELECT " + columnsToSelect + " FROM " + table;} else {sql = customQuery;}StringBuilder execSql = new StringBuilder(sql);//以id作为offsetif (!sql.contains("where")) {execSql.append(" where ");execSql.append("id").append(">").append(currentIndex);return execSql.toString();} else {int length = execSql.toString().length();return execSql.toString().substring(, length - String.valueOf(currentIndex).length()) + currentIndex;}}//执行查询List<List<Object>> executeQuery() {try {//每次执行查询时都要重新生成sql,因为id不同customQuery = buildQuery();//存放结果的集合List<List<Object>> results = new ArrayList<>();if (ps == null) {//ps = conn.prepareStatement(customQuery);}ResultSet result = ps.executeQuery(customQuery);while (result.next()) {//存放一条数据的集合(多个列)List<Object> row = new ArrayList<>();//将返回结果放入集合for (int i = ; i <= result.getMetaData().getColumnCount(); i++) {row.add(result.getObject(i));}results.add(row);}LOG.info("execSql:" + customQuery + "\nresultSize:" + results.size());return results;} catch (SQLException e) {LOG.error(e.toString());// 重新连接conn = InitConnection(connectionURL, connectionUserName, connectionPassword);}return null;}//将结果集转化为字符串,每一条数据是一个list集合,将每一个小的list集合转化为字符串List<String> getAllRows(List<List<Object>> queryResult) {List<String> allRows = new ArrayList<>();if (queryResult == null || queryResult.isEmpty())return allRows;StringBuilder row = new StringBuilder();for (List<Object> rawRow : queryResult) {Object value = null;for (Object aRawRow : rawRow) {value = aRawRow;if (value == null) {row.append(",");} else {row.append(aRawRow.toString()).append(",");}}allRows.add(row.toString());row = new StringBuilder();}return allRows;}//更新offset元数据状态,每次返回结果集后调用。必须记录每次查询的offset值,为程序中断续跑数据时使用,以id为offsetvoid updateOffset2DB(int size) {//以source_tab做为KEY,如果不存在则插入,存在则更新(每个源表对应一条记录)String sql = "insert into flume_meta(source_tab,currentIndex) VALUES('"+ this.table+ "','" + (recordSixe += size)+ "') on DUPLICATE key update source_tab=values(source_tab),currentIndex=values(currentIndex)";LOG.info("updateStatus Sql:" + sql);execSql(sql);}//执行sql语句private void execSql(String sql) {try {ps = conn.prepareStatement(sql);LOG.info("exec::" + sql);ps.execute();} catch (SQLException e) {e.printStackTrace();}}//获取当前id的offsetprivate Integer getStatusDBIndex(int startFrom) {//从flume_meta表中查询出当前的id是多少String dbIndex = queryOne("select currentIndex from flume_meta where source_tab='" + table + "'");if (dbIndex != null) {return Integer.parseInt(dbIndex);}//如果没有数据,则说明是第一次查询或者数据表中还没有存入数据,返回最初传入的值return startFrom;}//查询一条数据的执行语句(当前id)private String queryOne(String sql) {ResultSet result = null;try {ps = conn.prepareStatement(sql);result = ps.executeQuery();while (result.next()) {return result.getString();}} catch (SQLException e) {e.printStackTrace();}return null;}//关闭相关资源void close() {try {ps.close();conn.close();} catch (SQLException e) {e.printStackTrace();}}int getCurrentIndex() {return currentIndex;}void setCurrentIndex(int newValue) {currentIndex = newValue;}int getRunQueryDelay() {return runQueryDelay;}String getQuery() {return query;}String getConnectionURL() {return connectionURL;}private boolean isCustomQuerySet() {return (customQuery != null);}Context getContext() {return context;}public String getConnectionUserName() {return connectionUserName;}public String getConnectionPassword() {return connectionPassword;}String getDefaultCharsetResultSet() {return defaultCharsetResultSet;}}
Hadoop-(Flume)的更多相关文章
- hadoop flume 架构及监控的部署
1 Flume架构解释 Flume概念 Flume是一个分布式 ,可靠的,和高可用的,海量的日志聚合系统 支持在系统中定制各类的数据发送方 用于收集数据 提供简单的数据提取能力 并写入到各种接受方 ...
- flume学习安装
近期项目组有需求点击流日志须要自己收集,学习了一下flume而且成功安装了.相关信息记录一下. 1)下载flume1.5版本号 wget http://www.apache.org/dyn/clos ...
- flume从kafka读取数据到hdfs中的配置
#source的名字 agent.sources = kafkaSource # channels的名字,建议按照type来命名 agent.channels = memoryChannel # si ...
- 最新Hadoop Shell完全讲解
本文为原创博客,转载请注明出处:http://www.cnblogs.com/MrFee/p/4683953.html 1.appendToFile 功能:将一个或多个源文件系统的内容追加至 ...
- Flume集群搭建
0. 软件版本下载 http://mirror.bit.edu.cn/apache/flume/ 1. 集群环境 Master 172.16.11.97 Slave1 172.16.11.98 S ...
- flume学习笔记
#################################################################################################### ...
- Flume定时启动任务 防止挂掉
一,查看Flume条数:ps -ef|grep java|grep flume|wc -l ==>15 检查进程:给sh脚本添加权限,chmod 777 xx.sh #!/bin/s ...
- flume 日志导入elasticsearch
Flume配置 . flume生成的数据结构 <span style="font-size:18px;">"_index" : "logs ...
- Flume+Morphlines实现数据的实时ETL
转载:http://mp.weixin.qq.com/s/xCSdkQo1XMQwU91lch29Uw Apache Flume介绍: Apache Flume是一个Apache的开源项目,是一个分布 ...
- Flume Channel Selectors + kafka
http://flume.apache.org/FlumeUserGuide.html#custom-channel-selector 官方文档上channel selectors 有两种类型: Re ...
随机推荐
- Codevs 1169 传纸条 2008年NOIP全国联赛提高组
1169 传纸条 2008年NOIP全国联赛提高组 时间限制: 1 s 空间限制: 128000 KB 题目等级 : 钻石 Diamond 题目描述 Description 小渊和小轩是好朋友也是同班 ...
- 【poj1733】Parity game--边带权并查集
Time Limit: 1000MS Memory Limit: 65536K Total Submissions: 15776 Accepted: 5964 Description Now ...
- codeforces163D
Large Refrigerator CodeForces - 163D 给定一个长方体的体积V,求出这个长方体的最小表面积. 输入 第一行有一个整数t (1 ≤ t ≤ 500) — 测试数据的组数 ...
- 【洛谷2053】 [SCOI2007]修车(费用流)
传送门 洛谷 Solution 考虑把每一个修车工人拆成\(n\)个点,那么考虑令\(id(i,j)\)为第\(i\)个工人倒数第\(j\)次修车. 然后就可以直接跑费用流了!!! 代码实现 /* m ...
- bypass disable_function总结学习
通常bypass的思路如下 1. 攻击后端组件,寻找存在命令注入的.web 应用常用的后端组件,如,ImageMagick 的魔图漏洞.bash 的破壳漏洞 2. 寻找未禁用的漏网函数,常见的执行命令 ...
- Linux设备驱动程序 之 主次设备号
主设备号和次设备号 对字符设备的访问是通过文件系统内的设备名称进行的,这些名称被称为特殊文件.设备文件.或者简单称之为文件系统树的节点,它们通常位于/dev目录.字符设备驱动程序的设备文件可以通过ls ...
- Flutter移动电商实战 --(2)建立项目和编写入口文件
1.创建项目 采用AndroidStudio构建本项目,FIle>New>New Flutter Project… 创建后的项目如下图所示: 我们着重需要注意一下几个文件夹,其他的暂时不用 ...
- pytorch-LeNet网络
LeNet网络的结构 输入的32x32x1的单通道图片, 第一层网络: 3x3x1x6的卷积层,步长为1, padding = 1, 经过2x2的池化操作 第二层网络: 5x5x6x16的卷积层, 步 ...
- 框架 | Spring面试题总结
1.什么是Spring? Spring是一个开源的Java EE开发框架.Spring框架的核心功能可以应用在任何Java应用程序中,但对Java EE平台上的Web应用程序有更好的扩展性.Sprin ...
- Tomcat多实例集群架构 安全优化和性能优化
Tomcat多实例 复制tomcat目录 /usr/local/tomcat1 /usr/local/tomcat2 修改多实例配置文件 #创建多实例的网页根目录 mkdir -p /data/www ...