2019.1.2 Spring管理事务的方式
Spring管理事务的方式
1.编码式
1.将核心事务管理器配置到Spring容器

2.配置TransactionTemplate模版

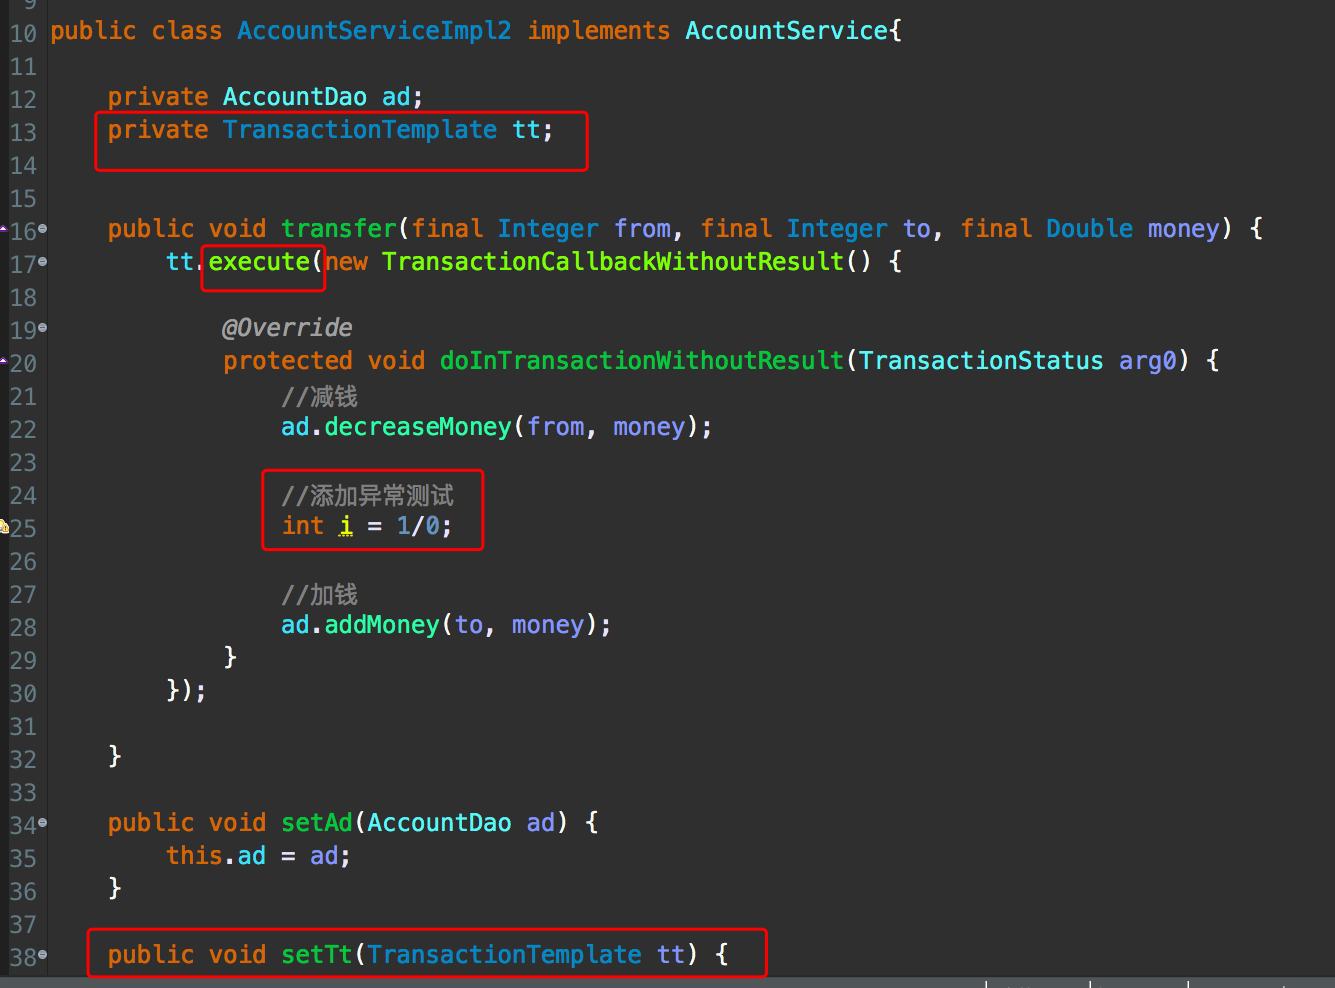
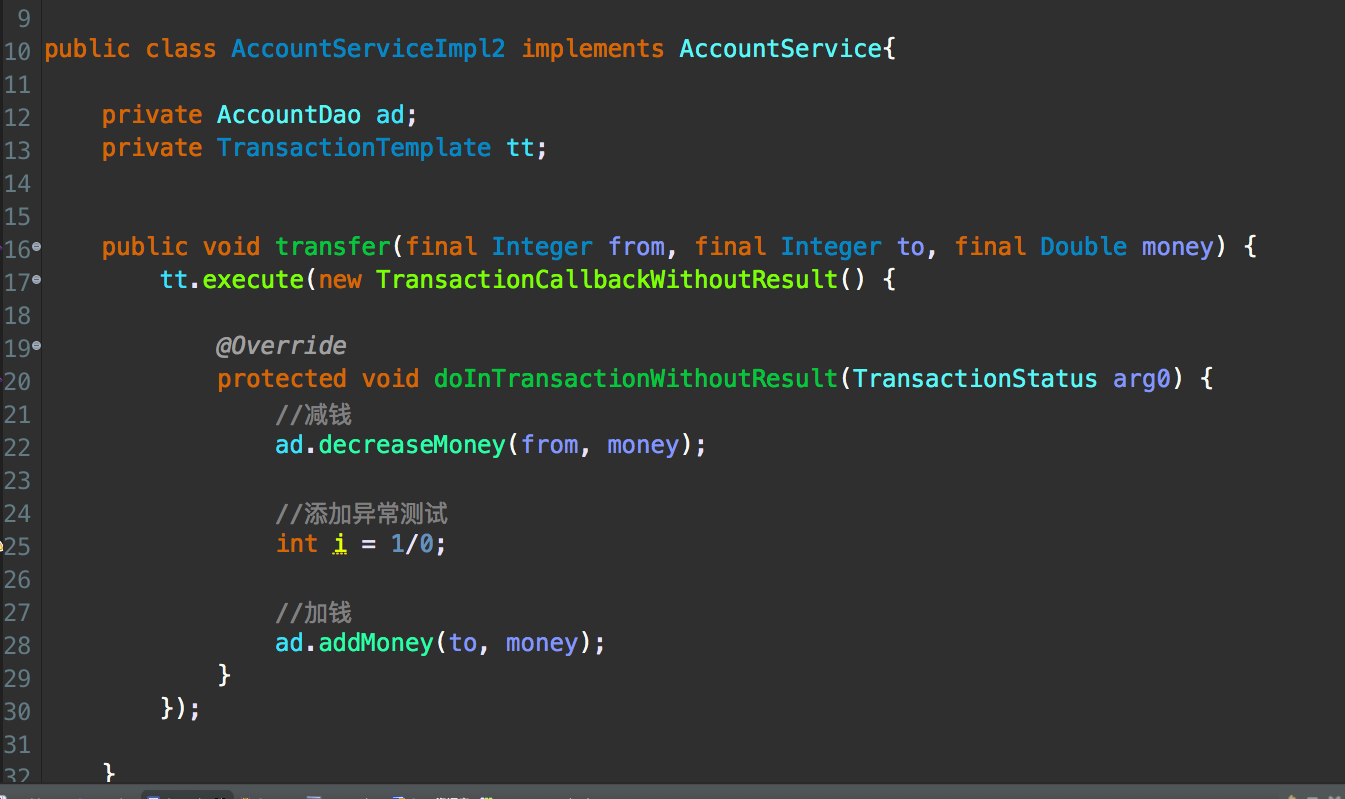
3.将事务模版注入service

4.在Service中调用模版
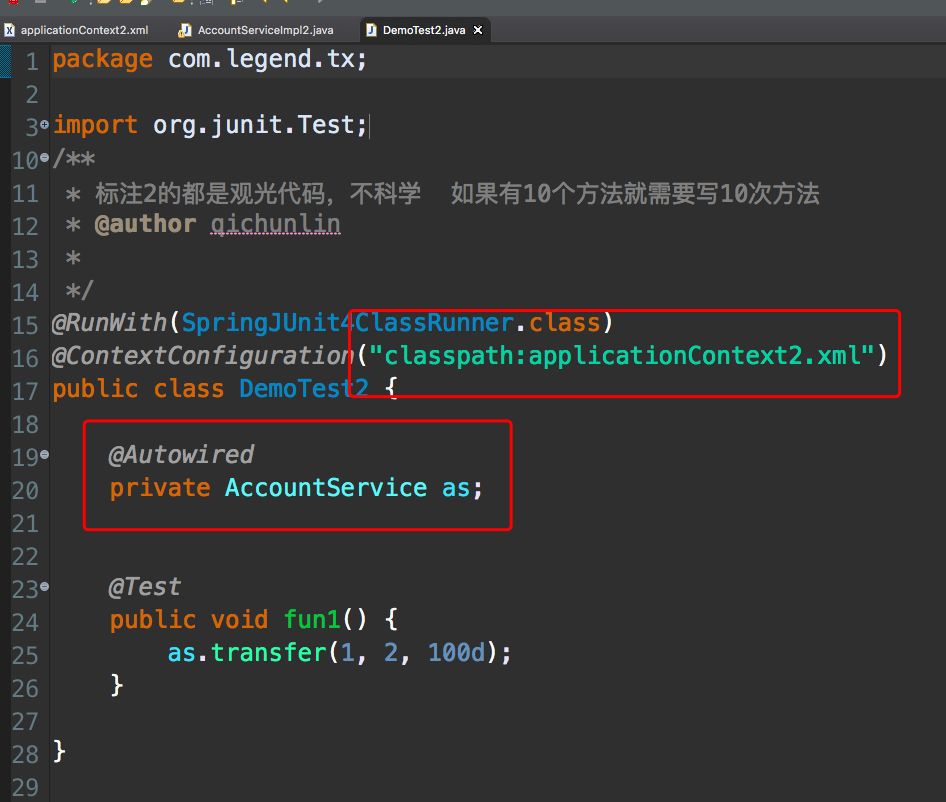
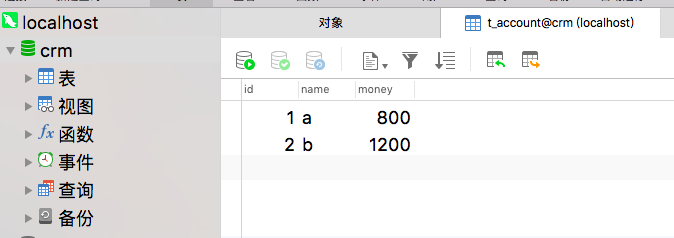
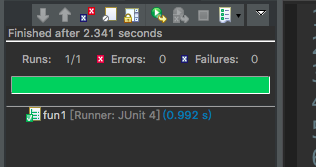
测试
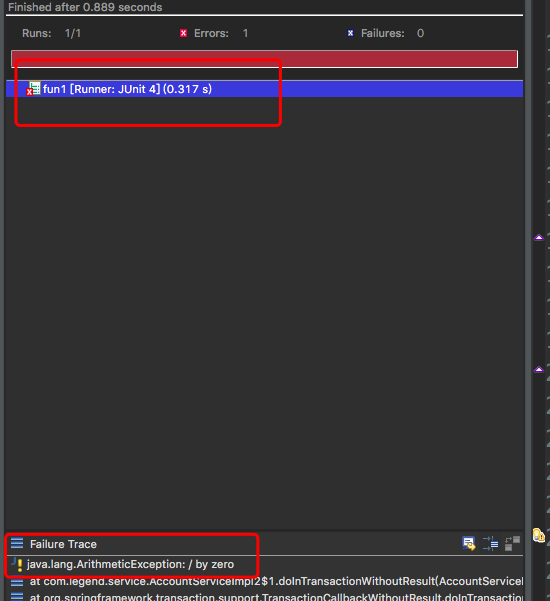
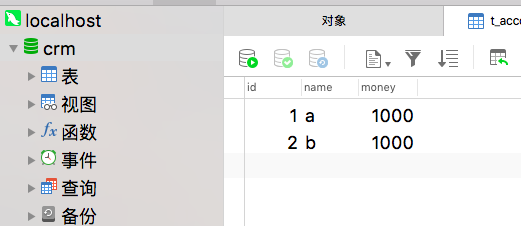
执行了两次
<?xml version="1.0" encoding="UTF-8"?>

<beans xmlns:xsi="http://www.w3.org/2001/XMLSchema-instance"

	xmlns="http://www.springframework.org/schema/beans"

	xmlns:context="http://www.springframework.org/schema/context"

	xsi:schemaLocation="http://www.springframework.org/schema/beans http://www.springframework.org/schema/beans/spring-beans-4.2.xsd http://www.springframework.org/schema/context http://www.springframework.org/schema/context/spring-context-4.2.xsd ">

	<context:property-placeholder

		location="classpath:db.properties" />

	<bean name="dataSource"

		class="com.mchange.v2.c3p0.ComboPooledDataSource">

		<property name="jdbcUrl" value="${jdbc.jdbcUrl}"></property>

		<property name="driverClass" value="${jdbc.driverClass}"></property>

		<property name="user" value="${jdbc.user}"></property>

		<property name="password" value="${jdbc.password}"></property>

	</bean>

	<bean name="accountDao" class="com.legend.dao.impl.AccountDaoImpl">

		<property name="dataSource" ref="dataSource"></property>

	</bean>

	<bean name="accountService"

		class="com.legend.service.AccountServiceImpl">

		<property name="ad" ref="accountDao"></property>

	</bean>

</beans>

<?xml version="1.0" encoding="UTF-8"?>

<beans xmlns:xsi="http://www.w3.org/2001/XMLSchema-instance" xmlns="http://www.springframework.org/schema/beans" xmlns:context="http://www.springframework.org/schema/context" xsi:schemaLocation="http://www.springframework.org/schema/beans http://www.springframework.org/schema/beans/spring-beans-4.2.xsd http://www.springframework.org/schema/context http://www.springframework.org/schema/context/spring-context-4.2.xsd ">

<context:property-placeholder location="classpath:db.properties"/>

<!-- 事务核心管理器,封装了所有事务操作,依赖于连接池 -->

<bean name="transactionManager" class="org.springframework.jdbc.datasource.DataSourceTransactionManager">

	<property name="dataSource" ref="dataSource"></property>

</bean>

<!-- 事务模版对象 -->

<bean name="transactionTemplate" class="org.springframework.transaction.support.TransactionTemplate">

	<property name="transactionManager" ref="transactionManager"></property>

</bean>

<bean name="dataSource" class="com.mchange.v2.c3p0.ComboPooledDataSource" >

	<property name="jdbcUrl" value="${jdbc.jdbcUrl}" ></property>

	<property name="driverClass" value="${jdbc.driverClass}" ></property>

	<property name="user" value="${jdbc.user}" ></property>

	<property name="password" value="${jdbc.password}" ></property>

</bean>

<bean name="accountDao" class="com.legend.dao.impl.AccountDaoImpl">

	<property name="dataSource" ref="dataSource"></property>

</bean>

<bean name="accountService2" class="com.legend.service.AccountServiceImpl2">

	<property name="ad" ref="accountDao"></property>

	<property name="tt" ref="transactionTemplate"></property>

</bean>

</beans>
2.xml配置(aop)
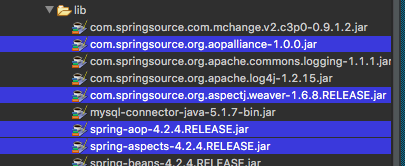
1.导包
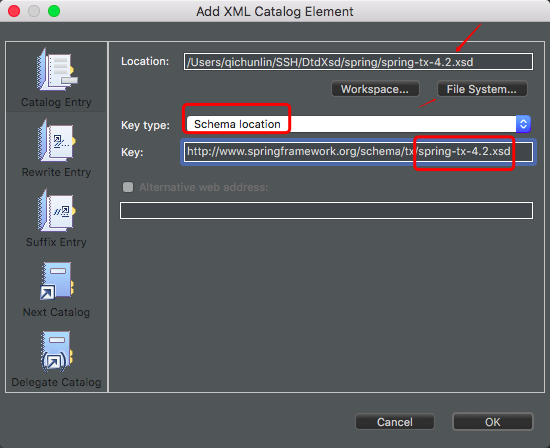
2.导入新的约束(tx)

命名空间的作用
beans:最基本
context:读取properties配置
aop:配置aop
tx:配置事务通知
3.配置通知
4.配置将通知织入目标
配置文件
<?xml version="1.0" encoding="UTF-8"?>
<beans xmlns:xsi="http://www.w3.org/2001/XMLSchema-instance" xmlns="http://www.springframework.org/schema/beans" xmlns:context="http://www.springframework.org/schema/context" xmlns:aop="http://www.springframework.org/schema/aop" xmlns:tx="http://www.springframework.org/schema/tx" xsi:schemaLocation="http://www.springframework.org/schema/beans http://www.springframework.org/schema/beans/spring-beans-4.2.xsd http://www.springframework.org/schema/context http://www.springframework.org/schema/context/spring-context-4.2.xsd http://www.springframework.org/schema/aop http://www.springframework.org/schema/aop/spring-aop-4.2.xsd http://www.springframework.org/schema/tx http://www.springframework.org/schema/tx/spring-tx-4.2.xsd ">
<context:property-placeholder location="classpath:db.properties"/>
<!-- 事务核心管理器,封装了所有事务操作,依赖于连接池 -->
<bean name="transactionManager" class="org.springframework.jdbc.datasource.DataSourceTransactionManager">
<property name="dataSource" ref="dataSource"></property>
</bean>
<!-- 事务模版对象 -->
<bean name="transactionTemplate" class="org.springframework.transaction.support.TransactionTemplate">
<property name="transactionManager" ref="transactionManager"></property>
</bean>
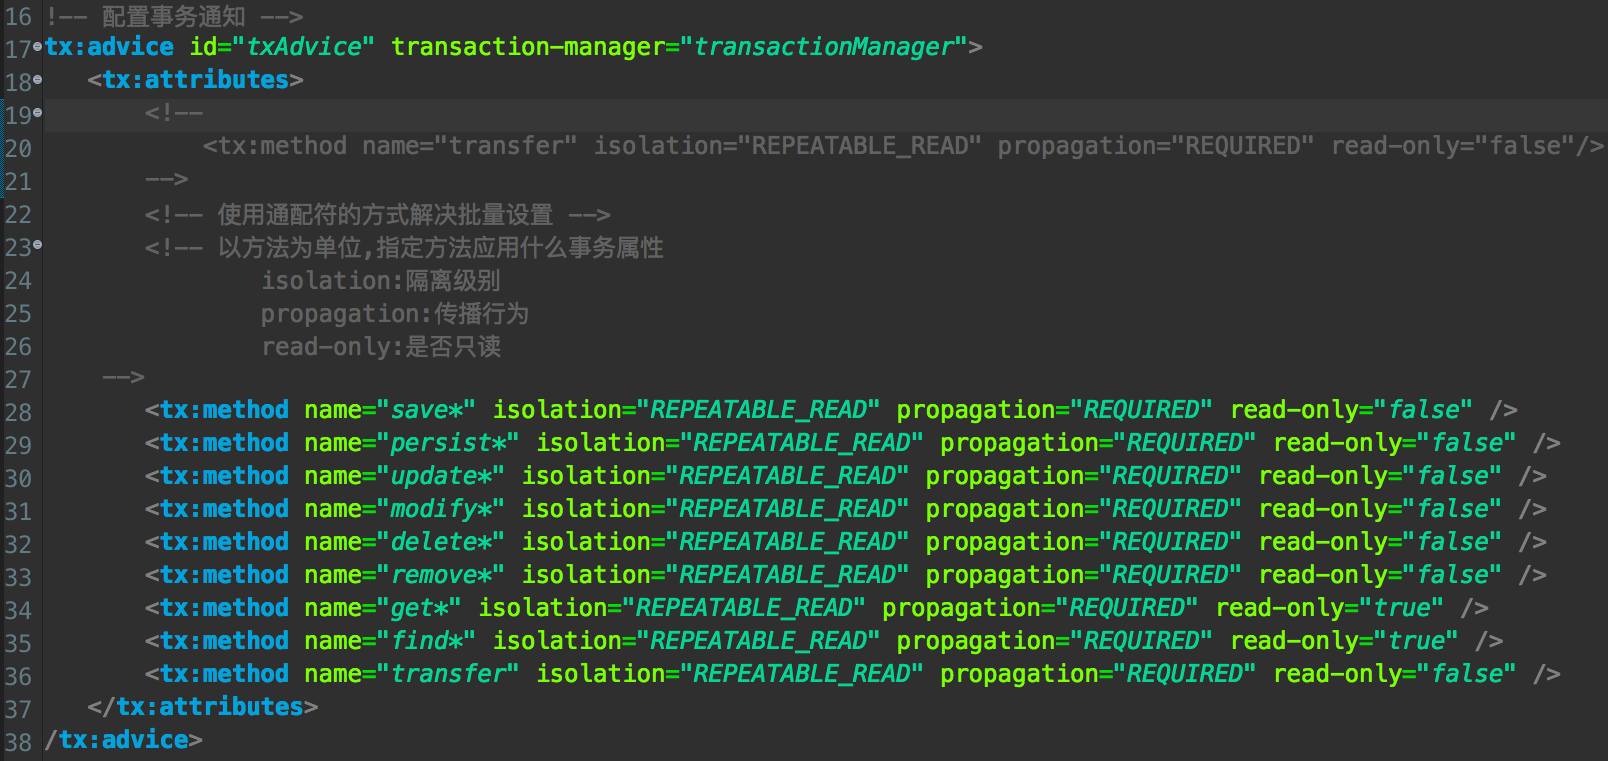
<!-- 配置事务通知 -->
<tx:advice id="txAdvice" transaction-manager="transactionManager">
<tx:attributes>
<!--
<tx:method name="transfer" isolation="REPEATABLE_READ" propagation="REQUIRED" read-only="false"/>
-->
<!-- 使用通配符的方式解决批量设置 -->
<!-- 以方法为单位,指定方法应用什么事务属性
isolation:隔离级别
propagation:传播行为
read-only:是否只读
-->
<tx:method name="save*" isolation="REPEATABLE_READ" propagation="REQUIRED" read-only="false" />
<tx:method name="persist*" isolation="REPEATABLE_READ" propagation="REQUIRED" read-only="false" />
<tx:method name="update*" isolation="REPEATABLE_READ" propagation="REQUIRED" read-only="false" />
<tx:method name="modify*" isolation="REPEATABLE_READ" propagation="REQUIRED" read-only="false" />
<tx:method name="delete*" isolation="REPEATABLE_READ" propagation="REQUIRED" read-only="false" />
<tx:method name="remove*" isolation="REPEATABLE_READ" propagation="REQUIRED" read-only="false" />
<tx:method name="get*" isolation="REPEATABLE_READ" propagation="REQUIRED" read-only="true" />
<tx:method name="find*" isolation="REPEATABLE_READ" propagation="REQUIRED" read-only="true" />
<tx:method name="transfer" isolation="REPEATABLE_READ" propagation="REQUIRED" read-only="false" />
</tx:attributes>
</tx:advice>
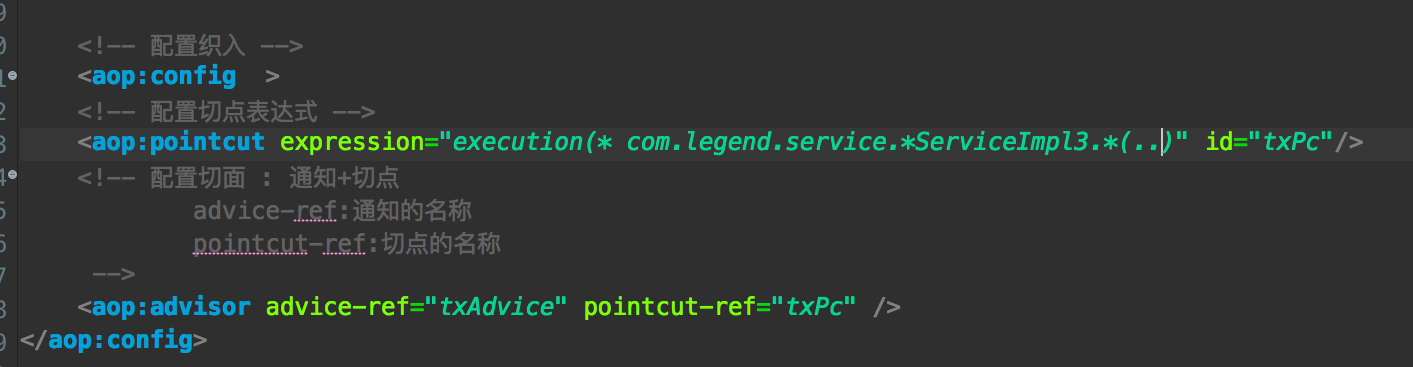
<!-- 配置织入 -->
<aop:config >
<!-- 配置切点表达式 -->
<aop:pointcut expression="execution(* com.legend.service.*ServiceImpl3.*(..))" id="txPc"/>
<!-- 配置切面 : 通知+切点
advice-ref:通知的名称
pointcut-ref:切点的名称
-->
<aop:advisor advice-ref="txAdvice" pointcut-ref="txPc" />
</aop:config>
<bean name="dataSource" class="com.mchange.v2.c3p0.ComboPooledDataSource" >
<property name="jdbcUrl" value="${jdbc.jdbcUrl}" ></property>
<property name="driverClass" value="${jdbc.driverClass}" ></property>
<property name="user" value="${jdbc.user}" ></property>
<property name="password" value="${jdbc.password}" ></property>
</bean>
<bean name="accountDao" class="com.legend.dao.impl.AccountDaoImpl">
<property name="dataSource" ref="dataSource"></property>
</bean>
<bean name="accountService3" class="com.legend.service.AccountServiceImpl3">
<property name="ad" ref="accountDao"></property>
<property name="tt" ref="transactionTemplate"></property>
</bean>
</beans>


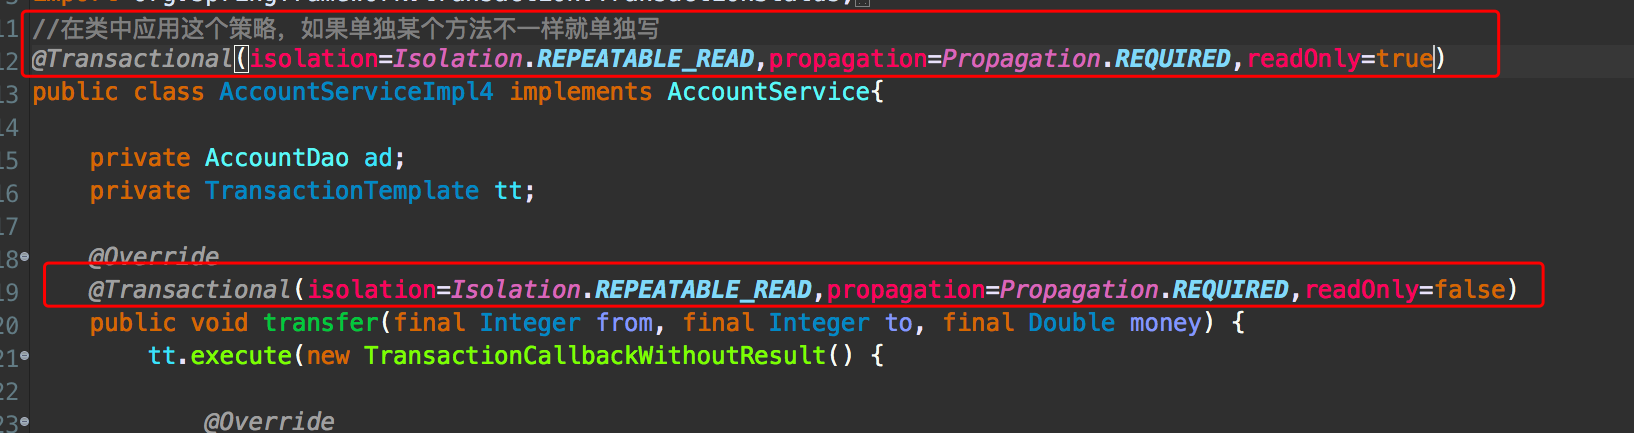
3.注解配置
1.导包
2.导入新的约束(tx)
3.开启注解事务配置
4.使用注解
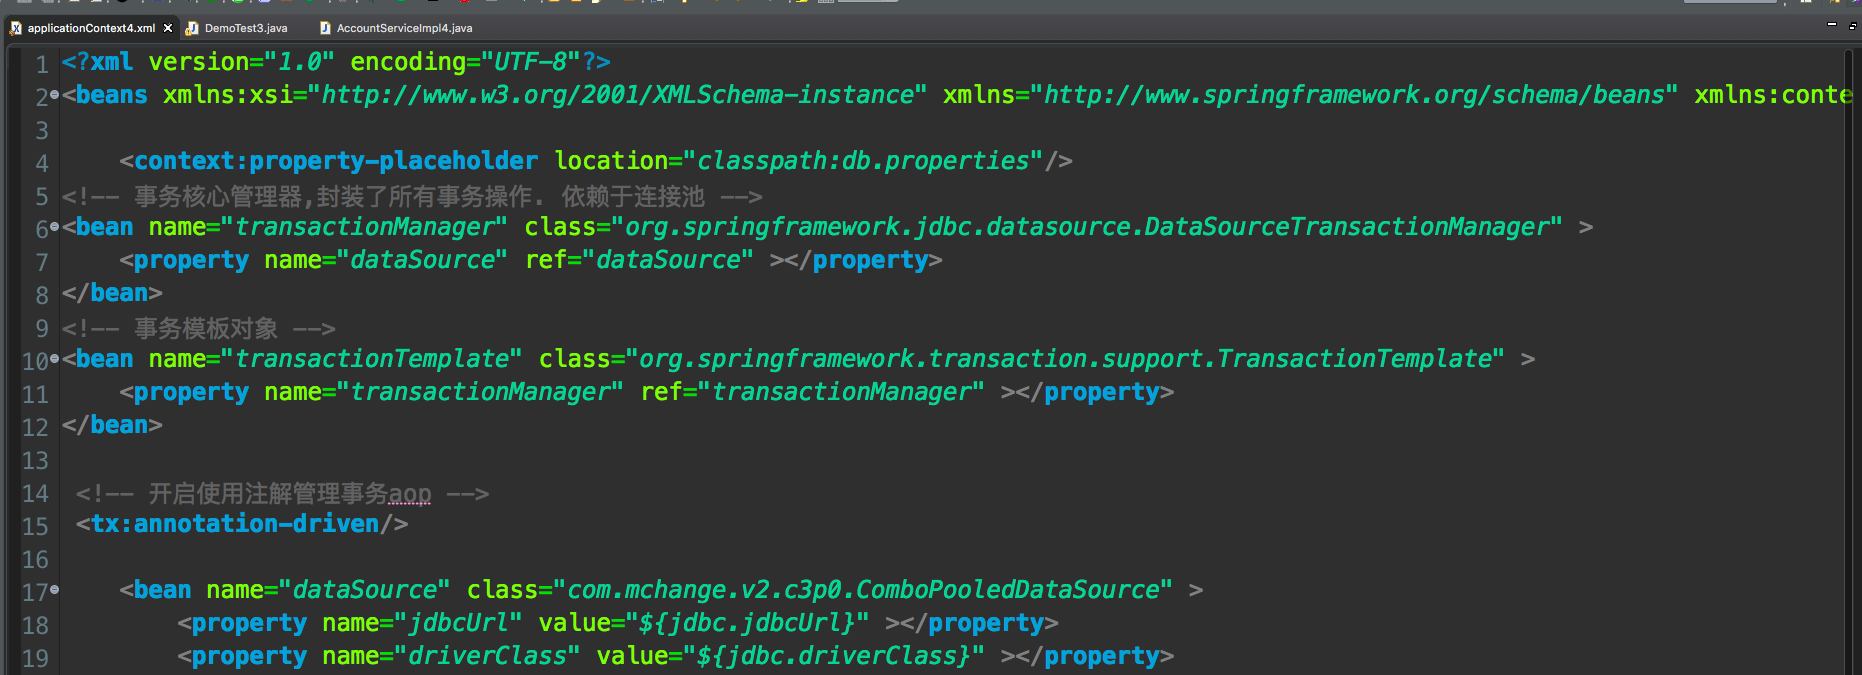

<?xml version="1.0" encoding="UTF-8"?>
<beans xmlns:xsi="http://www.w3.org/2001/XMLSchema-instance" xmlns="http://www.springframework.org/schema/beans" xmlns:context="http://www.springframework.org/schema/context" xmlns:aop="http://www.springframework.org/schema/aop" xmlns:tx="http://www.springframework.org/schema/tx" xsi:schemaLocation="http://www.springframework.org/schema/beans http://www.springframework.org/schema/beans/spring-beans-4.2.xsd http://www.springframework.org/schema/context http://www.springframework.org/schema/context/spring-context-4.2.xsd http://www.springframework.org/schema/aop http://www.springframework.org/schema/aop/spring-aop-4.2.xsd http://www.springframework.org/schema/tx http://www.springframework.org/schema/tx/spring-tx-4.2.xsd ">
<context:property-placeholder location="classpath:db.properties"/>
<!-- 事务核心管理器,封装了所有事务操作. 依赖于连接池 -->
<bean name="transactionManager" class="org.springframework.jdbc.datasource.DataSourceTransactionManager" >
<property name="dataSource" ref="dataSource" ></property>
</bean>
<!-- 事务模板对象 -->
<bean name="transactionTemplate" class="org.springframework.transaction.support.TransactionTemplate" >
<property name="transactionManager" ref="transactionManager" ></property>
</bean>
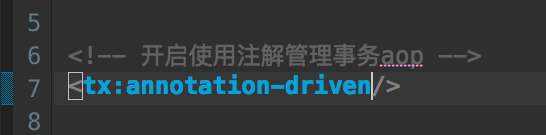
<!-- 开启使用注解管理事务aop -->
<tx:annotation-driven/>
<bean name="dataSource" class="com.mchange.v2.c3p0.ComboPooledDataSource" >
<property name="jdbcUrl" value="${jdbc.jdbcUrl}" ></property>
<property name="driverClass" value="${jdbc.driverClass}" ></property>
<property name="user" value="${jdbc.user}" ></property>
<property name="password" value="${jdbc.password}" ></property>
</bean>
<bean name="accountDao" class="com.legend.dao.impl.AccountDaoImpl">
<property name="dataSource" ref="dataSource"></property>
</bean>
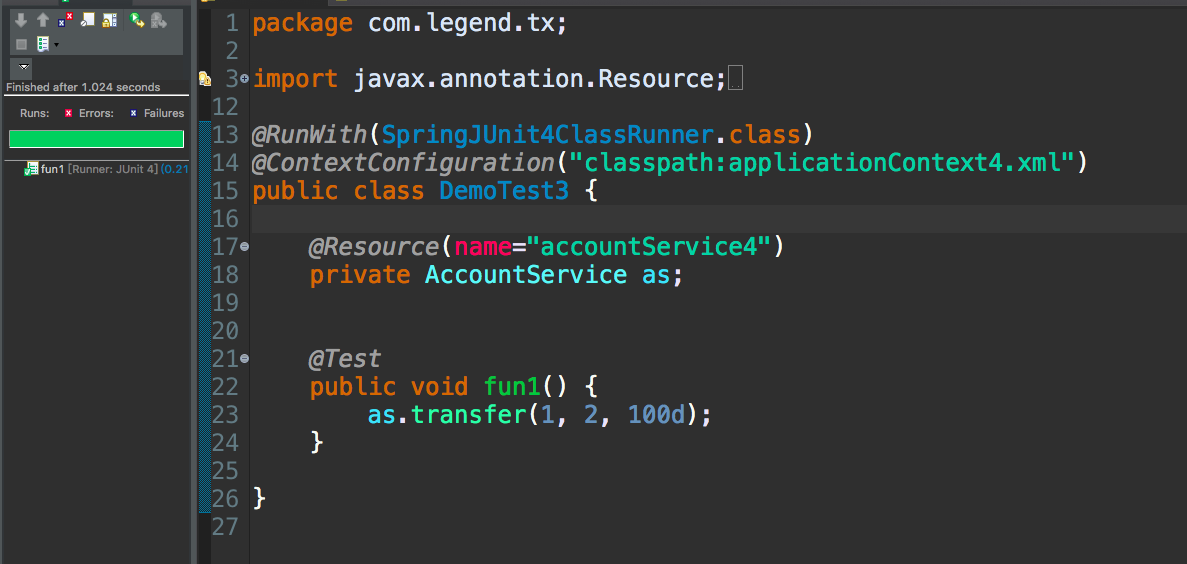
<bean name="accountService4" class="com.legend.service.AccountServiceImpl4">
<property name="ad" ref="accountDao"></property>
<property name="tt" ref="transactionTemplate"></property>
</bean>
</beans>
2019.1.2 Spring管理事务的方式的更多相关文章
- spring框架学习(六)AOP事务及spring管理事务方式之Template模板
概念 1.事务 1)事务特性:ACID 原子性 :强调事务的不可分割. 一致性 :事务的执行的前后数据的完整性保持一致. 隔离性 :一个事务执行的过程中,不应该受到其他事务的干扰. 持久性 :事务一旦 ...
- 通过案例掌握Spring 管理事务的步骤及配置
案例描述 通过完成生成订单业务,掌握事务处理. 需要d_order表和d_item表 订单生成时的业务逻辑:向d_order插入1条数据的同时,向t_item中插入若干条数据 这就是一个独立的 ...
- Spring管理事务默认回滚的异常
一.默认方式 Spring的事务管理默认只对出现运行期异常(java.lang.RuntimeException及其子类),Error进行回滚. 如果一个方法抛出Exception或者Checked异 ...
- spring 管理事务配置时,结果 报错: No Hibernate Session bound to thread, and configuration does not allow creation of non-transactional one here这个异常
java.lang.IllegalStateException: No Hibernate Session bound to thread, and configuration does not al ...
- spring管理事务
2.1 事务管理器 Spring并不直接管理事务,而是提供了多种事务管理器,他们将事务管理的职责委托给Hibernate或者JTA等持久化机制所提供的相关平台框架的事务来实现. Spring事务管理器 ...
- spring管理事务回滚
spring 事务回滚 1.遇到的问题 当我们一个方法里面有多个数据库保存操作的时候,中间的数据库操作发生的错误.伪代码如下: ? 1 2 3 4 5 6 7 public method() { ...
- spring框架学习(八)spring管理事务方式之注解配置
1.DAO AccountDao.java package cn.mf.dao; public interface AccountDao { //加钱 void increaseMoney(Integ ...
- spring框架学习(七)spring管理事务方式之xml配置
1.DAO AccountDao.java package cn.mf.dao; public interface AccountDao { //加钱 void increaseMoney(Integ ...
- spring管理事务需要注意的
org.springframework.transaction.NoTransactionException: No transaction aspect-managed TransactionSta ...
随机推荐
- datatable填装List代替for循环
public class DataToModelHelper<T> where T : new() { public static IList<T> ConvertToMode ...
- Vue指令(二)--数组的变动
1.数组更新数据,引起视图更新 数据驱动:数据发生变化,引起视图的变化 Vue在检测数组变化的时候,并不是直接重新渲染整个列表,而是最大化的复用Dom元素. 替换的数组中,含有相同元素的项是不会被重新 ...
- MySQL批量插入多条数据方便测试
批量插入流程 数据库字段 delimiter create procedure doinsert3() begin declare i int; declare j int; ; ; ) do ins ...
- js-原始类型和声明变量
** Java的基本数据类型:byte.short.int.long.float.double.char.boolean ** 定义变量 都是用关键字 var(ES6中可以使用const和let来定义 ...
- easyui numberbox 输入框禁止输入
{ field: 'Amount', title: '金额', width: 80, editor: { type: 'numberbox', options: { disabled: true, p ...
- easyui扩展行默认展开 以及 去除滚动条
问题背景: 在做打印页面的时候,要求有详细的默认展开显示. 遇到的问题: 1)在用扩展行的时候,grid的所有行都添加了展开收起的图标,(第二行没有明细)如下 2)默认展示有详细行的时候,内 ...
- 139.00.003 Git学习-Git时光机之Inbox体系(三)
一.Git时光机之Inbox 体系 工作区有一个隐藏目录.git,这个不算工作区,而是Git的版本库. Git的版本库里存了很多东西,其中最重要的就是称为stage(或者叫index)的暂存区,还有G ...
- angular 动态组件类型
出处:https://github.com/Penggggg/angular-component-practices 组件类型1:纯函数功能,而没有视图部分,即Factory(类似于$http) pr ...
- SQL日期转换
SQL 语句日期用法及函数 --DAY().MONTH().YEAR()——返回指定日期的天数.月数.年数: select day(cl_s_time) as '日' from class --返回 ...
- X11/Xlib.h:没有该文件或目录
编译程序时出现的错误,在安装日志上发现一句:x11/xlib.h nosuch file or directory 在网上查阅了资料,原来是x11M没有装. 解决方案:先安装X11,命令为 su ...