
Linux中搭建HTTP服务器
1、配置IP
[root@localhost~]# cat /etc/sysconfig/network-scripts/ifcfg-eth0
DEVICE=eth0
BOOTPROTO=static
ONBOOT=yes
HWADDR=00:0c:29:5d:a8:80
IPADDR=192.168.126.133
NETMASK=255.255.255.0
2、配置主机名
[root@localhost~]# cat /etc/sysconfig/network
NETWORKING=yes
NETWORKING_IPV6=yes
HOSTNAME=web.gx.com
3、修改hosts文件
[root@localhost~]# cat /etc/hosts
127.0.0.1 localhost.localdomain localhost
::1 localhost6.localdomain6 localhost6
192.168.10.253 web.gx.com web
[root@localhost~]# service network restart
[root@localhost~]# chkconfig network on
4、软件包的安装
[root@localhost~]# rpm -q httpd
package httpd is not installed
[root@localhost~]# yum -y install httpd
5、启动服务
[root@localhost~]# service httpd restart
[root@localhost~]# chkconfig httpd on
试验二:基本HTTP服务器的配置
Web服务器域名:www.gx.com
默认首页包括:index.html、index.*
开启保持连接
网站用自己的静态网页musicapp测试
服务器操作:
1、备份主配置文件
[root@localhost ~]# cd /etc/httpd/conf
[root@localhost conf]# cp httpd.conf httpd.conf.bak
2、修改主配置文件
[root@localhost ~]# vim /etc/httpd/conf/httpd.conf
...
74 KeepAlive On
...
265 ServerName www.gx.com:80
...
391 DirectoryIndex index.html index.php
...
3、启动服务
[root@localhost ~]# service httpd restart
[root@localhost ~]# chkconfig httpd on
将musicapp文件夹中的文件全部拷贝到/var/www/html/下
4.修改客户端hosts文件
192.168.126.133 www.gx.com
[root@localhost ~]# vim /etc/hosts
5.经测试发现通过本机IP192.168.126.133不能访问,网上查找后删除/etc/httpd/conf.d/welcome.conf
6.打开浏览器访问 http://www.gx.com

3、新建authdir站点,只允许某个IP192.168.126.135访问www.gx.com,允许所有人访问www.gx.com/authdir
[root@web ~]# mkdir /var/www/html/authdir
[root@web ~]# echo "http://www.gx.com/authdir/index.html" > /var/www/html/authdir/index.html
[root@web ~]# vim /etc/httpd/conf/httpd.conf
...
337 <Directory /var/www/html/authdir>
338 Order allow,deny
339 Allow from all
340 </Directory>
[root@localhost ~]# service httpd restart
在不同客户端测试
[root@localhost ~]# tail /var/log/httpd/error_log
试验四:HTTP的用户授权
客户端访问http://www.gx.com/authdir需要输入用户名密码验证
1、修改主配置文件
[root@localhost ~]# vim /etc/httpd/conf/httpd.conf
...
337 <Directory "/var/www/html/authdir">
338 Order allow,deny
339 Allow from all
340 AuthName "Please Input Password!!"
341 AuthType Basic
342 AuthUserFile "/etc/httpd/.vuser"
343 Require valid-user
344 </Directory>
...
2、创建账户密码
[root@localhost ~]# htpasswd -c /etc/httpd/.vuser admin
New password:
Re-type new password:
Adding password for user admin
3、启动服务测试
[root@localhost ~]# service httpd restart
http://www.gx.com/authdir
实验五:HTTP目录别名
客户端访问http://www.gx.com/baidu时可以访问/var/www/html/baidu.com/bbs下的网页
1、创建测试站点
[root@localhost ~]# mkdir -p /var/www/html/baidu.com/bbs
[root@localhost ~]# cat /var/www/html/baidu.com/bbs/index.html
<html>
<head><title>This is a test Page!!!</title></head>
<body>
<h1>This is bbs.baidu.com test Page!!!</h1>
</body>
</html>
2、修改主配置文件
[root@localhost ~]# tail -n 1 /etc/httpd/conf/httpd.conf
Alias /baidu "/var/www/html/baidu.com/bbs"
3、启动服务测试
[root@web01 ~]# service httpd restart
http://www.gx.com/baidu
实验六:查看默认HTTP使用进程管理方式 更改默认进程管理方式为worker模式
[root@localhost ~]# httpd -l
Compiled in modules:
core.c
prefork.c
http_core.c
mod_so.c
[root@localhost ~]# cd /usr/sbin/
[root@localhost sbin]# mv httpd httpd.prefork
[root@localhost sbin]# mv httpd.worker httpd
[root@localhost sbin]# service httpd restart
[root@localhost sbin]# httpd -l
Compiled in modules:
core.c
worker.c
http_core.c
mod_so.c
试验七:部署Awstats统计Http访问日志
1、安装软件(软件在/usr/src下)
[root@localhost ~]# cd /usr/src/
[root@localhost src]# tar -zxvf awstats-7.1.tar.gz -C /usr/local/
[root@localhost src]# cd /usr/local/
[root@localhost local]# mv awstats-7.1/ awstats
[root@localhost local]# cd awstats/tools/
[root@localhost tools]# ./awstats_configure.pl
...
Config file path ('none' to skip web server setup):
> /etc/httpd/conf/httpd.conf //输入apache的主配置文件
...
-----> Need to create a new config file ?
Do you want me to build a new AWStats config/profile
file (required if first install) [y/N] ? y //生成awstats的配置文件
...
Your web site, virtual server or profile name:
> www.gx.com //输入你的web服务器名字
...
Default: /etc/awstats
Directory path to store config file(s) (Enter for default):
>
...
/usr/local/awstats/tools/awstats_updateall.pl now
Press ENTER to continue...
...
Press ENTER to finish...
2、修改主配置文件
[root@localhost tools]# vim /etc/awstats/awstats.www.gx.com.conf
...
51 LogFile="/var/log/httpd/access_log"
[root@localhost tools]# mkdir /var/lib/awstats
3、将日志文件导入Awstats
[root@localhost tools]# ./awstats_updateall.pl now
[root@localhost tools]# crontab -l
----------------------------------------------
输入该命令出现错误提示no crontab for root
这个问题非常简单,同样在 root 用户下输入 crontab -e 按 Esc 按: wq 回车
在输入 crontab -l 就没有问题了
主要原因是由于这个liunx服务器 第一次使用 crontab ,还没有生成对应的文件导致的,执行了 编辑(crontab -e)后 就生成了这个文件
----------------------------------------------
[root@localhost tools]# service crond restart
[root@localhost tools]# chkconfig crond on
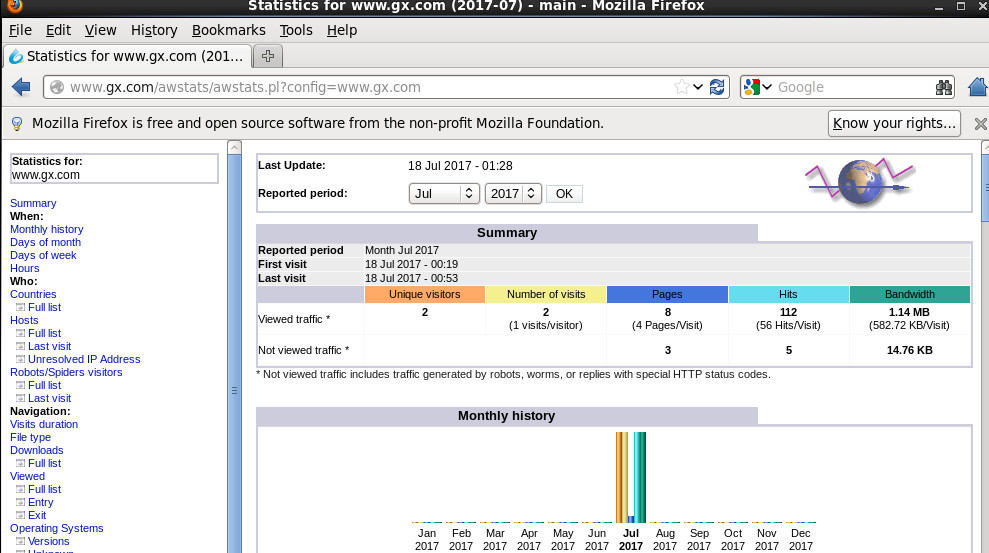
4、验证:
http://www.gx.com/awstats/awstats.pl?config=www.gx.com
补充:
通过html代码实现网页跳转功能
[root@localhost tools]# cat /var/www/html/awstats.html
<html>
<head><meta http-equiv=refresh content="0; url=http://www.gx.com/awstats/awstats.pl? config=www.gx.com">
</head>
<body>
</body>
</html>
验证:
http://www.gx.com/awstats.html
实验八:基于域名的虚拟主机
www.baidu.com 192.168.126.133 baidu网站
www.sohu.com 192.168.126.133 sohu网站
1、修改主配置文件新建一个配置文件(虚似主机配置专用)
[root@localhost ~]# vim /etc/httpd/conf.d/virt.conf
NameVirtualHost *:80
<VirtualHost *:80>
DocumentRoot /var/www/baidu
ServerName www.baidu.comE
rrorLog logs/www.baidu.com-error_log
CustomLog logs/www.baidu.com-access_log common
</VirtualHost>
<VirtualHost *:80>
DocumentRoot /var/www/sohu
ServerName www.sohu.com
ErrorLog logs/www.sohu.com-error_log
CustomLog logs/www.sohu.com-access_log common
</VirtualHost>
创建网站目录和文件
[root@localhost ~]# mkdir /var/www/{baidu,sohu}
[root@localhost ~]# cat /var/www/baidu/index.html
<h1>www.baidu.com</h1>
[root@localhost ~]# cat /var/www/sohu/index.html
<h1>www.sohu.com</h1>
[root@localhost ~]# service httpd restart
验证:先在客户端修改hosts文件
192.168.126.133 www.baidu.com
192.168.126.133 www.sohu.com
实验九:基于端口的虚拟主机
192.168.126.133:8081 baidu网站
192.168.126.133:8082 sohu网站
2、修改主配置文件新建一个配置文件(虚似主机配置专用)
[root@localhost ~]# vim /etc/httpd/conf.d/virt.conf
Listen 8081 //激活端口
Listen 8082
<VirtualHost *:8081>
DocumentRoot /var/www/baidu
ServerName 192.168.126.133
ErrorLog logs/www.baidu.com-error_log
CustomLog logs/www.baidu.com-access_log common
</VirtualHost>
<VirtualHost *:8082>
DocumentRoot /var/www/sohu
ServerName 192.168.10.253
ErrorLog logs/www.sohu.com-error_log
CustomLog logs/www.sohu.com-access_log common
</VirtualHost>
2、启动服务
[root@localhost ~]# service httpd restart
实验十:配置HTTP支持php
1、安装php
[root@localhost ~]# yum -y install php
[root@localhost ~]# cat /var/www/baidu/test.php
<?php //PHP测试页
phpinfo();
?>
[root@localhost ~]# service httpd restart
测试:
http://192.168.126.133:8081/test.php
Linux中搭建HTTP服务器的更多相关文章
- 在linux中搭建git服务器
个人觉得, 以下搭建git服务器的过程就像是在linux增加了一个用户, 而这个用户的登录shell是 git-shell, 太刨根问底的东西我也说不清楚, 还是看下面的过程吧. 过程参考了网上的文章 ...
- Linux中搭建FTP服务器
FTP工作原理 (1)FTP使用端口 [root@localhost ~]# cat /etc/services | grep ftp ftp-data 20/tcp #数据链路:端口20 ftp 2 ...
- Linux中搭建SVN服务器
一 下载工具 1. subversion-1.6.17.tar.gz 2. subversion-deps-1.6.17.tar.gz 二 解压两个包: 1.在此之前,我已经创建了一个用户svnroo ...
- 在Linux中搭建一个FTP服务器
在Linux中搭建一个ftp服务器,以供两个工作小组保管文件使用.禁用匿名.第一个小组使用ftp账号:ftp1,工作目录在:/var/ftp/ftp1:第二个小组使用ftp2,工作目录在:/var/f ...
- Linux中搭建一个ftp服务器详解
来源:Linux社区 作者:luzhi1024 详解Linux中搭建一个ftp服务器. ftp工作是会启动两个通道:控制通道 , 数据通道在ftp协议中,控制连接均是由客户端发起的,而数据连接有两种 ...
- 在Ubuntu中搭建KMS服务器
介绍 基于vlmcsd搭建的KMS服务器. 根据github上的说明,这个工具是用C写的,没有任何依赖,可以直接运行.而且它横跨几乎现在所有的系统平台,如Android, FreeBSD, Solar ...
- Windows中搭建ftp服务器
使用工具Quick Easy FTP Server Windows中搭建FTP服务器有什么用呢? 确实没有用,直到有一次,我在VM中安装了Linux虚拟机,但是文件怎么也上传不到这个虚拟机中. 然后用 ...
- CentOS Linux上搭建PPPoE服务器及拨号设置
CentOS Linux上搭建PPPoE服务器及拨号设置 搭建PPPoE,成功了的话,就觉得超级简单,在CentOS Linux更是5步左右就能搞定. 1.安装pppoe,安装完成后,会有pppoe- ...
- Windows/Linux 环境搭建Git服务器 + vs2012集成git
1. 下载.安装Git 我的系统是Windows 7,需要安装Git for Windows. 下载地址: http://code.google.com/p/msysgit/downloads/lis ...
随机推荐
- windows服务器详细安全设置
1).系统安全基本设置 1.安装说明:系统全部NTFS格式化,重新安装系统(采用原版win2003),安装杀毒软件(Mcafee),并将杀毒软件更新,安装sp2补钉,安装IIS(只安装必须的组件),安 ...
- PHPExcel 对xls表格的文件读取
//先去http://phpexcel.codeplex.com/releases/view/119187 下载文件包最后解压Classes到当前目录header("Content-type ...
- Atitit.js模块化 atiImport 的新特性javascript import
Atitit.js模块化 atiImport 的新特性javascript import 1. 常见的js import规范amd ,cmd ,umd1 1.1. Require更多流行3 2. at ...
- List 通过 Collections.binarySearch 进行记录筛选
1. Collections.sort(list, new Comparator<TreeDto>() { @Override public int compare(TreeDto a2, ...
- myeclipse能启动tomcat但是用startup.bat无法启动
myeclipse能启动tomcat但是用startup.bat无法启动 这个问题困扰了我一天,把一天的周末时间白白花费了.各种百度,各种尝试都没办法解决.在江湖上闯,难道就只有百度一招吗? 不是,我 ...
- Action的mapping.findFoward(forwardName)必须要在struts-config.xml中的对应的action节点配置一个forward节点
比如说你有个SampleAction,在execute(ActionMapping mapping, ...)中写了句 return mapping.findForward("some_pa ...
- 问题-Delphi7中JSON遍历节点不支持使用IN处理方法?
相关资料:http://www.cnblogs.com/del/archive/2009/10/23/1588690.html 问题现象:在高版本中可以使用IN处理JSON的节点循环问题,可是发现D7 ...
- emblog后台拿shell
emlog版本:5.3.1 先本地弄好shell 新建一个文件夹,里面放shell,shell名称和文件名要一致.压缩为zip 然后在安装插件处上传. 成功后的路径content/plugins/te ...
- ASP.NET MVC 4新建库项目中找不到 System.Web.Security 的引用
.NET 4中,WebSecurity的引用已经不再System.Web中,而是转移到了System.Web.ApplicationServices Dll中,添加该Dll即可.
- OkHttp+Stetho+Chrome调试android网络部分(原创)
android网络调试一直是一个比较麻烦的部分,因为在不同序列的请求中,返回的数据会有不同的变化,如果能像web开发一样使用调试功能查看页面的访问数据该是多么美好的事情! 很幸运的是,现在Androi ...