
Fragment详解及举例
1.为什么用Fragment(Android3.0提出)来替代TabActivity(Android4.0以后正式被弃用)?
因为Fragment可以适应各种不同屏幕大小,也就是适应不同屏幕的分辨率。例如:
当开发的应用程序同时适用于平板电脑和手机时,可以利用Fragment实现灵活的布局,改善用户体验。
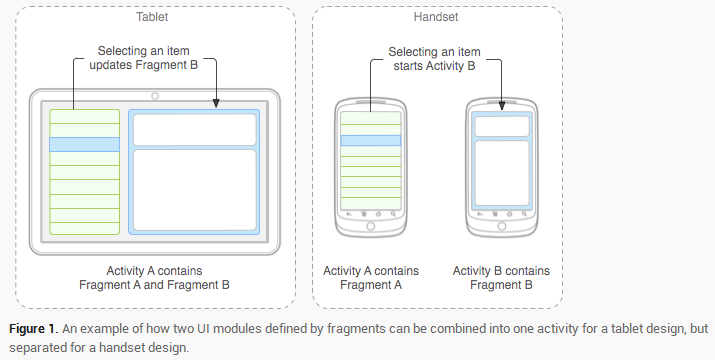
2.Fragment的特征:
- Fragment是Activity中的一部分,或者说值一种行为。Fragment可以调用getActivity()方法获取它所在的Activity,Activity可调用FragmentManager的findFragmentById()或者findFragmentByTag()方法来获取Fragment。
- 一个Activity可以同时组合多个Fragment;反过来,一个Fragment也可被多个Activity复用。
- 在Activity的运行过程中,可调用FragmentManager的add()、remove()、replace()方法动态的添加,删除或者替换Fragment。可以将一个Fragment事务添加到栈中,被activity管理,有了这个栈可以返回执行Fragment事务,可以支持fragment级别的返回。在activity中添加fragment时它必须置于ViewGroup中,并且需要定义fragment自己的界面。
- Fragment可以响应自己的输入事件,并拥有自己的生命周期,但它们的生命周期直接被其所属的Activity的生命周期控制。
3.Fragment的生命周期:
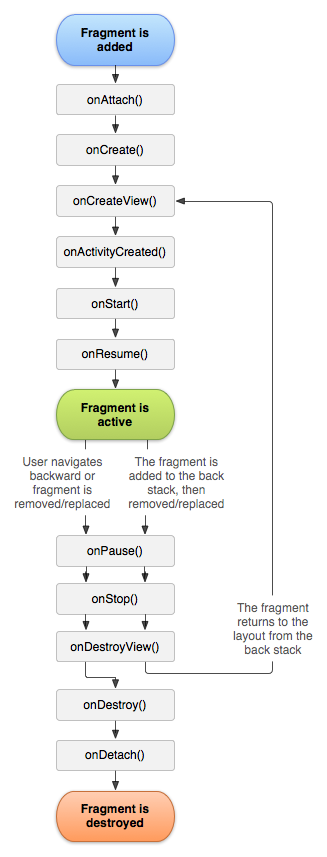
OnAttach():当该fragment被添加到Activity时被回调,该方法值会被调用一次。
onCreate(Bundle savedStatus):创建Fragment时被回调,该方法只会被调用一次。
onCreateView():每次创建、绘制该Fragment的View组件时,回调该方法,Fragment将会显示该方法返回的View组件。
onActivityCreated():当Fragment所在的Activity被启动完成后回调该方法。
onStart():启动Fragment时被回调。
OnResume():恢复Fragment时被回调,onStart()方法后一定会回调onResume()方法。
onPause():暂停Fragment时被回调。
onStop():停止Fragment时被回调。
onDestroyView():销毁Fragment所包含的View组件时调用。
onDestroy():销毁Fragment时被回调,该方法只会被调用一次。
onDetach():将该Fragment从Activity中被删除、被替换完成时回调该方法,onDestroy()方法后一定会回调onDetach()方法,该方法只会被调用一次。
4.将Fragment添加到Activity中的两种方式:
- 在布局中使用<fragment.../>元素添加到Fragment,<fragment.../>元素的Android:name属性指定为Fragment的实现类。
- 在Java代码中通过FragmentTransaction对象的add()方法来添加Fragment。
5.Fragment与Activity之间的通信:
- Activity向Fragment传递数据,在Activity中创建Bundle数据包,并调用Fragment的SetArguments(Bundle bundle)方法即可将绑定的数据包传递给Fragment。
- Fragment向Activity传递数据或Activity需要在Fragment运行中进行实时通信,在Fragment中定义一个内部回调接口,再让包含该Fragment的Activity事项该回调接口,这样Fragment即可调用改回调方法将数据传给Activity。
实例:
定义布局文件fragment_book_detail.xml,展示书的标题和描述
<?xml version="1.0" encoding="utf-8"?>

<LinearLayout xmlns:android="http://schemas.android.com/apk/res/android"

    android:orientation="vertical" android:layout_width="match_parent"

    android:layout_height="match_parent">

    <!--定义一个TextVew来显示图书标题-->

    <TextView

        android:layout_width="match_parent"

        android:layout_height="wrap_content"

        android:textAppearance="?android:attr/textAppearanceLarge"

        android:text="Large Text"

        android:id="@+id/book_title"

        android:padding="16dp"/>

    <!--定义一个TextView来显示图书描述-->

    <TextView

        android:layout_width="match_parent"

        android:layout_height="match_parent"

        android:textAppearance="?android:attr/textAppearanceMedium"

        android:text="Medium Text"

        android:id="@+id/book_desc"

        android:padding="16dp"/>

</LinearLayout>
定义布局文件activity_book_twopane.xml,左边展示书名,单击后右边展示书名和书描述。
<?xml version="1.0" encoding="utf-8"?>

<LinearLayout xmlns:android="http://schemas.android.com/apk/res/android"

    android:orientation="horizontal"

    android:layout_width="match_parent"

    android:layout_height="match_parent"

    android:layout_marginLeft="16dp"

    android:layout_marginRight="16dp"

    android:divider="?android:attr/dividerHorizontal"

    android:showDividers="middle">

    <!--添加一个Fragment-->

    <fragment

        android:name="fragment.BookListFragment"

        android:id="@+id/book_list"

        android:layout_width="0dp"

        android:layout_height="match_parent"

        android:layout_weight="1"/>

    <!--添加一个FrameLayout容器-->

    <FrameLayout

        android:id="@+id/book_detail_container"

        android:layout_width="0dp"

        android:layout_height="match_parent"

        android:layout_weight="3"

        />

</LinearLayout>
定义一个BookContent实体类:
package bean;

import java.util.ArrayList;

import java.util.HashMap;

import java.util.List;

import java.util.Map;

/**

 * Created by xiaoping on 2015/8/10.

 */

public class BookContent {

    //定义一个内部类,作为系统的业务对象

    public static class Book {

        public Integer id;

        public String title;

        public String desc;

        public Book(Integer id, String title, String desc) {

            this.id = id;

            this.title = title;

            this.desc = desc;

        }

        @Override

        public String toString() {

            return title;

        }

    }

        //使用List集合记录系统所包含的Book对象

        public static List<Book> ITEMS=new ArrayList<Book>();

        //使用Map集合来记录系统所包含的Book对象

        public static Map<Integer,Book> ITEM_MAP=new HashMap<Integer,Book>();

        static {

           //使用静态的初始化代码,将Book对象添加到List集合,Map集合中

            addItem(new Book(1,"疯狂的Java讲解","一本好书!"));

            addItem(new Book(2,"Java 特种兵","一本好书好书中的好书!"));

            addItem(new Book(3,"小明同学","一本即将出版的书"));

        }

        private static void addItem(Book book) {

            ITEMS.add(book);

            ITEM_MAP.put(book.id,book);

        }

    }
创建在activity_book_twopane.xml布局中BookListFragment类直接activity中Bundle中获取数据。
package fragment;

import android.app.Fragment;

import android.os.Bundle;

import android.view.LayoutInflater;

import android.view.View;

import android.view.ViewGroup;

import android.widget.TextView;

import bean.BookContent;

import whushare.cn.whu.fragment.R;

/**

 * Created by xiaoping on 2015/8/10.

 */

public class BookDetailFragment extends Fragment {

    public static final String ITEM_ID="item_id";

    BookContent.Book book;//保存改Fragment显示的对象

    @Override

    public void onCreate(Bundle savedInstanceState) {

        super.onCreate(savedInstanceState);

        //如果启动该Fragment时包含了ITEM_ID参数

       if(getArguments().containsKey(ITEM_ID)){

           book=BookContent.ITEM_MAP.get(getArguments().getInt(ITEM_ID));

       }

    }

    @Override

    public View onCreateView(LayoutInflater inflater, ViewGroup container, Bundle savedInstanceState) {

       //加载布局文件 fragment_book_detail.xml布局文件

        View rootView=inflater.inflate(R.layout.fragment_book_detail,container,false);

        initView(rootView);

        return rootView;

    }

    private void initView(View rootView) {

        if(book!=null){

            TextView bookTitle= (TextView) rootView.findViewById(R.id.book_title);

            bookTitle.setText(book.title);

            TextView bookDesc= (TextView) rootView.findViewById(R.id.book_desc);

            bookDesc.setText(book.desc);

        }

    }

}
activity的具体实现类SelectBookActivity,在这个里面创建了数据包,并将数据包中的数据当做参数传递个BookDetailFragment。
package whushare.cn.whu.fragment;

import android.app.Activity;

import android.app.FragmentManager;

import android.app.FragmentTransaction;

import android.support.v7.app.ActionBarActivity;

import android.os.Bundle;

import android.view.KeyEvent;

import android.view.Menu;

import android.view.MenuItem;

import fragment.BookDetailFragment;

import fragment.BookListFragment;

import fragment.Callbacks;

public class SelectBookActivity extends Activity implements Callbacks {

    private FragmentManager mFragmentManager;

     @Override

    protected void onCreate(Bundle savedInstanceState) {

        super.onCreate(savedInstanceState);

        //加载activity_book_twopane布局

        setContentView(R.layout.activity_book_twopane);

    }

    //实现Callbacks接口必须实现的方法

    @Override

    public void onItemSelected(Integer id) {

        //创建Bundle,准备向Fragment传人参数

        Bundle arguments=new Bundle();

        arguments.putInt(BookDetailFragment.ITEM_ID,id);

        //创建BookDetailFragment 对象

        BookDetailFragment fragment=new BookDetailFragment();

        //向Fragment传入参数

        fragment.setArguments(arguments);

        //使用fragment替换book_detail_container容器当前显示的Fragment

        mFragmentManager=getFragmentManager();

        FragmentTransaction transaction= mFragmentManager.beginTransaction();

        transaction.replace(R.id.book_detail_container,fragment);

        transaction.commit();

    }

}
在上面的代码执行加载activity_book_twopane布局setContentView(R.layout.activity_book_twopane);时,BookListFragment被添加到activity中。activity通过实现BookListFragment中的Callbacks接口来获取BookListFragment中的数据。
BookListFragment类的具体实现:
package fragment;

import android.app.Activity;

import android.app.ListFragment;

import android.os.Bundle;

import android.view.View;

import android.widget.ArrayAdapter;

import android.widget.ListAdapter;

import android.widget.ListView;

import bean.BookContent;

/**

 * Created by xiaoping on 2015/8/10.

 */

public class BookListFragment extends ListFragment {

       //定义一个回调接口,该Fragment所在Activity需要实现该接口,该Fragment将通过该接口与它所在的Activity交互

    private Callbacks mCallbacks;

    public interface Callbacks {

    public void onItemSelected(Integer id);

}

    @Override

    public void onCreate(Bundle savedInstanceState){

        super.onCreate(savedInstanceState);

        ListAdapter listAdapter=new ArrayAdapter<BookContent.Book>(getActivity(),android.R.layout.simple_list_item_activated_1,android.R.id.text1,BookContent.ITEMS);

        setListAdapter(listAdapter);

    }

    //当该Fragment被添加,显示到Activity时,回调该方法

    @Override

    public void onAttach(Activity activity){

        super.onAttach(activity);

        //如果Activity没有实现Callbacks接口,抛出异常

        if(!(activity instanceof Callbacks)){

            throw new IllegalStateException("BookListFragment 所在的Activity必须实现Callbacks接口!");

        }

        mCallbacks=(Callbacks)activity;

    }

    //当Fragment从它所属的Activity中被删除时回调该方法

    @Override

    public void onDetach(){

        super.onDetach();

        mCallbacks=null;

    }

    @Override

    public void onListItemClick(ListView listView, View view, int position, long id) {

        super.onListItemClick(listView,view,position,id);

        //激发mCallbacks的onItemSelected方法

        mCallbacks.onItemSelected(BookContent.ITEMS.get(position).id);

    }

    public void setActivateOnItemClick(boolean activateOnItemClick){

        getListView().setChoiceMode(activateOnItemClick?ListView.CHOICE_MODE_SINGLE:ListView.CHOICE_MODE_NONE);

    }

}
上述代码并不能实现适应不同屏幕的分辨率,我们将上面的SelectBookActivity换成如下两个Activity即可。而且还要定义一个名为refs.xml的引用资源文件。
<?xml version="1.0" encoding="utf-8"?>

<resources>

    <!--定义activity_book_list 实际应用了@layout/activity_book_twopane资源-->

    <item name="activity_book_list" type="layout">

        @layout/activity_book_twopane</item>

</resources>
定义一个activity_book_list布局
<?xml version="1.0" encoding="utf-8"?>

    <!--添加一个Fragment-->

    <fragment xmlns:android="http://schemas.android.com/apk/res/android"

        android:name="fragment.BookListFragment"

        android:id="@+id/book_list"

        android:layout_width="match_parent"

        android:layout_height="match_parent"

        android:layout_marginLeft="16dp"

        android:layout_marginRight="16dp"/>
同过BookListActivity操作来确定为平板电脑的显示模式,还是手机。
package fragment;

import android.app.Activity;

import android.app.FragmentManager;

import android.app.FragmentTransaction;

import android.content.Intent;

import android.os.Bundle;

import whushare.cn.whu.fragment.R;

/**

 * Created by xiaoping on 2015/8/11.

 */

public class BookListActivity extends Activity implements Callbacks {

   //定义一个旗标,用于标记该应用是否支持大屏幕

    private boolean mTwoPane;

    @Override

    public void onItemSelected(Integer id) {

        if(mTwoPane){

            //创建bundle准备向fragment中传递参数

            Bundle bundle=new Bundle();

            bundle.putInt(BookDetailFragment.ITEM_ID,id);

            //创建BookDetailActivity对象

            BookDetailFragment fragment=new BookDetailFragment();

            //向fragment中传递参数

            fragment.setArguments(bundle);

            //使用当前的fragment替换book_detail_container容器显示当前的fragment

            FragmentTransaction transaction=getFragmentManager().beginTransaction();

            transaction.replace(R.id.book_detail_container,fragment);

            //将事务添加到back栈,允许用户按下Back按键时返回到替换fragment之前的状态

            transaction.addToBackStack(null);

            transaction .commit();

        }

        else

        {

            //创建启动BookDetailActivity的Intent

            Intent intent=new Intent(this,BookDetailActivity.class);

            //设置传递给BookDetailActivity的参数

            intent.putExtra(BookDetailFragment.ITEM_ID,id);

            //启动Activity

            startActivity(intent);

        }

    }

    @Override

    protected void onCreate(Bundle savedInstanceState) {

        super.onCreate(savedInstanceState);

        //指定加载的R.layout.activity_book_list对应的界面布局文件

        //但实际上该应用会根据屏幕的分辨率加载不同的界面布局文件

        setContentView(R.layout.activity_book_list);

        if(findViewById(R.id.book_detail_container)!=null)

        {

            mTwoPane=true;

            ((BookListFragment)getFragmentManager().findFragmentById(R.id.book_list)).setActivateOnItemClick(true);

        }

    }

}
如果为手机模式则用BookDetailActivity来显示图书的详情。
package fragment;

import android.app.Activity;

import android.app.FragmentTransaction;

import android.content.Intent;

import android.os.Bundle;

import android.view.MenuItem;

import whushare.cn.whu.fragment.R;

/**

 * Created by xiaoping on 2015/8/11.

 */

public class BookDetailActivity extends Activity{

    @Override

    protected void onCreate(Bundle savedInstanceState) {

        super.onCreate(savedInstanceState);

        setContentView(R.layout.activity_book_detail);

//        getActionBar().setDisplayHomeAsUpEnabled(true);

        if(savedInstanceState==null){

            //创建BookDetailFragment对象

            BookDetailFragment fragment=new BookDetailFragment();

            //创建Bundle对象

            Bundle arguments=new Bundle();

            arguments.putInt(BookDetailFragment.ITEM_ID,getIntent().getIntExtra(BookDetailFragment.ITEM_ID,0));

            //向Fragment中传递参数

            fragment.setArguments(arguments);

            //将指定的fragment添加到book_detail_container中

            FragmentTransaction transaction=getFragmentManager().beginTransaction();

            transaction.replace(R.id.book_detail_container,fragment);

            transaction.addToBackStack(null);

            transaction.commit();

        }

    }

    @Override

    public boolean onOptionsItemSelected(MenuItem item) {

        if(item.getItemId()==android.R.id.home){

            //创建启动BookListActivity的Intent

            Intent intent=new Intent(this,BookListActivity.class);

            //添加额外的Flag,将Activity栈中处于FirstActivity之上的Activity弹出

            intent.addFlags(Intent.FLAG_ACTIVITY_CLEAR_TOP);

            //启动intent对应的Activity

            startActivity(intent);

            return true;

        }

        return super.onOptionsItemSelected(item);

    }

}
Fragment详解及举例的更多相关文章
- Linux防火墙iptables学习笔记(三)iptables命令详解和举例[转载]
Linux防火墙iptables学习笔记(三)iptables命令详解和举例 2008-10-16 23:45:46 转载 网上看到这个配置讲解得还比较易懂,就转过来了,大家一起看下,希望对您工作能 ...
- Fragment详解之三——管理Fragment(1)
相关文章: 1.<Fragment详解之一--概述>2.<Fragment详解之二--基本使用方法>3.<Fragment详解之三--管理Fragment(1)>4 ...
- iptables命令详解和举例
网上看到这个配置讲解得还比较易懂,就转过来了,大家一起看下,希望对您工作能有所帮助.网管员的安全意识要比空喊Linux安全重要得多. iptables -Fiptables -Xiptables -F ...
- Android Fragment 详解(一)
Android从3.0开始引入fragment,主要是为了支持更动态更灵活的界面设计,比如在平板上的应用.平板机上拥有比手机更大的屏幕空间来组合和交互界面组件们.Fragment使你在做那样的设计时, ...
- Android Fragment详解(三): 实现Fragment的界面
为fragment添加用户界面: Fragment一般作为activity的用户界面的一部分,把它自己的layout嵌入到activity的layout中. 一个 要为fragment提供layout ...
- android——fragment详解
在android开发过程中,如果使用到了导航栏.那么不可避免的就需要使用fragment来处理界面.闲着没事,就详解一下Framgent的使用方法吧. 难得写一次.本人 shoneworn shone ...
- Android面试收集录4 Fragment详解
1.什么是Fragment? 你可以简单的理解为,Fragment是显示在Activity中的Activity. 它可以显示在Activity中,然后它也可以显示出一些内容. 因为它拥有自己的生命周期 ...
- Android 开发 之 Fragment 详解
本文转载于 : http://blog.csdn.net/shulianghan/article/details/38064191 本博客代码地址 : -- 单一 Fragment 示例 : http ...
- 5. Fragment详解
onCreateView是Fragment生命周期方法中最重要的一个.因为在该 方法中会创建在Fragment中显示的View. public View onCreateView(LayoutInfl ...
随机推荐
- github Git-fork-别人的项目后更新代码的方法
用github还处于菜的阶段,遇到问题简单记录. 举个例子,需要 fork 这个项目 https://github.com/tarobjtu/WebFundamentals.git 点击 for ...
- 《Python学习手册》(三)
string 字符串,和列表.元组,都适用序列操作. 关于python转义字符 迭代 for x in S: print(x) [c * 2 for c in S] Comparasion: > ...
- JumpGame,JumpGame2
JumpGame:给定一个非负整数数组,开始在第一个位置,每个位置上的数字代表最大可以跳跃的步数,判断能不能跳到最后一个位置. 例如:A=[2,3,1,1,4],在位置0处,可以跳一步到位置1,位置1 ...
- Python 导出数据from Mysql
环境 Anaconda3 Python 3.6, Window 64bit 目的 从MySQL数据库读取目标表数据,并处理 代码 # -*- coding: utf-8 -*- import pand ...
- cin关闭流同步加速
习惯了用cin 很多人会说cin的速度比scanf慢很多, 其实不然. cin慢的原因主要在于默认cin与stdin总是保持同步, 这一步是消耗时间大户. 只需要加上std::iOS::sync_wi ...
- 数据挖掘算法Analysis Services-基于SQL Server的数据挖掘
数据挖掘算法(Analysis Services – 数据挖掘) data mining algorithm is a set of heuristics and calculations that ...
- Spring 在xml配置里配置事务
事先准备:配置数据源对象用<bean>实例化各个业务对象. 1.配置事务管理器. <bean id="transactionManager" class=&quo ...
- EL表达式自定义函数
表达式语言除了可以使用基本的运算符外,还可以使用自定义函数.通过使用自定义函数,加强了表达式语言的功能. EL表达式函数,主要功能是完成对数据的修改,统一化格式: 步骤 1.开发函数处理类,处理类就是 ...
- react-hooks: custom hooks
memberEntitiy: export interface MemberEntity { id: number; name: string; code: string; } const useMe ...
- react antd form多组表单数据处理
import React from 'react'; import {Form, InputNumber, Input, DatePicker, Button, Select, Icon} from ...