OpenCL 图像卷积 2
▶ 上一篇图像卷积 http://www.cnblogs.com/cuancuancuanhao/p/8535569.html。这篇使用了 OpenCV 从文件读取彩色的 jpeg 图像,进行边缘检测以后写回文件。
● 代码(没有使用局部内存优化)
 // convolution.cl,核函数,应该和上一篇中无优化内核是一样的

 __kernel void convolution(__read_only image2d_t sourceImage, __write_only image2d_t outputImage,

     int rows, int cols, __constant float* filter, int filterWidth, sampler_t sampler)

 {

     const int col = get_global_id(), row = get_global_id();   // 注意工作项的顺序,图像上是先横着数再竖着数

     const int halfWidth = (int)(filterWidth / );

     float4 sum = { 0.0f, 0.0f, 0.0f, 0.0f }, pixel;             // 输出数据类型是四元浮点数,与 image 统一

     int i, j, filterIdx;                                        // 传入的卷积窗口是一维的,用一个下标即可遍历

     int2 coords;

     for (filterIdx = , i = -halfWidth; i <= halfWidth; i++)

     {

         coords.y = row + i;                         // 从 work-item 分到的行号偏移 i 行,作为图像坐标的第二分量

         for (j = -halfWidth; j <= halfWidth; j++)

         {

             coords.x = col + j;                     // 从 work-item 分到的列号偏移 i 列,作为图像坐标的第一分量

             pixel = read_imagef(sourceImage, sampler, coords);  // 读取源图像上相应位置的值

             sum.x += pixel.x * filter[filterIdx++];

         }

     }

     if (row < rows && col < cols)                   // 将落在有效范围内的计算数据输出

     {

         coords.x = col;

         coords.y = row;

         write_imagef(outputImage, coords, sum);

     }

     return;

 }
 // convolution.c,主函数

 #include <stdio.h>

 #include <stdlib.h>

 #include <cl.h>

 #include <opencv.hpp>

 #include <D:\Program\OpenCV\build\include\opencv2\core\cvstd.hpp>// 不知道为什么要加这个,否则报错

 #include <iostream>

 #include <vector>

 using namespace std;

 using namespace cv;

 #define CUAN_OPENCL12

 #ifndef CUAN_OPENCL12

 #pragma warning(disable : 4996)// 部分函数在 OpenCL2.0 中已经被弃用,需要添加该行以支持老版本中的函数,否则报错,信息举例 "'clCreateImage2D': 被声明为已否决    "

 #endif

 const char *sourceProgram = "D:\\Code\\OpenCL\\convolution.cl";// 核函数文件

 char* readSource(const char* kernelPath)// 读取文本文件,存储为 char *

 {

     FILE *fp;

     char *source;

     long int size;

     printf("readSource, Program file: %s\n", kernelPath);

     fopen_s(&fp, kernelPath, "rb");

     if (!fp)

     {

         printf("Open kernel file failed\n");

         exit(-);

     }

     if (fseek(fp, , SEEK_END) != )

     {

         printf("Seek end of file faildd\n");

         exit(-);

     }

     if ((size = ftell(fp)) < )

     {

         printf("Get file position failed\n");

         exit(-);

     }

     rewind(fp);

     if ((source = (char *)malloc(size + )) == NULL)

     {

         printf("Allocate space failed\n");

         exit(-);

     }

     fread(source, , size, fp);

     fclose(fp);

     source[size] = '\0';

     return source;

 }

 int main()

 {

     // 卷积窗口相关

     const int filterWidth = , filterSize = filterWidth * filterWidth, halfFilterWidth = filterWidth / ;

     float filter[filterSize] =

     /*

     {// 恒等映射

         0, 0, 0, 0, 0,

         0, 0, 0, 0, 0,

         0, 0, 1, 0, 0,

         0, 0, 0, 0, 0,

         0, 0, 0, 0, 0

     };

     */

     {// 边缘检测

         -, ,-, , ,

          ,-, , , ,

         -, , , ,-,

          , , ,-, ,

          , ,-, ,-,

     };

     // 图片相关

     Mat image = imread("D:\\1.jpg");

     Mat channel[];

     split(image, channel);

     int imageHeight = image.rows, imageWidth = image.cols;

     float *imageData = (float*)malloc(sizeof(float) * imageHeight * imageWidth);

     // 准备平台,设备,上下文,命令队列部分

     cl_int status;

     cl_platform_id platform;

     clGetPlatformIDs(, &platform, NULL);

     cl_device_id device;

     clGetDeviceIDs(platform, CL_DEVICE_TYPE_ALL, , &device, NULL);

     cl_context_properties props[] = { CL_CONTEXT_PLATFORM,(cl_context_properties)(platform),  };

     cl_context context;

     context = clCreateContext(props, , &device, NULL, NULL, &status);

     cl_command_queue queue;

     queue = clCreateCommandQueue(context, device, , &status);

     // 设置 image 数据描述符,仅使用 OpenCL1.2 规范

     cl_image_desc desc;

     desc.image_type = CL_MEM_OBJECT_IMAGE2D;

     desc.image_width = imageWidth;

     desc.image_height = imageHeight;

     desc.image_depth = ;

     desc.image_array_size = ;

     desc.image_row_pitch = ;

     desc.image_slice_pitch = ;

     desc.num_mip_levels = ;

     desc.num_samples = ;

     desc.buffer = NULL;

     cl_image_format format;

     format.image_channel_order = CL_R;

     format.image_channel_data_type = CL_FLOAT;

     cl_mem d_inputImage = clCreateImage(context, CL_MEM_READ_ONLY, &format, &desc, NULL, &status);

     cl_mem d_outputImage = clCreateImage(context, CL_MEM_WRITE_ONLY, &format, &desc, NULL, &status);

     // 卷积窗口缓冲区

     cl_mem d_filter = clCreateBuffer(context, , filterSize * sizeof(float), NULL, &status);

     // 主机数据写入设备

     size_t origin[] = { , ,  }, region[] = { imageWidth, imageHeight,  };// 偏移量和每个维度上的尺寸

     clEnqueueWriteBuffer(queue, d_filter, CL_TRUE, , filterSize * sizeof(float), filter, , NULL, NULL);

     // 创建采样器,规定图像坐标系的类型和访问越界时的解决方案,以及插值方式

     cl_sampler sampler = clCreateSampler(context, CL_FALSE, CL_ADDRESS_CLAMP_TO_EDGE, CL_FILTER_NEAREST, &status);

     // 程序的运行时编译,创建内核

     const char* source = readSource(sourceProgram);

     cl_program program = clCreateProgramWithSource(context, , &source, NULL, NULL);

     clBuildProgram(program, , &device, NULL, NULL, NULL);

     cl_kernel kernel = clCreateKernel(program, "convolution", &status);

     // 声明内核参数

     clSetKernelArg(kernel, , sizeof(cl_mem), &d_inputImage);

     clSetKernelArg(kernel, , sizeof(cl_mem), &d_outputImage);

     clSetKernelArg(kernel, , sizeof(int), &imageHeight);

     clSetKernelArg(kernel, , sizeof(int), &imageWidth);

     clSetKernelArg(kernel, , sizeof(cl_mem), &d_filter);

     clSetKernelArg(kernel, , sizeof(int), &filterWidth);

     clSetKernelArg(kernel, , sizeof(cl_sampler), &sampler);

     // 内核参数

     size_t globalSize[] = { imageWidth, imageHeight };

     int i, j;

     for (i = ; i < ; i++)// 三个通道,分别为蓝、绿、红

     {

         // 更新输入缓冲区

         for (j = ; j < imageHeight * imageWidth; j++)

             imageData[j] = (float)channel[i].data[j];

         clEnqueueWriteImage(queue, d_inputImage, CL_TRUE, origin, region, , , imageData, , NULL, NULL);

         // 执行内核

         clEnqueueNDRangeKernel(queue, kernel, , NULL, globalSize, NULL, , NULL, NULL);

         // 向文件中写入结果

         clEnqueueReadImage(queue, d_outputImage, CL_TRUE, origin, region, , , imageData, , NULL, NULL);

         for (j = ; j < imageHeight * imageWidth; j++)

             channel[i].data[j] = (imageData[j] <  ?  : (unsigned char)int(imageData[j]));

     }

     merge(channel, , image);                                          // 三个通道合成

     imwrite("D:\\2.jpg", image, vector<int>{IMWRITE_JPEG_QUALITY, });// 最后一个参数为输出图片的选项,95%质量

     imshow("merge", image);                                            // 在窗口中展示图片

     waitKey();                                                        // 等待键盘输入

     free(imageData);

     getchar();

     return ;

 }
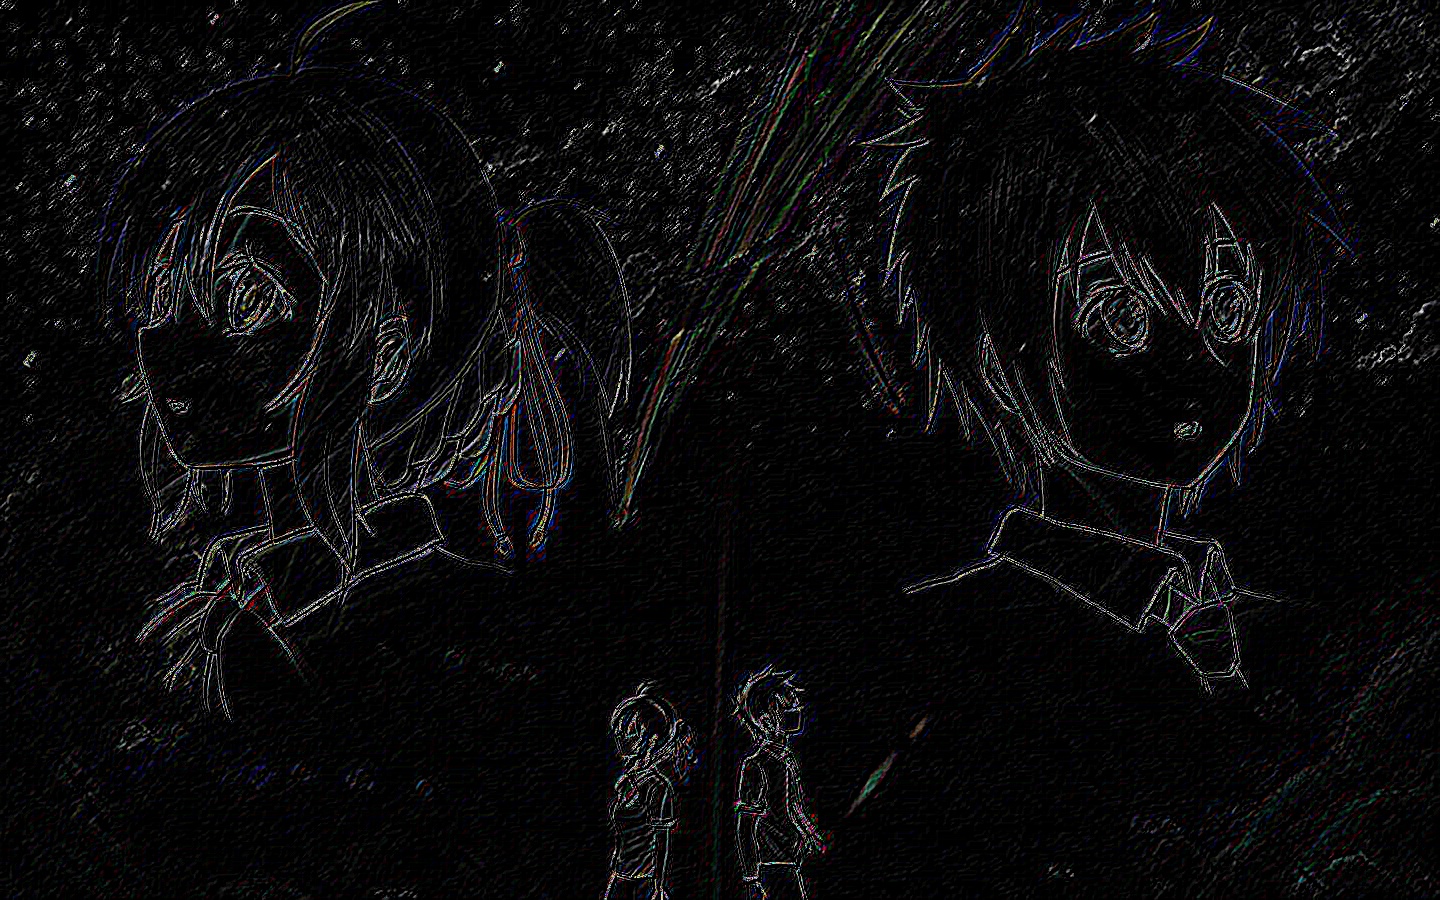
● 输出结果,感谢助教提供的图  ,原图大小 1440 * 900
readSource, Program file: D:\Code\OpenCL\convolution.cl

● 用到 OpenCV 的关键部分
 #include <opencv.hpp>

 #include <D:\Program\OpenCV\build\include\opencv2\core\cvstd.hpp>// 不知道为什么要加这个,否则报错

 #include <iostream>

 #include <vector>

 {

     Mat image = imread("D:\\1.jpg");        // 读取图片,OpenCV 自动识别文件类型,返回一个 Mat 类

     Mat channel[];                         // 分别存放图像的三个通道

     split(image, channel);                  // 将原图像拆分为三个通道,分别为蓝色、绿色、红色

     int imageHeight = image.rows, imageWidth = image.cols;// 获取图像的行数和列数

     float value = (float)channel[].data[];        // 获取图像中某一像素的值,注意格式为 unsigned char,注意与 float 之间的转换

     channel[].data[] = (unsigned char)int(value); // float 转回 unsigned char,注意数据范围和四舍五入方向

     merge(channel, , image);                                          // 三个通道合成

     imwrite("D:\\2.jpg", image, vector<int>{IMWRITE_JPEG_QUALITY, });// 最后一个参数为输出图片的选项,95% 压缩质量

     imshow("merge", image);                                            // 在窗口中展示图片

     waitKey();                                                        // 等待键盘输入

 }
● 一个玄学错误:在使用图像写入函数 imwrite() 时报错
0x00007FFBB8A086C2 (opencv_world320.dll)处(位于 OpenCLProjectTemp.exe 中)引发的异常: 0xC0000005: 读取位置 0x000001DB4743F000 时发生访问冲突。
找了很多方法,大致有:
① 改文件途径,把路径从 "XX.jpg" 变成 "./XX.jpg" 或 ".\\XX.jpg"。无效,我用的绝对路径仍然会报错。
② OpenCV 不支持中文路径。我把输入和输出文件放到 "D:\\中文" 目录下,程序仍然能够正确执行。
③ 使用 release 模式而不是 debug 模式,仍然会出错。
④ 在调用函数 imwrite() 时显式规定第三个参数。这个我信了Orz,虽然该函数的原型中该参数有默认值 vector<int>{0},但是不显式规定第三个参数的情况下一次都没有通过。可能还与我用的保存格式(jpg)有关,保存为 jpg、png 的时候可能必须规定该参数,而保存为 bmp 时没有改参数还是通过了。
⑤ 我之前觉得这个是内存泄漏了,因为该问题没有可重现性,直接用 .exe 执行程序会有以一定概率出错(注意动态库 opencv_world320.dll 的位置,拿不准环境变量的就放一份到 .exe 目录下);在 VS 里 debug 时完全不改的代码仍有一定概率报错。
⑥ 关于 lib 的配置,这个解决了我的问题(不知道其他人是不是这样)。一开始 配置属性 -> 链接器-> 输入 -> 附加依赖项 的时候我用的是 opencv_world320.lib 而不是 opencv_world320d.lib,且运行程序用的是 debug 模式,所以会报错。其实这里 d 是 debug 的意思,opencv_world320.lib 是用于 release 模式的,opencv_world320d.lib 才是用于 debug 模式的,所以 ③ 说的是对的,应该使用与库相应的模式,不再有报错。
OpenCL 图像卷积 2的更多相关文章
- OpenCL 图像卷积 3 使用 CPU
▶ CPU 图像卷积,共四种方法.分别为基本串行,使用模板,使用局部内存,使用AVX指令优化 ● 全部的代码,仅在主函数中选择调用的函数名即可. #include <stdio.h> #i ...
- OpenCL 图像卷积 1
▶ 书上的代码改进而成,从文件读入一张 256 阶灰度图,按照给定的卷积窗口计算卷积,并输出到文件中. ● 代码,使用 9 格的均值窗口,居然硬读写 .bmp 文件,算是了解一下该文件的具体格式,留作 ...
- 图像卷积、相关以及在MATLAB中的操作
图像卷积.相关以及在MATLAB中的操作 2016年7月11日 20:34:35, By ChrisZZ 区分卷积和相关 图像处理中常常需要用一个滤波器做空间滤波操作.空间滤波操作有时候也被叫做卷积滤 ...
- SSE图像算法优化系列十一:使用FFT变换实现图像卷积。
本文重点主要不在于FFT的SSE优化,而在于使用FFT实现快速卷积的相关技巧和过程. 关于FFT变换,有很多参考的代码,特别是对于长度为2的整数次幂的序列,实现起来也是非常简易的,而对于非2次幂的序列 ...
- zz图像卷积与滤波的一些知识点
Xinwei: 写的通俗易懂,终于让我这个不搞CV.不搞图像的外行理解卷积和滤波了. 图像卷积与滤波的一些知识点 zouxy09@qq.com http://blog.csdn.net/zouxy09 ...
- 对抗生成网络-图像卷积-mnist数据生成(代码) 1.tf.layers.conv2d(卷积操作) 2.tf.layers.conv2d_transpose(反卷积操作) 3.tf.layers.batch_normalize(归一化操作) 4.tf.maximum(用于lrelu) 5.tf.train_variable(训练中所有参数) 6.np.random.uniform(生成正态数据
1. tf.layers.conv2d(input, filter, kernel_size, stride, padding) # 进行卷积操作 参数说明:input输入数据, filter特征图的 ...
- UFLDL教程笔记及练习答案五(自编码线性解码器与处理大型图像**卷积与池化)
自己主动编码线性解码器 自己主动编码线性解码器主要是考虑到稀疏自己主动编码器最后一层输出假设用sigmoid函数.因为稀疏自己主动编码器学习是的输出等于输入.simoid函数的值域在[0,1]之间,这 ...
- TensorFlow实现图像卷积并可视化示例
图片尺寸要自己修改. 看起来好像没啥意思,不知道下一步能干什么,先卷了再说.由于weights是随机生成的(tf.random_normal作用:用于从服从指定正太分布的数值中取出随机数),所以每次卷 ...
- opencv:图像卷积
卷积基本概念 C++代码实现卷积 #include <opencv2/opencv.hpp> #include <iostream> using namespace cv; u ...
随机推荐
- Python环境管理--virtualenvwrapper
遇到问题: 当最近的开发和部署过程中,多个服务器部署的时候发现对于库和包的管理非常混乱,主要有俩个版本问题: 因为业务需要,代码得分别部署在不同的服务器上面,每次部署的时候都得重复的安装包而且不能确定 ...
- UVA-12118 Inspector's Dilemma (欧拉回路)
题目大意:一个有v个顶点的完全图,找一条经过m条指定边的最短路径. 题目分析:当每条边仅经过一次时,路径最短.给出的边可能构成若干棵树.在一棵树中,奇点个数总为偶数,若一棵树的奇点个数为0,则这棵树可 ...
- 019PHP基础知识——函数(二)
<?php /** * 变量的作用范围 * 函数体内的变量只作用于函数体内. */ /*$bbs="bbs.blog.com"; function say(){ $bbs=& ...
- java之子类继承抽象类,子类构造器调用抽象类构造器问题
package com.wtd; public abstract class Car { private String name= "car"; public Car(String ...
- 如何创建管理员权限的CMD命令提示符窗口
最近在使用netstat -anob命令时提示 请求的操作需要提升. 总结了几种创建管理员权限的CMD命令行的方法. 创建临时管理员权限的CMD Win8系统: 按下windows徽标,直接输入cmd ...
- mouseover、mouseout和mouseenter、mouseleave
这里直接把<Javascript 高级程序设计(第三版)>中的解释贴出来: mouseover:在鼠标指针位于一个元素外部,然后用户将其首次移入另一个元素边界之内时触发.不能通过键盘触发这 ...
- New Concept English Two 7
$课文14 你会讲英语吗? 133. I had an amusing experience last year. 去年我有过一次有趣的经历. 134. After I had left a smal ...
- JDk和Mevan安装和配置
一.Mevan安装和配置 1.下载Maven 官方下载地址:http://maven.apache.org/download.html 选择你所希望下载的版本,并保存到常用安装目录.这里以Maven ...
- CSS布局相关概要
一.文档流 运用css布局首先要具备一些概念上的知识,文档流的概念充斥着布局的整个过程.浏览器渲染页面是有先后顺序的,其顺序是至上而下,根据HTML的文档结构进行渲染. 二.div+css 耳熟能详的 ...
- C# 实现网络时间同步功能
using System; using System.Collections.Generic; using System.Linq; using System.Text; using System.I ...