Spock测试套件入门
Spock测试套件
Spock套件基于一个单元测试框架,它有比junit更为简洁高效的测试语法。
核心概念
整体认识
Spock中一个单元测试类名叫Specification。所有的单元测试类,都需要继承Specification
class MyFirstSpecification extends Specification {

  // fields

  // fixture methods

  // feature methods

  // helper methods

}
对于spock来说,Specification代表了一个软件、应用、类的使用规范,其中的所有单元测试方法,被称为feature,即功能。
一个feature method的执行逻辑大概是如下几步:
- setup 设置该功能的前置配置
- stimulus 提供一个输入,触发该功能
- response 描述你期望该功能的返回值
- cleanup 清理功能的前置配置
所以,对spock来说,一个单元测试,其实是这个软件应用提供的功能使用规范,这个规范中提供了每个功能的使用说明书,输入什么,会得到什么,大体是按这个看法,去写单元测试的。
前置、后置
就像junit一样,我们可以对整个单元测试类做一些前置,并清理。也可以对每个单元测试的方法做一些前置后清理。
其跟Junit的类比关系为
setupSpec 对应 @BeforeClass

setup 对应 @Before

cleanup 对应 @After

cleanupSpec 对应 @AfterClass
同时由于Spock的单元测试本身是会集成Specification 父类的,所以父类中的前置、后置方法也会被调用,不过不用显示调用,会自动调用。
一个测试功能方法执行时,其整体的执行顺序为:
super.setupSpec

sub.setupSpec

super.setup

sub.setup

**feature method

sub.cleanup

super.cleanup

sub.cleanupSpec

super.cleanupSpec
同junit的类比

Feature 方法
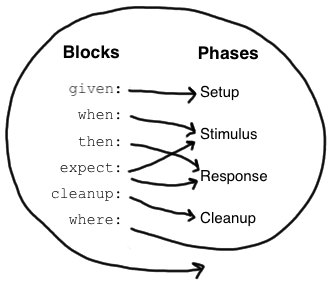
blocks
feature的具体写法有很多的block组成,这些block对应的feature方法本身的四个阶段(setup, stimulus, reponse, cleanup) 。每个block对应阶段示意图
典型的用法
    def '测试++'(){

        given:

            def x = 5

        when: def result = calculateService.plusPlus(x)

        then: result == 6

    }
- given也可以写成setup,feature方法里的given其实跟外面的setup方法功能一样,都是做测试功能的前置设置。只是单独的setup方法,是用来写对每个测试feature都有用的测试。只跟当前feature相关的设置,请放在feature方法内的given标签
- when 标签用来实际调用想要测试的feature
- then 中对when的调用返回进行结果验证,这里不需要写断言,直接写表达式就是断言
异常condition
then中的断言在spock中叫condition。比如Java中的Stack在没有元素时,进行Popup,则会EmptyStackException异常。我们期望它确实会抛出这个异常,那么写法如下
def '异常2'() {

        given:

        def stack = new Stack()

        when:

        def result = stack.pop()

        then:

        EmptyStackException e = thrown()

    }
它并不会抛出EmptyStackException,我们要测试这个预期的话,代码如下:
    def '异常2'() {

        given:

        def stack = new Stack()

        stack.push("hello world")

        when:

        stack.pop()

        then:

        EmptyStackException e = notThrown()

    }
then和expect的区别
前面说了when block用来调用,then用来判断预期结果。但有的时候,我们的调用和预期判断并不复杂,那么可以用expect将两者合在一起,比如以下两段代码等价
when:

def x = Math.max(1, 2)

then:

x == 2
expect:

Math.max(1, 2) == 2
cleanup block的用法
def 'cleanup'() {

        given:

        def file = new File("/some/path")

        file.createNewFile()

        // ...

        cleanup:

        file.delete()

    }
用于清理feature测试执行后的一些设置,比如打开的文件链接。该操作即便测试的feature出异常,依然会被调用
同样,如果多个测试feature都需要这个cleanup.那么建议将cleanup的资源提到setup方法中,并在cleanup方法中去清理
测试用例中的文本描述
为了让单元测试可读性更高,可以将测试方法中每一部分用文本进行描述,多个描述可以用and来串联
    def '异常2'() {

        given:'设置stack对象'

        def stack = new Stack()

        and:'其它变量设施'

        stack.push('hello world')

        when:'从stack中弹出元素'

        def result = stack.pop()

        then:'预期会出现的异常'

        EmptyStackException e = thrown()

    }
Extension
spock通过标注来扩充单元测试的功能
@Timeout指定一个测试方法,或一个设置方法最长可以执行的时间,用于对性能有要求的测试
@Ignore用于忽略当前的测试方法
@IgnoreRest忽略除当前方法外的所有方法,用于想快速的测一个方法
@FailsWith 跟exception condition类似
数据驱动测试
数据表
对于有些功能逻辑,其代码是一样的,只是需要测试不同输入值。按照先前的介绍,最简洁的写法为:
    def "maximum of two numbers1"() {

        expect:

        // exercise math method for a few different inputs

        Math.max(1, 3) == 3

        Math.max(7, 4) == 4

        Math.max(0, 0) == 1

    }
缺点:
- Math.max代码需要手动调用三次
- 第二行出错后,第三行不会被执行
- 数据和代码耦合在一起,不方便数据从其它地方独立准备
所以spock引入了数据表的概念,将测试数据和代码分开。典型实例如下:
class MathSpec extends Specification {

  def "maximum of two numbers"() {

    expect:

    Math.max(a, b) == c

    where:

    a | b || c

    1 | 3 || 3

    7 | 4 || 7

    0 | 0 || 0

  }

}
- where语句中,定义数据表。第一行是表头,定义这一列所属的变量。
- 实际代码调用,只需要调用一次。代码中的变量跟数据表中的变量必须一一对应
- 看似一个方法,实际上执行时,spock会根据数据表中的行数,循环迭代执行代码。每一行都是独立于其余行执行,所以有setup和cleanup块,对每一个行的都会重复执行一次
- 并且某一行的数据出错,并不影响其余行的执行
另外的写法
def "maximum of two numbers"(int a, int b ,int c) {

        expect:

        Math.max(a, b) == c

        where:

        a | b | c

        1 | 3 | 3

        7 | 4 | 4

        0 | 0 | 1

    }
- 变量可以在方法参数中声明,但没必要
- 数据表可以全部用一个竖线来分割,但无法像两个竖线一样清晰的分割输入和输出
更清晰的测试结果展示
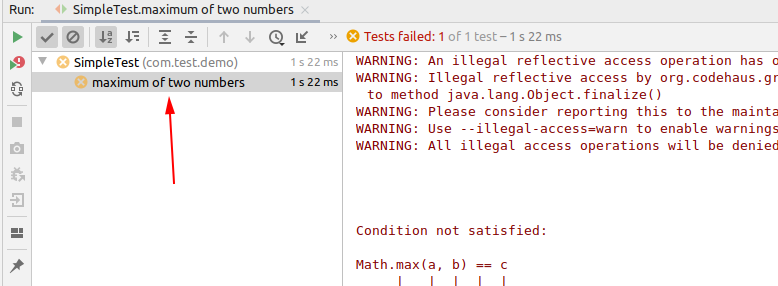
class MathSpec extends Specification {

  def "maximum of two numbers"() {

    expect:

    Math.max(a, b) == c

    where:

    a | b || c

    1 | 3 || 3

    7 | 4 || 4

    0 | 0 || 1

  }

}
以上测试代码,数据表中的后两行会执行失败。但从测试结果面板中,不能很好的看到详细结果
使用@Unroll可以将每个迭代的执行结果输出
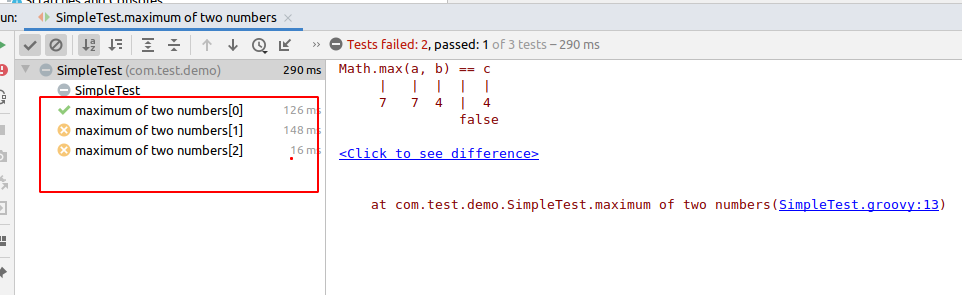
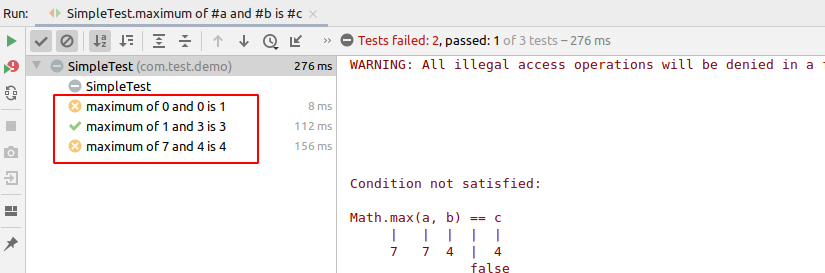
可以看到面板中实际输出的文本为测试方法的名称。如果像在输出中加上输入输出的变量,来详细展示每个迭代,可以在方法名中使用占位符#variable来引用变量的值。举例如下:
@Unroll

    def "maximum of #a and #b is #c"() {

        expect:

        Math.max(a, b) == c

        where:

        a | b || c

        1 | 3 || 3

        7 | 4 || 4

        0 | 0 || 1

    }
更丰富的数据准备方式
前面的数据表显示的将数据以表格的形式写出来。实际上,数据在where block中的准备还有其它多种方式。
where:

a << [1, 7, 0]

b << [3, 4, 0]

c << [3, 7, 0]
从数据库中查询
@Shared sql = Sql.newInstance("jdbc:h2:mem:", "org.h2.Driver")

def "maximum of two numbers"() {

  expect:

  Math.max(a, b) == c

  where:

  [a, b, c] << sql.rows("select a, b, c from maxdata")

}
使用groovy代码赋值
where:

a = 3

b = Math.random() * 100

c = a > b ? a : b
以上几种方式可以混搭。
其中方法名也可以以丰富的表达式引用where block中的变量
def "person is #person.age years old"() {

  ...

  where:

  person << [new Person(age: 14, name: 'Phil Cole')]

  lastName = person.name.split(' ')[1]

}
基于交互的测试(Interaction Based Testing)
有的时候,我们测试的功能,需要依赖另外的collaborators来测试。这种涉及到多个执行单元之间的交互,叫做交互测试
比如:
class Publisher {

  List<Subscriber> subscribers = []

  int messageCount = 0

  void send(String message){

    subscribers*.receive(message)

    messageCount++

  }

}

interface Subscriber {

  void receive(String message)

}
我们想测Publisher,但Publisher有个功能是是发消息给所有的Subscriber。要想测试Publisher的发送功能确实ok,那么需要测试Subscriber的确能收到消息。
使用一个实际的Subscriber实现固然能实现这个测试。但对具体的Subscriber实现造成了依赖,这里需要Mock。使用spock的测试用例如下:
class PublisherTest extends Specification{

    Publisher publisher = new Publisher()

    Subscriber subscriber = Mock()

    Subscriber subscriber2 = Mock() //创建依赖的Subscriber Mock

    def setup() {

        publisher.subscribers << subscriber // << is a Groovy shorthand for List.add()

        publisher.subscribers << subscriber2

    }

    def "should send messages to all subscribers"() {

        when:

        publisher.send("hello") //调用publisher的方法

        then:

        1*subscriber.receive("hello") //期望subscriber的receive方法能被调用一次

        1*subscriber2.receive("hello")//期望subscriber1的receive方法能被调用一次

    }

}
以上代码的目的是通过mock来测试当Publisher的send的方法被执行时,且执行参数是'hello'时,subscriber的receive方法一定能被调用,且入参也为‘hello’
对依赖Mock的调用期望,其结构如下
1 * subscriber.receive("hello")

|   |          |       |

|   |          |       argument constraint

|   |          method constraint

|   target constraint

cardinality
cardinality
定义右边期望方法执行的次数,这里是期望执行一次,可能的写法有如下:
1 * subscriber.receive("hello")      // exactly one call

0 * subscriber.receive("hello")      // zero calls

(1..3) * subscriber.receive("hello") // between one and three calls (inclusive)

(1.._) * subscriber.receive("hello") // at least one call

(_..3) * subscriber.receive("hello") // at most three calls

_ * subscriber.receive("hello")      // any number of calls, including zero
target constraint
定义被依赖的对象。可能的写法如下
1 * subscriber.receive("hello") // a call to 'subscriber'

1 * _.receive("hello")          // a call to any mock object
Method Constraint
定义在上述对象上期望被调用的方法,可能的写法如下:
1 * subscriber.receive("hello") // a method named 'receive'

1 * subscriber./r.*e/("hello")  // a method whose name matches the given regular expression

                                // (here: method name starts with 'r' and ends in 'e')
Argument Constraints
对被调用方法,期望的入参进行定义。可能写法如下:
1 * subscriber.receive("hello")        // an argument that is equal to the String "hello"

1 * subscriber.receive(!"hello")       // an argument that is unequal to the String "hello"

1 * subscriber.receive()               // the empty argument list (would never match in our example)

1 * subscriber.receive(_)              // any single argument (including null)

1 * subscriber.receive(*_)             // any argument list (including the empty argument list)

1 * subscriber.receive(!null)          // any non-null argument

1 * subscriber.receive(_ as String)    // any non-null argument that is-a String

1 * subscriber.receive(endsWith("lo")) // any non-null argument that is-a String

1 * subscriber.receive({ it.size() > 3 && it.contains('a') })

// an argument that satisfies the given predicate, meaning that

// code argument constraints need to return true of false

// depending on whether they match or not

// (here: message length is greater than 3 and contains the character a)
一些通配符
1 * subscriber._(*_)     // any method on subscriber, with any argument list

1 * subscriber._         // shortcut for and preferred over the above

1 * _._                  // any method call on any mock object

1 * _                    // shortcut for and preferred over the above
严格模式(Strict Mocking)
when:

publisher.publish("hello")

then:

1 * subscriber.receive("hello") // demand one 'receive' call on 'subscriber'

_ * auditing._                  // allow any interaction with 'auditing'

0 * _                           // don't allow any other interaction
默认情况下,你对Mock实例的方法的调用,会返回该方法返回值的默认值,比如该方法返回的是布尔型,那么你你调用mock实例中的该方法时,将返回布尔型的默认值false.
如果我们希望严格的限定Mock实例的各方法行为,可以通过上述代码,对需要测试的方法显示定义期望调用行为,对其它方法设置期望一次都不调用。以上then block中的0 * _ 即是定义这种期望。当除subscriber中的receive和auditing中的所有方法被调用时,该单元测试会失败,因为这不符合我们对其它方法调用0次的期望
调用顺序
then:

2 * subscriber.receive("hello")

1 * subscriber.receive("goodbye")
以上两个期望被调用的顺序是随机的。如果要保证调用顺序,使用两个then
then:

2 * subscriber.receive("hello")

then:

1 * subscriber.receive("goodbye")
Stubbing 定义方法返回
前面的interaction mock是用来测试被mock的对象,期望方法的调用行为。比如入参,调用次数。
而stubbing则用来定义被mock的实例,在调用时返回的行为
总结,前者定义调用行为期望,后者定义返回行为期望。且Interaction test 测试的是执行期望或断言。的stubbing则是用来定义mock的模拟的行为。
所以stubbing 对mock方法返回值的定义应该放在given block. 而对mock方法本身的调用Interaction test 应该放在then block中。所以stubbing对返回值的定义相当于在定义测试的测试数据。
Stubbing的使用场景也很明确。假设Publisher需要依赖Subscriber方法的返回值,再做下一步操作。那我们就需要对Subscriber的返回值进行mock,来测试不同返回值对目标测试代码(feature)的行为。
我们将上述Subscriber接口对应的方法添加一个返回值
class Publisher {

        Subscriber subscriber

        int messageCount = 0

        int send(String message){

            if(subscriber.receive(message) == 'ok') {

                this.messageCount++

            }

            return messageCount

        }

    }

interface Subscriber {

    String receive(String message)

}
测试代码举例
Publisher publisher = new Publisher()

Subscriber subscriber = Mock()

def setup() {

    publisher.subscriber = subscriber

}

def "should send msg to subscriber"() {

     given:

     subscriber.receive("message1") >> "ok"

     when:

     def result = publisher.send("message1")

     then:

     result == 1

 }
以上代码表示,模拟subscriber.receive被调用时,且调用参数为message1,方法返回ok. 而此时期望(断言)Publisher的send方法,返回的是1
stubbing 返回值结构
subscriber.receive(_) >> "ok"

|          |       |     |

|          |       |     response generator

|          |       argument constraint

|          method constraint

target constraint
注意这里多了response generator,并且没有interaction test中的Cardinality
各种返回值定义
返回固定值
subscriber.receive("message1") >> "ok"

subscriber.receive("message2") >> "fail"
顺序调用返回不同的值
subscriber.receive(_) >>> ["ok", "error", "error", "ok"]
第一次调用返回ok,第二次、三次调用返回error。剩下的调用返回ok
根据入参计算返回值
subscriber.receive(_) >> { args -> args[0].size() > 3 ? "ok" : "fail" }
subscriber.receive(_) >> { String message -> message.size() > 3 ? "ok" : "fail" }
上述两者效果都一样,都是对第一个入参的长度进行判断,然后确定返回值
返回异常
subscriber.receive(_) >> { throw new InternalError("ouch") }
链式返回值设定
subscriber.receive(_) >>> ["ok", "fail", "ok"] >> { throw new InternalError() } >> "ok"
前三次调用依次返回ok,fail,ok。第四次调用返回异常,之后的调用返回ok
将Interaction Mock和stubbing组合
1 * subscriber.receive("message1") >> "ok"

1 * subscriber.receive("message2") >> "fail"
这里即定义了被mock 的subscriber其方法返回值,也定义了该方法期望被调用多少次。举例:
Publisher publisher = new Publisher()

Subscriber subscriber = Mock()

def setup() {

    publisher.subscriber = subscriber

}

def "should send msg to subscriber"() {

    given:

    1*subscriber.receive("message1") >> "ok"

    when:

    def result = publisher.send("message1")

    then:

    result == 1

}
以上写法,即测试了subscriber.receive被调用了一次,也测试了publisher.send执行结果为1.如果将Interaction Mock和stubbing组合拆开,像下面这种写法是不行的:
Publisher publisher = new Publisher()

Subscriber subscriber = Mock()

def setup() {

    publisher.subscriber = subscriber

}

def "should send msg to subscriber"() {

        given:

        subscriber.receive("message1") >> "ok"

        when:

        def result = publisher.send("message1")

        then:

        result == 1

        1*subscriber.receive("message1")

    }
如何创建单元测试类
方式一
像Junit一样,在需要测试的类上,使用Idea的帮助快捷键,然后弹出
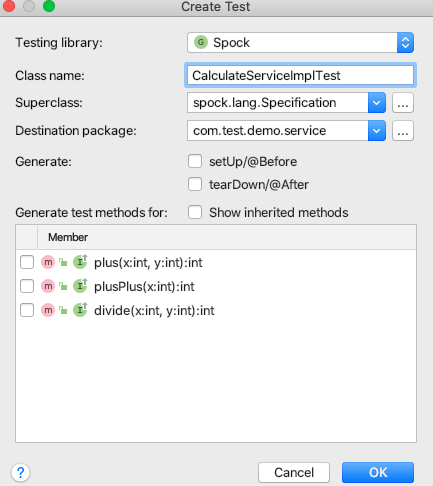
选择指定的测试框架spock和路径即可
方式二
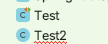
直接在指定的测试目录下,新建对应的测试类,注意是新建groovy class
在Idea中,groovy class的图标是方块,java class是圆形,注意区分
有可能建完后,对应的图标是

,说明Ide没有识别到这是个groovy 类,一般是由于其代码有问题,可以打开该文件,把具体的错误修复,比如把注释去掉之类的
参考资料
http://spockframework.org/spock/docs/1.1/all_in_one.html#_introduction
Spock测试套件入门的更多相关文章
- Groovy/Spock 测试导论
Groovy/Spock 测试导论 原文 http://java.dzone.com/articles/intro-so-groovyspock-testing 翻译 hxfirefox 测试对于软件 ...
- 『心善渊』Selenium3.0基础 — 28、unittest中测试套件的使用
目录 1.测试套件的作用 2.使用测试套件 (1)入门示例 (2)根据不同的条件加载测试用例(了解) (3)常用方式(推荐) 1.测试套件的作用 在我们实际工作,使用unittest框架会有两个问题: ...
- selenium测试套件
1.测试套件测试套件,简单理解就是讲多个用例,装在一个容器里来同时执行完成. 2.测试套件分析 #coding=utf-8 import unittestimport BaiDuSearch,BaiD ...
- Android自动化压力测试快速入门教程(图解)——MonkeyRunner
一.MonkeyRunner测试环境配置(转自) 1. android-sdk 下载地址:http://www.android-doc.com/sdk/index.html 下载完成后,只需要解压就 ...
- selenium-webdriver用例批量运行和测试套件使用 ------之我见
用例批量运行和测试套件使用 ------之我见 学习selenium-webdriver已经一段时间了,最近学习到,测试用例的批量执行,和测试套件的使用,有点自己的理解,不晓得对不对,希望大家指正! ...
- 【转】兼容性测试套件(CTS)框架用户手册
原文网址:http://blog.sina.com.cn/s/blog_416166e90102v6bi.html 兼容性测试套件(CTS)框架用户手册 1.为什么需要兼容性测试(以下称CTS)? 2 ...
- JUnit4中的测试套件
测试套件 JUnit3.8中,用测试套件同时运行多个测试类(http://www.cnblogs.com/mengdd/archive/2013/04/07/3006265.html). 在JUnit ...
- 安卓CTS官方文档之兼容性测试套件简介-attach
官方英文文档原文:https://source.android.com/compatibility/cts-intro.html Compatibility Test Suite 兼容性测试套件 H ...
- 安卓CTS官方文档之兼容性测试套件简介
官方英文文档原文:https://source.android.com/compatibility/cts-intro.html Compatibility Test Suite 兼容性测试套件 Ho ...
随机推荐
- (趣味哈哈镜)JMF中摄像头相关的问题
JMF已经非常古老了.最近由于做实验的需要,不得不使用JMF处理视频.开发使用win10系统和eclipse.使用中的问题如下: 1.首先想要使用JMF需要必须安装32位JDK,同时编译软件也需要是3 ...
- 第7章 Spark SQL 的运行原理(了解)
第7章 Spark SQL 的运行原理(了解) 7.1 Spark SQL运行架构 Spark SQL对SQL语句的处理和关系型数据库类似,即词法/语法解析.绑定.优化.执行.Spark SQL会先将 ...
- fdisk时WARNING: Re-reading the partition table failed with error 16: 设备或资源忙.
现象:划分磁盘有警告, fdisk可以看到 lsblk却没有 partprobe刷新分区还是不行 放大招 #reboot #这个是最好的方法(重启后新的分区表不一定生效) 或 # partx -a ...
- 使用Spring Cloud Config统一管理配置,别再到处放配置文件了
1 前言 欢迎访问南瓜慢说 www.pkslow.com获取更多精彩文章! 可配置是一个成熟软件系统应该提供的特性,而配置管理对于大型系统就显得十分重要,特别是对于拥有多个应用的微服务系统.可喜的是, ...
- Web自动化必会知识:「Web基础、元素定位、元素操作、Selenium运行原理、项目实战+框架」
1.web 基础-html.dom 对象.js 基本语法 Dom 对象里面涉及元素定位以及对元素的修改.因为对元素操作当中涉及的一些 js 操作,js 基本语法要会用.得要掌握前端的基本用法.为什么要 ...
- js实现树级递归,通过js生成tree树形菜单(递归算法)
方法封装: /** * 数据转换为树形(递归),示例:toTreeByRecursion(source, 'id', 'parentId', null, 'children') * @param {A ...
- Failed to start component [StandardEngine[Tomcat].StandardHost[localhost].StandardContex
问题描述: 在idea中maven构建web项目,启动Tomcat插件时,出现Failed to start component [StandardEngine[Tomcat].StandardHos ...
- JMH--一款由OpenJDK开发的基准测试工具
什么是JMH JMH 是 OpenJDK 团队开发的一款基准测试工具,一般用于代码的性能调优,精度甚至可以达到纳秒级别,适用于 java 以及其他基于 JVM 的语言.和 Apache JMeter ...
- 使用tensorflow2识别4位验证码及思考总结
在学习了CNN之后,自己想去做一个验证码识别,网上找了很多资料,杂七杂八的一大堆,但是好多是tf1写的,对tf1不太熟悉,有点看不懂,于是自己去摸索吧. 摸索的过程是异常艰难呀,一开始我直接用capt ...
- PyTorch入门-CIFAR10图像分类
CIFAR10数据集下载 CIFAR10数据集包含10个类别,图像尺寸为 3×32×32 官方下载地址很慢,这里给一个百度云: https://pan.baidu.com/s/1oTvW8wNa-VO ...