
记一次Java获取本地摄像头(基于OpenCV)
OpenCV官网下载地址(下载安装后,在安装目录可以找到动态链接库和OpenCv.jar)

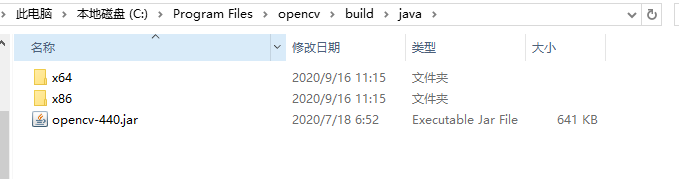
安装完成后,这是我的安装目录
maven 依赖(这个是安装完成后我把jar放到maven本地仓库中,然后在maven中就可以直接引用了)
          <!-- opencv依赖 -->

		<dependency>

			<groupId>org.opencv</groupId>

			<artifactId>opencv</artifactId>

			<version>440</version>

		</dependency>
1.配置OpenCV环境

新建本地依赖


自己定义依赖库的名称


选择动态链接库dll文件的目录

选择OpenCV的安装目录

这个是根据你的JDK来选择,如果你的JDK是64位的就选择x64

2.摄像头获取类
package com.crow.safeBoxHardware;

import java.awt.FlowLayout;

import java.awt.event.WindowEvent;

import java.awt.event.WindowListener;

import java.io.File;

import java.io.IOException;

import java.io.InputStream;

import javax.swing.JFrame;

import javax.swing.JPanel;

import javax.swing.WindowConstants;

import org.opencv.core.Core;

import org.opencv.core.Mat;

import org.opencv.core.MatOfRect;

import org.opencv.core.Rect;

import org.opencv.core.Size;

import org.opencv.imgcodecs.Imgcodecs;

import org.opencv.imgproc.Imgproc;

import org.opencv.objdetect.CascadeClassifier;

import org.opencv.videoio.VideoCapture;

import org.opencv.videoio.Videoio;

import org.springframework.core.io.ClassPathResource;

import org.springframework.stereotype.Component;

import com.crow.safeBoxHardware.components.exception.BizErrorCode;

import com.crow.safeBoxHardware.components.exception.BizException;

import com.crow.safeBoxHardware.util.FileUtil;

import lombok.extern.log4j.Log4j2;

@Log4j2

@Component

public class Test2 {

    // 从配置文件lbpcascade_frontalface.xml中创建一个人脸识别器,该文件位于opencv安装目录中

    private CascadeClassifier faceDetector;

    // 从配置文件lbpcascade_frontalface.xml中创建一个人眼识别器,该文件位于opencv安装目录中

    private CascadeClassifier eyeDetector;

    private JFrame cameraFrame;

    public CamarePanel panelCamera;

    // 是否打开摄像头

    private boolean open = false;

    // 相机

    public VideoCapture capture;

    // 人脸图像

    public Mat faceMat;

    // 摄像头读取的帧

    public Mat capImg;

    public Test2() {

        // 初始化人脸检测器

//        faceDetector = new CascadeClassifier(

//                "C:\\worksplace\\safeBoxHardware\\src\\main\\resources\\native\\face\\xml\\haarcascade_frontalface_alt.xml");

//

//        eyeDetector = new CascadeClassifier(

//                "C:\\worksplace\\safeBoxHardware\\src\\main\\resources\\native\\face\\xml\\haarcascade_eye.xml");

        capture = new VideoCapture();

    }

    /**

     * 打开摄像头

     *

     * @param x

     * @param y

     */

    public void open(int x, int y) {

        capImg = new Mat();

        faceMat = new Mat();

        cameraFrame = new JFrame("camare");

        panelCamera = new CamarePanel();

        // 打开相机

        capture.open(0);

        boolean grab = capture.grab();

        if (!grab) {

            throw new BizException(BizErrorCode.CAMARE_OPEN_ERROE);

        }

        // 打开摄像头

        open = true;

        // 设置分辨率

        capture.set(Videoio.CAP_PROP_FRAME_WIDTH, 1280);

        capture.set(Videoio.CAP_PROP_FRAME_HEIGHT, 720);

        // 设置帧率

        capture.set(Videoio.CAP_PROP_FPS, 30);

        // 添加到Frame

        cameraFrame.setContentPane(panelCamera);

        // 设置去掉边框

        cameraFrame.setUndecorated(true);

        // 是否显示窗口

        cameraFrame.setVisible(true);

        // 设置在最顶层

        cameraFrame.setAlwaysOnTop(true);

        // 设置关闭

        cameraFrame.setDefaultCloseOperation(WindowConstants.DISPOSE_ON_CLOSE);

        // 窗口关闭事件

        cameraFrame.addWindowListener(new WindowListener() {

            @Override

            public void windowOpened(WindowEvent e) {

            }

            @Override

            public void windowIconified(WindowEvent e) {

            }

            @Override

            public void windowDeiconified(WindowEvent e) {

            }

            @Override

            public void windowDeactivated(WindowEvent e) {

            }

            @Override

            public void windowClosing(WindowEvent e) {

                close();

            }

            @Override

            public void windowClosed(WindowEvent e) {

            }

            @Override

            public void windowActivated(WindowEvent e) {

            }

        });

        // 设置位置

        if (x > 0 && y > 0) {

            cameraFrame.setBounds(x, y, 400, 600);

        } else {

            // 设置大小

            cameraFrame.setSize(400, 600);

            // 居中显示

            cameraFrame.setLocationRelativeTo(null);

        }

        while (open) {

            capture.read(capImg);

            if (!capImg.empty()) {

                // 转换成BufferImage并绘制到Panel

                panelCamera.setImageWithMat(capImg);

                // 重新绘制

                cameraFrame.repaint();

                //检测人脸并保存

                //detectFace(capImg, "C:\\Users\\Crow\\Desktop\\"+System.currentTimeMillis()+".png");

            }

        }

        log.info("相机已关闭......");

    }

    /**

     * 关闭窗口和摄像头释放资源

     */

    public void close() {

        // 关闭循环

        open = false;

        if (cameraFrame != null) {

            // 关闭窗口

            cameraFrame.dispose();

            cameraFrame = null;

        }

        if (panelCamera != null) {

            // 清空

            panelCamera = null;

        }

        if (capture != null && capture.isOpened()) {

            // 关闭视频文件或捕获设备,并释放资源

            capture.release();

        }

        log.warn("关闭相机...........................");

    }

    /**

     * 检测人脸,并保存

     *

     * @param videoMat

     * @param savePath

     * @return

     */

    public Mat detectFace(Mat videoMat, String savePath) {

        File file = new File(savePath);

        // 验证父目录是否存在,不存在则新建

        if (!file.getParentFile().exists()) {

            file.getParentFile().mkdirs();

        }

        // 创建用来装检测出来的人脸的容器

        MatOfRect faces = new MatOfRect();

        // 检测人脸,videoMat为要检测的图片,faces用来存放检测结果

        faceDetector.detectMultiScale(videoMat, faces);

        Rect[] facesArray = faces.toArray();

        // 创建用来装检测出来的人眼的容器

        MatOfRect eyes = new MatOfRect();

        // 检测人眼,videoMat为要检测的图片,faces用来存放检测结果

        eyeDetector.detectMultiScale(videoMat, eyes);

        Rect[] eyesArray = eyes.toArray();

        if (facesArray.length > 0 && eyesArray.length > 0) {

            for (int i = 0; i < facesArray.length; i++) {

                Rect rect = facesArray[i];

                // 只获取人脸行和人脸列

                Mat faceImage = videoMat.rowRange(rect.y, rect.y + rect.height).colRange(rect.x, rect.x + rect.width);

                // 设置大小

                Size size = new Size(400, 600);

                // 调整图像

                Imgproc.resize(faceImage, faceMat, size);

                // 保存

                Imgcodecs.imwrite(savePath, faceMat);

            }

        }

        return faceMat;

    }

    public boolean isOpen() {

        return open;

    }

    public void setOpen(boolean open) {

        this.open = open;

    }

    public CamarePanel getPanelCamera() {

        return panelCamera;

    }

    public Mat getFaceMat() {

        return faceMat;

    }

    public static void main(String[] args) {

        //加载opencv动态链接库

        System.loadLibrary(Core.NATIVE_LIBRARY_NAME);

        //打开摄像头,并设置位置

        new Test2().open(298, 81);

    }

}
3.图像显示Panel容器
package com.crow.safeBoxHardware.components.hardware.camare;

import java.awt.Graphics;

import java.awt.GraphicsConfiguration;

import java.awt.GraphicsDevice;

import java.awt.GraphicsEnvironment;

import java.awt.HeadlessException;

import java.awt.Image;

import java.awt.Transparency;

import java.awt.image.BufferedImage;

import javax.swing.ImageIcon;

import javax.swing.JPanel;

import org.opencv.core.Mat;

/**

 * <p>

 * 用于在面板上显示和拍摄

 * </p>

 *

 * @author Crow

 * @version 0.0.1

 * @since 2020-9-158:54:36

 */

public class CamarePanel extends JPanel {

    private static final long serialVersionUID = 1L;

    //摄像头获取的原始图像

    private BufferedImage image;

    //裁剪修正后的图像

    private BufferedImage updateImage;

    public CamarePanel() {

        super();

    }

    private BufferedImage getimage() {

        return image;

    }

    /**

     * 裁剪修正后的图像

     * @return

     */

    public BufferedImage getUpdateImage() {

        return updateImage;

    }

    public void setUpdateImage(BufferedImage updateImage) {

        this.updateImage = updateImage;

    }

    public void setImage(BufferedImage newimage) {

        image = newimage;

        return;

    }

    public void setImageWithMat(Mat newimage) {

        image = this.ConvertImage(newimage);

        return;

    }

    /*

     * 将对象转换为BufferedImage,以在帧内显示它

     */

    public BufferedImage ConvertImage(Mat matrix) {

        // 列和缓冲区图像对象的对象大小

        int cols = matrix.cols();

        int rows = matrix.rows();

        int elemSize = (int) matrix.elemSize();

        byte[] data = new byte[cols * rows * elemSize];

        int type;

        matrix.get(0, 0, data);

        // 在颜色空间中显示对象的通道数。

        switch (matrix.channels()) {

        // 单通道使用灰色矩阵

        case 1:

            type = BufferedImage.TYPE_BYTE_GRAY;

            break;

        // 如果有3个通道

        case 3:

            type = BufferedImage.TYPE_3BYTE_BGR;

            /*

             * 由于 opencv 将 rgb 颜色空间保留为 bgr, 因此我们将它转换为 rgb 空间, 在成像中实现整洁的图像

             */

            byte b;

            for (int i = 0; i < data.length; i = i + 3) {

                b = data[i];

                data[i] = data[i + 2];

                data[i + 2] = b;

            }

            break;

        default:

            return null;

        }

        BufferedImage bufferedImage = new BufferedImage(cols, rows, type);

        bufferedImage.getRaster().setDataElements(0, 0, cols, rows, data);

        return bufferedImage;

    }

    @Override

    protected void paintComponent(Graphics g) {

        super.paintComponent(g);

        BufferedImage temp = getimage();

        if (temp != null) {

            // 缩放

            Image scaledInstance = temp.getScaledInstance(1000, 600, Image.SCALE_SMOOTH);

            // 转换

            updateImage = toBufferedImage(scaledInstance);

            // 裁剪

            updateImage = updateImage.getSubimage(300, 0, 400, 600);

            // 绘制

            g.drawImage(updateImage, 0, 0, 400, 600, this);

       //g.drawImage(temp, 0, 0, 1280, 720, this);

        }

    }

    /**

     * 将image对象 转成 BufferedImage

     *

     * @param image

     * @return

     */

    private BufferedImage toBufferedImage(Image image) {

        if (image instanceof BufferedImage) {

            return (BufferedImage) image;

        }

        image = new ImageIcon(image).getImage();

        BufferedImage bimage = null;

        GraphicsEnvironment ge = GraphicsEnvironment.getLocalGraphicsEnvironment();

        try {

            int transparency = Transparency.OPAQUE;

            GraphicsDevice gs = ge.getDefaultScreenDevice();

            GraphicsConfiguration gc = gs.getDefaultConfiguration();

            bimage = gc.createCompatibleImage(image.getWidth(null), image.getHeight(null), transparency);

        } catch (HeadlessException e) {

        }

        if (bimage == null) {

            int type = BufferedImage.TYPE_INT_RGB;

            bimage = new BufferedImage(image.getWidth(null), image.getHeight(null), type);

        }

        Graphics g = bimage.createGraphics();

        g.drawImage(image, 0, 0, null);

        g.dispose();

        return bimage;

    }

}
摄像头像素较差(百度的度目摄像头)
效果图(本人就不上镜了)

OK,搞定
记一次Java获取本地摄像头(基于OpenCV)的更多相关文章
- java获取本地计算机MAC地址
java获取本地计算机MAC地址代码如下: public class SocketMac { //将读取的计算机MAC地址字节转化为字符串 public static String transByte ...
- Java获取本地IP地址
import java.net.InetAddress; import java.net.UnknownHostException; public class IpTest { public stat ...
- directshow 获取本地摄像头播放
最近因为项目的需要,做了一个基本的获取本地笔记本摄像头并且播放的例子,因为网上的关于这部分的完整例子基本都没有,那我就上传一个吧,希望能够帮到需要学习视频的朋友. 另外也是为了纪念雷霄骅博士为音视频方 ...
- java 获取本地 mac 地址
主要参考:Java获取本机MAC地址/IP地址/主机名 做的更改: 1.我的windows是中文版,程序中获取mac时是按照physical address 获取的,添加上"物理地址&quo ...
- Java获取本地IP地址和主机名
方式一:通过java.net.InetAddress类获取 public void test1() { try { InetAddress addr = InetAddress.getLocalHos ...
- java获取本地json格式的内容
前言 该功能模块基于springBoot,自己在开发中遇到相关功能开发,总结如写: 1.首先将所需要获取的json文件放在项目resource目录下: 2.所需要的pom依赖: <depende ...
- java 获取本地电脑的分辨率代码
1.代码: java.awt.Toolkit tk=java.awt.Toolkit.getDefaultToolkit(); java.awt.Dimension screenSize= ...
- Java 获取本地IP地址
private static String getIpAddress( ){ String ip = ""; Collection<InetAddress> colIn ...
- java获取本地IP地址集合包括虚拟机的ip
public static ArrayList<String> getLocalIpAddr() { ArrayList<String> ipList = new ArrayL ...
随机推荐
- SpringBoot使用简单缓存
第一步开启缓存(只要是springboot项目就可以) 数据库连接等相关配置请读者自行实现. 在Application启动类上添加注解 @EnableCaching 开启缓存 @SpringBoot ...
- 运用sed命令高效地删除文件的特定行
运用 sed 命令高效地删除文件的特定行 正常来说,我们想要删除文件中的某些行内容,一般都是先打开这个文件,然后找到要删除的内容,再然后选中这些行并按删除键进行删除,这在数据量很少时是没有问题的.但是 ...
- IDEA下Maven项目搭建踩坑记----1.pom,xml文件下${spring-version}不能用
因为pom.xml文件是直接复制别人配好的web环境,所以在粘贴进去的之后有一部分没有粘贴到,因此出现爆红 解决方法:↓↓↓↓ 代码: <project.build.sourceEncoding ...
- #企业项目实战 .Net Core + Vue/Angular 分库分表日志系统六 | 最终篇-通过AOP自动连接数据库-完成日志业务
教程预览 01 | 前言 02 | 简单的分库分表设计 03 | 控制反转搭配简单业务 04 | 强化设计方案 05 | 完善业务自动创建数据库 06 | 最终篇-通过AOP自动连接数据库-完成日志业 ...
- 焦大翻译:提防一些seo错误认知(完整版)
http://www.wocaoseo.com/thread-179-1-1.html 多人在开始做seo的时候,都曾经尝试通过黑盒测试来找出哪些因素对排名有效果. 黑盒测试是我们IT行业常用术语,它 ...
- 国内几大seo高手(夫唯,王通,久久)的技术分析
http://www.wocaoseo.com/thread-146-1-1.html 目前学习seo的人越来越多了,这种技术的普及和推广也在不断的扩大,先进的好的培训机构不断涌现,很多高水平老师都在 ...
- linux字符终端(控制台)的字体更改
查看已安装的终端字体 ls /usr/share/consolefonts/ 设置终端字体 sudo dpkg-reconfigure console-setup 或者 sudo vim /etc/d ...
- git 合并两个分支的某个文件
软件开发基本都是多个feature分支并行开发,而在上线前有可能某个分支的开发或测试还没有完成,又或者是产品调整,取消了该分支功能的上线计划,我们在release前不合并该分支即可,然而如果该分支中的 ...
- 分布式ID生成方案汇总
1.目标 1.1.全局唯一 不能出现重复的ID,全局唯一是最基本的要求. 1.2.趋势有序 业务上分页查询需求,排序需求,如果ID直接有序,则不必建立更多的索引,增加查询条件. 而且Mysql Inn ...
- Java代理之静态代理
什么是代理 代理就是给目标对象一个代理对象,并由代理对象控制目标的引用. 为什么要使用代理模式 1.通过引入代理对象的方式,可以间接的访问目标对象,避免直接访问目标对象给系统带来不必要的复杂性. 2. ...