【水滴石穿】React-Redux-Demo
这个项目没有使用什么组件,可以理解就是个redux项目
项目地址为:https://github.com/HuPingKang/React-Redux-Demo
先看效果图
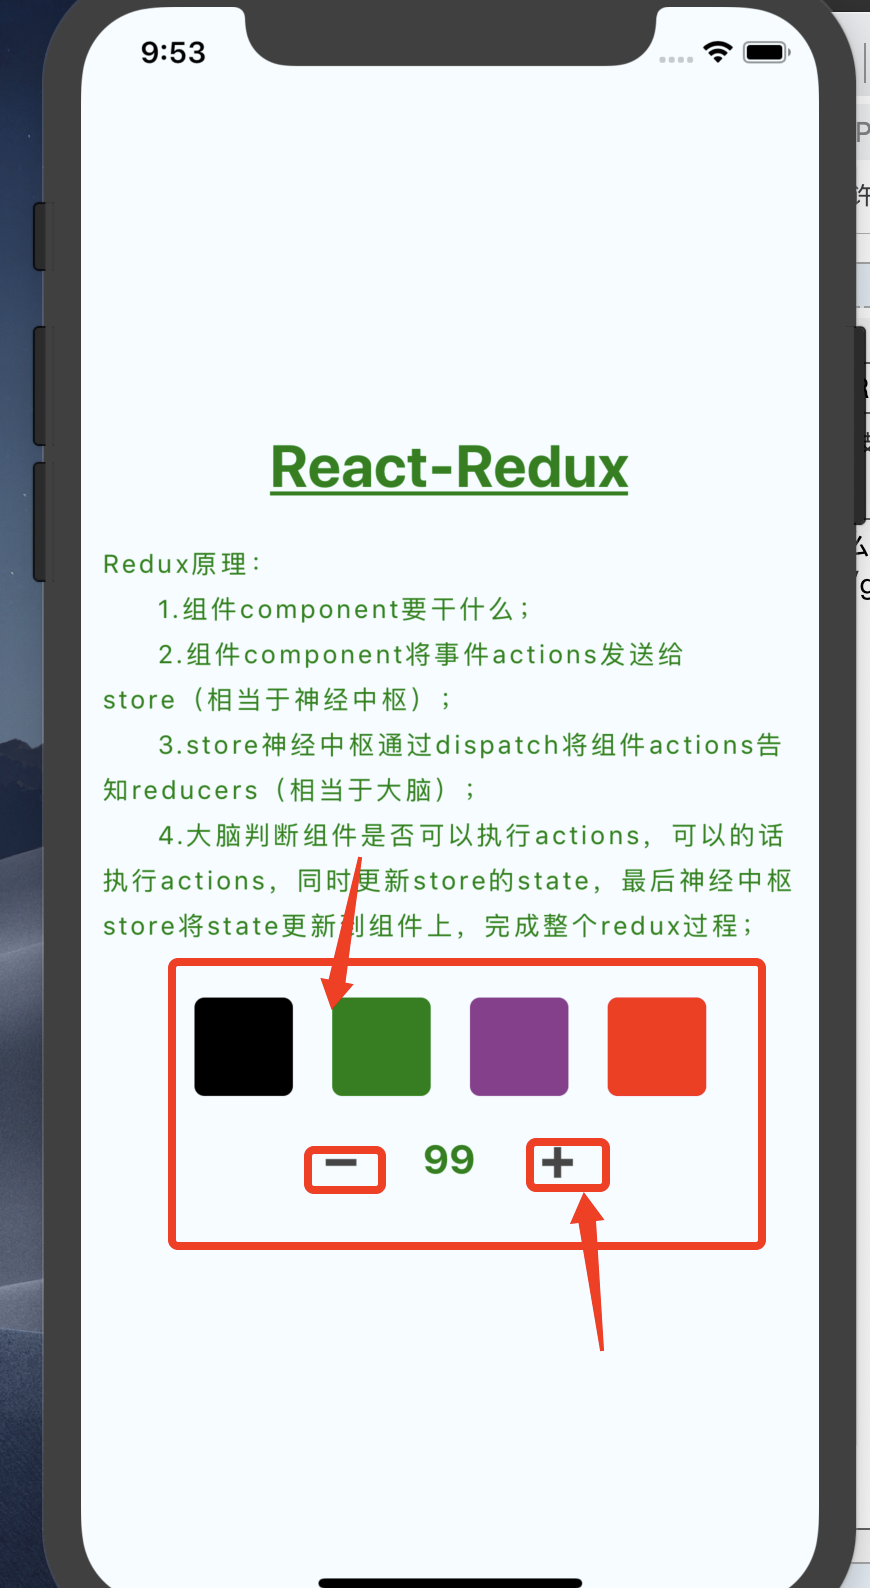
点击颜色字体颜色改变,以及可以进行加减法运算
代码如下
//index.js

/**

 * @format

 * @lint-ignore-every XPLATJSCOPYRIGHT1

 */

import {AppRegistry} from 'react-native';

import App from './App';

import {name as appName} from './app.json';

AppRegistry.registerComponent(appName, () => App);
//React-Redux-Demo/App.js

import { Provider } from 'react-redux';

import React, {Component} from 'react';

import {StyleSheet, Text, View,Button,TouchableWithoutFeedback} from 'react-native';

import configureStore from './redux/store';

const store = configureStore();

/**

 * Redux原理:

 *    1.组件component要干什么;

 *    2.组件component将事件actions发送给store(相当于神经中枢);

 *    3.store神经中枢通过dispatch讲组件actions告知reducers(相当于大脑);

 *    4.大脑判断组件是否可以执行actions,可以的话执行actions,同时更新store的

 *      state,最后神经中枢store将state更新到组件上,完成整个redux过程;

 *

 *    ex:耳朵想听歌,耳朵通过神经中枢将想听歌这件事告知大脑皮层,大脑发送指令开始拿起耳机播放音乐;

 *

 *    综上:完成一个Redux流程需要三个角色(组件component、神经中枢store、大脑reducer);

 *      component___actions___>store___dispatch___>reducer___state___>store___state;

 *

 */

 var number = 100;

export default class App extends Component{

  constructor(props){

      super(props);

      //生命周期函数中,从store中获得state作为当前的state;

      this.state = store.getState();

      //当前界面绑定store更新事件;

      store.subscribe(()=>this._storeChanged());

      this._selectColorIndex = this._selectColorIndex.bind(this._selectColorIndex);

  }

  //监听store是否更新了;

  _storeChanged(){

    //store更新后 重新获取store的state作为当前的state;当前界面上的组件就会被刷新;

    this.setState(store.getState());

  }

  //组件发送事件给store;

  _clickAdd(){

    number = number+1;

    const action = {

      //每个action绑定一个type;

          type:'change_number_add',

          //需要更新store中的相关数据;

          value:number

    };

    //store将事件派发给reducer;

    store.dispatch(action);

  }

  _clickPlus(){

    number = number-1;

    const action = {

          type:'change_number_plus',

          value:number

    };

    store.dispatch(action);

  }

  _selectColorIndex(index){

    const colors = ['black','green','#8E388E','red'];

    const action={

        type:'change_theme_color',

        value:colors[index],

    };

    store.dispatch(action);

  }

   _colorViews(){

    var colorViews = [];

    var styleYS = [styles.blackContainer,styles.greenContainer,styles.purpureContainer,styles.redContainer];

    styleYS.map((item)=>{

      colorViews.push(

        <TouchableWithoutFeedback key={styleYS.indexOf(item)} onPress={()=>this._selectColorIndex(styleYS.indexOf(item))}>

          <View style={item}></View>

        </TouchableWithoutFeedback>

      );

    });

    return colorViews;

  }

  render() {

    const desString = 'Redux原理:\n\t1.组件component要干什么;\n\t2.组件component将事件actions发送给store(相当于神经中枢);\n\t3.store神经中枢通过dispatch将组件actions告知reducers(相当于大脑);\n\t4.大脑判断组件是否可以执行actions,可以的话执行actions,同时更新store的state,最后神经中枢store将state更新到组件上,完成整个redux过程;';

    return (

      <Provider store={store}>

        <View style={styles.container}>

          <Text style={{

            fontSize: 30,textAlign: 'center',margin: 10,color:this.state.theme.themeColor,fontWeight:"bold",textDecorationLine:'underline'

          }}>React-Redux</Text>

          <Text style={{

            fontSize: 13,textAlign: 'left',margin: 10,color:this.state.theme.themeColor,lineHeight:23,letterSpacing:1.5

          }}>{desString}</Text>

          <View style={{justifyContent:"center",flexDirection:'row',marginTop:5}}>

            {this._colorViews()}

          </View>

          <View style={{justifyContent:"center",flexDirection:'row',marginTop:5}}>

              <Button onPress={()=>this._clickPlus()} title='➖'></Button>

              {/* 读取当前state的number值 */}

              <Text style={{

                fontSize: 20,textAlign: 'center',margin: 5,color:this.state.theme.themeColor,fontWeight:"bold",width:60

              }}>{this.state.number.number}</Text>

              <Button onPress={()=>this._clickAdd()} title="➕"></Button>

          </View>

        </View>

      </Provider>

    );

  }

}

const styles = StyleSheet.create({

  container: {

    flex: 1,

    justifyContent: 'center',

    alignItems: 'center',

    backgroundColor: '#F5FCFF',

  },

  blackContainer: {

    width:50,

    height:50,

    borderRadius:5,

    backgroundColor:'black',

    margin:10,

  },

  greenContainer: {

    width:50,

    height:50,

    borderRadius:5,

    backgroundColor:'green',

    margin:10,

  },

  purpureContainer: {

    width:50,

    height:50,

    borderRadius:5,

    backgroundColor:'#8E388E',

    margin:10,

  },

  redContainer: {

    width:50,

    height:50,

    borderRadius:5,

    backgroundColor:'red',

    margin:10,

  }

});
redux里面的东西比较有意思

//React-Redux-Demo/redux/CounterReducer.js

const defaluteState = {

    number:100,

}

//redux接受store.dispatch事件;state为store中保存的所有state;

export default function numbers(state=defaluteState,actions){

    //reducer判断事件类型;

    if(actions.type==='change_number_plus' || actions.type==='change_number_add'){

        //深拷贝store的state;

        const newState = JSON.parse(JSON.stringify(state));

        //设置新的state的属性值;

        newState.number = actions.value;

        //将新的state作为返回值,返回给store,作为store的新的state,完成store的更新;

        return newState;

    }

    //返回store默认的state;

    return state;

}
//React-Redux-Demo/redux/IndexReducer.js

import { combineReducers } from 'redux'

import numbers from './CounterReducer'

import themeColor from './ThemeReducer'

export default combineReducers({

    number:numbers, //store.getState().number.number

    theme:themeColor //store.getState().theme.themeColor

})
//React-Redux-Demo/redux/store.js

'use strict';

import { createStore, applyMiddleware } from 'redux';

import thunkMiddleware from 'redux-thunk';

import reducer from './IndexReducer';

const createStoreWithMiddleware = applyMiddleware(thunkMiddleware)(createStore);

export default function configureStore(initialState) {

  const store = createStoreWithMiddleware(reducer, initialState)

  return store;

}
//这个有意思

//React-Redux-Demo/redux/ThemeReducer.js

const defaluteState = {

    themeColor:'black',

}

//redux接受store.dispatch事件;state为store中保存的所有state;

export default function themeColor(state=defaluteState,actions){

    if(actions.type==='change_theme_color'){

        //深拷贝store的state;

        const newState = JSON.parse(JSON.stringify(state));

        //设置新的state的属性值;

        newState.themeColor = actions.value;

        return newState;

    }

    //返回store默认的state;

    return state;

}
//app.js里面对颜色还是做了限制的

_selectColorIndex(index){

    const colors = ['black','green','#8E388E','red'];

    const action={

        type:'change_theme_color',

        value:colors[index],

    };

    store.dispatch(action);

  }

   _colorViews(){

    var colorViews = [];

    var styleYS = [styles.blackContainer,styles.greenContainer,styles.purpureContainer,styles.redContainer];

    styleYS.map((item)=>{

      colorViews.push(

        <TouchableWithoutFeedback key={styleYS.indexOf(item)} onPress={()=>this._selectColorIndex(styleYS.indexOf(item))}>

          <View style={item}></View>

        </TouchableWithoutFeedback>

      );

    });

    return colorViews;

  }
项目还不是很精通的读懂啊~~~
【水滴石穿】React-Redux-Demo的更多相关文章
- 我的第一个 react redux demo
最近学习react redux,先前看过了几本书和一些博客之类的,感觉还不错,比如<深入浅出react和redux>,<React全栈++Redux+Flux+webpack+Bab ...
- angular开发者吐槽react+redux的复杂:“一个demo证明你的开发效率低下”
曾经看到一篇文章,写的是jquery开发者吐槽angular的复杂.作为一个angular开发者,我来吐槽一下react+redux的复杂. 例子 为了让大家看得舒服,我用最简单的一个demo来展示r ...
- webpack+react+redux+es6开发模式
一.预备知识 node, npm, react, redux, es6, webpack 二.学习资源 ECMAScript 6入门 React和Redux的连接react-redux Redux 入 ...
- webpack+react+redux+es6
一.预备知识 node, npm, react, redux, es6, webpack 二.学习资源 ECMAScript 6入门 React和Redux的连接react-redux Redux 入 ...
- webpack+react+redux+es6开发模式---续
一.前言 之前介绍了webpack+react+redux+es6开发模式 ,这个项目对于一个独立的功能节点来说是没有问题的.假如伴随着源源不断的需求,前段项目会涌现出更多的功能节点,需要独立部署运行 ...
- react+redux构建淘票票首页
react+redux构建淘票票首页 描述 在之前的项目中都是单纯的用react,并没有结合redux.对于中小项目仅仅使用react是可以的:但当项目变得更加复杂,仅仅使用react是远远不够的,我 ...
- ReactJS React+Redux+Router+antDesign通用高效率开发模板,夜间模式为例
工作比较忙,一直没有时间总结下最近学习的一些东西,为了方便前端开发,我使用React+Redux+Router+antDesign总结了一个通用的模板,这个技术栈在前端开发者中是非常常见的. 总的来说 ...
- react+redux+generation-modation脚手架添加一个todolist
当我遇到问题: 要沉着冷静. 要管理好时间. 别被bug或error搞的不高兴,要高兴,又有煅炼思维的机会了. 要思考这是为什么? 要搞清楚问题的本质. 要探究问题,探究数据的流动. TodoList ...
- 详解react/redux的服务端渲染:页面性能与SEO
亟待解决的疑问 为什么服务端渲染首屏渲染快?(对比客户端首屏渲染) react客户端渲染的一大痛点就是首屏渲染速度慢问题,因为react是一个单页面应用,大多数的资源需要在首次渲染前就加载 ...
- React+Redux实现追书神器网页版
引言 由于现在做的react-native项目没有使用到redux等框架,写了一段时间想深入学习react,有个想法想做个demo练手下,那时候其实还没想好要做哪一个类型的,也看了些动漫的,小说阅读, ...
随机推荐
- Windows API 第19篇 FindFirstVolumeMountPoint FindNextVolumeMountPoint
相关函数:HANDLE FindFirstVolumeMountPoint( ...
- 玩转xargs
xargs命令可以把标准输入数据转换成命令行参数.也可以将单行或多行文本输入转换成其他格式,是构建单行命令的重要组件之一. xargs命令应该紧跟在管道操作符之后,以stdin作为主要的源数据流,使用 ...
- html2canvas JS截图插件
github/download:https://github.com/niklasvh/html2canvas/releases 参考文章:基于html2canvas实现网页保存为图片及图片清晰度优化 ...
- ArcGIS 10.2 for Server 集群部署
ArcGIS 10.2 for Server 具有很灵活的体系结构,而 ArcGIS 10.2 forServer site 可以包含一台或多台安装 GIS Server 的机器,这些参与ArcGI ...
- RxJS 入门指引和初步应用
作者:徐飞链接:https://zhuanlan.zhihu.com/p/25383159来源:知乎著作权归作者所有.商业转载请联系作者获得授权,非商业转载请注明出处. RxJS是一个强大的React ...
- 解读Python中 locals() 和 globals() 内置函数
首先globals() 和 locals() 是作用于作用域下的内置函数,所以我将它们分为作用域类型的内置函数 1.作用域相关: 1)globals() # 返回全局作用域中的所有名字 2)local ...
- Python的格式化输出--制作名片
效果图 代码如下: name = input("Your name:")age = int(input("Your age:"))job = input(&qu ...
- 汇总下几个IP计算/转换的shell小脚本-转
原文:http://blog.chinaunix.net/uid-20788470-id-1841646.html 1. IP转换为整数> vi ip2num.sh#!/bin/bash# ...
- Spring cloud properties与yml配置说明
encrypt说明 名称 默 认 描述 encrypt.fail-on-error true 标记说,如果存在加密或解密错误,进程将失败. encrypt.key 对称密钥.作为一个更强大的替代方案, ...
- JMETER的三个线程组
JMETER的三个线程组 Jmeter有三个线程组分类:Thread Group(线程组).setUp Thread Group.tearDown Thread Group,如下图所示: (1).th ...