cas的单点登录实现
1. 前提条件
环境:jdk1.8、shiro1.4.0及以上版本、项目以 spring+shiro构建
工具:buji-pac4j-3.1.0-jar-with-dependencies.jar以及相关配置文件
从网上下载cas项目源码
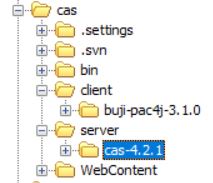
client为客户端代码,server为服务端代码。
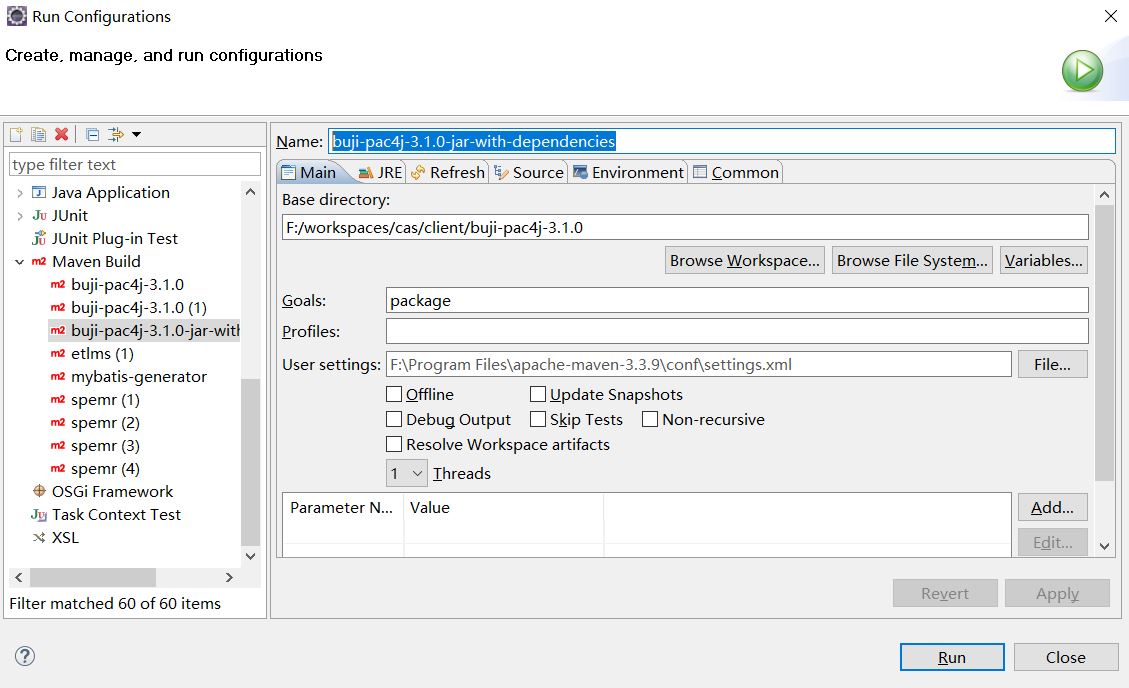
将buji-pac4j-3.1.0导入eclipse,eclipse须装Maven插件,项目右键:
Run As --> Run Configurations
打开弹窗,Name一栏填buji-pac4j-3.1.0-jar-with-dependencies,
Base directory一栏选择buji-pac4j-3.1.0的路径,
Goals一栏填package,点击Run即可生成buji-pac4j-3.1.0-jar-with-dependencies.jar
2. 导入相关文件
在项目的WEB-INF的lib下导入buji-pac4j-3.1.0-jar-with-dependencies.jar.
引入cas.properties(在编译器中请放在resources下,tomcat中放在WEB-INF的class下)。
3. 修改相关联的配置文件。
- 修改web.xml增加context-param
<!--本地登录开关-->
<context-param>
<param-name>pac4jConfigLocation</param-name>
<param-value>classpath:cas.properties</param-value>
</context-param>
- 修改web.xml增加listener
<listener>
<listener-class>io.buji.pac4j.extension.listener.Pac4jServletContextListener</listener-class>
</listener>
放在Spring容器加载之后例如:
<!-- 加载Spring容器配置 -->
<listener>
<listener-class>org.springframework.web.context.ContextLoaderListener</listener-class>
</listener>
<listener>
<listener-class>io.buji.pac4j.extension.listener.Pac4jServletContextListener</listener-class>
</listener>
4 在shiro中追加相关配置
     <!--追加 start-->

<bean id="annotationProxy"

      class="org.springframework.aop.framework.autoproxy.DefaultAdvisorAutoProxyCreator"

      depends-on="lifecycleBeanPostProcessor">

    <property name="proxyTargetClass" value="true" />

</bean>

<bean id="casRealm" class="io.buji.pac4j.extension.realm.SSOCasRealm">

    <property name="cachingEnabled" value="false" />

    <property name="authenticationCachingEnabled" value="false" />

    <property name="authenticationCacheName" value="authenticationCache" />

    <property name="authorizationCachingEnabled" value="false" />

    <property name="authorizationCacheName" value="authorizationCache" />

</bean>

<!--追加 end-->
depends-on 需要Shiro生命周期处理器的id。例如:
<bean id="lifecycleBeanPostProcessor" class="org.apache.shiro.spring.LifecycleBeanPostProcessor"/>
depends-on 需要的这个bean的id。
自定义casRealm实现认证和授权
<bean id="casRealm" class="io.buji.pac4j.extension.realm.SSOCasRealm">
<property name="cachingEnabled"
value="false" />
<property name="authenticationCachingEnabled"
value="false" />
<property name="authenticationCacheName"
value="authenticationCache" />
<property name="authorizationCachingEnabled"
value="false" />
<property name="authorizationCacheName"
value="authorizationCache" />
</bean>
请继承Pac4jRealm,bean的ID不要变例如:
public class Pac4jRealm extends io.buji.pac4j.realm.Pac4jRealm {
@Autowired
private UserService userService;
private String principalNameAttribute;
@Autowired
protected UserRoleService userRoleService;
@Autowired
protected OrganizationRoleService
organizationRoleService;
@Autowired
protected ModuleService moduleService;
@Autowired
protected UserCasService userCasService;
// 是否启用超级管理员
protected boolean activeRoot = true;
public String getPrincipalNameAttribute() {
return this.principalNameAttribute;
}
public void setPrincipalNameAttribute(String
principalNameAttribute) {
this.principalNameAttribute
= principalNameAttribute;
}
@Override
protected AuthenticationInfo
doGetAuthenticationInfo(AuthenticationToken authenticationToken) throws AuthenticationException
{
Pac4jToken token =
(Pac4jToken)authenticationToken;
LinkedHashMap<String, CommonProfile>
profiles = token.getProfiles();
String username =
profiles.get("SSOCasClient").getId();
User user = userService.getByUsername(username);
ShiroUser shiroUser
= new ShiroUser(user.getId(), user.getUsername(), user);
Object credentials
= token.getCredentials();
return new SimpleAuthenticationInfo(shiroUser,credentials,getName());
}
/**
* 授权查询回调函数, 进行鉴权但缓存中无用户的授权信息时调用.
*/
@Override
protected AuthorizationInfo
doGetAuthorizationInfo(PrincipalCollection principals)
{
Collection<?> collection =
principals.fromRealm(getName());
if (Collections3.isEmpty(collection))
{
return null;
}
ShiroUser shiroUser =
(ShiroUser)collection.iterator().next();
/* SimplePrincipalCollection
collection =(SimplePrincipalCollection) principals.getPrimaryPrincipal();
String userName =(String)
collection.getPrimaryPrincipal();
User user =
userService.getByUsername(userName);*/
List<UserRole>
userRoles = userRoleService.find(shiroUser.getId());
List<OrganizationRole>
organizationRoles =
organizationRoleService.find(shiroUser.getUser().getOrganization().getId());
//ShiroUser shiroUser
= new ShiroUser(user.getId(), user.getUsername(), user);
SimpleAuthorizationInfo
info = new SimpleAuthorizationInfo();
info.addStringPermissions(makePermissions(userRoles, organizationRoles, shiroUser));
return info;
}
private Collection<String>
makePermissions(List<UserRole> userRoles, List<OrganizationRole>
organizationRoles,
ShiroUser shiroUser)
{
// 是否启用超级管理员
if (activeRoot)
{
// 为超级管理员,构造所有权限
if (userCasService.isSupervisor(shiroUser.getId()))
{
Collection<String>
stringPermissions = Sets.newHashSet();
List<Module>
modules = moduleService.findAll();
for (Module module :
modules)
{
List<Permission> permissions = module.getPermissions();
// 默认构造CRUD权限
stringPermissions.add(module.getSn()
+ ":" + Permission.PERMISSION_CREATE);
stringPermissions.add(module.getSn()
+ ":" + Permission.PERMISSION_READ);
stringPermissions.add(module.getSn()
+ ":" + Permission.PERMISSION_UPDATE);
stringPermissions.add(module.getSn()
+ ":" + Permission.PERMISSION_DELETE);
for (Permission
permission : permissions)
{
stringPermissions.add(module.getSn() + ":" +
permission.getShortName());
}
}
//log.info("使用了超级管理员:" + shiroUser.getLoginName() + "登录了系统。At " + new Date());
//log.info(shiroUser.getLoginName() + "拥有的权限:" + stringPermissions);
return stringPermissions;
}
}
Set<Role> roles = Sets.newHashSet();
for (UserRole userRole
: userRoles)
{
roles.add(userRole.getRole());
}
for (OrganizationRole
organizationRole : organizationRoles)
{
roles.add(organizationRole.getRole());
}
Collection<String>
stringPermissions = Sets.newHashSet();
for (Role role : roles)
{
List<RolePermission>
rolePermissions = role.getRolePermissions();
for (RolePermission
rolePermission : rolePermissions)
{
Permission permission =
rolePermission.getPermission();
stringPermissions.add(permission.getModule().getSn()
+ ":" + permission.getShortName());
}
}
// log.info(shiroUser.getLoginName() + "拥有的权限:" + stringPermissions);
return stringPermissions;
}
}
可以直接仿造自己项目中的realm写,不一定要按照以上的Demo写。
5 修改cas.properties
##cas服务前缀
sso.cas.server.prefixUrl=http://127.0.0.1:8081/cas
##cas服务登录url
sso.cas.server.loginUrl=http://127.0.0.1:8081/cas/login
##cas客户端回调地址
sso.cas.client.callbackUrl=http://127.0.0.1:8080/dts/callback?client_name=SSOCasClient
##cas服务端成功跳转地址
sso.cas.client.successUrl=http://127.0.0.1:8080/dts/index
##cas登出地址
sso.cas.client.logoutUrl=http://127.0.0.1:8081/cas/logout
##本地登录地址
sso.cas.client.nativeLoginUrl=http://127.0.0.1:8080/dts/login
##securityManagerId
securityManagerId=securityManager
##shiro配置filterChainDefinitions中定义的logout
logoutUrl=/logout
##shiro配置filterChainDefinitions中的最后一个匿名访问地址
lastAnonUrl =/zui*/**
##shiro配置的org.apache.shiro.spring.web.ShiroFilterFactoryBean的id
originFilter=shiroFilter
##pac4j配置的org.apache.shiro.spring.web.ShiroFilterFactoryBean的id
ssoFilter=myfilter
##是否启用开关
#1只能单点登录 0全开启 -1 只能本地登录
loadFlag =1
这个Demo使用的cas服务端的登录地址为:http://127.0.0.1:8081/cas/login
以上属性名不要改变,只配置属性值,ssoFilter这个属性不用配置
6 服务端打war包及部署。
在IDEA里导入服务端项目cas\server\cas-4.2.1,
用Gradle插件刷新显示所有子项目,找到cas-server-webapp,
点开cas-server-webapp --> Tasks --> build,先点击clean再点击war,
等待运行结束,在cas-server-webapp项目下build下libs里生成了war包。
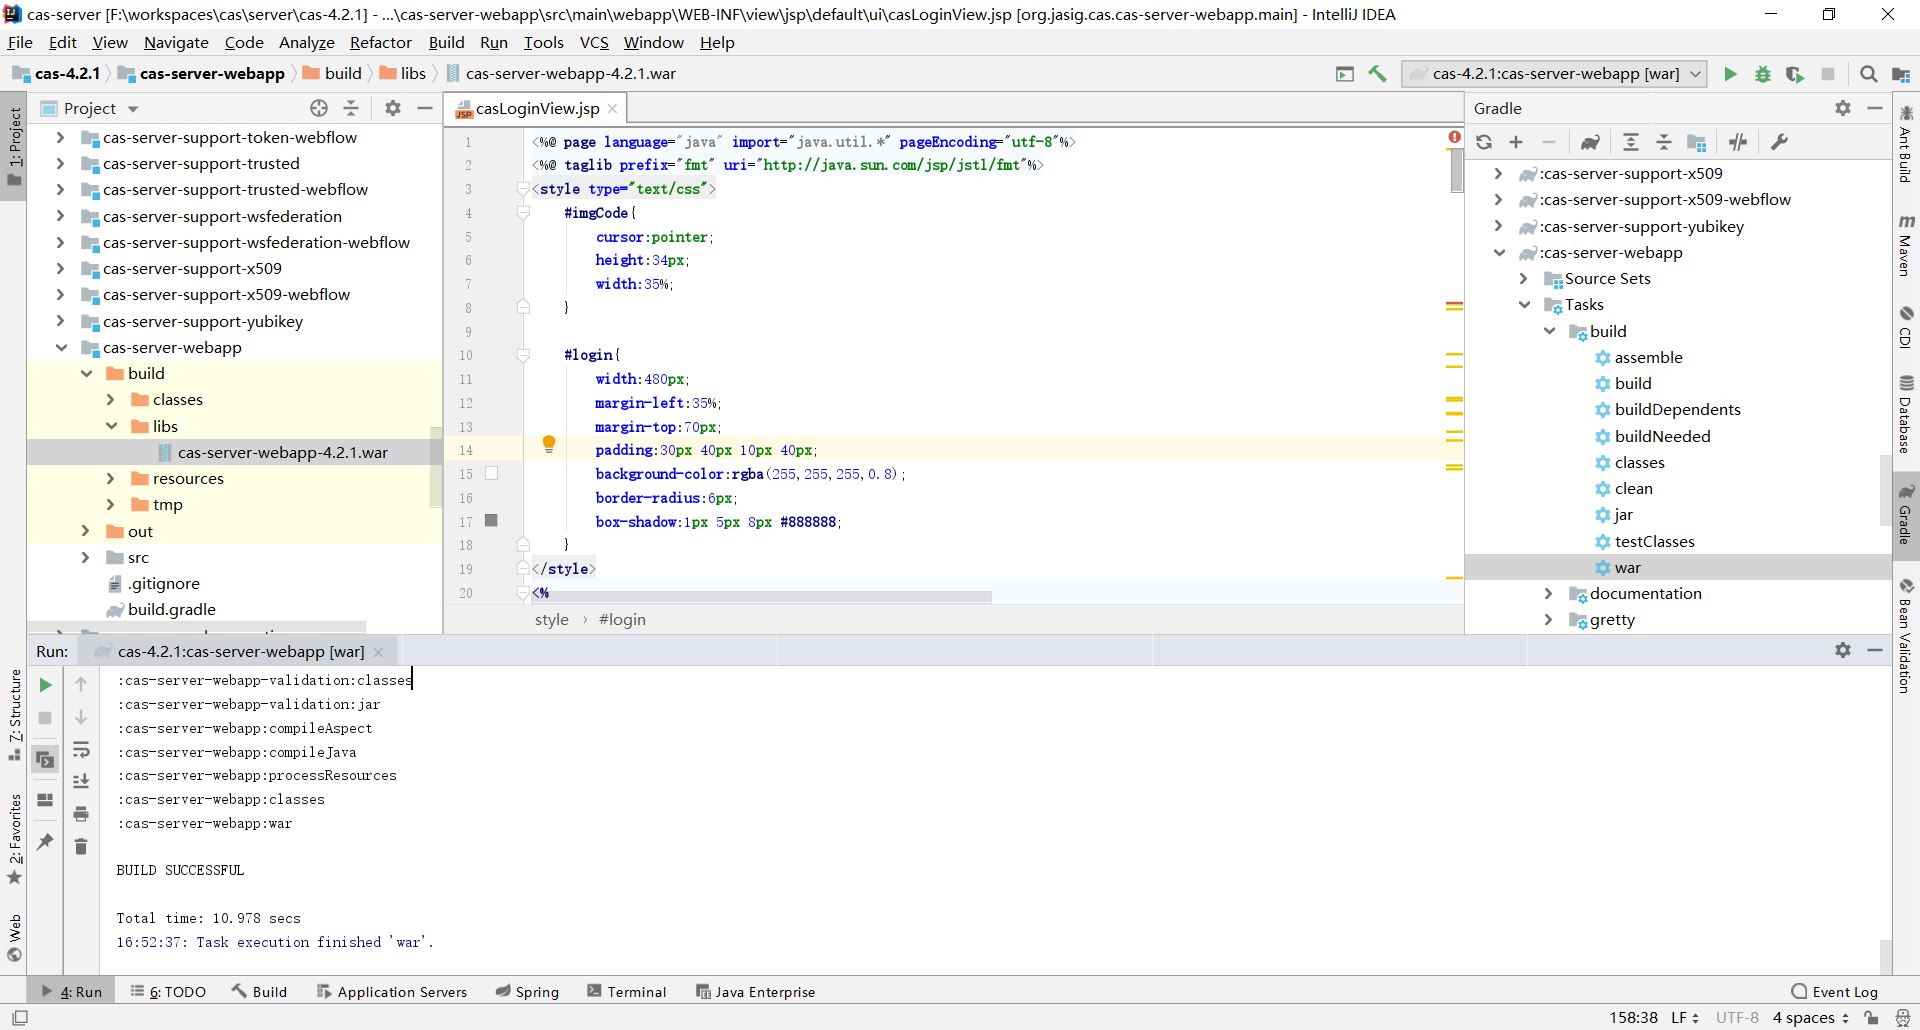
将war包部署至服务器,访问该项目即可。
7 常见问题解决。
1.项目部署之后, One or more listeners failed to start. Full details will be found
in the appropriate container log file。
这个问题一般来是jar包冲突或版本不对。常见的就是Shiro的jar包版本过低。请升级到1.4或以上版本。还有一种情况,guava版本不同,可以尝试下,删除buji-pac4j-3.1.0-jar-with-dependencies.jar中的com文件夹。(删除前请备份。)
cas的单点登录实现的更多相关文章
- 如何利用tomcat和cas实现单点登录(1):配置tomcat的ssl和部署cas
如何利用tomcat和cas实现单点登录,借鉴了网上的很多教程,主要分为以下几个步骤: 一:下载好cas,tomcat之后,首先配置tomcat: 用鼠标右键点击"计算机"→选择& ...
- CAS实现单点登录流程
CAS实现单点登录 环境 客户端: www.app1.com CAS服务器: www.cas-server.com 1.浏览器:发起请求 www.app1.com 2. 客户端:Authenticat ...
- CAS实现单点登录SSO执行原理及部署
一.不落俗套的开始 1.背景介绍 单点登录:Single Sign On,简称SSO,SSO使得在多个应用系统中,用户只需要登录一次就可以访问所有相互信任的应用系统. CAS框架:CAS(Centra ...
- [精华][推荐]CAS SSO 单点登录框架学习 环境搭建
1.了解单点登录 SSO 主要特点是: SSO 应用之间使用 Web 协议(如 HTTPS) ,并且只有一个登录入口. SSO 的体系中有下面三种角色: 1) User(多个) 2) Web 应用( ...
- CAS SSO单点登录框架学习
1.了解单点登录 SSO 主要特点是: SSO 应用之间使用 Web 协议(如 HTTPS) ,并且只有一个登录入口. SSO 的体系中有下面三种角色: 1) User(多个) 2) Web 应用( ...
- [精华][推荐]CAS SSO单点登录服务端客户端实例
1.修改server.xml文件,如下: 注意: 这里使用的是https的认证方式,需要将这个配置放开,并做如下修改: <Connector port="8443" prot ...
- CAS的单点登录和oauth2的最大区别
CAS的单点登录时保障客户端的用户资源的安全 oauth2则是保障服务端的用户资源的安全 CAS客户端要获取的最终信息是,这个用户到底有没有权限访问我(CAS客户端)的资源. oauth2获取的最终信 ...
- Spring Security 集成CAS实现单点登录
参考:http://elim.iteye.com/blog/2270446 众所周知,Cas是对单点登录的一种实现.本文假设读者已经了解了Cas的原理及其使用,这些内容在本文将不会讨论.Cas有Ser ...
- CAS SSO单点登录框架介绍
1.了解单点登录 SSO 主要特点是: SSO 应用之间使用 Web 协议(如 HTTPS) ,并且只有一个登录入口. SSO 的体系中有下面三种角色: 1) User(多个) 2) Web 应用( ...
- 基于CAS的单点登录实战(2)-- 搭建cas的php客户端
在这之前已经搭好了CAS服务端 基于CAS的单点登录实战(1)-- 搭建cas服务器 PHP-Client php-Client是官方支持的,去官网下个最新版就好了.phpCAS 接入很简单,解压放到 ...
随机推荐
- (转)Hadoop Combiner
转自:http://blog.csdn.net/jokes000/article/details/7072963 众所周知,Hadoop框架使用Mapper将数据处理成一个<key,value& ...
- LoadRunner使用记录
基本术语 性能测试--通过自动化的测试工具模拟多种正常.峰值以及异常负载条件来对系统的各项性能指标进行测试. 负载测试和压力测试都属于性能测试,两者可以结合进行. 负载测试,确定在各种工作负载下系统的 ...
- python3练习100题——006
继续做题-经过py3测试 原题链接:http://www.runoob.com/python/python-exercise-example6.html 题目:斐波那契数列. 我的代码: def fi ...
- 基于pyqt5的图片素材批量处理工具
功能 分辨率的批量转换,文件夹递归查找 像素偏移量批量调整,文件夹单层查找 画布的大小的批量进行调整,不进行缩放,文件夹单层查找 界面 通过PyUIC生成的代码 # -*- coding: utf-8 ...
- 命令行(一):Git
1,使用gitbash进行操作 2,初始化一个Git仓库,使用git init命令. 3,添加文件到Git仓库,分两步:使用命令git add <filename>可反复多次使用,添加多个 ...
- 【转】git rebase详解
git合并代码方式主要有两种方式,分别为:1.merge处理,这是大家比较能理解的方式.2.rebase处理,中文此处翻译为衍合过程. git rebase操作讲解例子: cd /usr/local/ ...
- 题解【洛谷P5315】头像上传
本题就是按照题目模拟, 只是要注意一些细节问题. Wrong Answer的主要有以下2个问题: 注意这句话: 在图片上传前,系统会对图片进行如下处理:如果图片的任何一边长度超过了 G ,那么系统会不 ...
- sourcetree(mac)设置代理
Mercurial: edit ~/.hgrcas shown here: http://www.selenic.com/mercurial/hgrc.5.html#http-proxy Git: e ...
- ASP.NET Core Web API中实现全局异常捕获与处理
处理全局异常 HANDLING ERRORS GLOBALLY 在上面的示例中,我们的 action 内部有一个 try-catch 代码块.这一点很重要,我们需要在我们的 action 方法体中处理 ...
- 使用SqlDataReader的查询操作
原创weixin_42430576 发布于2019-01-31 18:49:41 阅读数 762 收藏 展开 using System; using System.Collections.Gener ...