【Spring-Security】Re13 Oauth2协议P3 整合JWT
视频地址:
https://www.bilibili.com/video/BV12D4y1U7D8?p=44
有用到Redis存储JWT,头疼每次找Windows版的
https://github.com/MicrosoftArchive/redis/releases
20.09.29获取的下载地址:
https://github.com/microsoftarchive/redis/releases/download/win-3.2.100/Redis-x64-3.2.100.msi
1、移除之前工程中的Redis配置:
POM依赖移除
<!--<dependency>-->

<!--    <groupId>org.springframework.boot</groupId>-->

<!--    <artifactId>spring-boot-starter-data-redis</artifactId>-->

<!--</dependency>-->

<!--<dependency>-->

<!--    <groupId>org.apache.commons</groupId>-->

<!--    <artifactId>commons-pool2</artifactId>-->

<!--</dependency>-->
YML配置移除:
spring:

  redis:

    host: localhost
Redis配置类移除:
package cn.zeal4j.configuration;

import org.springframework.beans.factory.annotation.Autowired;

import org.springframework.context.annotation.Bean;

import org.springframework.context.annotation.Configuration;

import org.springframework.data.redis.connection.RedisConnectionFactory;

import org.springframework.security.oauth2.provider.token.TokenStore;

import org.springframework.security.oauth2.provider.token.store.redis.RedisTokenStore;

/**

 * @author Administrator

 * @file Spring-Security + Oauth2

 * @create 2020 09 29 17:16

 */

@Configuration

public class RedisConfiguration {

    @Autowired

    private RedisConnectionFactory redisConnectionFactory;

    @Bean

    public TokenStore getRedisTokenStore() {

        return new RedisTokenStore(redisConnectionFactory);

    }

}
数据源注入和Redis存储移除:
package cn.zeal4j.configuration;

import org.springframework.beans.factory.annotation.Autowired;

import org.springframework.beans.factory.annotation.Qualifier;

import org.springframework.context.annotation.Configuration;

import org.springframework.security.authentication.AuthenticationManager;

import org.springframework.security.core.userdetails.UserDetails;

import org.springframework.security.core.userdetails.UserDetailsService;

import org.springframework.security.crypto.password.PasswordEncoder;

import org.springframework.security.oauth2.config.annotation.configurers.ClientDetailsServiceConfigurer;

import org.springframework.security.oauth2.config.annotation.web.configuration.AuthorizationServerConfigurerAdapter;

import org.springframework.security.oauth2.config.annotation.web.configuration.EnableAuthorizationServer;

import org.springframework.security.oauth2.config.annotation.web.configurers.AuthorizationServerEndpointsConfigurer;

import org.springframework.security.oauth2.provider.token.TokenStore;

/**

 * @author Administrator

 * @file Spring-Security + Oauth2

 * @create 2020 09 29 11:48

 * @description 授权服务器配置

 */

@Configuration

@EnableAuthorizationServer

public class AuthorizationServerConfiguration extends AuthorizationServerConfigurerAdapter {

    @Autowired

    private PasswordEncoder passwordEncoder;

    @Autowired

    private AuthenticationManager authenticationManager;

    @Qualifier("customUserDetailsServiceImpl")

    @Autowired

    private UserDetailsService userDetailsService;

//    @Qualifier("getRedisTokenStore")

//    @Autowired

//    private TokenStore tokenStore;

    /**

     * 使用密码模式需要的配置方法

     * @param endpoints

     * @throws Exception

     */

    @Override

    public void configure(AuthorizationServerEndpointsConfigurer endpoints) throws Exception {

        endpoints.

                authenticationManager(authenticationManager).

                userDetailsService(userDetailsService);

//                tokenStore(tokenStore);

    }

    @Override

    public void configure(ClientDetailsServiceConfigurer clients) throws Exception {

        clients.

                inMemory().

                withClient("admin").

                secret(passwordEncoder.encode("112233")).

                // accessTokenValiditySeconds(3600). // 令牌有效时间 一小时

                redirectUris("http://www.baidu.com"). // 授权成功的跳转

                scopes("all").  // 所有范围

                // authorizedGrantTypes("authorization_code");     // 授权类型:授权码模式

                authorizedGrantTypes("password");     // 授权类型:密码模式

    }

}
2、编写JWT配置:
package cn.zeal4j.configuration;

import org.springframework.context.annotation.Bean;

import org.springframework.context.annotation.Configuration;

import org.springframework.security.oauth2.provider.token.TokenStore;

import org.springframework.security.oauth2.provider.token.store.JwtAccessTokenConverter;

import org.springframework.security.oauth2.provider.token.store.JwtTokenStore;

/**

 * @author Administrator

 * @file IntelliJ IDEA Spring-Security + Oauth2

 * @create 2020 09 29 22:36

 */

@Configuration

public class JwtTokenStoreConfiguration {

    @Bean

    public TokenStore getTokenStore(JwtAccessTokenConverter getJwtAccessTokenConverter) {

        return new JwtTokenStore(getJwtAccessTokenConverter);

    }

    @Bean

    public JwtAccessTokenConverter getJwtAccessTokenConverter() {

        JwtAccessTokenConverter jwtAccessTokenConverter = new JwtAccessTokenConverter();

        jwtAccessTokenConverter.setSigningKey("这不是盐【滑稽】 It's not salt [funny]");

        return jwtAccessTokenConverter;

    }

}
然后更改授权配置类:
package cn.zeal4j.configuration;

import org.springframework.beans.factory.annotation.Autowired;

import org.springframework.beans.factory.annotation.Qualifier;

import org.springframework.context.annotation.Configuration;

import org.springframework.security.authentication.AuthenticationManager;

import org.springframework.security.core.userdetails.UserDetails;

import org.springframework.security.core.userdetails.UserDetailsService;

import org.springframework.security.crypto.password.PasswordEncoder;

import org.springframework.security.oauth2.config.annotation.configurers.ClientDetailsServiceConfigurer;

import org.springframework.security.oauth2.config.annotation.web.configuration.AuthorizationServerConfigurerAdapter;

import org.springframework.security.oauth2.config.annotation.web.configuration.EnableAuthorizationServer;

import org.springframework.security.oauth2.config.annotation.web.configurers.AuthorizationServerEndpointsConfigurer;

import org.springframework.security.oauth2.provider.token.TokenStore;

import org.springframework.security.oauth2.provider.token.store.JwtAccessTokenConverter;

/**

 * @author Administrator

 * @file Spring-Security + Oauth2

 * @create 2020 09 29 11:48

 * @description 授权服务器配置

 */

@Configuration

@EnableAuthorizationServer

public class AuthorizationServerConfiguration extends AuthorizationServerConfigurerAdapter {

    @Autowired

    private PasswordEncoder passwordEncoder;

    @Autowired

    private AuthenticationManager authenticationManager;

    @Qualifier("customUserDetailsServiceImpl")

    @Autowired

    private UserDetailsService userDetailsService;

    @Qualifier("getTokenStore")

    @Autowired

    private TokenStore tokenStore;

    @Qualifier("getJwtAccessTokenConverter")

    @Autowired

    private JwtAccessTokenConverter jwtAccessTokenConverter;

//    @Qualifier("getRedisTokenStore")

//    @Autowired

//    private TokenStore tokenStore;

    /**

     * 使用密码模式需要的配置方法

     * @param endpoints

     * @throws Exception

     */

    @Override

    public void configure(AuthorizationServerEndpointsConfigurer endpoints) throws Exception {

        endpoints.

                authenticationManager(authenticationManager).

                userDetailsService(userDetailsService).accessTokenConverter(jwtAccessTokenConverter);

//                tokenStore(tokenStore);

    }

    @Override

    public void configure(ClientDetailsServiceConfigurer clients) throws Exception {

        clients.

                inMemory().

                withClient("admin").

                secret(passwordEncoder.encode("112233")).

                // accessTokenValiditySeconds(3600). // 令牌有效时间 一小时

                redirectUris("http://www.baidu.com"). // 授权成功的跳转

                scopes("all").  // 所有范围

                // authorizedGrantTypes("authorization_code");     // 授权类型:授权码模式

                authorizedGrantTypes("password");     // 授权类型:密码模式

    }

}
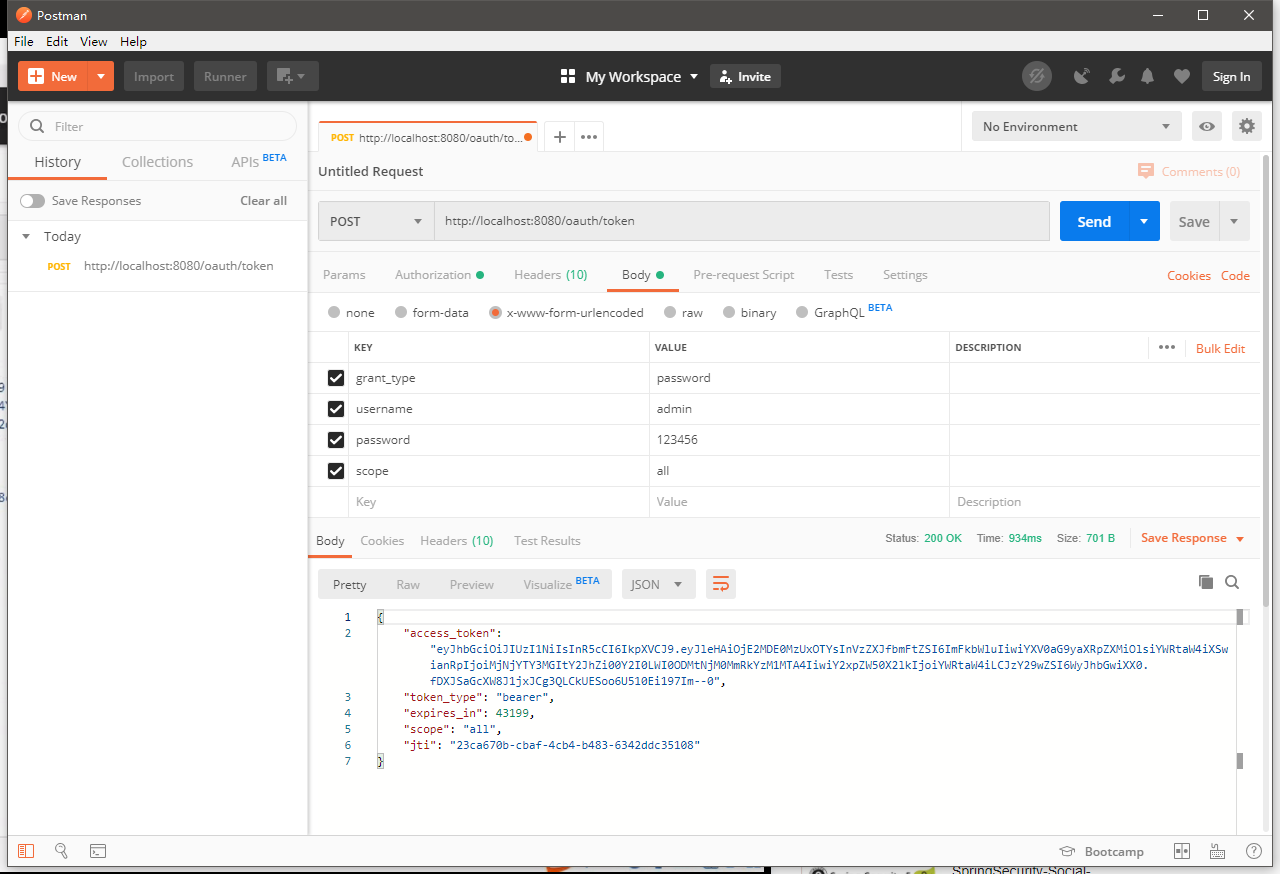
启动工程,Postman测试:
之前的接口的设置都不需要改变,还是之前的密码模式授权,这里就得到了JWT令牌
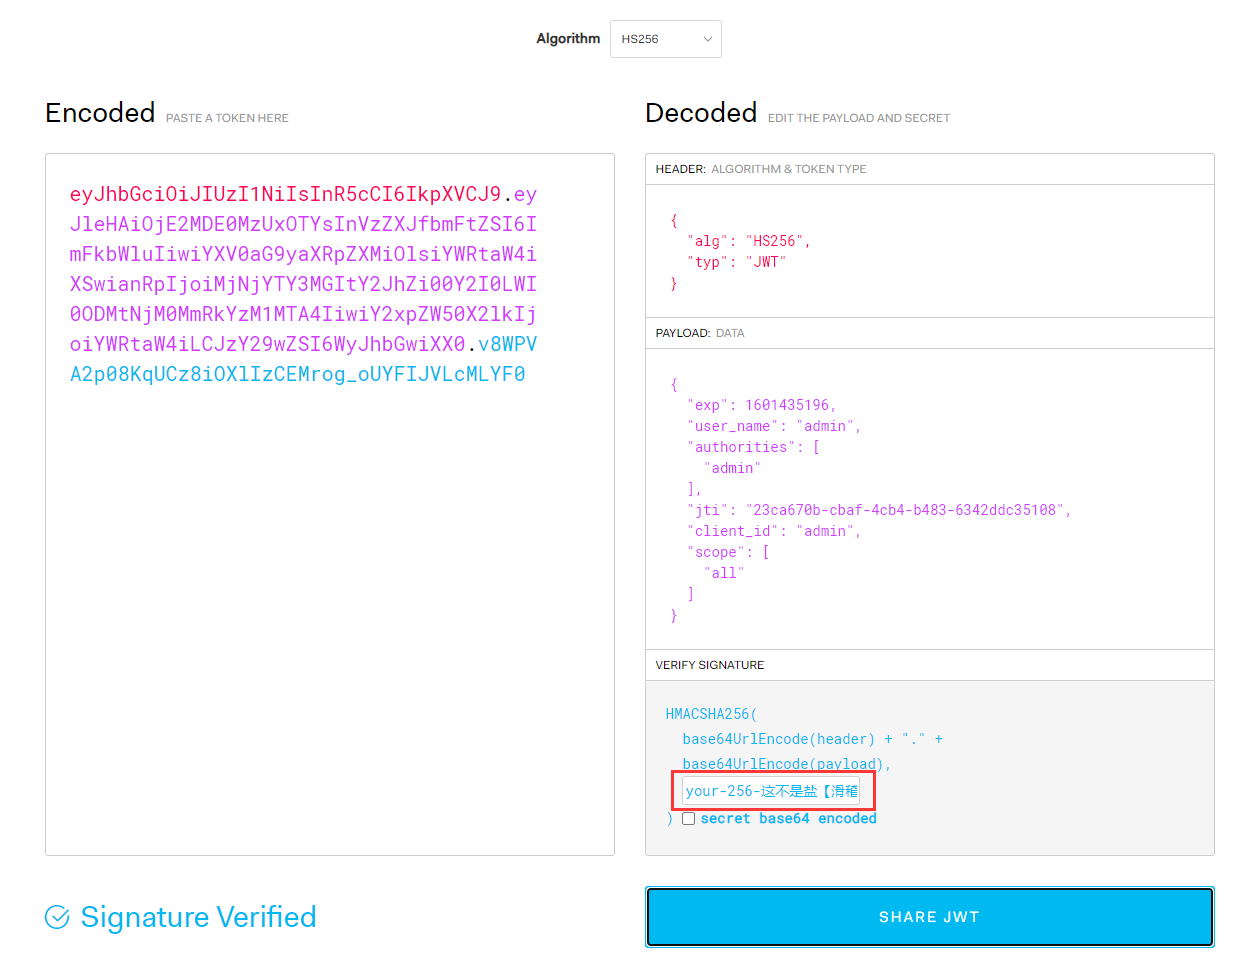
把令牌复制到JWT官网的解析工具进行解析查看:
https://jwt.io/#debugger-io
3、JWT自定义申明内容
package cn.zeal4j.configuration;

import org.springframework.security.oauth2.common.DefaultOAuth2AccessToken;

import org.springframework.security.oauth2.common.OAuth2AccessToken;

import org.springframework.security.oauth2.provider.OAuth2Authentication;

import org.springframework.security.oauth2.provider.token.TokenEnhancer;

import java.util.HashMap;

import java.util.Map;

/**

 * @author Administrator

 * @file IntelliJ IDEA Spring-Security + Oauth2

 * @create 2020 09 29 23:18

 */

public class CustomJwtTokenEnhancer implements TokenEnhancer {

    @Override

    public OAuth2AccessToken enhance(OAuth2AccessToken oAuth2AccessToken, OAuth2Authentication oAuth2Authentication) {

        Map<String, Object> map = new HashMap<String, Object>();

        map.put("jwt-key-aaa", "jwt-value-AAA");

        map.put("jwt-key-bbb", "jwt-value-BBB");

        map.put("jwt-key-ccc", "jwt-value-CCC");

        DefaultOAuth2AccessToken defaultOAuth2AccessToken = (DefaultOAuth2AccessToken)oAuth2AccessToken;

        defaultOAuth2AccessToken.setAdditionalInformation(map);

        return defaultOAuth2AccessToken;

    }

}
注入增强实现类:
package cn.zeal4j.configuration;

import org.springframework.context.annotation.Bean;

import org.springframework.context.annotation.Configuration;

import org.springframework.security.oauth2.provider.token.TokenEnhancer;

import org.springframework.security.oauth2.provider.token.TokenStore;

import org.springframework.security.oauth2.provider.token.store.JwtAccessTokenConverter;

import org.springframework.security.oauth2.provider.token.store.JwtTokenStore;

/**

 * @author Administrator

 * @file IntelliJ IDEA Spring-Security + Oauth2

 * @create 2020 09 29 22:36

 */

@Configuration

public class JwtTokenStoreConfiguration {

    @Bean

    public TokenStore getTokenStore(JwtAccessTokenConverter getJwtAccessTokenConverter) {

        return new JwtTokenStore(getJwtAccessTokenConverter);

    }

    @Bean

    public JwtAccessTokenConverter getJwtAccessTokenConverter() {

        JwtAccessTokenConverter jwtAccessTokenConverter = new JwtAccessTokenConverter();

        jwtAccessTokenConverter.setSigningKey("这不是盐【滑稽】 It's not salt [funny]");

        return jwtAccessTokenConverter;

    }

    @Bean

    public TokenEnhancer getJwtTokenEnhancer() {

        return new CustomJwtTokenEnhancer();

    }

}
注入增强器和配置增强方法:
package cn.zeal4j.configuration;

import org.springframework.beans.factory.annotation.Autowired;

import org.springframework.beans.factory.annotation.Qualifier;

import org.springframework.context.annotation.Configuration;

import org.springframework.security.authentication.AuthenticationManager;

import org.springframework.security.core.userdetails.UserDetails;

import org.springframework.security.core.userdetails.UserDetailsService;

import org.springframework.security.crypto.password.PasswordEncoder;

import org.springframework.security.oauth2.config.annotation.configurers.ClientDetailsServiceConfigurer;

import org.springframework.security.oauth2.config.annotation.web.configuration.AuthorizationServerConfigurerAdapter;

import org.springframework.security.oauth2.config.annotation.web.configuration.EnableAuthorizationServer;

import org.springframework.security.oauth2.config.annotation.web.configurers.AuthorizationServerEndpointsConfigurer;

import org.springframework.security.oauth2.provider.token.TokenEnhancer;

import org.springframework.security.oauth2.provider.token.TokenEnhancerChain;

import org.springframework.security.oauth2.provider.token.TokenStore;

import org.springframework.security.oauth2.provider.token.store.JwtAccessTokenConverter;

import java.util.ArrayList;

import java.util.List;

/**

 * @author Administrator

 * @file Spring-Security + Oauth2

 * @create 2020 09 29 11:48

 * @description 授权服务器配置

 */

@Configuration

@EnableAuthorizationServer

public class AuthorizationServerConfiguration extends AuthorizationServerConfigurerAdapter {

    @Autowired

    private PasswordEncoder passwordEncoder;

    @Autowired

    private AuthenticationManager authenticationManager;

    @Qualifier("customUserDetailsServiceImpl")

    @Autowired

    private UserDetailsService userDetailsService;

    @Qualifier("getTokenStore")

    @Autowired

    private TokenStore tokenStore;

    @Qualifier("getJwtAccessTokenConverter")

    @Autowired

    private JwtAccessTokenConverter jwtAccessTokenConverter;

    @Qualifier("getJwtTokenEnhancer")

    @Autowired

    private TokenEnhancer tokenEnhancer;

//    @Qualifier("getRedisTokenStore")

//    @Autowired

//    private TokenStore tokenStore;

    /**

     * 使用密码模式需要的配置方法

     * @param endpoints

     * @throws Exception

     */

    @Override

    public void configure(AuthorizationServerEndpointsConfigurer endpoints) throws Exception {

        // - - - - - 配置JWT自定义申明增强 Starter - - - - -

        TokenEnhancerChain tokenEnhancerChain = new TokenEnhancerChain();

        List<TokenEnhancer> tokenEnhancerList = new ArrayList<>();

        tokenEnhancerList.add(tokenEnhancer);

        tokenEnhancerList.add(jwtAccessTokenConverter);

        tokenEnhancerChain.setTokenEnhancers(tokenEnhancerList);

        // - - - - - 配置JWT自定义申明增强 End - - - - -

        endpoints.

                authenticationManager(authenticationManager).

                userDetailsService(userDetailsService).

                accessTokenConverter(jwtAccessTokenConverter).

                tokenEnhancer(tokenEnhancerChain);

//                tokenStore(tokenStore);

    }

    @Override

    public void configure(ClientDetailsServiceConfigurer clients) throws Exception {

        clients.

                inMemory().

                withClient("admin").

                secret(passwordEncoder.encode("112233")).

                // accessTokenValiditySeconds(3600). // 令牌有效时间 一小时

                redirectUris("http://www.baidu.com"). // 授权成功的跳转

                scopes("all").  // 所有范围

                // authorizedGrantTypes("authorization_code");     // 授权类型:授权码模式

                authorizedGrantTypes("password");     // 授权类型:密码模式

    }

}
重启项目,进行Postman测试:
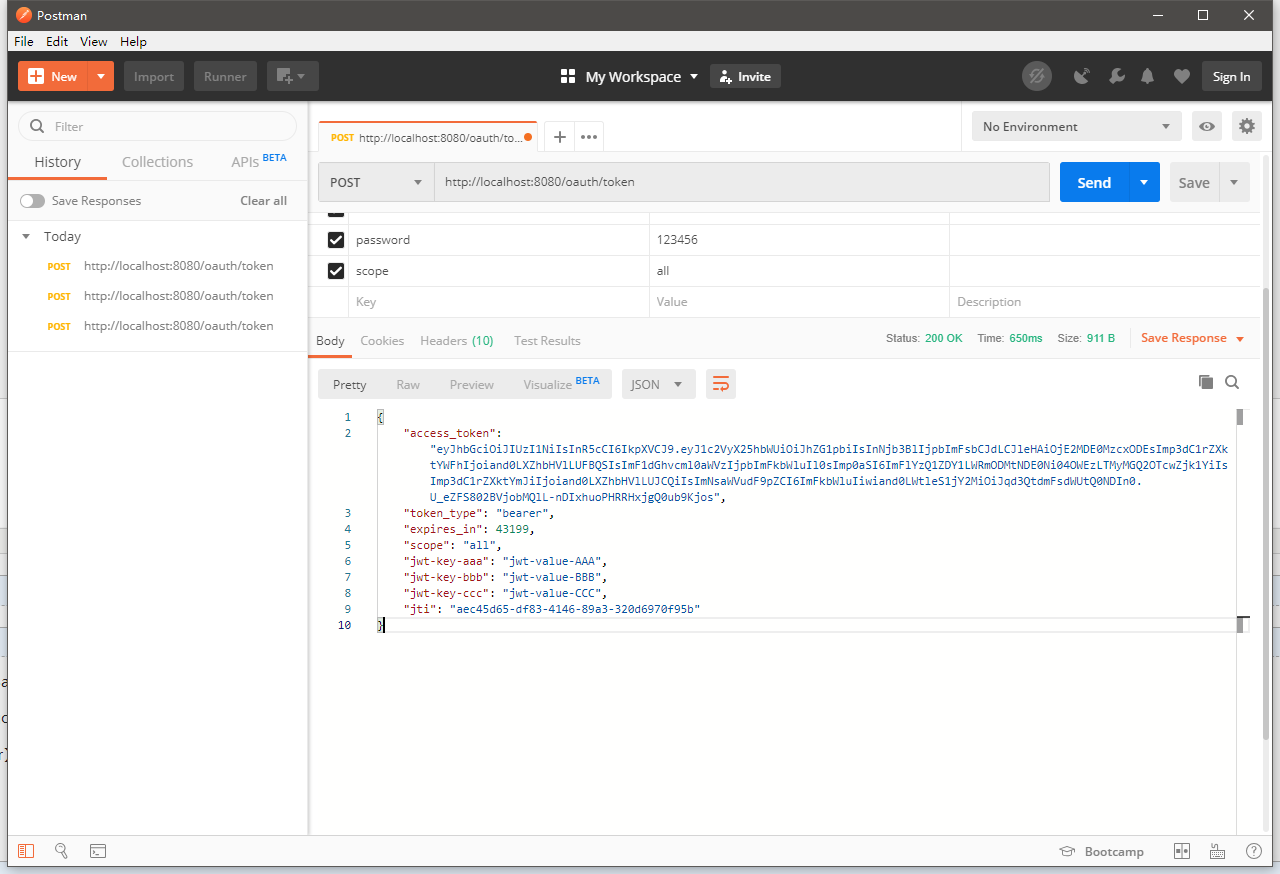
在增强器中设置的申明都在这里传输了:
{

    "access_token": "eyJhbGciOiJIUzI1NiIsInR5cCI6IkpXVCJ9.eyJ1c2VyX25hbWUiOiJhZG1pbiIsInNjb3BlIjpbImFsbCJdLCJleHAiOjE2MDE0MzcxODEsImp3dC1rZXktYWFhIjoiand0LXZhbHVlLUFBQSIsImF1dGhvcml0aWVzIjpbImFkbWluIl0sImp0aSI6ImFlYzQ1ZDY1LWRmODMtNDE0Ni04OWEzLTMyMGQ2OTcwZjk1YiIsImp3dC1rZXktYmJiIjoiand0LXZhbHVlLUJCQiIsImNsaWVudF9pZCI6ImFkbWluIiwiand0LWtleS1jY2MiOiJqd3QtdmFsdWUtQ0NDIn0.U_eZFS802BVjobMQlL-nDIxhuoPHRRHxjgQ0ub9Kjos",

    "token_type": "bearer",

    "expires_in": 43199,

    "scope": "all",

    "jwt-key-aaa": "jwt-value-AAA",

    "jwt-key-bbb": "jwt-value-BBB",

    "jwt-key-ccc": "jwt-value-CCC",

    "jti": "aec45d65-df83-4146-89a3-320d6970f95b"

}
在令牌解析中同样也存入了

4、JWT解析:
加入JWT解析组件:
<dependency>

    <groupId>io.jsonwebtoken</groupId>

    <artifactId>jjwt</artifactId>

    <version>0.9.1</version>

</dependency>
新加一个资源获取的接口:
演示中是对原接口更改,我这里就保留不动了
package cn.zeal4j.controller;

import io.jsonwebtoken.Claims;

import io.jsonwebtoken.Jws;

import io.jsonwebtoken.JwtParser;

import io.jsonwebtoken.Jwts;

import org.springframework.security.core.Authentication;

import org.springframework.stereotype.Controller;

import org.springframework.web.bind.annotation.RequestMapping;

import org.springframework.web.bind.annotation.ResponseBody;

import javax.servlet.http.HttpServletRequest;

import java.nio.charset.StandardCharsets;

/**

 * @author Administrator

 * @file Spring-Security + Oauth2

 * @create 2020 09 29 12:01

 */

@Controller

@RequestMapping("user")

public class UserController {

    /**

     * 获取当前用户

     * @param authentication

     * @return user/getCurrentUser

     */

    @RequestMapping("/getCurrentUser")

    @ResponseBody

    public Object getCurrentUser(Authentication authentication) {

        return authentication.getPrincipal();

    }

    /**

     * 获取当前用户

     * @param authentication

     * @return user/getCurrentUser

     */

    @RequestMapping("/getJwtToken")

    @ResponseBody

    public Object getJwtToken(HttpServletRequest httpServletRequest, Authentication authentication) {

        String authorization = httpServletRequest.getHeader("Authorization");

        String token = authorization.substring(authorization.indexOf("bearer") + 7);

        JwtParser jwtParser = Jwts.parser();

        Jws<Claims> claimsJws = jwtParser.

                setSigningKey("这不是盐【滑稽】 It's not salt [funny]".getBytes(StandardCharsets.UTF_8)).

                parseClaimsJws(token);

        Claims claimsJwsBody = claimsJws.getBody();

        return claimsJwsBody;

    }

}
启动项目:还是一样,第一步Postman获取JWT令牌
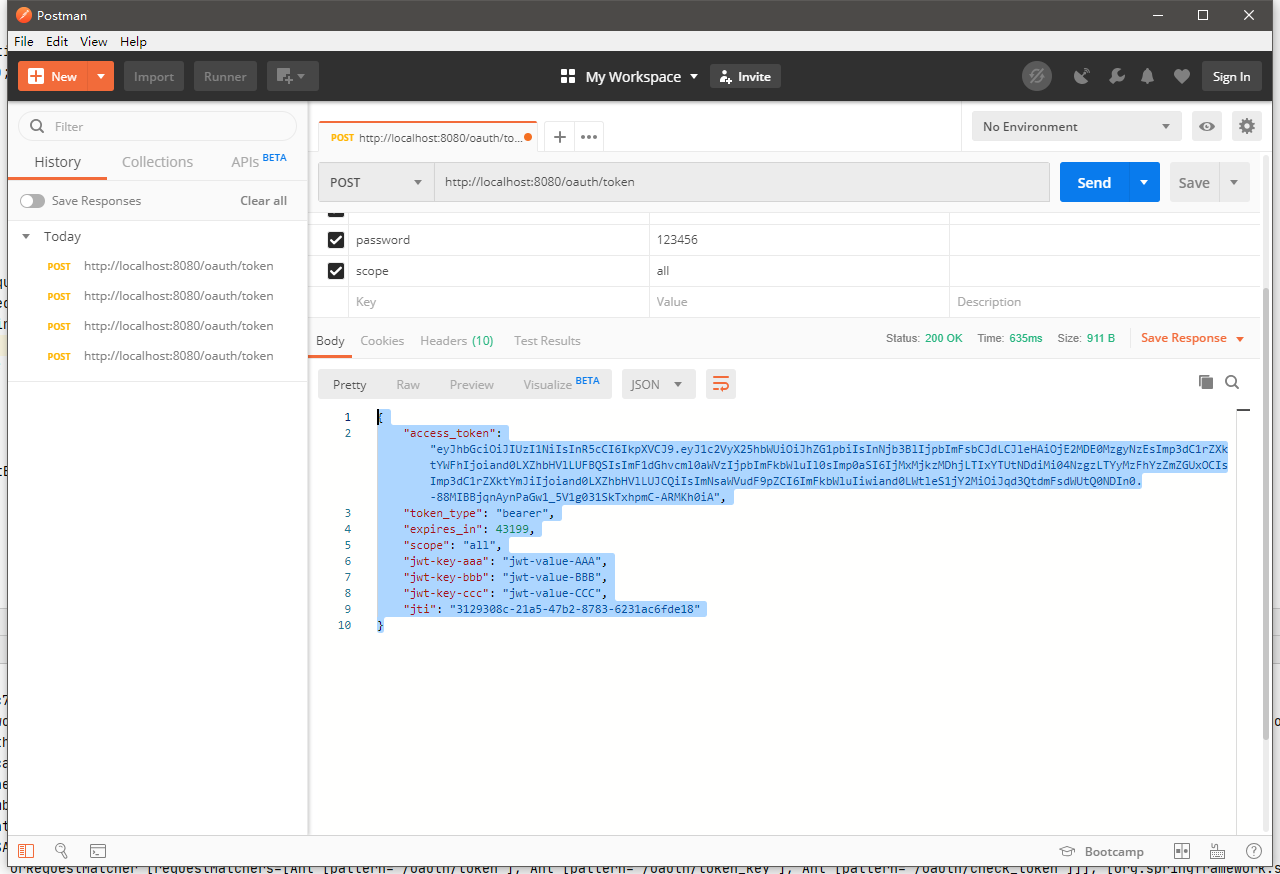
{

    "access_token": "eyJhbGciOiJIUzI1NiIsInR5cCI6IkpXVCJ9.eyJ1c2VyX25hbWUiOiJhZG1pbiIsInNjb3BlIjpbImFsbCJdLCJleHAiOjE2MDE0MzgyNzEsImp3dC1rZXktYWFhIjoiand0LXZhbHVlLUFBQSIsImF1dGhvcml0aWVzIjpbImFkbWluIl0sImp0aSI6IjMxMjkzMDhjLTIxYTUtNDdiMi04NzgzLTYyMzFhYzZmZGUxOCIsImp3dC1rZXktYmJiIjoiand0LXZhbHVlLUJCQiIsImNsaWVudF9pZCI6ImFkbWluIiwiand0LWtleS1jY2MiOiJqd3QtdmFsdWUtQ0NDIn0.-88MIBBjqnAynPaGw1_5V1g031SkTxhpmC-ARMKh0iA",

    "token_type": "bearer",

    "expires_in": 43199,

    "scope": "all",

    "jwt-key-aaa": "jwt-value-AAA",

    "jwt-key-bbb": "jwt-value-BBB",

    "jwt-key-ccc": "jwt-value-CCC",

    "jti": "3129308c-21a5-47b2-8783-6231ac6fde18"

}
然后Postman访问获取接口:
http://localhost:8080/user/getJwtToken
传输的响应头信息:
KEY -> Authorization

VALUE -> bearer eyJhbGciOiJIUzI1NiIsInR5cCI6IkpXVCJ9.eyJ1c2VyX25hbWUiOiJhZG1pbiIsInNjb3BlIjpbImFsbCJdLCJleHAiOjE2MDE0MzgyNzEsImp3dC1rZXktYWFhIjoiand0LXZhbHVlLUFBQSIsImF1dGhvcml0aWVzIjpbImFkbWluIl0sImp0aSI6IjMxMjkzMDhjLTIxYTUtNDdiMi04NzgzLTYyMzFhYzZmZGUxOCIsImp3dC1rZXktYmJiIjoiand0LXZhbHVlLUJCQiIsImNsaWVudF9pZCI6ImFkbWluIiwiand0LWtleS1jY2MiOiJqd3QtdmFsdWUtQ0NDIn0.-88MIBBjqnAynPaGw1_5V1g031SkTxhpmC-ARMKh0iA
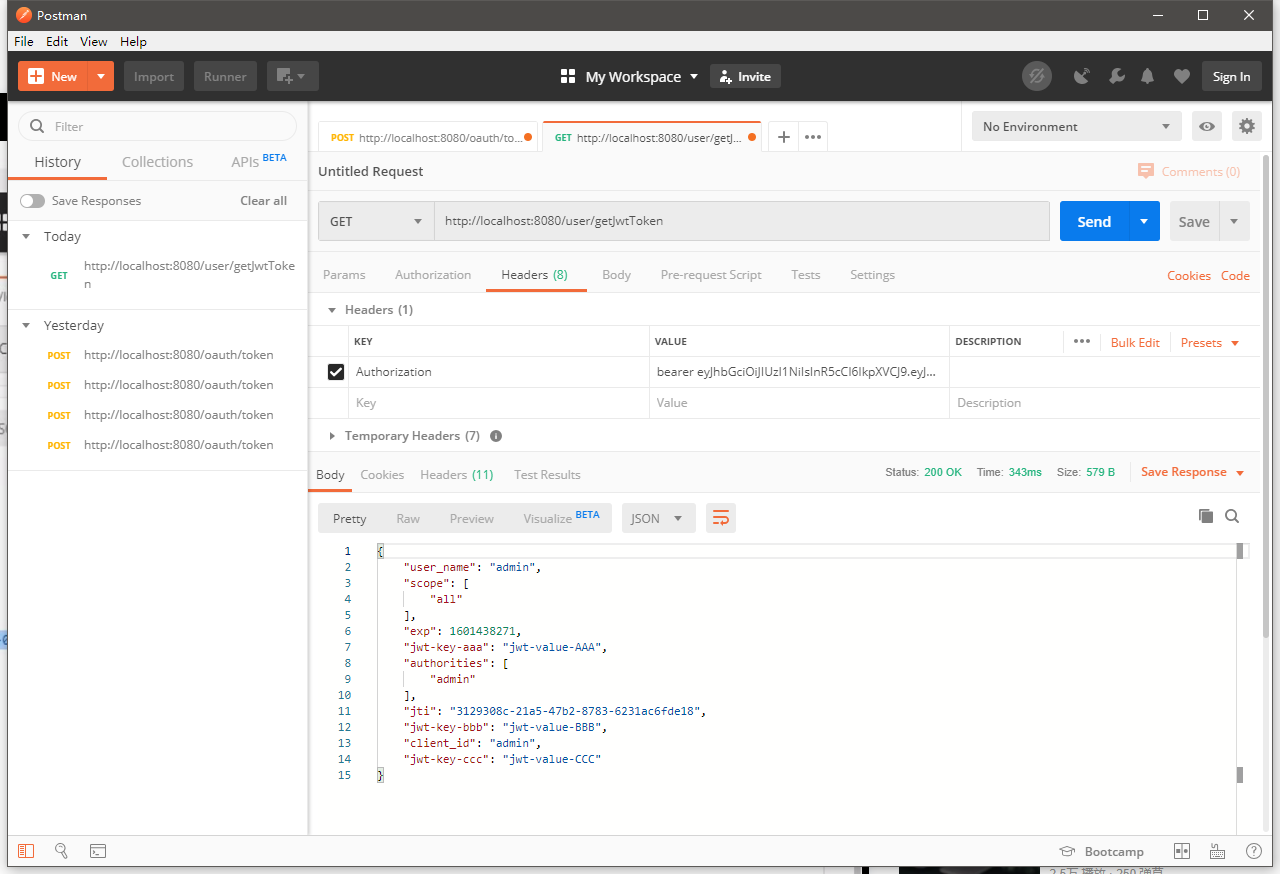
解析出来的JSON数据
{

    "user_name": "admin",

    "scope": [

        "all"

    ],

    "exp": 1601438271,

    "jwt-key-aaa": "jwt-value-AAA",

    "authorities": [

        "admin"

    ],

    "jti": "3129308c-21a5-47b2-8783-6231ac6fde18",

    "jwt-key-bbb": "jwt-value-BBB",

    "client_id": "admin",

    "jwt-key-ccc": "jwt-value-CCC"

}
5、刷新令牌
package cn.zeal4j.configuration;

import org.springframework.beans.factory.annotation.Autowired;

import org.springframework.beans.factory.annotation.Qualifier;

import org.springframework.context.annotation.Configuration;

import org.springframework.security.authentication.AuthenticationManager;

import org.springframework.security.core.userdetails.UserDetails;

import org.springframework.security.core.userdetails.UserDetailsService;

import org.springframework.security.crypto.password.PasswordEncoder;

import org.springframework.security.oauth2.config.annotation.configurers.ClientDetailsServiceConfigurer;

import org.springframework.security.oauth2.config.annotation.web.configuration.AuthorizationServerConfigurerAdapter;

import org.springframework.security.oauth2.config.annotation.web.configuration.EnableAuthorizationServer;

import org.springframework.security.oauth2.config.annotation.web.configurers.AuthorizationServerEndpointsConfigurer;

import org.springframework.security.oauth2.provider.token.TokenEnhancer;

import org.springframework.security.oauth2.provider.token.TokenEnhancerChain;

import org.springframework.security.oauth2.provider.token.TokenStore;

import org.springframework.security.oauth2.provider.token.store.JwtAccessTokenConverter;

import java.util.ArrayList;

import java.util.List;

/**

 * @author Administrator

 * @file Spring-Security + Oauth2

 * @create 2020 09 29 11:48

 * @description 授权服务器配置

 */

@Configuration

@EnableAuthorizationServer

public class AuthorizationServerConfiguration extends AuthorizationServerConfigurerAdapter {

    @Autowired

    private PasswordEncoder passwordEncoder;

    @Autowired

    private AuthenticationManager authenticationManager;

    @Qualifier("customUserDetailsServiceImpl")

    @Autowired

    private UserDetailsService userDetailsService;

    @Qualifier("getTokenStore")

    @Autowired

    private TokenStore tokenStore;

    @Qualifier("getJwtAccessTokenConverter")

    @Autowired

    private JwtAccessTokenConverter jwtAccessTokenConverter;

    @Qualifier("getJwtTokenEnhancer")

    @Autowired

    private TokenEnhancer tokenEnhancer;

//    @Qualifier("getRedisTokenStore")

//    @Autowired

//    private TokenStore tokenStore;

    /**

     * 使用密码模式需要的配置方法

     * @param endpoints

     * @throws Exception

     */

    @Override

    public void configure(AuthorizationServerEndpointsConfigurer endpoints) throws Exception {

        // - - - - - 配置JWT自定义申明增强 Starter - - - - -

        TokenEnhancerChain tokenEnhancerChain = new TokenEnhancerChain();

        List<TokenEnhancer> tokenEnhancerList = new ArrayList<>();

        tokenEnhancerList.add(tokenEnhancer);

        tokenEnhancerList.add(jwtAccessTokenConverter);

        tokenEnhancerChain.setTokenEnhancers(tokenEnhancerList);

        // - - - - - 配置JWT自定义申明增强 End - - - - -

        endpoints.

                authenticationManager(authenticationManager).

                userDetailsService(userDetailsService).

                accessTokenConverter(jwtAccessTokenConverter).

                tokenEnhancer(tokenEnhancerChain);

//                tokenStore(tokenStore);

    }

    @Override

    public void configure(ClientDetailsServiceConfigurer clients) throws Exception {

        clients.

                inMemory().

                withClient("admin").

                secret(passwordEncoder.encode("112233")).

                // accessTokenValiditySeconds(3600). // 令牌有效时间 一小时

                redirectUris("http://www.baidu.com"). // 授权成功的跳转

                scopes("all").  // 所有范围

                // authorizedGrantTypes("authorization_code");     // 授权类型:授权码模式

                authorizedGrantTypes("password", "refresh_token", "authorization_code");     // 授权类型:密码模式 追加令牌刷新,和兼容授权码模式

    }

}
重启项目:继续请求JWT令牌
这个时候会发现多了一个刷新的令牌:
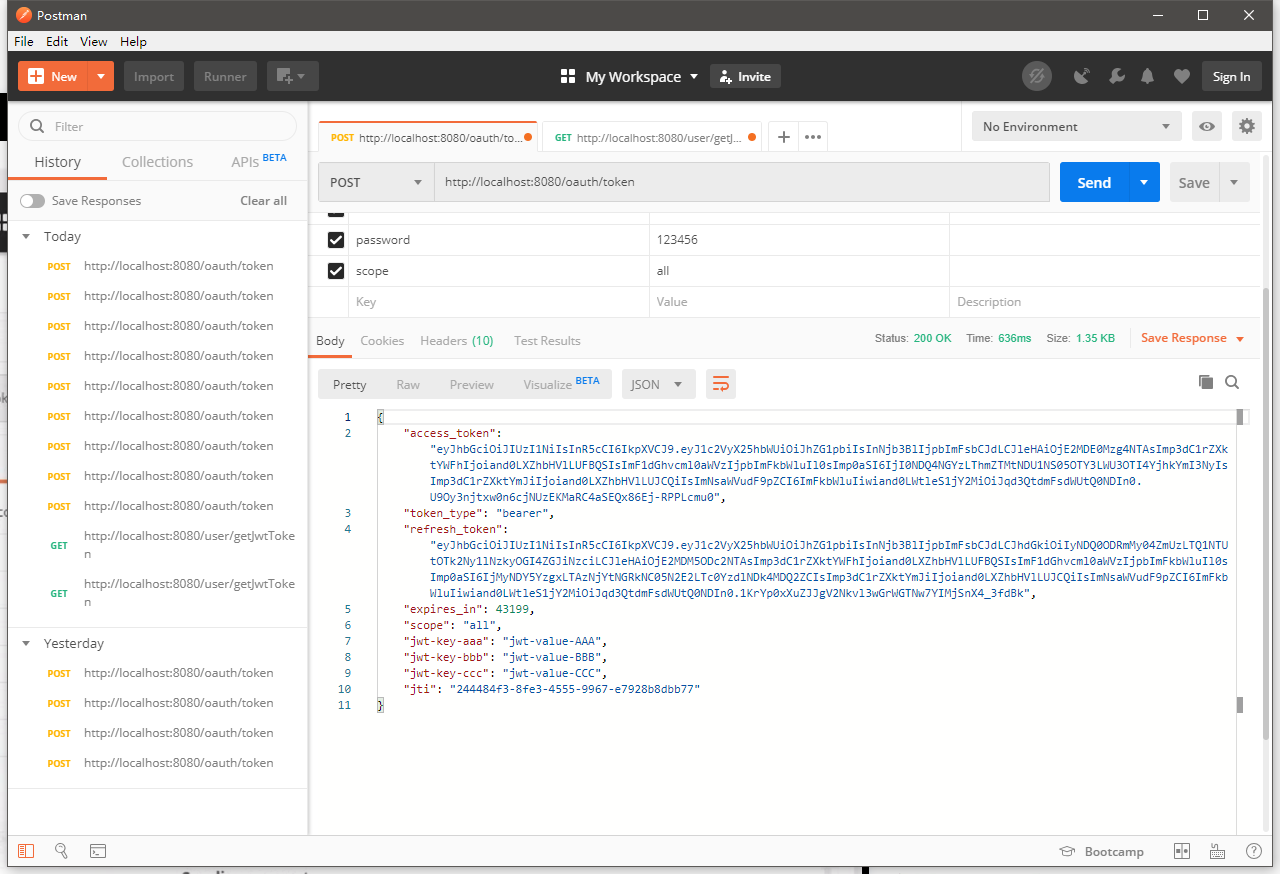
{

    "access_token": "eyJhbGciOiJIUzI1NiIsInR5cCI6IkpXVCJ9.eyJ1c2VyX25hbWUiOiJhZG1pbiIsInNjb3BlIjpbImFsbCJdLCJleHAiOjE2MDE0Mzg4NTAsImp3dC1rZXktYWFhIjoiand0LXZhbHVlLUFBQSIsImF1dGhvcml0aWVzIjpbImFkbWluIl0sImp0aSI6IjI0NDQ4NGYzLThmZTMtNDU1NS05OTY3LWU3OTI4YjhkYmI3NyIsImp3dC1rZXktYmJiIjoiand0LXZhbHVlLUJCQiIsImNsaWVudF9pZCI6ImFkbWluIiwiand0LWtleS1jY2MiOiJqd3QtdmFsdWUtQ0NDIn0.U9Oy3njtxw0n6cjNUzEKMaRC4aSEQx86Ej-RPPLcmu0",

    "token_type": "bearer",

    "refresh_token": "eyJhbGciOiJIUzI1NiIsInR5cCI6IkpXVCJ9.eyJ1c2VyX25hbWUiOiJhZG1pbiIsInNjb3BlIjpbImFsbCJdLCJhdGkiOiIyNDQ0ODRmMy04ZmUzLTQ1NTUtOTk2Ny1lNzkyOGI4ZGJiNzciLCJleHAiOjE2MDM5ODc2NTAsImp3dC1rZXktYWFhIjoiand0LXZhbHVlLUFBQSIsImF1dGhvcml0aWVzIjpbImFkbWluIl0sImp0aSI6IjMyNDY5YzgxLTAzNjYtNGRkNC05N2E2LTc0YzdlNDk4MDQ2ZCIsImp3dC1rZXktYmJiIjoiand0LXZhbHVlLUJCQiIsImNsaWVudF9pZCI6ImFkbWluIiwiand0LWtleS1jY2MiOiJqd3QtdmFsdWUtQ0NDIn0.1KrYp0xXuZJJgV2Nkvl3wGrWGTNw7YIMjSnX4_3fdBk",

    "expires_in": 43199,

    "scope": "all",

    "jwt-key-aaa": "jwt-value-AAA",

    "jwt-key-bbb": "jwt-value-BBB",

    "jwt-key-ccc": "jwt-value-CCC",

    "jti": "244484f3-8fe3-4555-9967-e7928b8dbb77"

}
以上面的刷新的令牌重新写入请求参数:

就可以以这个刷新令牌重新获得令牌:
{

    "access_token": "eyJhbGciOiJIUzI1NiIsInR5cCI6IkpXVCJ9.eyJ1c2VyX25hbWUiOiJhZG1pbiIsInNjb3BlIjpbImFsbCJdLCJleHAiOjE2MDE0MzkwNDcsImp3dC1rZXktYWFhIjoiand0LXZhbHVlLUFBQSIsImF1dGhvcml0aWVzIjpbImFkbWluIl0sImp0aSI6ImFmZjBlYTk0LTQ2YTctNDNmZi1iMTQzLTk3NmEzZmRkY2MxMyIsImp3dC1rZXktYmJiIjoiand0LXZhbHVlLUJCQiIsImNsaWVudF9pZCI6ImFkbWluIiwiand0LWtleS1jY2MiOiJqd3QtdmFsdWUtQ0NDIn0.ZA2tiTaJpKcnAMdKnVRH2M5zylb2DRTQGs7wYIXeQZE",

    "token_type": "bearer",

    "refresh_token": "eyJhbGciOiJIUzI1NiIsInR5cCI6IkpXVCJ9.eyJ1c2VyX25hbWUiOiJhZG1pbiIsInNjb3BlIjpbImFsbCJdLCJhdGkiOiJhZmYwZWE5NC00NmE3LTQzZmYtYjE0My05NzZhM2ZkZGNjMTMiLCJleHAiOjE2MDM5ODc2NTAsImp3dC1rZXktYWFhIjoiand0LXZhbHVlLUFBQSIsImF1dGhvcml0aWVzIjpbImFkbWluIl0sImp0aSI6IjMyNDY5YzgxLTAzNjYtNGRkNC05N2E2LTc0YzdlNDk4MDQ2ZCIsImp3dC1rZXktYmJiIjoiand0LXZhbHVlLUJCQiIsImNsaWVudF9pZCI6ImFkbWluIiwiand0LWtleS1jY2MiOiJqd3QtdmFsdWUtQ0NDIn0.WJVF6_hSTDhKCAzIdX31BppArv6pYkHTOcymbEF5sBU",

    "expires_in": 43199,

    "scope": "all",

    "jwt-key-aaa": "jwt-value-AAA",

    "jwt-key-bbb": "jwt-value-BBB",

    "jwt-key-ccc": "jwt-value-CCC",

    "jti": "aff0ea94-46a7-43ff-b143-976a3fddcc13"

}
【Spring-Security】Re13 Oauth2协议P3 整合JWT的更多相关文章
- security和oauth2.0的整合
security和oauth2.0的整合 之前已经介绍过security的相关的介绍,现在所需要做的就是security和oauth2.0的整合,在原有的基础上我们加上一些相关的代码;代码实现如下: ...
- Spring Security实现OAuth2.0授权服务 - 基础版
一.OAuth2.0协议 1.OAuth2.0概述 OAuth2.0是一个关于授权的开放网络协议. 该协议在第三方应用与服务提供平台之间设置了一个授权层.第三方应用需要服务资源时,并不是直接使用用户帐 ...
- Spring Security 与 OAuth2 介绍
个人 OAuth2 全部文章 Spring Security 与 OAuth2(介绍):https://www.jianshu.com/p/68f22f9a00ee Spring Security 与 ...
- Spring Security 与 OAuth2(介绍)
https://www.jianshu.com/p/68f22f9a00ee Spring Security 与 OAuth2(介绍) 林塬 2018.01.23 11:14* 字数 3097 阅读 ...
- [权限管理系统(四)]-spring boot +spring security短信认证+redis整合
[权限管理系统]spring boot +spring security短信认证+redis整合 现在主流的登录方式主要有 3 种:账号密码登录.短信验证码登录和第三方授权登录,前面一节Sprin ...
- Spring Security实现OAuth2.0授权服务 - 进阶版
<Spring Security实现OAuth2.0授权服务 - 基础版>介绍了如何使用Spring Security实现OAuth2.0授权和资源保护,但是使用的都是Spring Sec ...
- Spring Security基于Oauth2的SSO单点登录怎样做?一个注解搞定
一.说明 单点登录顾名思义就是在多个应用系统中,只需要登录一次,就可以访问其他相互信任的应用系统,免除多次登录的烦恼.本文主要介绍 同域 和 跨域 两种不同场景单点登录的实现原理,并使用 Spring ...
- spring boot:spring security实现oauth2+jwt管理认证授权及oauth2返回结果格式化(spring boot 2.3.3)
一,为什么oauth2要整合jwt? 1,OAuth2的token技术有一个最大的问题是不携带用户信息,所以资源服务器不能进行本地验证, 以致每次对于资源的访问,资源服务器都需要向认证服务器的toke ...
- Spring Boot,Spring Security实现OAuth2 + JWT认证
阅读此文,希望是对JWT以及OAuth2有一定了解的童鞋. JWT认证,提供了对称加密以及非对称的实现. 内容源码点我 涉及到源码中两个服务 spring-boot-oauth-jwt-server ...
- spring security和java web token整合
思路: spring security 1.用户输入用户名密码. 2.验证:从库中(可以是内存.数据库等)查询该用户的密码.角色,验证用户名和密码是否正确.如果正确,则将填充Authenticatio ...
随机推荐
- Hive 在工作中的调优总结
总结了一下在以往工作中,对于Hive SQL调优的一些实际应用,是日常积累的一些优化技巧,如有出入,欢迎在评论区留言探讨~ 一.EXPLAIN 查看执行计划 二.建表优化 2.1 分区 分区表基本操作 ...
- #9134.反转eehniy
blog 题面 yinhee 去面试 Google 总裁. 面试官给他了一个长度为 \(n\) 的 \(01\) 串. 面试官给他以下两种操作是的这个序列前 \(n-m\) 个数字与后 \(n-m\) ...
- 写了一个 SRE 调试工具,类似一个小木马
远程操作机器有时会比较麻烦,我写了一个工具,主要功能:1.远程执行命令 2.上传下载文件.是一个 Web Server,通过 HTTP 请求来操作机器,类似一个小木马.当然,因为是一个 Web Ser ...
- 将链表以m长度为一组反转链表
一群友分享的阿里面试题 1.将head链表以m为组反转链表(不足m则不反转): 例子:假设m=3. 链表 1 -> 2 -> 3 -> 4 -> 5 -> 6 -> ...
- C# .NET 常见DeepCopy 深度拷贝的性能对比
先上结论 Method Mean Error StdDev Gen0 Gen1 Allocated JSONConvert 2,273.02 ns 43.758 ns 52.091 ns 0.6599 ...
- java 8 stream toMap问题
最近使用java的stream功能有点多,理由有2: 1)少写了不少代码 2)在性能可以接受的范围内 在巨大的collection基础上使用stream,没有什么经验.而非关键业务上,乐于使用stre ...
- python利用公私钥加解密
小贴士 这里不再赘述公私钥的生成过程.可以利用OpenSSL进行生成. 加密代码 #!/usr/bin/python #加密 #conda install pycrypto #提前安装模块 impor ...
- 红黑树详细讲解(结合JavaTreeMap)
1:红黑树简介 红黑树又称红-黑二叉树,它首先是一颗二叉树,它具体二叉树所有的特性.同时红黑树更是一颗自平衡的排序二叉树.根据二叉查找树的概念可以得出正常情况下查找的时间复杂度为O(log n),但是 ...
- arm-gcc 命名规则
背景 在 Ubuntu中交叉编译裸机程序的时候,注意到了这个问题:因此对此作为一个总结. 命名规则 交叉编译工具链的命名规则为:arch [-vendor] [-os] [-(gnu)eabi] ar ...
- RK3568J“麒麟”+“翼辉”国产系统正式发布,“鸿蒙”也正在路上!
RK3568J "麒麟" + "翼辉"国产系统正式发布 近期,创龙科技RK3568J全国产平台(国产化率100%,提供报告)已正式适配两大国产系统:银河麒麟嵌入 ...